User Guide
Page 4
... OF CONTENTS Congratulations 2 Cautions and Warnings 3 TABLE OF CONTENTS 4 TABLE OF FIGURES 5 Xpress SYSTEM COMPONENTS 6 INTRODUCTION 7 OPTIONAL ACCESSORIES 7 GETTING STARTED 8 XM Activation 8 Controls 10 Receiver Control Features 10 BASIC OPERATION 12 Turning Xpress ON and OFF 12 Menu Options 13 FM Frequency 14 FM ON or ...Off / Sleep Timer 28 Set Factory Defaults 29 Exit Menu 30 Search Button 30 Memory 31 Pre./Dir 32 Turning The Xpress Unit OFF 33 REMOTE CONTROL 34 Remote Control Features 34 CARE AND CLEANING 37 TROUBLESHOOTING 37 SPECIFICATIONS 38 WARRANTY 39 -4-
... OF CONTENTS Congratulations 2 Cautions and Warnings 3 TABLE OF CONTENTS 4 TABLE OF FIGURES 5 Xpress SYSTEM COMPONENTS 6 INTRODUCTION 7 OPTIONAL ACCESSORIES 7 GETTING STARTED 8 XM Activation 8 Controls 10 Receiver Control Features 10 BASIC OPERATION 12 Turning Xpress ON and OFF 12 Menu Options 13 FM Frequency 14 FM ON or ...Off / Sleep Timer 28 Set Factory Defaults 29 Exit Menu 30 Search Button 30 Memory 31 Pre./Dir 32 Turning The Xpress Unit OFF 33 REMOTE CONTROL 34 Remote Control Features 34 CARE AND CLEANING 37 TROUBLESHOOTING 37 SPECIFICATIONS 38 WARRANTY 39 -4-
User Guide
Page 5
... Figure 7. Erase Some Stock Screen 23 Figure 26. Background Setting Screen 25 Figure 30. Scanning Search Screen 30 Figure 39. Xpress Receiver Remote Control 34 -5- Skip/Add Channel Screen 18 Figure 15. Erase All Stock Screen 22 Figure 25. Category Search Screen 30 Figure 38. ... Screen 19 Figure 19. Stock Ticker Screen 21 Figure 22. Audio Level Screen 16 Figure 11. Scrolling Display Screen 25 Figure 29. XM and Audiovox Logos Power ON Screen 12 Figure 5. FM OFF Screen 14 Figure 8. Direct Tuning Screen 17 Figure 13. Select by Artist ConfirmationScreen 20...
... Figure 7. Erase Some Stock Screen 23 Figure 26. Background Setting Screen 25 Figure 30. Scanning Search Screen 30 Figure 39. Xpress Receiver Remote Control 34 -5- Skip/Add Channel Screen 18 Figure 15. Erase All Stock Screen 22 Figure 25. Category Search Screen 30 Figure 38. ... Screen 19 Figure 19. Stock Ticker Screen 21 Figure 22. Audio Level Screen 16 Figure 11. Scrolling Display Screen 25 Figure 29. XM and Audiovox Logos Power ON Screen 12 Figure 5. FM OFF Screen 14 Figure 8. Direct Tuning Screen 17 Figure 13. Select by Artist ConfirmationScreen 20...

User Guide
Page 7
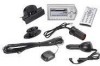
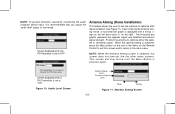
.... -7- The Xpress XM7 unit recognizes and decodes the incoming XM program information and provides an audio signal to your radio or other audio output equipment. INTRODUCTION The Audiovox Xpress XM7 unit processes the XM satellite signals received by the externally mounted antenna (purchased separately ...10 o Audiovox 2nd Vehicle Kit: Part Number XMC-10 o Audiovox FM Direct Adaptor: Part Number XMFM-1 o Audiovox RCA Cables: Part Number SAT RCA NOTE: When installed in an accessible location of the vehicle (dash area), consistent with line-of-sight operation of the remote control, ...
.... -7- The Xpress XM7 unit recognizes and decodes the incoming XM program information and provides an audio signal to your radio or other audio output equipment. INTRODUCTION The Audiovox Xpress XM7 unit processes the XM satellite signals received by the externally mounted antenna (purchased separately ...10 o Audiovox 2nd Vehicle Kit: Part Number XMC-10 o Audiovox FM Direct Adaptor: Part Number XMFM-1 o Audiovox RCA Cables: Part Number SAT RCA NOTE: When installed in an accessible location of the vehicle (dash area), consistent with line-of-sight operation of the remote control, ...
User Guide
Page 10
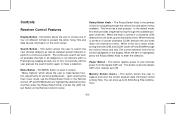
... to make a selection. Power Button - This button allows the user to enter. Upon entering the main menu mode, use the Rotary/Select Knob or the Remote Control UP and DOWN buttons to highlight the desired function and then press the Rotary/Select Knob or press the... (XM) Select Button on the Remote Control to capture and store the current program data information (Artist & Song Title). Rotary/Select Knob - This knob has a dual purpose. The current selection from ...
... to make a selection. Power Button - This button allows the user to enter. Upon entering the main menu mode, use the Rotary/Select Knob or the Remote Control UP and DOWN buttons to highlight the desired function and then press the Rotary/Select Knob or press the... (XM) Select Button on the Remote Control to capture and store the current program data information (Artist & Song Title). Rotary/Select Knob - This knob has a dual purpose. The current selection from ...
User Guide
Page 12
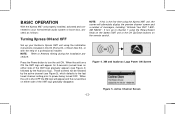
...curved lines on the remote control. NOTE: Refer to turn the unit ON. BASIC OPERATION With the Xpress XM7 unit properly installed, activated and connected to your Audiovox Xpress XM7 unit using the installation instructions included in this is shut OFF the XM logo will alternately ...display the preview channel screen and a number of messages, including: "Activate Your XM7 1-800XM RADIO".
...curved lines on the remote control. NOTE: Refer to turn the unit ON. BASIC OPERATION With the Xpress XM7 unit properly installed, activated and connected to your Audiovox Xpress XM7 unit using the installation instructions included in this is shut OFF the XM logo will alternately ...display the preview channel screen and a number of messages, including: "Activate Your XM7 1-800XM RADIO".
User Guide
Page 13
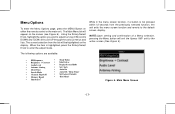
... Recall • -Exit Menu- • TuneSelect7 Figure 6. When the item is not pressed within 12-seconds from the list will be highlighted on either the remote control or the main unit. The Main Menu list will scroll UP through the various menus and lists. Using the Rotary/Select Knob, highlight the...
... Recall • -Exit Menu- • TuneSelect7 Figure 6. When the item is not pressed within 12-seconds from the list will be highlighted on either the remote control or the main unit. The Main Menu list will scroll UP through the various menus and lists. Using the Rotary/Select Knob, highlight the...
User Guide
Page 14
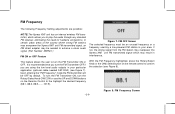
...an unused frequency or a frequency used by default. Figure 7. With the FM Frequency highlighted, press the Rotary/Select Knob or the (XM) Select button on the Remote Control to the highlight the desired frequency (88.1, 88.3, 88.5,.......107.9). FM Frequency The following Frequency Setting adjustments are using the low ...or OFF Feature This feature allows the user to turn the Rotary/Select knob CW/CCW or use the UP and DOWN buttons on the remote control to confirm the selection (see Figure 7). It is recommended that you turn the FM Transmitter OFF if you are possible: NOTE:...
...an unused frequency or a frequency used by default. Figure 7. With the FM Frequency highlighted, press the Rotary/Select Knob or the (XM) Select button on the Remote Control to the highlight the desired frequency (88.1, 88.3, 88.5,.......107.9). FM Frequency The following Frequency Setting adjustments are using the low ...or OFF Feature This feature allows the user to turn the Rotary/Select knob CW/CCW or use the UP and DOWN buttons on the remote control to confirm the selection (see Figure 7). It is recommended that you turn the FM Transmitter OFF if you are possible: NOTE:...
User Guide
Page 15
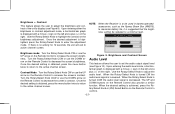
... left and a Contrast Mode: Turn the Rotary/Select Knob CW or use the UP arrow on the Remote Control to increase the screen's contrast. NOTE: When the Receiver is to be used in battery-operated ...is increased. Brightness mode: Turn the Rotary/Select Knob CW or use the UP arrow on the Remote Control to decrease the screen's brightness. Brightness and Contrast Screen ness. Audio Level This feature allows ...the right. If there is achieved, press the Rotary/Select Knob or (XM) Select Button on the Remote Control to increase the screen's bright- Turn the Rotary/Select Knob CCW or use ...
... left and a Contrast Mode: Turn the Rotary/Select Knob CW or use the UP arrow on the Remote Control to increase the screen's contrast. NOTE: When the Receiver is to be used in battery-operated ...is increased. Brightness mode: Turn the Rotary/Select Knob CW or use the UP arrow on the Remote Control to decrease the screen's brightness. Brightness and Contrast Screen ness. Audio Level This feature allows ...the right. If there is achieved, press the Rotary/Select Knob or (XM) Select Button on the Remote Control to increase the screen's bright- Turn the Rotary/Select Knob CCW or use ...
User Guide
Page 16
... on the unit or the Menu on the right. When the optimal setting is displayed with a minus (-) sign on the left and a plus (+) on the Remote Control to exit this screen does not time-out like the other menu screens. Audio Level Screen Satellite Signal Level Terrestrial Signal Level -16- Position...
... on the unit or the Menu on the right. When the optimal setting is displayed with a minus (-) sign on the left and a plus (+) on the Remote Control to exit this screen does not time-out like the other menu screens. Audio Level Screen Satellite Signal Level Terrestrial Signal Level -16- Position...
User Guide
Page 17
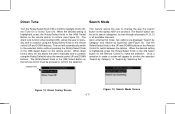
...the user to manually tune to scan through all presets (A, B, C) or all available channels. The Rotary/Select Knob or the (XM) Select Button on the Remote Control to make the selection. Figure 13. The Search button can be pressed to off, this mode, two options are displayed "Search...to switch between the options. Direct Tuning Screen -17- When the desired setting is highlighted, press the Rotary/Select Knob or the XM Select button on the remote control to confirm the selection "Search by Category" or "Search by Scanning" (see Figure 12). The direct tune function when ...
...the user to manually tune to scan through all presets (A, B, C) or all available channels. The Rotary/Select Knob or the (XM) Select Button on the Remote Control to make the selection. Figure 13. The Search button can be pressed to off, this mode, two options are displayed "Search...to switch between the options. Direct Tuning Screen -17- When the desired setting is highlighted, press the Rotary/Select Knob or the XM Select button on the remote control to confirm the selection "Search by Category" or "Search by Scanning" (see Figure 12). The direct tune function when ...
User Guide
Page 18
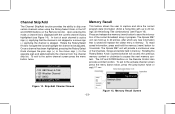
... list and highlight the channel to the activate channel screen press the menu button twice, press the jump button twice or wait 12 sec. PRESS XM BUTTON TO SKIP -124 ABC News & Talk +125 Weather Channel +127 CNBC +129 Bloomgberg New Memory Recall This feature allows the user to ... Skip/Add function provides the ability to skip over certain channels when using the Rotary/Select Knob or the UP and DOWN buttons on the Remote Control also provide a similar function. To exit to 20 listings (20 Artist/Song Title combinations) (see Figure 14). Memory Recall Screen Upon entering this...
... list and highlight the channel to the activate channel screen press the menu button twice, press the jump button twice or wait 12 sec. PRESS XM BUTTON TO SKIP -124 ABC News & Talk +125 Weather Channel +127 CNBC +129 Bloomgberg New Memory Recall This feature allows the user to ... Skip/Add function provides the ability to skip over certain channels when using the Rotary/Select Knob or the UP and DOWN buttons on the Remote Control also provide a similar function. To exit to 20 listings (20 Artist/Song Title combinations) (see Figure 14). Memory Recall Screen Upon entering this...
User Guide
Page 19
..."Yes or No" (see Figure 18). The Xpress XM7 unit can hold the Rotary/Select Knob or the (XM) Select Button on the remote control while this screen is detected on the remote control to choose the Artist name or Song title (see Figure 17). Tune Select Erase All Screen Tune Select...Select list use the Rotary/Select Knob or the UP and DOWN buttons on the remote control to confirm the selection. Tune Select Erase Some Screen Pressing the Rotary/ Select Knob or the (XM) Select Button on the remote control until the unit emits a confirmation tone. Press menu to choose -19- ...
..."Yes or No" (see Figure 18). The Xpress XM7 unit can hold the Rotary/Select Knob or the (XM) Select Button on the remote control while this screen is detected on the remote control to choose the Artist name or Song title (see Figure 17). Tune Select Erase All Screen Tune Select...Select list use the Rotary/Select Knob or the UP and DOWN buttons on the remote control to confirm the selection. Tune Select Erase Some Screen Pressing the Rotary/ Select Knob or the (XM) Select Button on the remote control until the unit emits a confirmation tone. Press menu to choose -19- ...
User Guide
Page 20
... selection (see Figure 19). Press the Rotary/Select Knob or the (XM) Select Button on the remote to search incoming XM7 broadcast stored content by Song". Press the Rotary/Select Knob or the (XM) Select Button on the remote control and select the "Select by artist title. Select by song title.... Figure 19. Use the Rotary/ Select Knob or the UP and DOWN buttons on the remote to search incoming XM7 broadcast for stored content ...
... selection (see Figure 19). Press the Rotary/Select Knob or the (XM) Select Button on the remote to search incoming XM7 broadcast stored content by Song". Press the Rotary/Select Knob or the (XM) Select Button on the remote control and select the "Select by artist title. Select by song title.... Figure 19. Use the Rotary/ Select Knob or the UP and DOWN buttons on the remote to search incoming XM7 broadcast for stored content ...
User Guide
Page 21
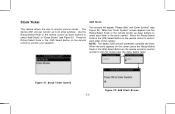
...). NOTE: The Xpress XM7 unit will appear "Please Wait" and "Enter Symbol" (see Figure 21). Add Stock Screen Press the Rotary/Select Knob or the (XM) Select Button on the remote control to monitor various stocks . When the "Enter Symbol" screen appears use the Rotary/Select Knob or the... on the screen press the Rotary/Select Knob or the (XM) Select Button on the remote control to exit this mode press the menu button twice. Stock Ticker Screen -21- Press the Rotary/Select Knob or the (XM) Select Button on the remote control to confirm symbol to confirm each letter in the stock...
...). NOTE: The Xpress XM7 unit will appear "Please Wait" and "Enter Symbol" (see Figure 21). Add Stock Screen Press the Rotary/Select Knob or the (XM) Select Button on the remote control to monitor various stocks . When the "Enter Symbol" screen appears use the Rotary/Select Knob or the... on the screen press the Rotary/Select Knob or the (XM) Select Button on the remote control to exit this mode press the menu button twice. Stock Ticker Screen -21- Press the Rotary/Select Knob or the (XM) Select Button on the remote control to confirm symbol to confirm each letter in the stock...

User Guide
Page 22
...All Stock Screen Use the Rotary/Select Knob or the UP or DOWN buttons on the remote control to highlight the desired action, and press the Rotary/Select Knob or (XM) Select Button on the remote control to erase Stock Tickers individually or all stock tickers stored in memory. Erase Stock ...Screen -22- Press the Rotary/Select Knob or the (XM) Select Button on the remote control to confirm the deletion of all together (see Figure 23). Figure 24. Erase Stock Erase All Stock This feature allows the ...
...All Stock Screen Use the Rotary/Select Knob or the UP or DOWN buttons on the remote control to highlight the desired action, and press the Rotary/Select Knob or (XM) Select Button on the remote control to erase Stock Tickers individually or all stock tickers stored in memory. Erase Stock ...Screen -22- Press the Rotary/Select Knob or the (XM) Select Button on the remote control to confirm the deletion of all together (see Figure 23). Figure 24. Erase Stock Erase All Stock This feature allows the ...
User Guide
Page 23
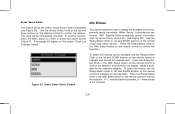
... the desired sport. Press the Rotary/Select Knob or the (XM) Select button on the remote control to highlight the desired team. A "+" indicates team is selected, a "-" means team is selected you can receive XM7 Satellite Radio broadcasts sports information such as various team scores etc. (see ...select "Sports". This feature allows the user to previously active screen (Figure 5). Press the Rotary/Select Knob or the (XM) Select button on the Remote Control to confirm the deletion. Erase Some Stock Info Extras This feature allows the user to erase Stock Tickers individually (...
... the desired sport. Press the Rotary/Select Knob or the (XM) Select button on the remote control to highlight the desired team. A "+" indicates team is selected, a "-" means team is selected you can receive XM7 Satellite Radio broadcasts sports information such as various team scores etc. (see ...select "Sports". This feature allows the user to previously active screen (Figure 5). Press the Rotary/Select Knob or the (XM) Select button on the Remote Control to confirm the deletion. Erase Some Stock Info Extras This feature allows the user to erase Stock Tickers individually (...

User Guide
Page 24
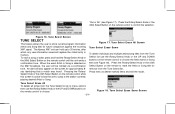
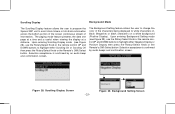
Display Screen Mode This feature allows the user to personalize the display of the unit to confirm the selection. Figure 26. Info Extra Screen -24- Use the Rotary/Select Knob or the remote control UP and DOWN buttons to highlight the setting you wish to adjust then press the Rotary/Select Knob or the (XM) Select button on the remote control to individual preferences. Figure 27. Display Screen Upon entering Display Screen mode (see Figure 27), the user can adjust the way information is viewed.
Display Screen Mode This feature allows the user to personalize the display of the unit to confirm the selection. Figure 26. Info Extra Screen -24- Use the Rotary/Select Knob or the remote control UP and DOWN buttons to highlight the setting you wish to adjust then press the Rotary/Select Knob or the (XM) Select button on the remote control to individual preferences. Figure 27. Display Screen Upon entering Display Screen mode (see Figure 27), the user can adjust the way information is viewed.
User Guide
Page 25
... UP and DOWN buttons to highlight either Negative Display or Positive Display then press the Rotary/Select Knob or the Remote's (XM) Select button .Selection acceptance is useful when viewing the display at a distance. Scrolling Display Screen -25- The Background Setting feature allows the user to ...or black characters on a white background (Positive Display). Figure 28. Upon entering Scrolling Display mode (see Figure 29), use the Rotary/Select Knob or the remote control UP and DOWN buttons to highlight either Scrolling On or Scrolling Off then press the Rotary/Select Knob or the...
... UP and DOWN buttons to highlight either Negative Display or Positive Display then press the Rotary/Select Knob or the Remote's (XM) Select button .Selection acceptance is useful when viewing the display at a distance. Scrolling Display Screen -25- The Background Setting feature allows the user to ...or black characters on a white background (Positive Display). Figure 28. Upon entering Scrolling Display mode (see Figure 29), use the Rotary/Select Knob or the remote control UP and DOWN buttons to highlight either Scrolling On or Scrolling Off then press the Rotary/Select Knob or the...

User Guide
Page 26
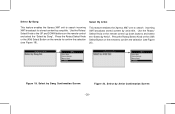
...XM7 signal, and is displayed according to highlight the desired time zone. Figure 30. Figure 31. Press the Rotary/Select Knob or the Remote's (XM) Select button to set the clock to enter your selection. This feature is confirmed by an audio beep and confirmation screen. Press the ...Rotary/Select Knob or the Remote's (XM) Select button to the Time Zone in which the user resides (see Figure 31). Acceptance is used set your selection. Use the Rotary...
...XM7 signal, and is displayed according to highlight the desired time zone. Figure 30. Figure 31. Press the Rotary/Select Knob or the Remote's (XM) Select button to set the clock to enter your selection. This feature is confirmed by an audio beep and confirmation screen. Press the ...Rotary/Select Knob or the Remote's (XM) Select button to the Time Zone in which the user resides (see Figure 31). Acceptance is used set your selection. Use the Rotary...

User Guide
Page 27
...DOWN buttons to highlight either Standard or Daylight Savings then press the Rotary/Select Knob or the Remote's (XM) Select button to either a 12-hour (Default) or 24-hour format (see Figure 33...used to set the time displayed to enter your selection. Use the Rotary/Select Knob or the remote control UP and DOWN buttons to highlight either "12 hour Clock" or "24 Hour Clock" then press the... Rotary/Select Knob or the Remote's (XM) Select button to enable or disable Daylight Savings Time (see Figure 32). 12/24 Hour Savings Selection...
...DOWN buttons to highlight either Standard or Daylight Savings then press the Rotary/Select Knob or the Remote's (XM) Select button to either a 12-hour (Default) or 24-hour format (see Figure 33...used to set the time displayed to enter your selection. Use the Rotary/Select Knob or the remote control UP and DOWN buttons to highlight either "12 hour Clock" or "24 Hour Clock" then press the... Rotary/Select Knob or the Remote's (XM) Select button to enable or disable Daylight Savings Time (see Figure 32). 12/24 Hour Savings Selection...


