User Guide
Page 2
... innovation in the 48 contiguous United States. © 2005 XM® Satellite Radio Inc. XM® is America's #1 Satellite Radio provider with the XM Welcome Kit and available at retailers where Audiovox main units are one -time activation fee. You are sold separately. XM® is a trademark of their respective owners. -2- XM® Satellite Radio will revolutionize your specific installation needs. Only available in XM® Satellite Radio. All other fees and taxes...
... innovation in the 48 contiguous United States. © 2005 XM® Satellite Radio Inc. XM® is America's #1 Satellite Radio provider with the XM Welcome Kit and available at retailers where Audiovox main units are one -time activation fee. You are sold separately. XM® is a trademark of their respective owners. -2- XM® Satellite Radio will revolutionize your specific installation needs. Only available in XM® Satellite Radio. All other fees and taxes...
User Guide
Page 3
... to the following two conditions: (1) this device may not cause harmful interference, and (2) this device must accept any interference received, including interference that may cause undesired operation. • The owner or operator shall not make any changes to the unit, antenna, or accessories, as this will void operator's authority to operate this equipment. • By adhering to these warnings and safety considerations...
... to the following two conditions: (1) this device may not cause harmful interference, and (2) this device must accept any interference received, including interference that may cause undesired operation. • The owner or operator shall not make any changes to the unit, antenna, or accessories, as this will void operator's authority to operate this equipment. • By adhering to these warnings and safety considerations...
User Guide
Page 4
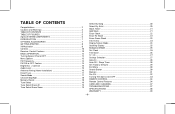
... 7 GETTING STARTED 8 XM Activation 8 Controls 10 Receiver Control Features 10 BASIC OPERATION 12 Turning Xpress ON and OFF 12 Menu Options 13 FM Frequency 14 FM ON or OFF Feature 14 Brightness + Contrast 15 Audio Level 15 Antenna Aiming (Home Installation 16 Direct Tune 17 Search Mode 17 Channel Skip/Add 18 Memory Recall 18 Tune Select 19 Tune Select Erase All 19 Tune Select Erase Some 19 Select By-Song 20 Select By Artist 20...
... 7 GETTING STARTED 8 XM Activation 8 Controls 10 Receiver Control Features 10 BASIC OPERATION 12 Turning Xpress ON and OFF 12 Menu Options 13 FM Frequency 14 FM ON or OFF Feature 14 Brightness + Contrast 15 Audio Level 15 Antenna Aiming (Home Installation 16 Direct Tune 17 Search Mode 17 Channel Skip/Add 18 Memory Recall 18 Tune Select 19 Tune Select Erase All 19 Tune Select Erase Some 19 Select By-Song 20 Select By Artist 20...

User Guide
Page 5
... Timer Screen 29 Figure 36. Memory Selection Screens 31 Figure 40. XM and Audiovox Logos Power ON Screen 12 Figure 5. Main Menu Screen 13 Figure 7. FM Frequency Screen 14 Figure 9. Select bySong ConfirmationScreen 20 Figure 20. Erase Some Stock Screen 23 Figure 26. Scanning Search Screen 30 Figure 39. Brightness and Contrast Screen 15 Figure 10. Direct Tuning Screen 17 Figure 13. Daylight Savings Selection Screen 27 Figure 34. Xpress Receiver Remote Control 34...
... Timer Screen 29 Figure 36. Memory Selection Screens 31 Figure 40. XM and Audiovox Logos Power ON Screen 12 Figure 5. Main Menu Screen 13 Figure 7. FM Frequency Screen 14 Figure 9. Select bySong ConfirmationScreen 20 Figure 20. Erase Some Stock Screen 23 Figure 26. Scanning Search Screen 30 Figure 39. Brightness and Contrast Screen 15 Figure 10. Direct Tuning Screen 17 Figure 13. Daylight Savings Selection Screen 27 Figure 34. Xpress Receiver Remote Control 34...

User Guide
Page 7
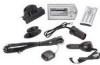
... radio or other audio output equipment. OPTIONAL ACCESSORIES o Audiovox Home Kit: Part Number XMH-10 o Audiovox Boom Box: Part Number XMB-10 o Audiovox 2nd Vehicle Kit: Part Number XMC-10 o Audiovox FM Direct Adaptor: Part Number XMFM-1 o Audiovox RCA Cables: Part Number SAT RCA NOTE: When installed in an accessible location of the vehicle (dash area), consistent with line-of-sight operation of the remote control, and/or within easy reach of the driver. The Xpress XM7 unit...
... radio or other audio output equipment. OPTIONAL ACCESSORIES o Audiovox Home Kit: Part Number XMH-10 o Audiovox Boom Box: Part Number XMB-10 o Audiovox 2nd Vehicle Kit: Part Number XMC-10 o Audiovox FM Direct Adaptor: Part Number XMFM-1 o Audiovox RCA Cables: Part Number SAT RCA NOTE: When installed in an accessible location of the vehicle (dash area), consistent with line-of-sight operation of the remote control, and/or within easy reach of the driver. The Xpress XM7 unit...
User Guide
Page 8
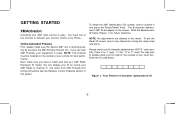
... XM Activation Activating your XM7 radio service is no "I" (eye), "o" (oh), "S" or "F" used. Next, make sure the Xpress XM7 unit is ready. The 8-character alphanumeric XM7 ID will appear on the outside of this mode. To exit the Radio ID screen, tune to any channel by Phone. There is easy. NOTE: The antenna must be installed on the outside of two choices to the XM7 Preview channel...
... XM Activation Activating your XM7 radio service is no "I" (eye), "o" (oh), "S" or "F" used. Next, make sure the Xpress XM7 unit is ready. The 8-character alphanumeric XM7 ID will appear on the outside of this mode. To exit the Radio ID screen, tune to any channel by Phone. There is easy. NOTE: The antenna must be installed on the outside of two choices to the XM7 Preview channel...

User Guide
Page 9
... you should keep your Xpress XM7 unit. LCD DISPLAY DISPLAY BUTTON PRESET KEYPAD (NUMBER) BUTTON SEARCH BUTTON MENU BUTTON ROTARY / SELECT KNOB POWER / IR EYE BUTTON MEMORY BUTTON PRESET/DIRECT JUMP BUTTON BUTTON Figure 2. This will be able to activate your receiver ON for at 1-800-XM RADIO (1-800-967-2346). When the Xpress XM7 unit is activated, you through the activation process. The Audiovox Xpress XM7 unit provides 7 control buttons, 1 Rotary/Select Knob and 10 number keys. One of XM7's friendly...
... you should keep your Xpress XM7 unit. LCD DISPLAY DISPLAY BUTTON PRESET KEYPAD (NUMBER) BUTTON SEARCH BUTTON MENU BUTTON ROTARY / SELECT KNOB POWER / IR EYE BUTTON MEMORY BUTTON PRESET/DIRECT JUMP BUTTON BUTTON Figure 2. This will be able to activate your receiver ON for at 1-800-XM RADIO (1-800-967-2346). When the Xpress XM7 unit is activated, you through the activation process. The Audiovox Xpress XM7 unit provides 7 control buttons, 1 Rotary/Select Knob and 10 number keys. One of XM7's friendly...

User Guide
Page 10
... menu mode, use the Rotary/Select Knob or the Remote Control UP and DOWN buttons to highlight the desired function and then press the Rotary/Select Knob or press the (XM) Select Button on the Remote Control to search the next channel category as well as between preset channels or perform a continuous search. When the knob is turned in all categories or all available channels in a clockwise (CW) direction the unit tunes...
... menu mode, use the Rotary/Select Knob or the Remote Control UP and DOWN buttons to highlight the desired function and then press the Rotary/Select Knob or press the (XM) Select Button on the Remote Control to search the next channel category as well as between preset channels or perform a continuous search. When the knob is turned in all categories or all available channels in a clockwise (CW) direction the unit tunes...
User Guide
Page 12
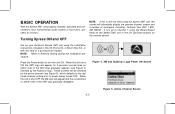
... messages, including: "Activate Your XM7 1-800XM RADIO". Figure 4. XM and Audiovox Logo Power ON Screen -12- Press the Power button to your Audiovox Xpress XM7 unit using the installation instructions included in this is shut OFF the XM logo will alternately display the preview channel screen and a number of the XM7 logo gradually disappear. BASIC OPERATION With the Xpress XM7 unit properly installed, activated and connected to turn the unit ON. When the unit turns ON the...
... messages, including: "Activate Your XM7 1-800XM RADIO". Figure 4. XM and Audiovox Logo Power ON Screen -12- Press the Power button to your Audiovox Xpress XM7 unit using the installation instructions included in this is shut OFF the XM logo will alternately display the preview channel screen and a number of the XM7 logo gradually disappear. BASIC OPERATION With the Xpress XM7 unit properly installed, activated and connected to turn the unit ON. When the unit turns ON the...

User Guide
Page 13
... previously selected function, the unit exits the menu screen function and reverts to adjust turning (CW) scrolls DOWN and (CCW) will appear on the screen (see Figure 6). The following options are available: • FM Frequency • Stock Ticker • Brightness + Contrast • Info Extras • Audio Level • Display Screen Mode • Antenna Aiming • Set Clock • Direct Tune • Auto-On • Search Mode • Auto-Off / Sleep Timer • Channel Skip...
... previously selected function, the unit exits the menu screen function and reverts to adjust turning (CW) scrolls DOWN and (CCW) will appear on the screen (see Figure 6). The following options are available: • FM Frequency • Stock Ticker • Brightness + Contrast • Info Extras • Audio Level • Display Screen Mode • Antenna Aiming • Set Clock • Direct Tune • Auto-On • Search Mode • Auto-Off / Sleep Timer • Channel Skip...

User Guide
Page 14
... the highlight the desired frequency (88.1, 88.3, 88.5,.......107.9). FM Frequency The following Frequency Setting adjustments are using the low level audio outputs in your area. FM OFF Screen The selected frequency must be OFF by a low powered FM station in your particular application (optional cable needed to achieve a clean audio signal (Part Number XMFM-1) FM ON or OFF Feature This feature allows the user to confirm the selection (see Figure 7).
... the highlight the desired frequency (88.1, 88.3, 88.5,.......107.9). FM Frequency The following Frequency Setting adjustments are using the low level audio outputs in your area. FM OFF Screen The selected frequency must be OFF by a low powered FM station in your particular application (optional cable needed to achieve a clean audio signal (Part Number XMFM-1) FM ON or OFF Feature This feature allows the user to confirm the selection (see Figure 7).

User Guide
Page 15
... menu button twice to return to the active channel screen. Once the desired setting is no activity for 12 seconds, the unit will exit to active channel screen. Upon entering either the brightness or contrast adjustment mode, a horizontal bar graph is increased. Turn the Rotary/Select Knob CCW or use the DOWN arrow on the Remote Control to decrease the screen's contrast. When the Rotary/Select Knob is turned CW the audio level...
... menu button twice to return to the active channel screen. Once the desired setting is no activity for 12 seconds, the unit will exit to active channel screen. Upon entering either the brightness or contrast adjustment mode, a horizontal bar graph is increased. Turn the Rotary/Select Knob CCW or use the DOWN arrow on the Remote Control to decrease the screen's contrast. When the Rotary/Select Knob is turned CW the audio level...
User Guide
Page 16
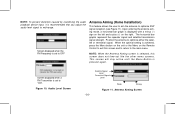
... Frequency is selected, this screen and to return to the main menu. Position the antenna to mid-range. Audio Level Screen Satellite Signal Level Terrestrial Signal Level -16- This screen will stay active until the Menu Button is set to OFF Antenna Aiming (Home Installation) This feature allows the user to aim the antenna to "ON". Screen displayed when a FM Transmitter is pressed again. Antenna Aiming Screen When the optimal setting is recommended that you adjust...
... Frequency is selected, this screen and to return to the main menu. Position the antenna to mid-range. Audio Level Screen Satellite Signal Level Terrestrial Signal Level -16- This screen will stay active until the Menu Button is set to OFF Antenna Aiming (Home Installation) This feature allows the user to aim the antenna to "ON". Screen displayed when a FM Transmitter is pressed again. Antenna Aiming Screen When the optimal setting is recommended that you adjust...

User Guide
Page 17
... buttons on the remote control to make the selection. Figure 12. When the desired setting is highlighted, press the Rotary/Select Knob or the XM Select button on the Xpress XM7 unit functions. This feature allows the user to change the way the search button on the Remote Control to confirm (see Figure 13). Direct Tune Search Mode Turn the Rotary/Select Knob CW or CCW to a station using the Rotary/Select Knob or the remote control...
... buttons on the remote control to make the selection. Figure 12. When the desired setting is highlighted, press the Rotary/Select Knob or the XM Select button on the Xpress XM7 unit functions. This feature allows the user to change the way the search button on the Remote Control to confirm (see Figure 13). Direct Tune Search Mode Turn the Rotary/Select Knob CW or CCW to a station using the Rotary/Select Knob or the remote control...

User Guide
Page 19
Pressing the Rotary/ Select Knob or the (XM) Select Button on the remote control while this screen is detected on the remote control until the unit emits a confirmation tone. Press menu to the station currently playing desired Artist or Song. When the exact Artist or Song is active forces the unit to jump to delete marked items and exit the mode. Tune Select Erase All Screen Tune Select Erase Some To delete...
Pressing the Rotary/ Select Knob or the (XM) Select Button on the remote control while this screen is detected on the remote control until the unit emits a confirmation tone. Press menu to the station currently playing desired Artist or Song. When the exact Artist or Song is active forces the unit to jump to delete marked items and exit the mode. Tune Select Erase All Screen Tune Select Erase Some To delete...

User Guide
Page 26
... 31. Time Zone Set Screen Set Clock Time Zone This feature allows the user to enter your selection. The clock data is provided via the XM7 signal, and is confirmed by an audio beep and confirmation screen. Press the Rotary/Select Knob or the Remote's (XM) Select button to set the clock to the users settings. Press the Rotary/Select Knob or the Remote's (XM) Select button to personalize the clock display. This feature is used set your selection. Figure...
... 31. Time Zone Set Screen Set Clock Time Zone This feature allows the user to enter your selection. The clock data is provided via the XM7 signal, and is confirmed by an audio beep and confirmation screen. Press the Rotary/Select Knob or the Remote's (XM) Select button to set the clock to the users settings. Press the Rotary/Select Knob or the Remote's (XM) Select button to personalize the clock display. This feature is used set your selection. Figure...
User Guide
Page 28
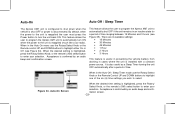
... or power is also useful as a Sleep Timer turning the unit OFF automatically after a period of time. There are 6 available settings: • 15 Minutes • 30 Minutes • 45 Minutes • 1 Hour • 2 Hours • 3 Hours This feature is useful in preventing the vehicle battery from draining in the Auto-On menu use the Rotary/Select Knob or the Remote Control UP and DOWN buttons...
... or power is also useful as a Sleep Timer turning the unit OFF automatically after a period of time. There are 6 available settings: • 15 Minutes • 30 Minutes • 45 Minutes • 1 Hour • 2 Hours • 3 Hours This feature is useful in preventing the vehicle battery from draining in the Auto-On menu use the Rotary/Select Knob or the Remote Control UP and DOWN buttons...
User Guide
Page 35
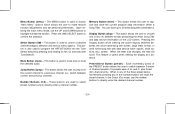
... allows the user to switch between current and previous channel). These buttons are used to directly enter a channel number. Upon entering the main menu mode, use the number buttons to program the ARTIST/SONG into the Tune Select feature by pressing and holding for two (2) seconds (see TuneSelect7). This button is useful when viewing the display at a distance. Memory Button (mem) - Pressing the Display button while viewing the active display switches between the artist name/song title screen, large...
... allows the user to switch between current and previous channel). These buttons are used to directly enter a channel number. Upon entering the main menu mode, use the number buttons to program the ARTIST/SONG into the Tune Select feature by pressing and holding for two (2) seconds (see TuneSelect7). This button is useful when viewing the display at a distance. Memory Button (mem) - Pressing the Display button while viewing the active display switches between the artist name/song title screen, large...
User Guide
Page 38
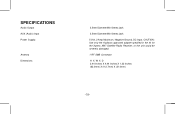
SPECIFICATIONS Audio Output AUX (Audio) Input Power Supply: Antenna Dimensions 3.5mm Diameter Min-Stereo Jack 3.5mm Diameter Min-Stereo Jack 5 Volt, 2 Amp Maximum, Negative Ground, DC Input. CAUTION: Use only the Audiovox approved adapter specified in the kit for the Xpress XM7 Satellite Radio Receiver, or the unit could be severely damaged. 1 RF SMB Connector H X W X D 2.44 Inches X 4.44 Inches X 1.22 Inches (62.0mm) X (112.7mm) X (31.0mm) -38-
SPECIFICATIONS Audio Output AUX (Audio) Input Power Supply: Antenna Dimensions 3.5mm Diameter Min-Stereo Jack 3.5mm Diameter Min-Stereo Jack 5 Volt, 2 Amp Maximum, Negative Ground, DC Input. CAUTION: Use only the Audiovox approved adapter specified in the kit for the Xpress XM7 Satellite Radio Receiver, or the unit could be severely damaged. 1 RF SMB Connector H X W X D 2.44 Inches X 4.44 Inches X 1.22 Inches (62.0mm) X (112.7mm) X (31.0mm) -38-
User Guide
Page 39
... the date of the factory serial number/bar code label(s). This Warranty does not extend to the elimination of externally generated static or noise, to costs incurred for the Company any product or part thereof which, in connection with the sale of defect(s), transportation prepaid, to be repaired or replaced with proof of satellite transmissions, repeater signal or receiver unit.
... the date of the factory serial number/bar code label(s). This Warranty does not extend to the elimination of externally generated static or noise, to costs incurred for the Company any product or part thereof which, in connection with the sale of defect(s), transportation prepaid, to be repaired or replaced with proof of satellite transmissions, repeater signal or receiver unit.


