Operation Manual
Page 1
MMD11 11" OVERHEAD LCD MONITOR WITH DVD PLAYER OPERATION MANUAL 128-8290
MMD11 11" OVERHEAD LCD MONITOR WITH DVD PLAYER OPERATION MANUAL 128-8290
Operation Manual
Page 2
...Do not use . An LCD panel and/or video monitor may scratch the screen. Licensed under one or more of the vehicle. u Lock the LCD screen in the fully closed position when not in use any anchor points in a vehicle, please contact Audiovox Technical Support at the point where it is applied...adjust the volume setting to the rear of the side curtain air bag assemblies. If the LCD panel or video monitor is used for television reception, video or DVD play , the LCD panel or video monitor must be installed to the lowest position. u Do not use any portion of the driver's seat where it...
...Do not use . An LCD panel and/or video monitor may scratch the screen. Licensed under one or more of the vehicle. u Lock the LCD screen in the fully closed position when not in use any anchor points in a vehicle, please contact Audiovox Technical Support at the point where it is applied...adjust the volume setting to the rear of the side curtain air bag assemblies. If the LCD panel or video monitor is used for television reception, video or DVD play , the LCD panel or video monitor must be installed to the lowest position. u Do not use any portion of the driver's seat where it...
Operation Manual
Page 3
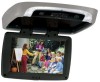
... Three Way Switch • Built-in 16 Channel Frequency Wireless FM Modulator • Last Position Memory for use with IR Wireless Headphones • Three Audio / Video Source Inputs (DVD, AUX,AV1) • Dome Lights with Drop-Down Video / Monitor. Congratulations Congratulations on your Audiovox entertainment system but remember the safety of video entertainment in the mobile environment.
... Three Way Switch • Built-in 16 Channel Frequency Wireless FM Modulator • Last Position Memory for use with IR Wireless Headphones • Three Audio / Video Source Inputs (DVD, AUX,AV1) • Dome Lights with Drop-Down Video / Monitor. Congratulations Congratulations on your Audiovox entertainment system but remember the safety of video entertainment in the mobile environment.
Operation Manual
Page 4
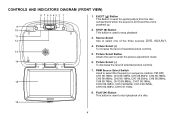
...STOP (n) Button This button is used to stop playback. 3. Picture Select (-) To decrease the level of the three sources: DVD, AUX,AV1. 4. Picture Select (+) To increase the level of a disc. 16 4 PLAY (u) Button This button is used for ejecting discs from the disc compartment when the source is... DVD and the unit is powered up. 2. CONTROLS AND INDICATORS DIAGRAM (FRONT VIEW) 8 7 6 5 43 2 1 9 10 11 12 1. EJECT (...
...STOP (n) Button This button is used to stop playback. 3. Picture Select (-) To decrease the level of the three sources: DVD, AUX,AV1. 4. Picture Select (+) To increase the level of a disc. 16 4 PLAY (u) Button This button is used for ejecting discs from the disc compartment when the source is... DVD and the unit is powered up. 2. CONTROLS AND INDICATORS DIAGRAM (FRONT VIEW) 8 7 6 5 43 2 1 9 10 11 12 1. EJECT (...
Operation Manual
Page 5
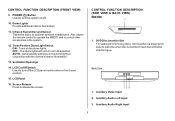
... lights will not turn off . 10. Automatically switches on /off the LCD panel monitor when in this position. DVD Disc insertion Slot For loading and removing discs. Auxiliary Video Input 2. Ventilation Openings 14. Three Position Dome Light Switch ON - LCD Panel 16. POWER ( ) Button Used to turn on in the closed position. 15. CONTROL...
... lights will not turn off . 10. Automatically switches on /off the LCD panel monitor when in this position. DVD Disc insertion Slot For loading and removing discs. Auxiliary Video Input 2. Ventilation Openings 14. Three Position Dome Light Switch ON - LCD Panel 16. POWER ( ) Button Used to turn on in the closed position. 15. CONTROL...

Operation Manual
Page 6
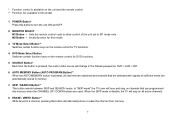
...the cover until it locks. The remote control will not control equipment from other manufacturers. 6 1 2 3 4 5 6 7 8 9 10 11 12 13 POWER MONITOR SELECT EJECT M1 M2 TV DVD SOURCE 1 2 3 AUTO MEMORY 4 5 6 SKIP/ SEARCH 7 8 9 ERASE/ WRITE 0 VOLUME FMM CHANNEL DAY/ ON/OFF SELECT NIGHT PIX IRT RETURN DISPLAY ...ON/OFF MUTE 35 34 33 32 31 30 29 14 OK 15 28 MENU SETUP 16 17 REPEAT 27 AUDIO ZOOM ...
...the cover until it locks. The remote control will not control equipment from other manufacturers. 6 1 2 3 4 5 6 7 8 9 10 11 12 13 POWER MONITOR SELECT EJECT M1 M2 TV DVD SOURCE 1 2 3 AUTO MEMORY 4 5 6 SKIP/ SEARCH 7 8 9 ERASE/ WRITE 0 VOLUME FMM CHANNEL DAY/ ON/OFF SELECT NIGHT PIX IRT RETURN DISPLAY ...ON/OFF MUTE 35 34 33 32 31 30 29 14 OK 15 28 MENU SETUP 16 17 REPEAT 27 AUDIO ZOOM ...
Operation Manual
Page 7
...AUTO MEMORY Button (AUTO PROGRAM Button)** When the AUTO MEMORY button is pressed, the audio / video source will change in memory. 7. In "SKIP mode" the TV tuner will alternately store ...are programmed into memory when the CHANNEL UP / DOWN buttons are automatically stored in the following sequence: DVD > AUX > AV1. 6. SKIP / SEARCH Button** This button selects between SKIP and SEARCH mode...the unit and the remote control. ** Function not available in this button to M1 mode only. MONITOR SELECT M1 Button - Invalid function for TV functions. 4. * Function control is disable, the TV...
...AUTO MEMORY Button (AUTO PROGRAM Button)** When the AUTO MEMORY button is pressed, the audio / video source will change in memory. 7. In "SKIP mode" the TV tuner will alternately store ...are programmed into memory when the CHANNEL UP / DOWN buttons are automatically stored in the following sequence: DVD > AUX > AV1. 6. SKIP / SEARCH Button** This button selects between SKIP and SEARCH mode...the unit and the remote control. ** Function not available in this button to M1 mode only. MONITOR SELECT M1 Button - Invalid function for TV functions. 4. * Function control is disable, the TV...
Operation Manual
Page 8
For Title/Chapter selection use CHq to enter the desired Title Chapter selection. 13. REPEAT Button Allows the user to access the DVD menu (DVD MODE). 16. CHANNEL SELECT Button* Selects the wireless FM Modulator Frequency (CH1 88.1MHz, CH2 88.3MHz, CH3 88.5MHz, CH4 88.7MHz, CH5 88.9MHz, CH6 ...
For Title/Chapter selection use CHq to enter the desired Title Chapter selection. 13. REPEAT Button Allows the user to access the DVD menu (DVD MODE). 16. CHANNEL SELECT Button* Selects the wireless FM Modulator Frequency (CH1 88.1MHz, CH2 88.3MHz, CH3 88.5MHz, CH4 88.7MHz, CH5 88.9MHz, CH6 ...
Operation Manual
Page 9
AUDIO Button Press to display and select the available subtitle language in DVD mode. SUBTITLE Button Press to display and select the available AUDIO languages in DVD mode. 17. STOP ( Note: The languages for subtitle vary from disc to disc. 19. Each time you press the button, the language changes. Note: The type and number of languages for audio vary from disc to disc. 18. Each time you press the button, the subtitle language changes.
AUDIO Button Press to display and select the available subtitle language in DVD mode. SUBTITLE Button Press to display and select the available AUDIO languages in DVD mode. 17. STOP ( Note: The languages for subtitle vary from disc to disc. 19. Each time you press the button, the language changes. Note: The type and number of languages for audio vary from disc to disc. 18. Each time you press the button, the subtitle language changes.
Operation Manual
Page 10
... Twice Enlarge the picture 2 times of the original size 3 times Enlarge the picture 3 times of the section to enlarge the picture when playing a DVD disc. SETUP Button Press to display the Setup Menu which allows the user to the previously set level. 10 Pressing M1 then IRT ON/OFF...this button to repeat (Set point B) 3 times AB Off Cancel the A-B repeat function 27. Pressing the button again restores the sound to change the DVD player options such as TV DISPLAY, OSD LANGUAGE, PARENTAL CONTROL etc. Mark the beginning of the section to repeat (Set point A) Twice Repeat AB ...
... Twice Enlarge the picture 2 times of the original size 3 times Enlarge the picture 3 times of the section to enlarge the picture when playing a DVD disc. SETUP Button Press to display the Setup Menu which allows the user to the previously set level. 10 Pressing M1 then IRT ON/OFF...this button to repeat (Set point B) 3 times AB Off Cancel the A-B repeat function 27. Pressing the button again restores the sound to change the DVD player options such as TV DISPLAY, OSD LANGUAGE, PARENTAL CONTROL etc. Mark the beginning of the section to repeat (Set point A) Twice Repeat AB ...
Operation Manual
Page 11
... selection of the picture adjustments. 34. In the "Day" mode, the LCD backlit intensity is used to decrease or increase the level of CD tracks, DVD chapters and password. 35. VOLUME DOWN (-) or UP (+)* Press to eject the disc. 11 EJECT () Button* This button is at maximum.
... selection of the picture adjustments. 34. In the "Day" mode, the LCD backlit intensity is used to decrease or increase the level of CD tracks, DVD chapters and password. 35. VOLUME DOWN (-) or UP (+)* Press to eject the disc. 11 EJECT () Button* This button is at maximum.
Operation Manual
Page 12
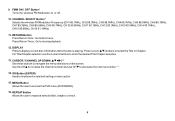
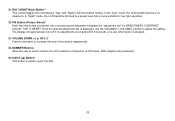
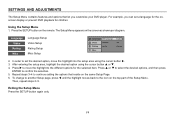
... q to select an item in the menu will have a green background) SCREEN MODE SELECT This allows the user to change the screen format (aspect ratio 16:9, 4:3). 1) To select the screen aspect ratio format highlight SCREEN MODE and then press the OK button to enter the sub menu. Then use the cursor... buttons por q to confirm the setting. SYSTEM MENU SCREEN MODE OSD LANGUAGE SOURCE DEFAULT DVD SCREEN MODE 4:3 16:9 12 Note: System Menu can be controlled via Remote Control only. (Items selected in the sub menu and then press the OK button to...
... q to select an item in the menu will have a green background) SCREEN MODE SELECT This allows the user to change the screen format (aspect ratio 16:9, 4:3). 1) To select the screen aspect ratio format highlight SCREEN MODE and then press the OK button to enter the sub menu. Then use the cursor... buttons por q to confirm the setting. SYSTEM MENU SCREEN MODE OSD LANGUAGE SOURCE DEFAULT DVD SCREEN MODE 4:3 16:9 12 Note: System Menu can be controlled via Remote Control only. (Items selected in the sub menu and then press the OK button to...
Operation Manual
Page 13
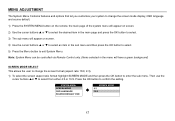
...-screen display. SYSTEM MENU SCREEN MODE OSD LANGUAGE SOURCE DEFAULT DVD SOURCE DEFAULT DVD ON OFF 13 OSD LANGUAGE This allows the user to DVD mode. The user can either select English, Spanish, French or German for the on - DVD default off- Whenever the unit is turned on it will ...return to select the language for the OSD language. SYSTEM MENU SCREEN MODE OSD LANGUAGE SOURCE DEFAULT DVD OSD LANGUAGE ENGLISH SPANISH FRENCH GERMAN SOURCE DEFAULT DVD This allows the user to the ...
...-screen display. SYSTEM MENU SCREEN MODE OSD LANGUAGE SOURCE DEFAULT DVD SOURCE DEFAULT DVD ON OFF 13 OSD LANGUAGE This allows the user to DVD mode. The user can either select English, Spanish, French or German for the on - DVD default off- Whenever the unit is turned on it will ...return to select the language for the OSD language. SYSTEM MENU SCREEN MODE OSD LANGUAGE SOURCE DEFAULT DVD OSD LANGUAGE ENGLISH SPANISH FRENCH GERMAN SOURCE DEFAULT DVD This allows the user to the ...
Operation Manual
Page 14
...using the cursor button p or q. 4. For example, you customize your DVD player. Exiting the Setup Menu Press the SETUP button again only. 14 Language Video Rating Misc Language Setup Video Setup Rating Setup Misc Setup Language OSD Language : English Video Rating Subtitle Audio : Off : English Misc 2. Repeat steps 3~4 to ... u. 3. Press p or q to select the desired options, and then press ENTER to set a language for the onscreen display or prevent DVD playback for the selected item. Press the SETUP button on the remote. In order to confirm the selection. 5.
...using the cursor button p or q. 4. For example, you customize your DVD player. Exiting the Setup Menu Press the SETUP button again only. 14 Language Video Rating Misc Language Setup Video Setup Rating Setup Misc Setup Language OSD Language : English Video Rating Subtitle Audio : Off : English Misc 2. Repeat steps 3~4 to ... u. 3. Press p or q to select the desired options, and then press ENTER to set a language for the onscreen display or prevent DVD playback for the selected item. Press the SETUP button on the remote. In order to confirm the selection. 5.
Operation Manual
Page 17
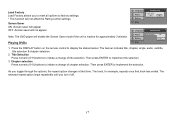
...loops repeatedly until you toggle through the options, the repeat option changes at that track has ended. Playing DVDs Language Load Factory Video Load Factory Screen Saver Yes No Rating Misc Language Load Factory Video Screen Saver Off Rating On Misc 1. Then press ENTER to display the status banner. Chapter selection Press numeric...selection. 2. Title Selection Press numeric (0~9) buttons to implement the selection. 3. Screen Saver ON -Screen saver will appear OFF -Screen saver will not appear Note: The DVD player will not affect the Rating control settings.
...loops repeatedly until you toggle through the options, the repeat option changes at that track has ended. Playing DVDs Language Load Factory Video Load Factory Screen Saver Yes No Rating Misc Language Load Factory Video Screen Saver Off Rating On Misc 1. Then press ENTER to display the status banner. Chapter selection Press numeric...selection. 2. Title Selection Press numeric (0~9) buttons to implement the selection. 3. Screen Saver ON -Screen saver will appear OFF -Screen saver will not appear Note: The DVD player will not affect the Rating control settings.
Operation Manual
Page 18
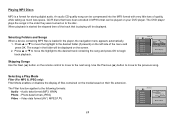
... Mode enables or disables the display of the track that have been encoded in the folder will be displayed. Audio data format (MP3, WMA) Photo - Video data format (AV1, MPEG , ) 18 1/12 00:00:21 / TRACK01 TRACK02 TRACK03 TRACK04 TRACK05 TRACK06 Filter Flat Mode Repeat : off Audio Photo Vi d e o ... to the desired track containing the song and press OK to the following formats: Audio - Skipping Songs Use the Next (:) button on your DVD player. Selecting Folders and Songs When a device containing MP3 files is loaded in the order they were burned on their file extension. The...
... Mode enables or disables the display of the track that have been encoded in the folder will be displayed. Audio data format (MP3, WMA) Photo - Video data format (AV1, MPEG , ) 18 1/12 00:00:21 / TRACK01 TRACK02 TRACK03 TRACK04 TRACK05 TRACK06 Filter Flat Mode Repeat : off Audio Photo Vi d e o ... to the desired track containing the song and press OK to the following formats: Audio - Skipping Songs Use the Next (:) button on your DVD player. Selecting Folders and Songs When a device containing MP3 files is loaded in the order they were burned on their file extension. The...
Operation Manual
Page 21
...Label towards driver) into the disc compartment. 21 If the codes don't match, the disc won't play. The unit will play •DVD* disc - DVD discs which contain video. •Audio discs - However, due to the variety of disc manufacturers and software, playback cannot be played in order for example, ...a CD-R with the player. DVD Basics To get the optimum use out of the DVD section, make sure that contains audio files (for the ...
...Label towards driver) into the disc compartment. 21 If the codes don't match, the disc won't play. The unit will play •DVD* disc - DVD discs which contain video. •Audio discs - However, due to the variety of disc manufacturers and software, playback cannot be played in order for example, ...a CD-R with the player. DVD Basics To get the optimum use out of the DVD section, make sure that contains audio files (for the ...
Operation Manual
Page 24
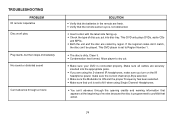
... has formed. If you are securely inserted into disc tray. Verify that the batteries in the remote are coded by region. This DVD player is selected. - Make sure your DVD is set to Region Number 1. - Make sure all cables are using the 2-channel IR headphones, make sure the correct channel (A-B) is set...
... has formed. If you are securely inserted into disc tray. Verify that the batteries in the remote are coded by region. This DVD player is selected. - Make sure your DVD is set to Region Number 1. - Make sure all cables are using the 2-channel IR headphones, make sure the correct channel (A-B) is set...


