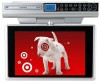

Owners Manual
Page 3
This equipment generates, uses, and can be authorized by Macrovision, and is connected. • Consult the dealer or an experienced radio/TV technician for home and other intellectual property rights. This Class B digital apparatus complies with Part 15 of apparatus in a residential installation. However, there is used ...
This equipment generates, uses, and can be authorized by Macrovision, and is connected. • Consult the dealer or an experienced radio/TV technician for home and other intellectual property rights. This Class B digital apparatus complies with Part 15 of apparatus in a residential installation. However, there is used ...
Owners Manual
Page 5
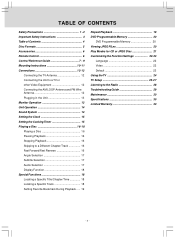
... Control 6 Control Reference Guide 7 - 9 Mounting Instructions 10-11 Connections 12-13 Connecting the TV Antenna 12 Connecting the Unit to a TV or other Video Equipment 12 Connecting the AM LOOP Antenna and FM Wire Antenna 12 Plugging in the Unit 13 Monitor Operation 13 Unit Operation 14 Sound System ... Specific Title/Chapter/Time 18 Locating a Specific Track 18 Setting Favorite Bookmark During Playback ..... 19 Repeat Playback 19 DVD Programmable Memory 20 DVD Programmable Memory 20 Viewing JPEG FILes 20 Play Modes for CD or JPEG Disc 21 Customizing the Function Settings 22-...
... Control 6 Control Reference Guide 7 - 9 Mounting Instructions 10-11 Connections 12-13 Connecting the TV Antenna 12 Connecting the Unit to a TV or other Video Equipment 12 Connecting the AM LOOP Antenna and FM Wire Antenna 12 Plugging in the Unit 13 Monitor Operation 13 Unit Operation 14 Sound System ... Specific Title/Chapter/Time 18 Locating a Specific Track 18 Setting Favorite Bookmark During Playback ..... 19 Repeat Playback 19 DVD Programmable Memory 20 DVD Programmable Memory 20 Viewing JPEG FILes 20 Play Modes for CD or JPEG Disc 21 Customizing the Function Settings 22-...

Owners Manual
Page 8
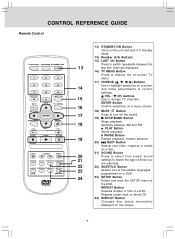
..., STEREO sound or Secondary Audio Program (SAP). 12) FORMAT Button Press to normal viewing. CONTROL REFERENCE GUIDE Remote Control 1) FUNCTION Button Use to select DVD, TV or RADIO mode. 2) PICTURE Button PICTURE 1 Selects from preset screen display settings to match the type of a CD. EXIT TV MENU 5) DVD MENU Button 4 Press to enter the main...
..., STEREO sound or Secondary Audio Program (SAP). 12) FORMAT Button Press to normal viewing. CONTROL REFERENCE GUIDE Remote Control 1) FUNCTION Button Use to select DVD, TV or RADIO mode. 2) PICTURE Button PICTURE 1 Selects from preset screen display settings to match the type of a CD. EXIT TV MENU 5) DVD MENU Button 4 Press to enter the main...
Owners Manual
Page 9
...Button Starts playback. buttons 15 Use to match the type of show you are watching. 22 22) SUBTITLE Button 23 Selects one of a DVD. ENTER Button 16 Confirm selections on a menu screen. 18) MUTE Button 17 Press to turn off the sound. 19) STOP/BAND ... chapter or title of the subtitle languages programmed on the screen. - 8 - CONTROL REFERENCE GUIDE Remote Control PICTURE 1 4 7 EXIT 2 3 5 6 8 9 LAST CH 0 TV MENU RETURN DVD MENU MUTE STOP BAND FORMAT MTS SOUND 13) STANDBY/ON Button Turns on the unit and puts it in standby mode. 14) Number (0-9) Buttons...
...Button Starts playback. buttons 15 Use to match the type of show you are watching. 22 22) SUBTITLE Button 23 Selects one of a DVD. ENTER Button 16 Confirm selections on a menu screen. 18) MUTE Button 17 Press to turn off the sound. 19) STOP/BAND ... chapter or title of the subtitle languages programmed on the screen. - 8 - CONTROL REFERENCE GUIDE Remote Control PICTURE 1 4 7 EXIT 2 3 5 6 8 9 LAST CH 0 TV MENU RETURN DVD MENU MUTE STOP BAND FORMAT MTS SOUND 13) STANDBY/ON Button Turns on the unit and puts it in standby mode. 14) Number (0-9) Buttons...
Owners Manual
Page 10
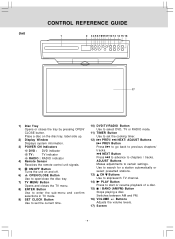
...AM and FM. 16) VOLUME +/- Place a disc on the disc tray, label side up. 2) Display Window Displays system information. 3) POWER ON Indicators DVD : DVD indicator TV : TV indicator RADIO : RADIO indicator 4) Remote Sensor Receives the remote control unit signals. 5) ON/OFF Button Turns the unit on and off. 6) OPEN/CLOSE Button...to enter the sub-menu and confirm selections in TV mode. 9) SET CLOCK Button Use to set the current time. 10) DVD/TV/RADIO Button Use to select DVD, TV or RADIO mode. 11) TIMER Button Use to set the cooking timer. 12) PREV/ NEXT/ ADJUST Buttons PREV Button Press...
...AM and FM. 16) VOLUME +/- Place a disc on the disc tray, label side up. 2) Display Window Displays system information. 3) POWER ON Indicators DVD : DVD indicator TV : TV indicator RADIO : RADIO indicator 4) Remote Sensor Receives the remote control unit signals. 5) ON/OFF Button Turns the unit on and off. 6) OPEN/CLOSE Button...to enter the sub-menu and confirm selections in TV mode. 9) SET CLOCK Button Use to set the current time. 10) DVD/TV/RADIO Button Use to select DVD, TV or RADIO mode. 11) TIMER Button Use to set the cooking timer. 12) PREV/ NEXT/ ADJUST Buttons PREV Button Press...
Owners Manual
Page 13
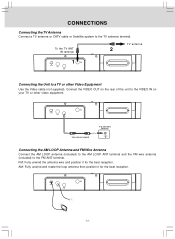
... and rotate the loop antenna then position it for the best reception. - 12 - Connect the VIDEO OUT on the rear of the unit to a TV or other video equipment. FM: Fully unwind the antenna wire and position it... for the best reception. TV or other Video Equipment (yellow) Video cable (not supplied) VIDEO IN Connecting the...LOOP ANT terminal and the FM wire antenna (included) to the TV antenna terminal. CONNECTIONS Connecting the TV Antenna Connect a TV antenna or CATV cable or Satellite system to the FM ANT terminal.
... and rotate the loop antenna then position it for the best reception. - 12 - Connect the VIDEO OUT on the rear of the unit to a TV or other video equipment. FM: Fully unwind the antenna wire and position it... for the best reception. TV or other Video Equipment (yellow) Video cable (not supplied) VIDEO IN Connecting the...LOOP ANT terminal and the FM wire antenna (included) to the TV antenna terminal. CONNECTIONS Connecting the TV Antenna Connect a TV antenna or CATV cable or Satellite system to the FM ANT terminal.
Owners Manual
Page 15
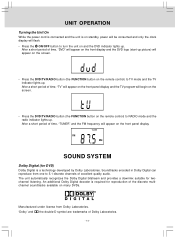
...up . After a short period of time, "TV" will appear on the front panel display and the TV program will begin on the screen. • Press the DVD/TV/RADIO button (the FUNCTION button on the remote control) to TV mode and the TV indicator lights up. An additional Dolby Digital decoder ...is required for reproduction of time, "TUNER" and the FM frequency will appear on many DVDs. SOUND SYSTEM Dolby Digital (for...
...up . After a short period of time, "TV" will appear on the front panel display and the TV program will begin on the screen. • Press the DVD/TV/RADIO button (the FUNCTION button on the remote control) to TV mode and the TV indicator lights up. An additional Dolby Digital decoder ...is required for reproduction of time, "TUNER" and the FM frequency will appear on many DVDs. SOUND SYSTEM Dolby Digital (for...
Owners Manual
Page 17
...button at x2 speed. • Four speeds are produced in a manner that the desired operation is not permitted by the unit or disc. Press the DVD/TV/RADIO button (the FUNCTION button on the remote) to interrupt playback. The disc tray opens. 4. After loading, the unit will automatically either bring you ...a short while for your unit to the beginning. To resume playback at normal speed. Press the OPEN/CLOSE button. If you to turn on the LCD display until MUTE is pressed again or VOL is not a defect in the unit. Fast Forward/Fast Reverse 1. To resume normal playback, press the ...
...button at x2 speed. • Four speeds are produced in a manner that the desired operation is not permitted by the unit or disc. Press the DVD/TV/RADIO button (the FUNCTION button on the remote) to interrupt playback. The disc tray opens. 4. After loading, the unit will automatically either bring you ...a short while for your unit to the beginning. To resume playback at normal speed. Press the OPEN/CLOSE button. If you to turn on the LCD display until MUTE is pressed again or VOL is not a defect in the unit. Fast Forward/Fast Reverse 1. To resume normal playback, press the ...

Owners Manual
Page 23
...select VIDEO. 3. Press the SETUP button in stop mode. 2. Press the or button to select DVD Menu. 3. Use the or button to select OSD Language. 3. Press the button to select TV Shape. 4. The screen will change subtitle selections via the disc menu only. Use the or button...selection on the disc. Use the or button to the normal screen. DVD Menu 1. Video TV Shape 1. Press the button. Press the button. Press the SETUP button in the selected language. If this case, the DVD player automatically displays disc menus consistent with the disc's initial language setting...
...select VIDEO. 3. Press the SETUP button in stop mode. 2. Press the or button to select DVD Menu. 3. Use the or button to select OSD Language. 3. Press the button to select TV Shape. 4. The screen will change subtitle selections via the disc menu only. Use the or button...selection on the disc. Use the or button to the normal screen. DVD Menu 1. Video TV Shape 1. Press the button. Press the button. Press the SETUP button in the selected language. If this case, the DVD player automatically displays disc menus consistent with the disc's initial language setting...
Owners Manual
Page 24
...Soft or Dynamic), then press the ENTER button. 5. Pan Scan: Select when a standard 4:3 TV is brighter. Note: Depending on the DVD. Press the SETUP button in use if you play DVDs recorded in the 4:3 picture size only, the playback picture always appears in stop mode. 2. Bright... screen. Dynamic: It includes 4 items (Brightness, Contrast, Tint and Color). Therefore, the playback picture of the TV Shape setting. • Select 16:9 to conform the LCD screen on screen without distortion. Press the button, then press the ENTER button. 4. CUSTOMIZING THE FUNCTION SETTINGS Notes:...
...Soft or Dynamic), then press the ENTER button. 5. Pan Scan: Select when a standard 4:3 TV is brighter. Note: Depending on the DVD. Press the SETUP button in use if you play DVDs recorded in the 4:3 picture size only, the playback picture always appears in stop mode. 2. Bright... screen. Dynamic: It includes 4 items (Brightness, Contrast, Tint and Color). Therefore, the playback picture of the TV Shape setting. • Select 16:9 to conform the LCD screen on screen without distortion. Press the button, then press the ENTER button. 4. CUSTOMIZING THE FUNCTION SETTINGS Notes:...
Owners Manual
Page 25
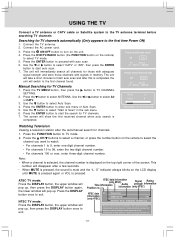
...the DVD/TV/RADIO button (the FUNCTION button on the top right corner of Auto Scan. 5. Proceed with auto scan. 6. Press the TV MENU button, then press the button to select Auto Scan. 4. Use the button to TV CHANNEL SETTING. 2. Use the button to select "Start to start the search for TV channels.... • When MUTE is pressed, the sound is mute and the "L O" indicator always blinks on the LCD display until MUTE is pressed again or VOL is completed. NTSC TV mode: Press the DISPLAY button, the upper window will immediately search all channels for those with adequate signal strength ...
...the DVD/TV/RADIO button (the FUNCTION button on the top right corner of Auto Scan. 5. Proceed with auto scan. 6. Press the TV MENU button, then press the button to select Auto Scan. 4. Use the button to TV CHANNEL SETTING. 2. Use the button to select "Start to start the search for TV channels.... • When MUTE is pressed, the sound is mute and the "L O" indicator always blinks on the LCD display until MUTE is pressed again or VOL is completed. NTSC TV mode: Press the DISPLAY button, the upper window will immediately search all channels for those with adequate signal strength ...
Owners Manual
Page 26
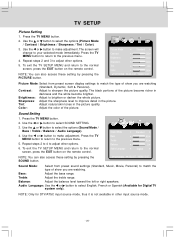
... select the options (Sound Mode / Bass / Treble / Balance / Audio Language). 4. Brightness: Adjust to the previous menu. 5. Press the TV MENU button. 2. Press the TV MENU button to return to brighten or darken the whole picture. Contrast: Adjust to select English, French or Spanish (Available for DTV/ATSC...balance level toward the left or right speakers. Audio Language: Use the or button to sharpen the picture quality. Press the TV MENU button to return to improve detail in darkness and the white become richer in the picture. Sharpness: Adjust the sharpness level...
... select the options (Sound Mode / Bass / Treble / Balance / Audio Language). 4. Brightness: Adjust to the previous menu. 5. Press the TV MENU button. 2. Press the TV MENU button to return to brighten or darken the whole picture. Contrast: Adjust to select English, French or Spanish (Available for DTV/ATSC...balance level toward the left or right speakers. Audio Language: Use the or button to sharpen the picture quality. Press the TV MENU button to return to improve detail in darkness and the white become richer in the picture. Sharpness: Adjust the sharpness level...

Owners Manual
Page 27
.... Repeat steps 2 to 4 to the normal screen, press the EXIT button on the remote control. To exit the TV SETUP MENU and return to adjust other options. 6. Note: TV TIMER SETTING is different from English / Français / Español. Use the or button to select the... options (OSD Duration / Time Zone / Day Saving Time). 4. Press the TV MENU button. 2. TV SETUP TV Timer Setting 1. Use the or button to select the options (Language / Color Mode / Restore Setting). 4. To exit the TV SETUP MENU and return to the factory settings, all your selected mode immediately. ...
.... Repeat steps 2 to 4 to the normal screen, press the EXIT button on the remote control. To exit the TV SETUP MENU and return to adjust other options. 6. Note: TV TIMER SETTING is different from English / Français / Español. Use the or button to select the... options (OSD Duration / Time Zone / Day Saving Time). 4. Press the TV MENU button. 2. TV SETUP TV Timer Setting 1. Use the or button to select the options (Language / Color Mode / Restore Setting). 4. To exit the TV SETUP MENU and return to the factory settings, all your selected mode immediately. ...
Owners Manual
Page 28
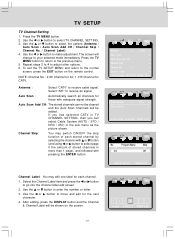
... Skip: You may edit one label for those with pressing the ENTER button. Select the Channel Label item and press the or button to select TV CHANNEL SETTING. 3. Use the or button to go into the channel label edit screen. 2. Antenna : Select "CATV" to the normal screen, press the EXIT ...Add CH: The stored channels can select Cable System (AUTO / STD / HRC / IRC) in more than 1 page), and followed with adequate signal strength. Press the TV MENU button. 2. Use the or button to receive air signal. Channel Label UP/DOWN ADJUST "MENU":EXIT Channel Label: You may switch ON/OFF the...
... Skip: You may edit one label for those with pressing the ENTER button. Select the Channel Label item and press the or button to select TV CHANNEL SETTING. 3. Use the or button to go into the channel label edit screen. 2. Antenna : Select "CATV" to the normal screen, press the EXIT ...Add CH: The stored channels can select Cable System (AUTO / STD / HRC / IRC) in more than 1 page), and followed with adequate signal strength. Press the TV MENU button. 2. Use the or button to receive air signal. Channel Label UP/DOWN ADJUST "MENU":EXIT Channel Label: You may switch ON/OFF the...
Owners Manual
Page 29
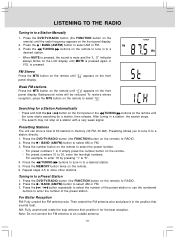
... front panel display. Press the TUNING buttons to tune in to enter the number of 60 stations in the position that sounds best. Press the DVD/TV/RADIO button (the FUNCTION button on the remote. 6. Press the / BAND (AM/FM) button to store other stations. Press the / BAND (AM/FM) button to... on the front panel display. 2. Note: Do not connect the FM antenna to select AM or FM. 3. Press the DVD/TV/RADIO button (the FUNCTION button on the remote) until " " appears on the LCD display until MUTE is pressed again or VOL is pressed. Press the TUNING buttons on the remote) to a desired...
... front panel display. Press the TUNING buttons to tune in to enter the number of 60 stations in the position that sounds best. Press the DVD/TV/RADIO button (the FUNCTION button on the remote. 6. Press the / BAND (AM/FM) button to store other stations. Press the / BAND (AM/FM) button to... on the front panel display. 2. Note: Do not connect the FM antenna to select AM or FM. 3. Press the DVD/TV/RADIO button (the FUNCTION button on the remote) until " " appears on the LCD display until MUTE is pressed again or VOL is pressed. Press the TUNING buttons on the remote) to a desired...

Owners Manual
Page 30
... and try again. • Check antenna location, direction or connection. • Check the PICTURE SETTING in the TV SETUP MENU. • Not plugged into AC outlet. • Make sure that you've selected DVD mode. • The system is heard. Press the PLAY button to return to normal play mode. •...normal play . TROUBLESHOOTING GUIDE SYMPTOM No power. DVD No sound or only a very low-level sound is too hot. Shut off the unit for 30 minutes, then turn ON again. - 29 - The picture is not clear Severe hum or noise is in tem- TV Snowy picture, multiple image, picture distorted, picture...
... and try again. • Check antenna location, direction or connection. • Check the PICTURE SETTING in the TV SETUP MENU. • Not plugged into AC outlet. • Make sure that you've selected DVD mode. • The system is heard. Press the PLAY button to return to normal play mode. •...normal play . TROUBLESHOOTING GUIDE SYMPTOM No power. DVD No sound or only a very low-level sound is too hot. Shut off the unit for 30 minutes, then turn ON again. - 29 - The picture is not clear Severe hum or noise is in tem- TV Snowy picture, multiple image, picture distorted, picture...


