Owners Manual
Page 5
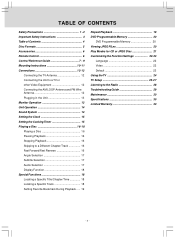
... Control 6 Control Reference Guide 7 - 9 Mounting Instructions 10-11 Connections 12-13 Connecting the TV Antenna 12 Connecting the Unit to a TV or other Video Equipment 12 Connecting the AM LOOP Antenna and FM Wire Antenna 12 Plugging in the Unit 13 Monitor Operation 13 Unit Operation 14 Sound System ... Specific Title/Chapter/Time 18 Locating a Specific Track 18 Setting Favorite Bookmark During Playback ..... 19 Repeat Playback 19 DVD Programmable Memory 20 DVD Programmable Memory 20 Viewing JPEG FILes 20 Play Modes for CD or JPEG Disc 21 Customizing the Function Settings 22-...
... Control 6 Control Reference Guide 7 - 9 Mounting Instructions 10-11 Connections 12-13 Connecting the TV Antenna 12 Connecting the Unit to a TV or other Video Equipment 12 Connecting the AM LOOP Antenna and FM Wire Antenna 12 Plugging in the Unit 13 Monitor Operation 13 Unit Operation 14 Sound System ... Specific Title/Chapter/Time 18 Locating a Specific Track 18 Setting Favorite Bookmark During Playback ..... 19 Repeat Playback 19 DVD Programmable Memory 20 DVD Programmable Memory 20 Viewing JPEG FILes 20 Play Modes for CD or JPEG Disc 21 Customizing the Function Settings 22-...

Owners Manual
Page 8
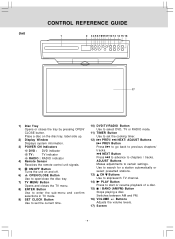
... Press to enter digital sub-channels (i.e. 7 8 9 11.3, 12.7). 4) EXIT/RETURN Button LAST CH 3 0 Press to exit the TV menu and return directly to select the picture format. - 7 - EXIT TV MENU 5) DVD MENU Button 4 Press to enter the main menu of the RETURN DVD you are watching. 6) VOLUME (+/-) Buttons DVD MENU MUTE 5 Adjusts the volume. 7) / TUNING Buttons...
... Press to enter digital sub-channels (i.e. 7 8 9 11.3, 12.7). 4) EXIT/RETURN Button LAST CH 3 0 Press to exit the TV menu and return directly to select the picture format. - 7 - EXIT TV MENU 5) DVD MENU Button 4 Press to enter the main menu of the RETURN DVD you are watching. 6) VOLUME (+/-) Buttons DVD MENU MUTE 5 Adjusts the volume. 7) / TUNING Buttons...
Owners Manual
Page 10
... Press to chapters / tracks. Place a disc on the disc tray, label side up. 2) Display Window Displays system information. 3) POWER ON Indicators DVD : DVD indicator TV : TV indicator RADIO : RADIO indicator 4) Remote Sensor Receives the remote control unit signals. 5) ON/OFF Button Turns the unit on and off. 6) OPEN/...to enter the sub-menu and confirm selections in TV mode. 9) SET CLOCK Button Use to set the current time. 10) DVD/TV/RADIO Button Use to select DVD, TV or RADIO mode. 11) TIMER Button Use to set the cooking timer. 12) PREV/ NEXT/ ADJUST Buttons PREV Button Press ...
... Press to chapters / tracks. Place a disc on the disc tray, label side up. 2) Display Window Displays system information. 3) POWER ON Indicators DVD : DVD indicator TV : TV indicator RADIO : RADIO indicator 4) Remote Sensor Receives the remote control unit signals. 5) ON/OFF Button Turns the unit on and off. 6) OPEN/...to enter the sub-menu and confirm selections in TV mode. 9) SET CLOCK Button Use to set the current time. 10) DVD/TV/RADIO Button Use to select DVD, TV or RADIO mode. 11) TIMER Button Use to set the cooking timer. 12) PREV/ NEXT/ ADJUST Buttons PREV Button Press ...
Owners Manual
Page 13
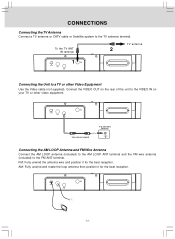
...the rear of the unit to a TV or other video equipment. AM: Fully unwind and rotate the loop antenna then position it for the best reception. - 12 - To the TV ANT IN terminal TV antenna 2 1 Connecting the Unit to the VIDEO IN on your TV or other Video Equipment Use the Video... cable (not supplied). TV or other Video Equipment (yellow) Video cable (not supplied) VIDEO IN...
...the rear of the unit to a TV or other video equipment. AM: Fully unwind and rotate the loop antenna then position it for the best reception. - 12 - To the TV ANT IN terminal TV antenna 2 1 Connecting the Unit to the VIDEO IN on your TV or other Video Equipment Use the Video... cable (not supplied). TV or other Video Equipment (yellow) Video cable (not supplied) VIDEO IN...


