Operation Manual
Page 2
... ...2 Setup ...5 Identification of Controls...8 Connections...12 Basic Operations ...18 Memorizing the Channels...20 Channel Selection ...22 Setting Picture ...23 Setting Picture/Adjusting Image ...24 Setting Sound ...25 System Setup...27 Clock and Timer Setup...28 Viewing Closed Captions ...29 Setting Parental Control ...30 PIP/PBP/POP Operations ...34 Electronic Program Guide ...36 Image Adjust for PC/Component Mode 37 Image Adjust for HDMI Mode ...38 Troubleshooting ...39 Care and Maintenance...40 Specifications ...41 Assemble the Speaker ...42 Programming the Universal Remote Control 43
... ...2 Setup ...5 Identification of Controls...8 Connections...12 Basic Operations ...18 Memorizing the Channels...20 Channel Selection ...22 Setting Picture ...23 Setting Picture/Adjusting Image ...24 Setting Sound ...25 System Setup...27 Clock and Timer Setup...28 Viewing Closed Captions ...29 Setting Parental Control ...30 PIP/PBP/POP Operations ...34 Electronic Program Guide ...36 Image Adjust for PC/Component Mode 37 Image Adjust for HDMI Mode ...38 Troubleshooting ...39 Care and Maintenance...40 Specifications ...41 Assemble the Speaker ...42 Programming the Universal Remote Control 43
Operation Manual
Page 3
....eia.org FCC STATEMENT FCC Notice LCD TV: A CLASS B digital device This equipment has been tested and found to comply with the instruction manual, may be of sufficient magnitude to counter interference. 1 This equipment generates, uses, and can radiate radio frequency energy and, if not installed and used in which case the user will be required to take adequate...
....eia.org FCC STATEMENT FCC Notice LCD TV: A CLASS B digital device This equipment has been tested and found to comply with the instruction manual, may be of sufficient magnitude to counter interference. 1 This equipment generates, uses, and can radiate radio frequency energy and, if not installed and used in which case the user will be required to take adequate...

Operation Manual
Page 5
... product does not operate properly as power-supply cord or plug is spilled on the product. 19.Damage requiring service---If any way. When the product displays an abnormal condition or exhibits a distinct change in the operating instructions. Placing the product on a wall or ceiling, be sure to the product. e. Replacement parts---In case the product needs replacement parts, make sure that the product needs servicing. 20.Safety...
... product does not operate properly as power-supply cord or plug is spilled on the product. 19.Damage requiring service---If any way. When the product displays an abnormal condition or exhibits a distinct change in the operating instructions. Placing the product on a wall or ceiling, be sure to the product. e. Replacement parts---In case the product needs replacement parts, make sure that the product needs servicing. 20.Safety...
Operation Manual
Page 7
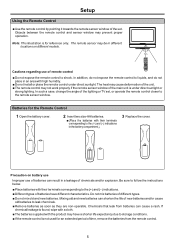
Setup Using the Remote Control
Setup Using the Remote Control

Operation Manual
Page 9
... terrestrial TV programs only, connect the antenna to Cable TV System Notes: ! When you in the CHANNEL SETUP menu and then perform auto channel search.(See section) VHF antenna UHF antenna RS-232 TV Side Mixer 75 Ohm coaxial cable 75 Ohm coaxial cable Connect to the AIR input on the TV rear. ! Your local television service centre or dealer may require the correct connection cable and plug between the wall antenna socket and your television receiver. ! Setup ! Select the TV Source...
... terrestrial TV programs only, connect the antenna to Cable TV System Notes: ! When you in the CHANNEL SETUP menu and then perform auto channel search.(See section) VHF antenna UHF antenna RS-232 TV Side Mixer 75 Ohm coaxial cable 75 Ohm coaxial cable Connect to the AIR input on the TV rear. ! Your local television service centre or dealer may require the correct connection cable and plug between the wall antenna socket and your television receiver. ! Setup ! Select the TV Source...

Operation Manual
Page 11
... (optical) 9. AV inputs 1/2 Receive video/audio signals from external sources such as VCR or DVD player. 6. The user can not operate the unit through the USB port. 10.RS-232 control interface For service only. USB port For software update only. HDMI 2 HDMI 1 DVI 2 IN DVI 1 IN AUDIO AUDIO S-VIDEO L R for software update only RS-232 Identification of a DVD player or Set-top box. 5. Component inputs 1/2 Connect to record programs. 7. AV output Connect to the VCR input jacks to the audio and component output jacks of Controls (continued) Main unit (rear view) 1 2 3 Remove the...
... (optical) 9. AV inputs 1/2 Receive video/audio signals from external sources such as VCR or DVD player. 6. The user can not operate the unit through the USB port. 10.RS-232 control interface For service only. USB port For software update only. HDMI 2 HDMI 1 DVI 2 IN DVI 1 IN AUDIO AUDIO S-VIDEO L R for software update only RS-232 Identification of a DVD player or Set-top box. 5. Component inputs 1/2 Connect to record programs. 7. AV output Connect to the VCR input jacks to the audio and component output jacks of Controls (continued) Main unit (rear view) 1 2 3 Remove the...

Operation Manual
Page 12
... settings of Controls 1. POWER Turn the unit on -screen Electronic Program Guide(EPG) 10 If your remote control does not work 2 correctly when you operate the unit, please try to adjust volume. 14 13 9. INPUT 7 8 To quickly select input source 6. VOL+/- 12 Used to press TV button. 3. Direct channel selector/number buttons 3 Use these number buttons to enter a program number for multiple program 5 4 channels such as 2-1,2-2, etc. 6 5. CH+/- Remote Control Identification of the selected menu item. 13.EXIT Used to exit the menu 14.GUIDE To display...
... settings of Controls 1. POWER Turn the unit on -screen Electronic Program Guide(EPG) 10 If your remote control does not work 2 correctly when you operate the unit, please try to adjust volume. 14 13 9. INPUT 7 8 To quickly select input source 6. VOL+/- 12 Used to press TV button. 3. Direct channel selector/number buttons 3 Use these number buttons to enter a program number for multiple program 5 4 channels such as 2-1,2-2, etc. 6 5. CH+/- Remote Control Identification of the selected menu item. 13.EXIT Used to exit the menu 14.GUIDE To display...
Operation Manual
Page 14
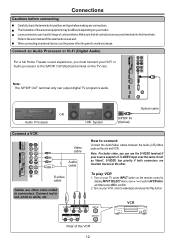
.... 2. Turn on your TV, press INPUT button on the TV rear. S-VIDEO AV OUT R AUDIO L VIDEO ANT IN VCR AV IN R AUDIO L VIDEO ANT OUT Rear of the external device as Video1. Connections Cautions before connecting Carefully check the terminals for software update only RS-232 OR Audio Processor HIFi System S/PDIF IN (Optical) Optical cable Connect a VCR or Video cable Audio cable How to connect: Connect the Audio/Video cables between the Audio (L/R)/Video jacks on your source supports it. Loose connectors can output digital TV program's audio. Use one...
.... 2. Turn on your TV, press INPUT button on the TV rear. S-VIDEO AV OUT R AUDIO L VIDEO ANT IN VCR AV IN R AUDIO L VIDEO ANT OUT Rear of the external device as Video1. Connections Cautions before connecting Carefully check the terminals for software update only RS-232 OR Audio Processor HIFi System S/PDIF IN (Optical) Optical cable Connect a VCR or Video cable Audio cable How to connect: Connect the Audio/Video cables between the Audio (L/R)/Video jacks on your source supports it. Loose connectors can output digital TV program's audio. Use one...
Operation Manual
Page 15
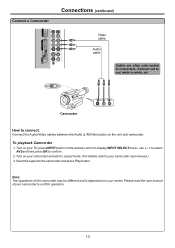
... model. Connect red to red, white to confirm operation. 13 Please read the user manual of the camcorder may be different and is dependant on the unit and camcorder. To playback Camcorder 1. Turn on your TV, press INPUT button on your camcorder and set it to output mode. (For details, refer to connect: Connect the Audio/Video cables between the Audio (L/R)/Video jacks on your camcorder to white, etc. Turn on the remote control to display INPUT SELECT menu, use...
... model. Connect red to red, white to confirm operation. 13 Please read the user manual of the camcorder may be different and is dependant on the unit and camcorder. To playback Camcorder 1. Turn on your TV, press INPUT button on your camcorder and set it to output mode. (For details, refer to connect: Connect the Audio/Video cables between the Audio (L/R)/Video jacks on your camcorder to white, etc. Turn on the remote control to display INPUT SELECT menu, use...

Operation Manual
Page 18
... the VGA input interface on the unit. Connect a PC HDMI 2 HDMI 1 DVI 2 IN DVI 1 IN Connections (continued) Audio cable (stereo mini plug) AUDIO AUDIO VGA cable (analog RGB) To monitor port (15-pin D-Sub) To audio output jack How to connect: Connect a VGA cable between the AUDIO output on the PC and AUDIO input jack on the unit. To Watch the PC screen 1. S-VIDEO Headphone L R for PC system requirements. 3. Turn on the remote control to display INPUT SELECT menu, use a suitable plug adaptor...
... the VGA input interface on the unit. Connect a PC HDMI 2 HDMI 1 DVI 2 IN DVI 1 IN Connections (continued) Audio cable (stereo mini plug) AUDIO AUDIO VGA cable (analog RGB) To monitor port (15-pin D-Sub) To audio output jack How to connect: Connect a VGA cable between the AUDIO output on the PC and AUDIO input jack on the unit. To Watch the PC screen 1. S-VIDEO Headphone L R for PC system requirements. 3. Turn on the remote control to display INPUT SELECT menu, use a suitable plug adaptor...
Operation Manual
Page 19
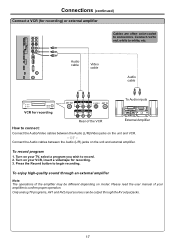
... AV output jacks. 17 To record program 1. Turn on your VCR, insert a videotape for recording) or external amplifier Cables are often color-coded to connect: Connect the Audio/Video cables between the Audio (L/R) jacks on your TV, select a program you wish to confirm proper operation. Connections (continued) Connect a VCR (for recording. 3. Connect red to red, white to begin recording. or - S-VIDEO L R for software update only RS-232 Audio cable Video cable Audio cable AV OUT ANT OUT S-VIDEO ANT IN R AUDIO L VIDEO To Audio inputs VCR...
... AV output jacks. 17 To record program 1. Turn on your VCR, insert a videotape for recording) or external amplifier Cables are often color-coded to connect: Connect the Audio/Video cables between the Audio (L/R) jacks on your TV, select a program you wish to confirm proper operation. Connections (continued) Connect a VCR (for recording. 3. Connect red to red, white to begin recording. or - S-VIDEO L R for software update only RS-232 Audio cable Video cable Audio cable AV OUT ANT OUT S-VIDEO ANT IN R AUDIO L VIDEO To Audio inputs VCR...
Operation Manual
Page 20
... volume Treble Bass Balance Focus window out* AVC Language Screen Saver Transparency OSD Time Out Clock Setup Source Name Edit Closed Caption Setup TV Source Current Channel Channel Label Channel Skip Favorite Channel Auto Search Input Select Signal Strength Content Password Set Password Password Confirm Parental Control Movie Block Canadian English Canadian French TV Blocking Note: r The above main menu is no H position and V position item in TV mode. Note: lTo clearly introduce the menu operations , this operation manual provides a description based...
... volume Treble Bass Balance Focus window out* AVC Language Screen Saver Transparency OSD Time Out Clock Setup Source Name Edit Closed Caption Setup TV Source Current Channel Channel Label Channel Skip Favorite Channel Auto Search Input Select Signal Strength Content Password Set Password Password Confirm Parental Control Movie Block Canadian English Canadian French TV Blocking Note: r The above main menu is no H position and V position item in TV mode. Note: lTo clearly introduce the menu operations , this operation manual provides a description based...

Operation Manual
Page 21
... clear the screen. Close Caption Setup > > > 3 Press EXIT button to return to enter. Selecting Input Source Signal 1 Press the INPUT button to display INPUT SELECT menu. 2 Press 6or 5 to select your desired input source, press OK to confirm. 3 Press INPUT button to "System Setup" section). Component1------Select signal from HDMI2 input interface. HDMI2-------Select signal from COMPONENT INPUT1 terminals. Channel number and name. - Resolution. - Current program start and end play times. First select your desired language. INPUT SELECT TV AV1...
... clear the screen. Close Caption Setup > > > 3 Press EXIT button to return to enter. Selecting Input Source Signal 1 Press the INPUT button to display INPUT SELECT menu. 2 Press 6or 5 to select your desired input source, press OK to confirm. 3 Press INPUT button to "System Setup" section). Component1------Select signal from HDMI2 input interface. HDMI2-------Select signal from COMPONENT INPUT1 terminals. Channel number and name. - Resolution. - Current program start and end play times. First select your desired language. INPUT SELECT TV AV1...

Operation Manual
Page 22
Note: Be sure to select the TV input (refer to section on for the first time after purchase, the initial auto channel search is connected to the unit. (i.e., an antenna or cable system) 1 In full screen mode, press MENU to display the main menu. 2 Press 4or3 to display CHANNEL SETUP menu page, press 6 to enter. 3 Press 6or 5 to select TV Source item, press 3or4 to exit. Channel Scan Source STD HRC IRC Note...
Note: Be sure to select the TV input (refer to section on for the first time after purchase, the initial auto channel search is connected to the unit. (i.e., an antenna or cable system) 1 In full screen mode, press MENU to display the main menu. 2 Press 4or3 to display CHANNEL SETUP menu page, press 6 to enter. 3 Press 6or 5 to select TV Source item, press 3or4 to exit. Channel Scan Source STD HRC IRC Note...

Operation Manual
Page 27
... pressing OK button and a green border will be mute. If "Both" is selected, then both speakers and headphone output focus window sound(as focus window by raising the sound output when the modulation signal is changed. You may be set this menu item will appear on if either window's program is default focus window. to TV viewing. volume Treble Adjusts Treble (high sounds). Bass Adjusts Bass (low sounds) 4: stronger 3: weaker...
... pressing OK button and a green border will be mute. If "Both" is selected, then both speakers and headphone output focus window sound(as focus window by raising the sound output when the modulation signal is changed. You may be set this menu item will appear on if either window's program is default focus window. to TV viewing. volume Treble Adjusts Treble (high sounds). Bass Adjusts Bass (low sounds) 4: stronger 3: weaker...

Operation Manual
Page 28
... illustration. Setting Sound Sound Mode Selection You can select the sound quality instantly among three preset modes and one . - Press the AUDIO button repeatedly to confirm. USER: The sound quality you are having difficulty receiving a stereo signal. 1 When viewing analog channel, press the MTS/SAP button to call up the AUDIO MODE menu. 2 Press 5or6to select your desired audio mode option, then press OK to select the desired sound quality. The digital-TV transmission...
... illustration. Setting Sound Sound Mode Selection You can select the sound quality instantly among three preset modes and one . - Press the AUDIO button repeatedly to confirm. USER: The sound quality you are having difficulty receiving a stereo signal. 1 When viewing analog channel, press the MTS/SAP button to call up the AUDIO MODE menu. 2 Press 5or6to select your desired audio mode option, then press OK to select the desired sound quality. The digital-TV transmission...
Operation Manual
Page 29
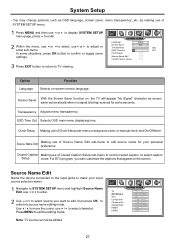
... menu, use 3or4 to display SYSTEM SETUP menu page, press 6 to exit the editing mode. Clock Setup Making use of SYSTEM SETUP menu. 1 Press MENU and then use 6or 5to select, use3or4 to setup auto clock, or manual clock, and On/Off timer. System Setup - You may change systems such as screen Screen Saver saver automatically when no signal is being received for some situations, press OK button to edit source name for your input source...
... menu, use 3or4 to display SYSTEM SETUP menu page, press 6 to exit the editing mode. Clock Setup Making use of SYSTEM SETUP menu. 1 Press MENU and then use 6or 5to select, use3or4 to setup auto clock, or manual clock, and On/Off timer. System Setup - You may change systems such as screen Screen Saver saver automatically when no signal is being received for some situations, press OK button to edit source name for your input source...
Operation Manual
Page 30
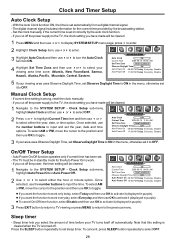
... Disable 3 If your TV turns itself off automatically. Auto Power On/Off function operates only if current time has been set sleep timer. l If you want the function to work everyday, select Everyday and then use 3or4 to select your viewing area uses Observe Daylight Time, set Observe Daylight Time to ON in the menu, otherwise set it (displayed in the menu, otherwise set it , press SLEEP button repeatedly to OFF. Clock and Timer Setup Auto Clock Setup...
... Disable 3 If your TV turns itself off automatically. Auto Power On/Off function operates only if current time has been set sleep timer. l If you want the function to work everyday, select Everyday and then use 3or4 to select your viewing area uses Observe Daylight Time, set Observe Daylight Time to ON in the menu, otherwise set it (displayed in the menu, otherwise set it , press SLEEP button repeatedly to OFF. Clock and Timer Setup Auto Clock Setup...
Operation Manual
Page 41
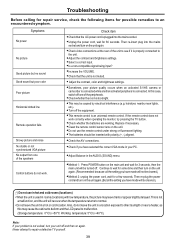
... a hot or cold location. Never attempt to the unit. =Adjust the contrast and brightness settings. =Select a correct input. =Is a non-compatible signal being input? =Increase the VOLUME. =Check that the AC power cord is plugged into the mains socket and turn on the unit again. =Check video connections at the rear of the unit to see if it is properly connected to repair a defective TV yourself. 39 Then...
... a hot or cold location. Never attempt to the unit. =Adjust the contrast and brightness settings. =Select a correct input. =Is a non-compatible signal being input? =Increase the VOLUME. =Check that the AC power cord is plugged into the mains socket and turn on the unit again. =Check video connections at the rear of the unit to see if it is properly connected to repair a defective TV yourself. 39 Then...

Operation Manual
Page 45
... digit. 6. Checking the Codes If you have set to save and exit. To view the code for future reference. After installing batteries, you can program the remote to control your device. Press a device key (VCR/DVD, CBL/ SAT, or AUX). 3. Press set up the remote using 2 for the second digit, 3 for the third digit, 4 for the fourth digit, and 5 for Your Code". 6. Press and hold SET until the red LED blinks...
... digit. 6. Checking the Codes If you have set to save and exit. To view the code for future reference. After installing batteries, you can program the remote to control your device. Press a device key (VCR/DVD, CBL/ SAT, or AUX). 3. Press set up the remote using 2 for the second digit, 3 for the third digit, 4 for the fourth digit, and 5 for Your Code". 6. Press and hold SET until the red LED blinks...


