Operation Manual
Page 2
... all instructions. 5) Do not use attachments/accessories specified by the manufacturer. 12) Use only with the cart, stand, tripod, bracket, or table specified by the manufacturer could cause harmful interference and would void the user's authority to persons. These limits are provided for your outlet, consult an electrician for replacement of the obsolete outlet. 10) Protect the power cord from...
... all instructions. 5) Do not use attachments/accessories specified by the manufacturer. 12) Use only with the cart, stand, tripod, bracket, or table specified by the manufacturer could cause harmful interference and would void the user's authority to persons. These limits are provided for your outlet, consult an electrician for replacement of the obsolete outlet. 10) Protect the power cord from...
Operation Manual
Page 3
... not pull the AC power cord. = Keep the AC power cord away from overheating, these instructions completely, and keep this unit. Unless proper ventilation is operating, unplug the TV and consult your dealer or local power company. Heat sources Do not install near any heat sources such as a precaution against injury, the following : = Do not install the unit turned backward or sideways. = Do...
... not pull the AC power cord. = Keep the AC power cord away from overheating, these instructions completely, and keep this unit. Unless proper ventilation is operating, unplug the TV and consult your dealer or local power company. Heat sources Do not install near any heat sources such as a precaution against injury, the following : = Do not install the unit turned backward or sideways. = Do...

Operation Manual
Page 4
... Section 810-21) Ground clamps Power service grounding electrode system (NEC Art 250 Part H) 3 Wall or ceiling mounting When mounting the product on a wall or ceiling, be placed on the screen as a fixed point of the Canadian Electrical Code in USA and Section 54 of blue, green or red. Pixel defect The panel is damaged. WHEN INSTALLING AN OUTDOOR ANTENNA SYSTEM, EXTREME CARE SHOULD BE...
... Section 810-21) Ground clamps Power service grounding electrode system (NEC Art 250 Part H) 3 Wall or ceiling mounting When mounting the product on a wall or ceiling, be placed on the screen as a fixed point of the Canadian Electrical Code in USA and Section 54 of blue, green or red. Pixel defect The panel is damaged. WHEN INSTALLING AN OUTDOOR ANTENNA SYSTEM, EXTREME CARE SHOULD BE...
Operation Manual
Page 5
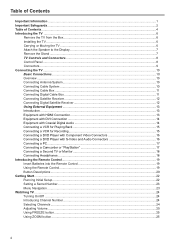
... Connecting a DVD Player with Component Video Connectors 16 Connecting a DVD Player with S-Video and Audio Connectors 16 Connecting a PC...17 Connecting a Camcorder or "PlayStation 17 Connecting a Second TV or Monitor 18 Connecting Headphones ...18 Introducing the Remote Control...19 Insert Batteries into the Remote Control 19 Using the Remote Control...19 Button Descriptions...20 Getting Start ...22 Running Initial Setup...22 Setting a Secret Number...23 Menu Navigation ...23 Watching TV ...24 Turning On/Off ...24 Introducing Channel Number ...24 Selecting Channels ...24 Adjusting Volume...
... Connecting a DVD Player with Component Video Connectors 16 Connecting a DVD Player with S-Video and Audio Connectors 16 Connecting a PC...17 Connecting a Camcorder or "PlayStation 17 Connecting a Second TV or Monitor 18 Connecting Headphones ...18 Introducing the Remote Control...19 Insert Batteries into the Remote Control 19 Using the Remote Control...19 Button Descriptions...20 Getting Start ...22 Running Initial Setup...22 Setting a Secret Number...23 Menu Navigation ...23 Watching TV ...24 Turning On/Off ...24 Introducing Channel Number ...24 Selecting Channels ...24 Adjusting Volume...

Operation Manual
Page 6
...the Program Guide...32 Accessing Program Guide ...32 Using the Program Guide ...32 Setting System ...33 Accessing Settings Menu...33 Setting Date & Time ...33 Setting Timer...33 Input Select ...34 Setting Caption Vision...34 Using the CCD button ...34 Setting Menu & Display...34 Editing Input Labels ...35 Setting Screen Saver ...35 Running Reset System ...35 Parental Lock Control...36 Accessing Locks Menu ...36 Selecting Locks Options ...36 Viewing Locked or Blocked Programs 37 Other Information ...38 Troubleshooting ...38 Care and Maintenance...40 Specifications ...41 Programming your Remote...
...the Program Guide...32 Accessing Program Guide ...32 Using the Program Guide ...32 Setting System ...33 Accessing Settings Menu...33 Setting Date & Time ...33 Setting Timer...33 Input Select ...34 Setting Caption Vision...34 Using the CCD button ...34 Setting Menu & Display...34 Editing Input Labels ...35 Setting Screen Saver ...35 Running Reset System ...35 Parental Lock Control...36 Accessing Locks Menu ...36 Selecting Locks Options ...36 Viewing Locked or Blocked Programs 37 Other Information ...38 Troubleshooting ...38 Care and Maintenance...40 Specifications ...41 Programming your Remote...
Operation Manual
Page 8
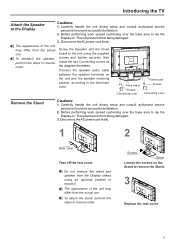
... the TV Attach the Speaker to the terminals' color. This will prevent it from being damaged. 3. Connect the speaker audio cable between the speaker terminals on the Stand to lay the Display on . Before performing work spread cushioning over the base area to mount it from the Display unless using the supplied screws and tighten securely, then install the two Connecting covers as the diagram illustrates. Do not remove the stand and speaker...
... the TV Attach the Speaker to the terminals' color. This will prevent it from being damaged. 3. Connect the speaker audio cable between the speaker terminals on the Stand to lay the Display on . Before performing work spread cushioning over the base area to mount it from the Display unless using the supplied screws and tighten securely, then install the two Connecting covers as the diagram illustrates. Do not remove the stand and speaker...
Operation Manual
Page 10
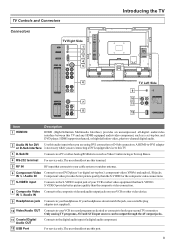
... picture quality than the S-VIDEO or the composite video connections. 7 S-VIDEO input Connects to the S-VIDEO output jack of a digital audio component. 12 USB Port For service only. The user should not use a suitable plug adaptor (not supplied). 10 Video/Audio OUT Connects to record programs as Video Conferencing or Set-top Boxes. 4 RS-232 terminal For service only. The user should not use this TV and any HDMI-equipped audio/video component, such as a set -top box's component video (YPbPr) and audio (L/R) jacks. Only analog TV programs, AV1and AV2 input sources can be output...
... picture quality than the S-VIDEO or the composite video connections. 7 S-VIDEO input Connects to the S-VIDEO output jack of a digital audio component. 12 USB Port For service only. The user should not use a suitable plug adaptor (not supplied). 10 Video/Audio OUT Connects to record programs as Video Conferencing or Set-top Boxes. 4 RS-232 terminal For service only. The user should not use this TV and any HDMI-equipped audio/video component, such as a set -top box's component video (YPbPr) and audio (L/R) jacks. Only analog TV programs, AV1and AV2 input sources can be output...
Operation Manual
Page 12
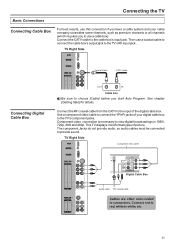
.... This TV displays most format types of the digital cable box. Connecting the TV Basic Connections Connecting Cable Box For best results, use this connection if you have a cable system and your digital cable box to the cable box's input jack. Connect the CATV cable to the TV's component jacks. Use a component video cable to connect the YPbPr jacks of your cable company scrambles some channels, such as premium channels or all channels (which requires you start Auto Program. TV Right Side HDMI INPUT D-Sub/DVI AUDIO INPUT Component video cable D-Sub INPUT (PC/DTV INPUT) RS...
.... This TV displays most format types of the digital cable box. Connecting the TV Basic Connections Connecting Cable Box For best results, use this connection if you have a cable system and your digital cable box to the cable box's input jack. Connect the CATV cable to the TV's component jacks. Use a component video cable to connect the YPbPr jacks of your cable company scrambles some channels, such as premium channels or all channels (which requires you start Auto Program. TV Right Side HDMI INPUT D-Sub/DVI AUDIO INPUT Component video cable D-Sub INPUT (PC/DTV INPUT) RS...
Operation Manual
Page 16
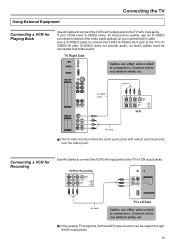
... red to red, white to white, etc. Connecting a VCR for Recording S-VIDEO VCR(OUTPUT) VIDEO R COAXIAL L DIGITAL AUDIO OUT USB(UPGRADE PORT) AV cable TV Left Side Cables are often color-coded to connectors. VIDEO AV VIDEO VIDEO L L R R 2 1 S-VIDEO cable AV cable S-VIDEO VCR The S-video terminal share the same audio jacks with video2 and has priority over the video2 jack. Only analog TV programs, AV1and AV2 input sources can be connected to provide sound. If your combined A/V cable. Connecting the TV Using External Equipment Connecting a VCR for best picture...
... red to red, white to white, etc. Connecting a VCR for Recording S-VIDEO VCR(OUTPUT) VIDEO R COAXIAL L DIGITAL AUDIO OUT USB(UPGRADE PORT) AV cable TV Left Side Cables are often color-coded to connectors. VIDEO AV VIDEO VIDEO L L R R 2 1 S-VIDEO cable AV cable S-VIDEO VCR The S-video terminal share the same audio jacks with video2 and has priority over the video2 jack. Only analog TV programs, AV1and AV2 input sources can be connected to provide sound. If your combined A/V cable. Connecting the TV Using External Equipment Connecting a VCR for best picture...
Operation Manual
Page 19
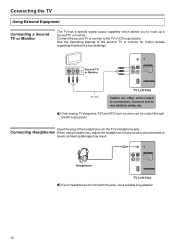
... Monitor VCR(OUTPUT) VIDEO R COAXIAL L DIGITAL AUDIO OUT USB(UPGRADE PORT) AV cable TV Left Side Cables are often color-coded to white, etc. Connect red to red, white to connectors. Insert the plug of the second TV or monitor for further details regarding that device's input settings. Connecting Headphones When using headphones, adjust the headphone volume so as to the TV's VCR output jacks. Connect the second TV or monitor to avoid excessive levels, as hearing damage may result. See the Operating Manual...
... Monitor VCR(OUTPUT) VIDEO R COAXIAL L DIGITAL AUDIO OUT USB(UPGRADE PORT) AV cable TV Left Side Cables are often color-coded to white, etc. Connect red to red, white to connectors. Insert the plug of the second TV or monitor for further details regarding that device's input settings. Connecting Headphones When using headphones, adjust the headphone volume so as to the TV's VCR output jacks. Connect the second TV or monitor to avoid excessive levels, as hearing damage may result. See the Operating Manual...
Operation Manual
Page 21
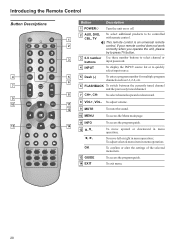
... not work correctly when you operate the unit, please try to press TV button. 3 3 0-9 number Use these number buttons to select channel or buttons input password. 4 INPUT To display the INPUT source list or to be controlled 1 CBL, TV with remote control. Introducing the Remote Control Button Descriptions 4 7 9 10 13 MTS/SAP ZOOM CCD SLEEP LIST FAVORITE AUDIO PICTURE PIP P.POSITION SWAP FREEZE Button Description 1 POWER Turn the unit on or off. 2 AUX, DVD, To select additional products to quickly select input source. 5 5 Dash (-) To enter a program number...
... not work correctly when you operate the unit, please try to press TV button. 3 3 0-9 number Use these number buttons to select channel or buttons input password. 4 INPUT To display the INPUT source list or to be controlled 1 CBL, TV with remote control. Introducing the Remote Control Button Descriptions 4 7 9 10 13 MTS/SAP ZOOM CCD SLEEP LIST FAVORITE AUDIO PICTURE PIP P.POSITION SWAP FREEZE Button Description 1 POWER Turn the unit on or off. 2 AUX, DVD, To select additional products to quickly select input source. 5 5 Dash (-) To enter a program number...
Operation Manual
Page 22
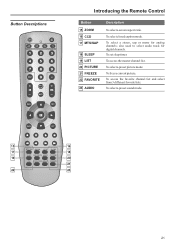
... lists. To freeze current picture. also used to select audio track for analog channels; Button Descriptions Introducing the Remote Control Button 15 ZOOM 16 CCD 17 MTS/SAP 18 SLEEP 19 LIST 20 PICTURE 21 FREEZE 22 FAVORITE 23 AUDIO Description To select a screen aspect ratio. To set sleep timer. To select a preset picture mode. To access the master channel list. To select closed caption mode. To select a stereo, sap or mono for digital channels. To select a preset sound mode...
... lists. To freeze current picture. also used to select audio track for analog channels; Button Descriptions Introducing the Remote Control Button 15 ZOOM 16 CCD 17 MTS/SAP 18 SLEEP 19 LIST 20 PICTURE 21 FREEZE 22 FAVORITE 23 AUDIO Description To select a screen aspect ratio. To set sleep timer. To select a preset picture mode. To access the master channel list. To select closed caption mode. To select a stereo, sap or mono for digital channels. To select a preset sound mode...
Operation Manual
Page 23
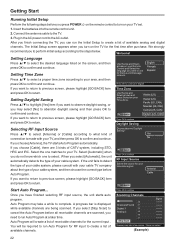
... the type of available analog and digital channels. If the unit fails to create a list of your cable system, please consult with your television signal. If you select [Stop Scan] to cancel the Auto Program before all receivable channels are scanned, you to perform initial setup according to use for menus and message screens. Select [Automatic] when you do not know which one matches to your Remote Control and...
... the type of available analog and digital channels. If the unit fails to create a list of your cable system, please consult with your television signal. If you select [Stop Scan] to cancel the Auto Program before all receivable channels are scanned, you to perform initial setup according to use for menus and message screens. Select [Automatic] when you do not know which one matches to your Remote Control and...

Operation Manual
Page 24
... [Locks]........... The secret number is set successfully, the TV requests you to enter secret number if you are going to: = Access to the [Locks] menu. = Scan channels automatically. = Find channel manually. = View a blocked program. = Reset all settings to defaults by entering it in the sub-menu. 4. You may use 0-9 number buttons to adjust the selected items or move the on-screen cursor in a familiar place. Locks Guide HDMI Conversion OFF RESET PICTURE Press to enter a new four-digit secret number...
... [Locks]........... The secret number is set successfully, the TV requests you to enter secret number if you are going to: = Access to the [Locks] menu. = Scan channels automatically. = Find channel manually. = View a blocked program. = Reset all settings to defaults by entering it in the sub-menu. 4. You may use 0-9 number buttons to adjust the selected items or move the on-screen cursor in a familiar place. Locks Guide HDMI Conversion OFF RESET PICTURE Press to enter a new four-digit secret number...
Operation Manual
Page 31
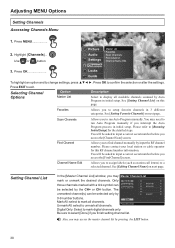
... asked to run Auto Program manually if you access the [Find Channel] screen. Unmark All: select to exit. Scan Channels Find Channel Channel Name Edit Allows you to input a correct secret number before you access the [Channel Scan] screen. Only those channels marked with a tick symbol can be selected by Mark All Unmark All Digital Only 2.0 2.1 KFOX-HD 2.2 KFOX-SD 3.0 4.0 4.1 KGO-DT 0-9 number buttons. Adjusting MENU Options Setting Channels Accessing Channels Menu 1. See [Editing Channel Name] on next...
... asked to run Auto Program manually if you access the [Find Channel] screen. Unmark All: select to exit. Scan Channels Find Channel Channel Name Edit Allows you to input a correct secret number before you access the [Channel Scan] screen. Only those channels marked with a tick symbol can be selected by Mark All Unmark All Digital Only 2.0 2.1 KFOX-HD 2.2 KFOX-SD 3.0 4.0 4.1 KGO-DT 0-9 number buttons. Adjusting MENU Options Setting Channels Accessing Channels Menu 1. See [Editing Channel Name] on next...
Operation Manual
Page 35
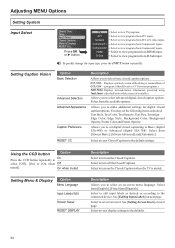
... view programs from AV1 inputs. To quickly change the input type, press the INPUT button repeatedly. Select from [English], [French] and [Spanish]. Description Allows you to turn on the Closed Captions when the TV is muted. Select from the available options. Select to reset display settings to the default settings. Adjusting MENU Options Setting System Input Select Date & Time Timer Input Select Closed Captions Menu & Displays RESET ALL Press OK or ► button. On when muted Setting Menu & Display Option Menu Language Input Labels Edit Screen Saver RESET DISPLAY...
... view programs from AV1 inputs. To quickly change the input type, press the INPUT button repeatedly. Select from [English], [French] and [Spanish]. Description Allows you to turn on the Closed Captions when the TV is muted. Select from the available options. Select to reset display settings to the default settings. Adjusting MENU Options Setting System Input Select Date & Time Timer Input Select Closed Captions Menu & Displays RESET ALL Press OK or ► button. On when muted Setting Menu & Display Option Menu Language Input Labels Edit Screen Saver RESET DISPLAY...
Operation Manual
Page 39
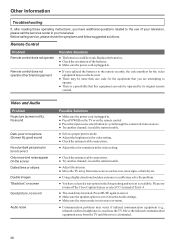
... "Black box" on the remote control. ● Press the input source select button to cycle through the connected video sources. ● Try another channel; Press MUTE again to cancel. ● Make sure the speaker option is set to On in . ● Press POWER on the TV or on screen Good picture, no sound Audio noise Possible Solutions ● Make sure the power cord is plugged in theAudio settings. ● Make sure the stereo mode...
... "Black box" on the remote control. ● Press the input source select button to cycle through the connected video sources. ● Try another channel; Press MUTE again to cancel. ● Make sure the speaker option is set to On in . ● Press POWER on the TV or on screen Good picture, no sound Audio noise Possible Solutions ● Make sure the power cord is plugged in theAudio settings. ● Make sure the stereo mode...
Operation Manual
Page 40
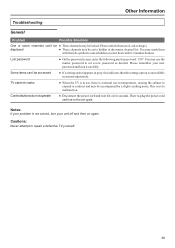
... channel list. You may mark them with 0-9 number buttons. Control buttons do not operate ● Disconnect the power cord and wait for a few seconds. Please unlock them with the tick symbol to set to repair a defective TV yourself. 39 Some items can 't be ● These channels may be accessed ● If a setting option appears in gray, this indicates that the settings option is unavailable in use the master password...
... channel list. You may mark them with 0-9 number buttons. Control buttons do not operate ● Disconnect the power cord and wait for a few seconds. Please unlock them with the tick symbol to set to repair a defective TV yourself. 39 Some items can 't be ● These channels may be accessed ● If a setting option appears in gray, this indicates that the settings option is unavailable in use the master password...
Operation Manual
Page 42
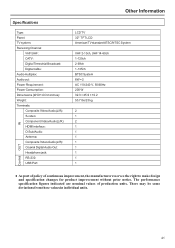
... in inches): Weight: Terminals: Composite Video/Audio(L/R): S-video: Component Video/Audio(L/R): HDMI interface: D-Sub/Audio: Antenna: Composite Video/Audio(L/R): Coaxial Digital Audio Out: Headphone jack: RS-232: USB Port: Other Information LCD TV 32" TFT LCD American TV standard ATSC/NTSC System VHF 2-13ch, UHF 14-69ch 1-125ch 2-69ch 1-135ch BTSC System 8W × 2 AC 110-240 V, 50/60Hz 200 W 32.3 × 25.9 × 10.2 50.7 lbs/23 kg 2 1 2 1 1 1 1 1 1 1 1 Control OUT ● As part of...
... in inches): Weight: Terminals: Composite Video/Audio(L/R): S-video: Component Video/Audio(L/R): HDMI interface: D-Sub/Audio: Antenna: Composite Video/Audio(L/R): Coaxial Digital Audio Out: Headphone jack: RS-232: USB Port: Other Information LCD TV 32" TFT LCD American TV standard ATSC/NTSC System VHF 2-13ch, UHF 14-69ch 1-125ch 2-69ch 1-135ch BTSC System 8W × 2 AC 110-240 V, 50/60Hz 200 W 32.3 × 25.9 × 10.2 50.7 lbs/23 kg 2 1 2 1 1 1 1 1 1 1 1 Control OUT ● As part of...
Operation Manual
Page 43
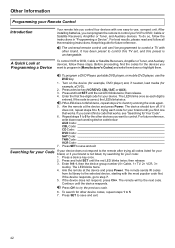
... LED blinks once as each working device code below: AUX Code: CBL Code: CD Code: DVD Code: SAT Code: TNR Code: VCR Code: 7. Aim the remote at the device and press Power. For future reference, write down or highlight them down each digit is not listed, try the next code. To control VCR or DVD, Cable or Satellite Receivers, Amplifier or Tuner, and Auxiliary devices, follow these steps. Press and hold SET until...
... LED blinks once as each working device code below: AUX Code: CBL Code: CD Code: DVD Code: SAT Code: TNR Code: VCR Code: 7. Aim the remote at the device and press Power. For future reference, write down or highlight them down each digit is not listed, try the next code. To control VCR or DVD, Cable or Satellite Receivers, Amplifier or Tuner, and Auxiliary devices, follow these steps. Press and hold SET until...


