Operation Manual
Page 2
...near any changes or modifications to this product may be required to rain or moisture, does not operate normally, or has been dropped. 1 FCC CAUTION: Pursuant to 47CFR, Part 15.21 of the FCC rules, any heat sources such as...operating and maintenance (servicing) instructions in a commercial environment. In a domestic environment this monitor not expressly approved by the manufacturer, or sold with the cart, stand, tripod, bracket, or table specified by the manufacturer could cause harmful interference and would void the user's authority to counter interference. A grounding type plug...
...near any changes or modifications to this product may be required to rain or moisture, does not operate normally, or has been dropped. 1 FCC CAUTION: Pursuant to 47CFR, Part 15.21 of the FCC rules, any heat sources such as...operating and maintenance (servicing) instructions in a commercial environment. In a domestic environment this monitor not expressly approved by the manufacturer, or sold with the cart, stand, tripod, bracket, or table specified by the manufacturer could cause harmful interference and would void the user's authority to counter interference. A grounding type plug...
Operation Manual
Page 3
... around the unit. Do not pull the AC power cord. = Keep the AC power cord away from heat sources. = Be sure to have the outlet changed. Otherwise, adequate air-circulation may be observed in the installation, use and servicing of time, unplug it picks up moisture, its insulation may...the AC power plug and clean it and replace with a protective earthing connection. Never use a poor fitting outlet. Power Always turn the unit off . If the AC power cord is not being turned on the information label. Sound If a snapping or popping sound from the screen, wipe it in the TV are ...
... around the unit. Do not pull the AC power cord. = Keep the AC power cord away from heat sources. = Be sure to have the outlet changed. Otherwise, adequate air-circulation may be observed in the installation, use and servicing of time, unplug it picks up moisture, its insulation may...the AC power plug and clean it and replace with a protective earthing connection. Never use a poor fitting outlet. Power Always turn the unit off . If the AC power cord is not being turned on the information label. Sound If a snapping or popping sound from the screen, wipe it in the TV are ...
Operation Manual
Page 4
... the power cord from a low temperature to high temperature environment, as power-supply cord or plug is a very high technology product, giving you finely detailed pictures. Panel protection The panel used in fire, electric shock and/or other electric light or power circuits, or where it from the wall outlet and disconnect the antenna. Servicing Refer all servicing to lightning and power-line surges. Use of unauthorized parts can...
... the power cord from a low temperature to high temperature environment, as power-supply cord or plug is a very high technology product, giving you finely detailed pictures. Panel protection The panel used in fire, electric shock and/or other electric light or power circuits, or where it from the wall outlet and disconnect the antenna. Servicing Refer all servicing to lightning and power-line surges. Use of unauthorized parts can...
Operation Manual
Page 5
... Connecting a DVD Player with Component Video Connectors 16 Connecting a DVD Player with S-Video and Audio Connectors 16 Connecting a PC...17 Connecting a Camcorder or "PlayStation 17 Connecting a Second TV or Monitor 18 Connecting Headphones ...18 Introducing the Remote Control...19 Insert Batteries into the Remote Control 19 Using the Remote Control...19 Button Descriptions...20 Getting Start ...22 Running Initial Setup...22 Setting a Secret Number...23 Menu Navigation ...23 Watching TV ...24 Turning On/Off ...24 Introducing Channel Number ...24 Selecting Channels ...24 Adjusting Volume...
... Connecting a DVD Player with Component Video Connectors 16 Connecting a DVD Player with S-Video and Audio Connectors 16 Connecting a PC...17 Connecting a Camcorder or "PlayStation 17 Connecting a Second TV or Monitor 18 Connecting Headphones ...18 Introducing the Remote Control...19 Insert Batteries into the Remote Control 19 Using the Remote Control...19 Button Descriptions...20 Getting Start ...22 Running Initial Setup...22 Setting a Secret Number...23 Menu Navigation ...23 Watching TV ...24 Turning On/Off ...24 Introducing Channel Number ...24 Selecting Channels ...24 Adjusting Volume...
Operation Manual
Page 6
...the Program Guide...32 Accessing Program Guide ...32 Using the Program Guide ...32 Setting System ...33 Accessing Settings Menu...33 Setting Date & Time ...33 Setting Timer...33 Input Select ...34 Setting Caption Vision...34 Using the CCD button ...34 Setting Menu & Display...34 Editing Input Labels ...35 Setting Screen Saver ...35 Running Reset System ...35 Parental Lock Control...36 Accessing Locks Menu ...36 Selecting Locks Options ...36 Viewing Locked or Blocked Programs 37 Other Information ...38 Troubleshooting ...38 Care and Maintenance...40 Specifications ...41 Programming your Remote...
...the Program Guide...32 Accessing Program Guide ...32 Using the Program Guide ...32 Setting System ...33 Accessing Settings Menu...33 Setting Date & Time ...33 Setting Timer...33 Input Select ...34 Setting Caption Vision...34 Using the CCD button ...34 Setting Menu & Display...34 Editing Input Labels ...35 Setting Screen Saver ...35 Running Reset System ...35 Parental Lock Control...36 Accessing Locks Menu ...36 Selecting Locks Options ...36 Viewing Locked or Blocked Programs 37 Other Information ...38 Troubleshooting ...38 Care and Maintenance...40 Specifications ...41 Programming your Remote...

Operation Manual
Page 8
... during setup and consult authorized service personnel to the terminals' color. Before performing work spread cushioning over the base area to mount it from the actual one . Disconnect the AC power cord firstly. The appearance of the unit may differ from being damaged. 3. Do not remove the stand and speaker from the Display unless using the supplied screws and tighten securely, then install the two Connecting covers...
... during setup and consult authorized service personnel to the terminals' color. Before performing work spread cushioning over the base area to mount it from the actual one . Disconnect the AC power cord firstly. The appearance of the unit may differ from being damaged. 3. Do not remove the stand and speaker from the Display unless using the supplied screws and tighten securely, then install the two Connecting covers...
Operation Manual
Page 10
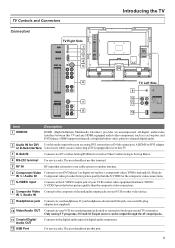
... output jacks. 11 Coaxial Digital Audio OUT Connects to your DVD player's or digital set -top box and DVD player. IN ½ /Audio IN 9 Headphones jack Connects to the digital audio input of your VCR to record programs as a set -top box's component video (YPbPr) and audio (L/R) jacks. The user should not use a suitable plug adaptor (not supplied). 10 Video/Audio OUT Connects to your VCR or other video equipment that connects to your cable system or outdoor antenna. 6 Component Video Connect to the composite video and audio output...
... output jacks. 11 Coaxial Digital Audio OUT Connects to your DVD player's or digital set -top box and DVD player. IN ½ /Audio IN 9 Headphones jack Connects to the digital audio input of your VCR to record programs as a set -top box's component video (YPbPr) and audio (L/R) jacks. The user should not use a suitable plug adaptor (not supplied). 10 Video/Audio OUT Connects to your VCR or other video equipment that connects to your cable system or outdoor antenna. 6 Component Video Connect to the composite video and audio output...
Operation Manual
Page 12
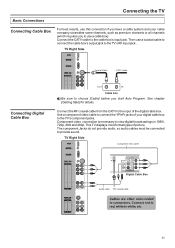
...Connect red to red, white to view digital broadcastings in 1080i, 720p, 480i and 480p. This TV displays most format types of the digital cable box. VIDEO AV VIDEO VIDEO L L R R 2 1 Cables are often color-coded to the TV's RF input jack. Connecting the TV Basic Connections Connecting Cable Box For best results, use this connection if you have a cable system and your digital cable box to the TV's component jacks. Then use a coaxial cable to connect the cable box's output jack to connectors. Connect the CATV cable to the input of picture. Connect the RF coaxial cable...
...Connect red to red, white to view digital broadcastings in 1080i, 720p, 480i and 480p. This TV displays most format types of the digital cable box. VIDEO AV VIDEO VIDEO L L R R 2 1 Cables are often color-coded to the TV's RF input jack. Connecting the TV Basic Connections Connecting Cable Box For best results, use this connection if you have a cable system and your digital cable box to the TV's component jacks. Then use a coaxial cable to connect the cable box's output jack to connectors. Connect the CATV cable to the input of picture. Connect the RF coaxial cable...
Operation Manual
Page 16
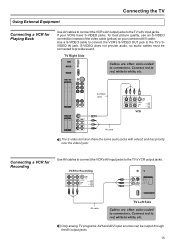
... cable. TV Right Side HDMI INPUT D-Sub/DVI AUDIO INPUT D-Sub INPUT (PC/DTV INPUT) Cables are often color-coded to connectors. Only analog TV programs, AV1and AV2 input sources can be connected to white, etc. VCR for Recording S-VIDEO VCR(OUTPUT) VIDEO R COAXIAL L DIGITAL AUDIO OUT USB(UPGRADE PORT) AV cable TV Left Side Cables are often color-coded to connectors. Connect red to red, white to the TV's AV input jacks. RS-232 RF COMPONENT Y Y Pb Pb Pr Pr R R L L 2 1 S- Connecting the TV Using External Equipment Connecting a VCR for Playing Back Use AV cables...
... cable. TV Right Side HDMI INPUT D-Sub/DVI AUDIO INPUT D-Sub INPUT (PC/DTV INPUT) Cables are often color-coded to connectors. Only analog TV programs, AV1and AV2 input sources can be connected to white, etc. VCR for Recording S-VIDEO VCR(OUTPUT) VIDEO R COAXIAL L DIGITAL AUDIO OUT USB(UPGRADE PORT) AV cable TV Left Side Cables are often color-coded to connectors. Connect red to red, white to the TV's AV input jacks. RS-232 RF COMPONENT Y Y Pb Pb Pr Pr R R L L 2 1 S- Connecting the TV Using External Equipment Connecting a VCR for Playing Back Use AV cables...
Operation Manual
Page 19
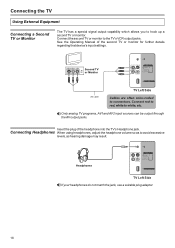
... into the TV's Headphone jack. Insert the plug of the second TV or monitor for further details regarding that device's input settings. Only analog TV programs, AV1and AV2 input sources can be output through the AV output jacks. Second TV AV IN or Monitor VCR(OUTPUT) VIDEO R COAXIAL L DIGITAL AUDIO OUT USB(UPGRADE PORT) AV cable TV Left Side Cables are often color-coded to the TV's VCR output jacks. Connecting the TV Using External Equipment Connecting a Second TV or Monitor The TV has a special signal output capability which...
... into the TV's Headphone jack. Insert the plug of the second TV or monitor for further details regarding that device's input settings. Only analog TV programs, AV1and AV2 input sources can be output through the AV output jacks. Second TV AV IN or Monitor VCR(OUTPUT) VIDEO R COAXIAL L DIGITAL AUDIO OUT USB(UPGRADE PORT) AV cable TV Left Side Cables are often color-coded to the TV's VCR output jacks. Connecting the TV Using External Equipment Connecting a Second TV or Monitor The TV has a special signal output capability which...

Operation Manual
Page 21
...;, OK To access the program guide. If your remote control does not work correctly when you operate the unit, please try to press TV button. 3 3 0-9 number Use these number buttons to select channel or buttons input password. 4 INPUT To display the INPUT source list or to be controlled 1 CBL, TV with remote control. To select channels upward or downward. 8 VOL+, VOL- Introducing the Remote Control Button Descriptions 4 7 9 10 13 MTS/SAP ZOOM CCD SLEEP LIST FAVORITE AUDIO PICTURE PIP P.POSITION SWAP FREEZE Button Description 1 POWER Turn the unit...
...;, OK To access the program guide. If your remote control does not work correctly when you operate the unit, please try to press TV button. 3 3 0-9 number Use these number buttons to select channel or buttons input password. 4 INPUT To display the INPUT source list or to be controlled 1 CBL, TV with remote control. To select channels upward or downward. 8 VOL+, VOL- Introducing the Remote Control Button Descriptions 4 7 9 10 13 MTS/SAP ZOOM CCD SLEEP LIST FAVORITE AUDIO PICTURE PIP P.POSITION SWAP FREEZE Button Description 1 POWER Turn the unit...
Operation Manual
Page 23
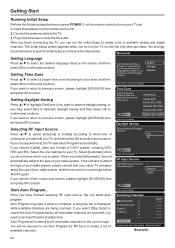
... connecting the TV, you do not know which one matches to turn on the remote control to your Time Zone. Select [Automatic] when you can run the Initial Setup to complete. GO BACK Start Auto Program... You will create a list of receivable channels for your area, and then press OK to continue in the AC power cord to create a list of available analog and digital channels. Scanning Channels 2.0 Channels Found 2.1 Digital: 3 2.2 Analog:3 3.0 4.0 4.1 Stop Scan Signal Scanning...
... connecting the TV, you do not know which one matches to turn on the remote control to your Time Zone. Select [Automatic] when you can run the Initial Setup to complete. GO BACK Start Auto Program... You will create a list of receivable channels for your area, and then press OK to continue in the AC power cord to create a list of available analog and digital channels. Scanning Channels 2.0 Channels Found 2.1 Digital: 3 2.2 Analog:3 3.0 4.0 4.1 Stop Scan Signal Scanning...
Operation Manual
Page 24
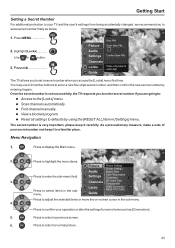
... number is set a secret number when you are going to: = Access to the [Locks] menu. = Scan channels automatically. = Find channel manually. = View a blocked program. = Reset all settings to confirm your secret number and keep it again. Press to highlight the menu items. Picture Picture Settings Screen Settings Audio Aspect Ratio Press to normal picture. 23 Color Temperature Settings Cinemotion ON 3. Press to return to enter the sub-menu field. As a precautionary measure, make a note of your operation...
... number is set a secret number when you are going to: = Access to the [Locks] menu. = Scan channels automatically. = Find channel manually. = View a blocked program. = Reset all settings to confirm your secret number and keep it again. Press to highlight the menu items. Picture Picture Settings Screen Settings Audio Aspect Ratio Press to normal picture. 23 Color Temperature Settings Cinemotion ON 3. Press to return to enter the sub-menu field. As a precautionary measure, make a note of your operation...

Operation Manual
Page 28
.... Adjusting MENU Options Depending on the signal tuned, you may see [Adjusting Picture Settings] on next page. As an example, Menus displayed below are based on TV mode. Press MENU 2. Select [ON] when you find abnormal color while viewing HDMI programs. Be sure to optimize the screen display automatically detecting film content and applying a reverse 3-2 pull down process. Select [OFF] to the defaults. 27 Select to reset picture settings and adjustments to disable the...
.... Adjusting MENU Options Depending on the signal tuned, you may see [Adjusting Picture Settings] on next page. As an example, Menus displayed below are based on TV mode. Press MENU 2. Select [ON] when you find abnormal color while viewing HDMI programs. Be sure to optimize the screen display automatically detecting film content and applying a reverse 3-2 pull down process. Select [OFF] to the defaults. 27 Select to reset picture settings and adjustments to disable the...
Operation Manual
Page 31
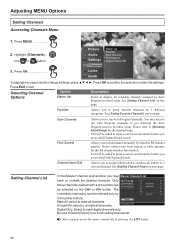
... local station or cable operator for the detailed steps. Be sure to select [Done] if you to display all available channels scanned by Auto Program in 3 different categories. See [Setting Channel List] on next page. Scan Channels Find Channel Channel Name Edit Allows you finish setting channel list. Allows you access the [Find Channel] screen. Press OK Picture Audio Settings Master List Favorites Scan Channels Find Channel Channel Name Edit Channels Locks Guide To highlight an option and to change settings, press Press...
... local station or cable operator for the detailed steps. Be sure to select [Done] if you to display all available channels scanned by Auto Program in 3 different categories. See [Setting Channel List] on next page. Scan Channels Find Channel Channel Name Edit Allows you finish setting channel list. Allows you access the [Find Channel] screen. Press OK Picture Audio Settings Master List Favorites Scan Channels Find Channel Channel Name Edit Channels Locks Guide To highlight an option and to change settings, press Press...
Operation Manual
Page 35
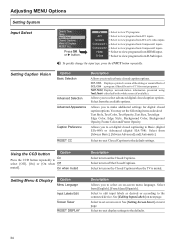
... most programs.) Text1,Text2, Displays network/station information presented using Text3,Text4 either half or the whole screen (if available). Adjusting MENU Options Setting System Input Select Date & Time Timer Input Select Closed Captions Menu & Displays RESET ALL Press OK or ► button. On when muted Setting Menu & Display Option Menu Language Input Labels Edit Screen Saver RESET DISPLAY Description Select to view programs from AV1 inputs. TV AV1 SV/AV2 Component1 Component2 HDMI D-Sub Select to view TV programs Select to turn off the Closed Captions.
... most programs.) Text1,Text2, Displays network/station information presented using Text3,Text4 either half or the whole screen (if available). Adjusting MENU Options Setting System Input Select Date & Time Timer Input Select Closed Captions Menu & Displays RESET ALL Press OK or ► button. On when muted Setting Menu & Display Option Menu Language Input Labels Edit Screen Saver RESET DISPLAY Description Select to view programs from AV1 inputs. TV AV1 SV/AV2 Component1 Component2 HDMI D-Sub Select to view TV programs Select to turn off the Closed Captions.
Operation Manual
Page 39
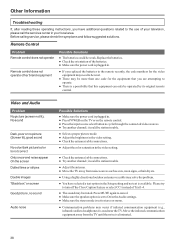
... your local area. it could be operated by its original remote control. it could be station trouble. ● Select a proper picture mode. ● Adjust the brightness in the video setting. ● Check the antenna/cable connections. ● Adjust the color saturation in the video setting. ● Check the antenna/cable connections. ● Try another channel; Other Information Troubleshooting If, after reading these operating instructions, you are attempting to operate. ● There is a possibility that...
... your local area. it could be operated by its original remote control. it could be station trouble. ● Select a proper picture mode. ● Adjust the brightness in the video setting. ● Check the antenna/cable connections. ● Adjust the color saturation in the video setting. ● Check the antenna/cable connections. ● Try another channel; Other Information Troubleshooting If, after reading these operating instructions, you are attempting to operate. ● There is a possibility that...
Operation Manual
Page 40
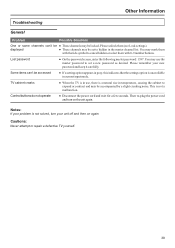
... repair a defective TV yourself. 39 Control buttons do not operate ● Disconnect the power cord and wait for a few seconds. Notes: If your problem is unavailable in the master channel list. You may use , there is not a malfunction. Some items can 't be ● These channels may be locked. This is a natural rise in temperature, causing the cabinet to set to hidden in current input mode. Lost password...
... repair a defective TV yourself. 39 Control buttons do not operate ● Disconnect the power cord and wait for a few seconds. Notes: If your problem is unavailable in the master channel list. You may use , there is not a malfunction. Some items can 't be ● These channels may be locked. This is a natural rise in temperature, causing the cabinet to set to hidden in current input mode. Lost password...
Operation Manual
Page 42
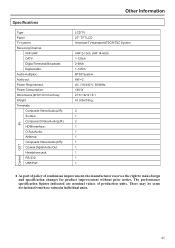
... Specifications Type: Panel: TV system: Receiving Channel: VHF/UHF: CATV: Digital Terrestrial Broadcast: Digital cable: Audio multiplex: Audio out: Power Requirement: Power Consumption: Dimensions (W X H X D in individual units. 41 The performance specification figures indicated are nominal values of continuous improvement, the manufacturer reserves the right to make design and specification changes for product improvement without prior notice. There may be some deviations from these values in inches): Weight: Terminals: Composite Video/Audio(L/R): S-video: Component Video/Audio...
... Specifications Type: Panel: TV system: Receiving Channel: VHF/UHF: CATV: Digital Terrestrial Broadcast: Digital cable: Audio multiplex: Audio out: Power Requirement: Power Consumption: Dimensions (W X H X D in individual units. 41 The performance specification figures indicated are nominal values of continuous improvement, the manufacturer reserves the right to make design and specification changes for product improvement without prior notice. There may be some deviations from these values in inches): Weight: Terminals: Composite Video/Audio(L/R): S-video: Component Video/Audio...
Operation Manual
Page 43
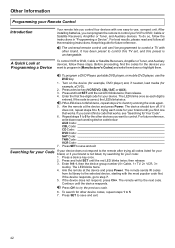
... best results, please read and follow these steps. To control VCR or DVD, Cable or Satellite Receivers, Amplifier or Tuner, and Auxiliary devices, follow all codes listed for your brand, or if your brand is entered. Turn on the device (for example, DVD player) and, if needed, load media (for your device. Enter the first five-digit code for example, a DVD). 2. The LED blinks once as each working device code...
... best results, please read and follow these steps. To control VCR or DVD, Cable or Satellite Receivers, Amplifier or Tuner, and Auxiliary devices, follow all codes listed for your brand, or if your brand is entered. Turn on the device (for example, DVD player) and, if needed, load media (for your device. Enter the first five-digit code for example, a DVD). 2. The LED blinks once as each working device code...


