Operation Manual
Page 2
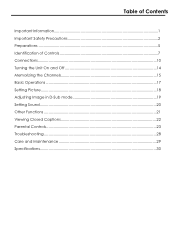
Table of Contents Important Information 1 Important Safety Precautions 2 Preparations ...5 Identification of Controls 7 Connections...10 Turning the Unit On and Off 14 Memorizing the Channels 15 Basic Operations ...17 Setting Picture ...18 Adjusting Image in D-Sub mode 19 Setting Sound ...20 Other Functions ...21 Viewing Closed Captions 22 Parental Controls ...23 Troubleshooting ...28 Care and Maintenance 29 Specifications...30
Table of Contents Important Information 1 Important Safety Precautions 2 Preparations ...5 Identification of Controls 7 Connections...10 Turning the Unit On and Off 14 Memorizing the Channels 15 Basic Operations ...17 Setting Picture ...18 Adjusting Image in D-Sub mode 19 Setting Sound ...20 Other Functions ...21 Viewing Closed Captions 22 Parental Controls ...23 Troubleshooting ...28 Care and Maintenance 29 Specifications...30
Operation Manual
Page 3
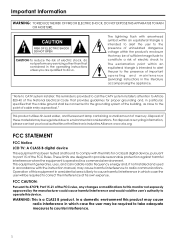
... the operating instructions unless you are designed to part 15 of mercury. CAUTION RISK OF ELECTRIC SHOCK DO NOT OPEN CAUTION-To reduce the risk of cable entry as close to the presence of this device. FCC CAUTION: Pursuant to 47CFR, Part 15.21 of the FCC rules, any servicing other than that provides guidelines for a Class B digital...
... the operating instructions unless you are designed to part 15 of mercury. CAUTION RISK OF ELECTRIC SHOCK DO NOT OPEN CAUTION-To reduce the risk of cable entry as close to the presence of this device. FCC CAUTION: Pursuant to 47CFR, Part 15.21 of the FCC rules, any servicing other than that provides guidelines for a Class B digital...
Operation Manual
Page 4
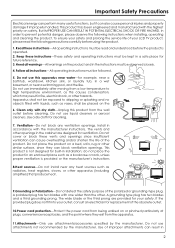
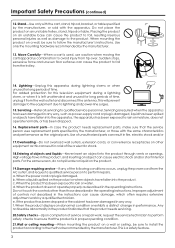
...instructions---All operating instructions must be followed. 5. Do not use attachments not recommended by the manufacturer. The vents and other hazards. do not place the product in an enclosed place such as a bookcase or rack, unless proper ventilation is not designed for replacement of the obsolete outlet. 10.Power cord protection---Protect the power cord... your LCD TV product, please read and understood before cleaning. Keep these instructions---All operating instructions must be read the following instructions when installing, operating and cleaning the product. Install in ...
...instructions---All operating instructions must be followed. 5. Do not use attachments not recommended by the manufacturer. The vents and other hazards. do not place the product in an enclosed place such as a bookcase or rack, unless proper ventilation is not designed for replacement of the obsolete outlet. 10.Power cord protection---Protect the power cord... your LCD TV product, please read and understood before cleaning. Keep these instructions---All operating instructions must be read the following instructions when installing, operating and cleaning the product. Install in ...
Operation Manual
Page 5
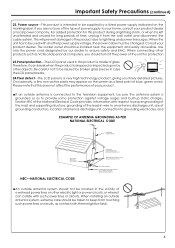
.... Placing the product on a wall, be sure to install the product according to perform repairs. Servicing---Refer all servicing to rain or water. When the power cord or plug is a safety feature. 3 b. e. Any noticeable abnormality in the product indicates that the service person uses replacement parts specified by the manufacturer, or sold with the cart, stand, tripod, bracket, or table specified by the manufacturer, or...
.... Placing the product on a wall, be sure to install the product according to perform repairs. Servicing---Refer all servicing to rain or water. When the power cord or plug is a safety feature. 3 b. e. Any noticeable abnormality in the product indicates that the service person uses replacement parts specified by the manufacturer, or sold with the cart, stand, tripod, bracket, or table specified by the manufacturer, or...
Operation Manual
Page 6
... detailed pictures. When connecting other objects. Occasionally, a few non-active pixels may appear on the marking label. When the unit has to be changed. The socket outlet should be supplied by a listed power supply indicated on the screen as VCRs and personal computers, you should turn off the power of the unit for protection 23.Panel protection---The LCD panel used with another power supply voltage, the power cable...
... detailed pictures. When connecting other objects. Occasionally, a few non-active pixels may appear on the marking label. When the unit has to be changed. The socket outlet should be supplied by a listed power supply indicated on the screen as VCRs and personal computers, you should turn off the power of the unit for protection 23.Panel protection---The LCD panel used with another power supply voltage, the power cable...
Operation Manual
Page 7
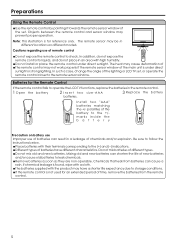
Preparations Using the Remote Control
Preparations Using the Remote Control
Operation Manual
Page 8
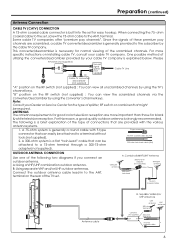
... RF switch (not supplied) : You can view the scrambled channels via the converter/descrambler by using the converter's channel keys. When connecting the 75- Some cable TV companies offer "premium pay channels are more specific instructions on the rear of the TV set , screw the 75-ohm cable to a 75-ohm terminal through a 300-75-ohm 300-ohm twin-lead cable (flat) adapter (not supplied). For this reason, a good quality outdoor antenna...
... RF switch (not supplied) : You can view the scrambled channels via the converter/descrambler by using the converter's channel keys. When connecting the 75- Some cable TV companies offer "premium pay channels are more specific instructions on the rear of the TV set , screw the 75-ohm cable to a 75-ohm terminal through a 300-75-ohm 300-ohm twin-lead cable (flat) adapter (not supplied). For this reason, a good quality outdoor antenna...
Operation Manual
Page 9
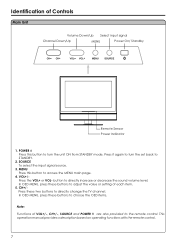
... input signal Channel Down/Up MENU Power On/ Standby CH CH+ VOL VOL+ MENU SOURCE Remote Sensor Power Indicator 1. In OSD MENU, press these two buttons to directly change the TV channel; MENU Press this button to turn the set back to STANDBY. 2. This operation manual provides a description based on operating functions with the remote control. 7 POWER Press this button to access the MENU main page. 4. SOURCE To select the input signal source. 3. Press it again to turn the unit ON from STANDBY mode. CH+/Press these buttons to adjust...
... input signal Channel Down/Up MENU Power On/ Standby CH CH+ VOL VOL+ MENU SOURCE Remote Sensor Power Indicator 1. In OSD MENU, press these two buttons to directly change the TV channel; MENU Press this button to turn the set back to STANDBY. 2. This operation manual provides a description based on operating functions with the remote control. 7 POWER Press this button to access the MENU main page. 4. SOURCE To select the input signal source. 3. Press it again to turn the unit ON from STANDBY mode. CH+/Press these buttons to adjust...
Operation Manual
Page 10
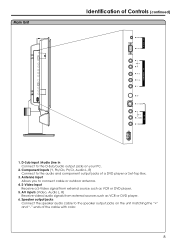
... Connect the speaker audio cable to the audio and component output jacks of a DVD player or Set-Top Box. 3. S-Video input Receive a S-Video signal from external sources such as VCR or DVD player. 5. Component inputs (Y, Pb/Cb, Pr/Cr, Audio L, R) Connect to the speaker output jacks on your PC. 2. Antenna input Allows you to the D-Sub/audio output jacks on the unit matching the "+" and "-" ends of Controls (continued) 1. AV inputs (Video, Audio L, R) Receive video/audio signals from external source such as VCR or DVD player. 6. Main Unit Identification of the cable with color...
... Connect the speaker audio cable to the audio and component output jacks of a DVD player or Set-Top Box. 3. S-Video input Receive a S-Video signal from external sources such as VCR or DVD player. 5. Component inputs (Y, Pb/Cb, Pr/Cr, Audio L, R) Connect to the speaker output jacks on your PC. 2. Antenna input Allows you to the D-Sub/audio output jacks on the unit matching the "+" and "-" ends of Controls (continued) 1. AV inputs (Video, Audio L, R) Receive video/audio signals from external source such as VCR or DVD player. 6. Main Unit Identification of the cable with color...

Operation Manual
Page 11
Identification of Controls (continued) Remote Control To display channel status or signal information Turn the unit on or off To select Stereo mode Sound mute [0-9] number buttons: Direct channel To access the MENU main page or exit menu operation To switch channels; to adjust selected item To confirm your operation To set sleep timer Audio mode select 9 In MENU operation, use CH+/- to select menu item To select input signal source Picture mode select To quickly jump between current channel and last selected channel. To adjust volume; In MENU operation, use ENTER or VOL+/-
Identification of Controls (continued) Remote Control To display channel status or signal information Turn the unit on or off To select Stereo mode Sound mute [0-9] number buttons: Direct channel To access the MENU main page or exit menu operation To switch channels; to adjust selected item To confirm your operation To set sleep timer Audio mode select 9 In MENU operation, use CH+/- to select menu item To select input signal source Picture mode select To quickly jump between current channel and last selected channel. To adjust volume; In MENU operation, use ENTER or VOL+/-
Operation Manual
Page 12
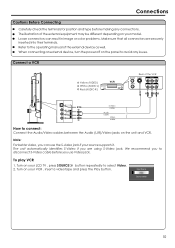
... external device, turn the power off on the panel to the operating manual of the external device as well. Loose connectors can use Video jack. Connect a VCR Y Yellow (VIDEO) W White (AUDIO L) R Red (AUDIO R ) VCR Rear of the external equipment may be different depending on your source supports it. Turn on your LCD TV , press SOURCE button repeatedly to select Video. 2. The illustration of the VCR ANT OUT S-VIDEO AV IN R AUDIO L VIDEO ANT IN AV OUT R AUDIO L VIDEO R W Y WR or S-Video cable Audio cable Video cable...
... external device, turn the power off on the panel to the operating manual of the external device as well. Loose connectors can use Video jack. Connect a VCR Y Yellow (VIDEO) W White (AUDIO L) R Red (AUDIO R ) VCR Rear of the external equipment may be different depending on your source supports it. Turn on your LCD TV , press SOURCE button repeatedly to select Video. 2. The illustration of the VCR ANT OUT S-VIDEO AV IN R AUDIO L VIDEO ANT IN AV OUT R AUDIO L VIDEO R W Y WR or S-Video cable Audio cable Video cable...
Operation Manual
Page 13
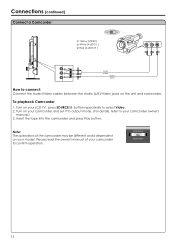
... owner's manual.) 3. Note: The operations of your model. To playback Camcorder 1. Insert the tape into the camcorder and press Play button. Input Source Video Source-switch 11 Turn on your camcorder to select Video. 2. Turn on the unit and camcorder. Connections (continued) Connect a Camcorder OUT IN Y Yellow (VIDEO) W White (AUDIO L) R Red (AUDIO R ) R AUDIO L VIDEO R W Y WR Y Audio cable Video cable How to connect: Connect the Audio/Video cables between the Audio (L/R)/Video jacks on your camcorder and set it to output mode. (For details, refer to your LCD TV...
... owner's manual.) 3. Note: The operations of your model. To playback Camcorder 1. Insert the tape into the camcorder and press Play button. Input Source Video Source-switch 11 Turn on your camcorder to select Video. 2. Turn on the unit and camcorder. Connections (continued) Connect a Camcorder OUT IN Y Yellow (VIDEO) W White (AUDIO L) R Red (AUDIO R ) R AUDIO L VIDEO R W Y WR Y Audio cable Video cable How to connect: Connect the Audio/Video cables between the Audio (L/R)/Video jacks on your camcorder and set it to output mode. (For details, refer to your LCD TV...
Operation Manual
Page 14
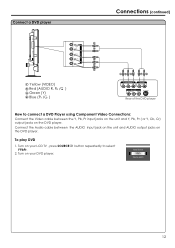
... your LCD TV , press SOURCE YPbPr. 2. Turn on your DVD player. button repeatedly to connect a DVD Player using Component Video Connections: Connect the Video cable between the AUDIO input jack on the unit and AUDIO output jacks on the DVD player. Connect the Audio cable between the Y, Pb, Pr input jacks on the unit and Y, Pb, Pr ( or Y, Cb, Cr) output jacks on the DVD player. To play DVD 1. Connect a DVD player Connections (continued) RW GB R Y Yellow (VIDEO) R Red (AUDIO R, PR /CR ) G Green (Y) B Blue (PB /CB ) GB R WR COMPONENT Y Pb Pr AUDIO L AUDIO...
... your LCD TV , press SOURCE YPbPr. 2. Turn on your DVD player. button repeatedly to connect a DVD Player using Component Video Connections: Connect the Video cable between the AUDIO input jack on the unit and AUDIO output jacks on the DVD player. Connect the Audio cable between the Y, Pb, Pr input jacks on the unit and Y, Pb, Pr ( or Y, Cb, Cr) output jacks on the DVD player. To play DVD 1. Connect a DVD player Connections (continued) RW GB R Y Yellow (VIDEO) R Red (AUDIO R, PR /CR ) G Green (Y) B Blue (PB /CB ) GB R WR COMPONENT Y Pb Pr AUDIO L AUDIO...
Operation Manual
Page 15
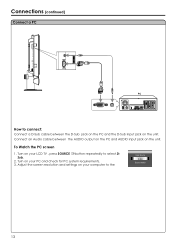
Turn on your LCD TV , press SOURCE button repeatedly to the Input Source D-Sub Source-switch 13 Connect an Audio cable between the D-Sub jack on the PC and the D-Sub input jack on your computer to select DSub. 2. Turn on the unit. To Watch the PC screen 1. Adjust the screen resolution and settings on the unit. Connections (continued) Connect a PC How to connect: Connect a D-Sub cable between the AUDIO output on the PC and AUDIO input jack on your PC and check for PC system requirements. 3.
Turn on your LCD TV , press SOURCE button repeatedly to the Input Source D-Sub Source-switch 13 Connect an Audio cable between the D-Sub jack on the PC and the D-Sub input jack on your computer to select DSub. 2. Turn on the unit. To Watch the PC screen 1. Adjust the screen resolution and settings on the unit. Connections (continued) Connect a PC How to connect: Connect a D-Sub cable between the AUDIO output on the PC and AUDIO input jack on your PC and check for PC system requirements. 3.
Operation Manual
Page 16
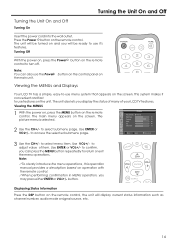
.... Turning Off With the power on, press the Power button on and you may press either ENTER or VOL+/- Viewing the MENUs and Displays Your LCD TV has a simple, easy-to use the Power button on the control panel on the remote control. to exit 3 Use the CH+/- Picture Picture Mode Normal Brightness 50 Contrast 75 Color 60 Tint 50 Sharpness 12 Move Select Menu to select submenu page. to access the...
.... Turning Off With the power on, press the Power button on and you may press either ENTER or VOL+/- Viewing the MENUs and Displays Your LCD TV has a simple, easy-to use the Power button on the control panel on the remote control. to exit 3 Use the CH+/- Picture Picture Mode Normal Brightness 50 Contrast 75 Color 60 Tint 50 Sharpness 12 Move Select Menu to select submenu page. to access the...
Operation Manual
Page 17
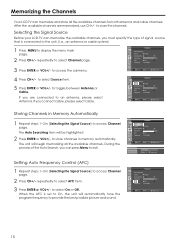
... Menu to exit Channel Auto Searching Source Cable Channel Skip On Off Fine Tune AFC On Off Frequency 55.25 MHz Move Select Menu to an antenna, please select Antenna. to store channels in [Selecting the Signal Source] to provide the best possible picture and sound. repeatedly to select Source item. 5 Press ENTER or VOL+/- to scan the channels. The Auto Searching item will automatically tune the program frequency to access Channel...
... Menu to exit Channel Auto Searching Source Cable Channel Skip On Off Fine Tune AFC On Off Frequency 55.25 MHz Move Select Menu to an antenna, please select Antenna. to store channels in [Selecting the Signal Source] to provide the best possible picture and sound. repeatedly to select Source item. 5 Press ENTER or VOL+/- to scan the channels. The Auto Searching item will automatically tune the program frequency to access Channel...

Operation Manual
Page 18
... ENTER or VOL+/- Channel Auto Searching Source Cable Channel Skip On Off Fine Tune AFC On Off Frequency 55.25 MHz Move Select Menu to fine tune till the best possible picture and sound are obtained. The erased channels can not be turned off , the selected channel will be selected by using the CH+/- to input channel number directly. 16 buttons unless you fine tune a program manually, the AFC...
... ENTER or VOL+/- Channel Auto Searching Source Cable Channel Skip On Off Fine Tune AFC On Off Frequency 55.25 MHz Move Select Menu to fine tune till the best possible picture and sound are obtained. The erased channels can not be turned off , the selected channel will be selected by using the CH+/- to input channel number directly. 16 buttons unless you fine tune a program manually, the AFC...
Operation Manual
Page 19
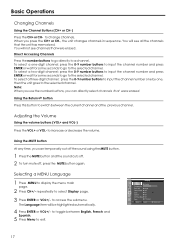
... 0-9 number buttons to input the channel number and press ENTER or wait for some seconds to go to switch between English, French and Spanish. 5 Press Menu to select Display page. 3 Press ENTER or VOL+/- Using the Return button Press this button to the selected channel. Display Language Transparency Back Light Factory Reset DCDi Captions CC When Mute Zoom English Bright Yes On Off Off Off Fill screen Move...
... 0-9 number buttons to input the channel number and press ENTER or wait for some seconds to go to switch between English, French and Spanish. 5 Press Menu to select Display page. 3 Press ENTER or VOL+/- Using the Return button Press this button to the selected channel. Display Language Transparency Back Light Factory Reset DCDi Captions CC When Mute Zoom English Bright Yes On Off Off Off Fill screen Move...
Operation Manual
Page 20
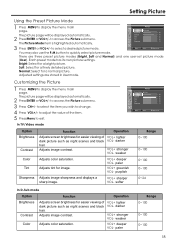
... picture such as night scenes and black VOL- darker hair. The Picture Mode item is highlighted automatically. to exit Option Brightness Contrast Color Tint Sharpness Function Operation Adjusts screen brightness for easier viewing of the item. 5 Press Menu to quickly select picture mode. There are stored in User mode. Each preset mode has its own picture settings. VOL+ deeper VOL- Move Select Menu to exit You may also use the P.M button...
... picture such as night scenes and black VOL- darker hair. The Picture Mode item is highlighted automatically. to exit Option Brightness Contrast Color Tint Sharpness Function Operation Adjusts screen brightness for easier viewing of the item. 5 Press Menu to quickly select picture mode. There are stored in User mode. Each preset mode has its own picture settings. VOL+ deeper VOL- Move Select Menu to exit You may also use the P.M button...
Operation Manual
Page 30
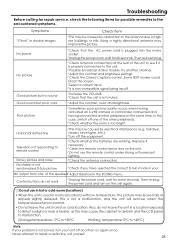
... or camcorder connected and having connected another channel. !Adjust the contrast and brightness settings. !Check the Closed Captions control. Some TEXT modes could block the screen. !Select a correct input. !Is a non-compatible signal being input? !Increase the VOLUME. !Check that the AC power cord is used in a location exposed to direct sunlight or near a heater, as this case, switch off the equipment. !Check whether the batteries are working. Using a highly directional antenna may...
... or camcorder connected and having connected another channel. !Adjust the contrast and brightness settings. !Check the Closed Captions control. Some TEXT modes could block the screen. !Select a correct input. !Is a non-compatible signal being input? !Increase the VOLUME. !Check that the AC power cord is used in a location exposed to direct sunlight or near a heater, as this case, switch off the equipment. !Check whether the batteries are working. Using a highly directional antenna may...


