User Manual
Page 2
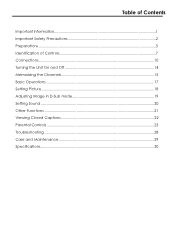
Table of Contents Important Information 1 Important Safety Precautions 2 Preparations ...5 Identification of Controls 7 Connections...10 Turning the Unit On and Off 14 Memorizing the Channels 15 Basic Operations ...17 Setting Picture ...18 Adjusting Image in D-Sub mode 19 Setting Sound ...20 Other Functions ...21 Viewing Closed Captions 22 Parental Controls ...23 Troubleshooting ...28 Care and Maintenance 29 Specifications...30
Table of Contents Important Information 1 Important Safety Precautions 2 Preparations ...5 Identification of Controls 7 Connections...10 Turning the Unit On and Off 14 Memorizing the Channels 15 Basic Operations ...17 Setting Picture ...18 Adjusting Image in D-Sub mode 19 Setting Sound ...20 Other Functions ...21 Viewing Closed Captions 22 Parental Controls ...23 Troubleshooting ...28 Care and Maintenance 29 Specifications...30
User Manual
Page 3
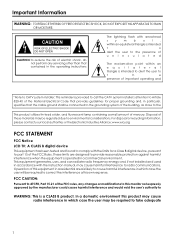
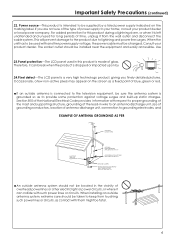
... FCC rules, any servicing other than that contained in accordance with the limits for proper grounding and, in a commercial environment. This equipment generates, uses, and can radiate radio frequency energy and, if not installed and used in the operating instructions The lightning flash with arrowhead symbol, within an equilateral triangle is intended t o alert the user to the presence...
... FCC rules, any servicing other than that contained in accordance with the limits for proper grounding and, in a commercial environment. This equipment generates, uses, and can radiate radio frequency energy and, if not installed and used in the operating instructions The lightning flash with arrowhead symbol, within an equilateral triangle is intended t o alert the user to the presence...
User Manual
Page 5
... described in performance. Lightning---Unplug this television equipment during lightning storms or when unused for long periods of controls not described in the operating instructions. Servicing is required when the apparatus has been damaged in any way, such as power-supply cord or plug is spilled on a wall or ceiling, be sure to qualified service personnel. c. When the product does not...
... described in performance. Lightning---Unplug this television equipment during lightning storms or when unused for long periods of controls not described in the operating instructions. Servicing is required when the apparatus has been damaged in any way, such as power-supply cord or plug is spilled on a wall or ceiling, be sure to qualified service personnel. c. When the product does not...
User Manual
Page 6
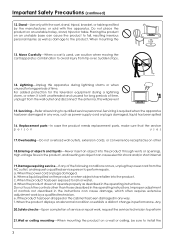
...wall outlet and disconnect the cable system. Use 23.Panel protection---The LCD panel used with another power supply voltage, the power cable must be installed near the equipment and easily accessible. Therefore, it can break when the product is dropped or impacted upon by a listed power supply indicated on the screen as a fixed point of time...label. If you finely detailed pictures. The socket outlet should be changed. When the unit has to lightning and power line surges. For added protection for long periods of blue, green or red. Power source---This product is left unattended ...
...wall outlet and disconnect the cable system. Use 23.Panel protection---The LCD panel used with another power supply voltage, the power cable must be installed near the equipment and easily accessible. Therefore, it can break when the product is dropped or impacted upon by a listed power supply indicated on the screen as a fixed point of time...label. If you finely detailed pictures. The socket outlet should be changed. When the unit has to lightning and power line surges. For added protection for long periods of blue, green or red. Power source---This product is left unattended ...

User Manual
Page 7
Preparations Using the Remote Control
Preparations Using the Remote Control
User Manual
Page 8
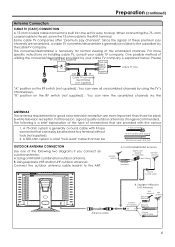
... normal viewing of the following is necessary for black & white television reception. A 75-ohm system is strongly recommended. For this reason, a good quality outdoor antenna is generally a round cable with F-type connector that are more specific instructions on the RF switch (not supplied) : You can easily be F-type connector 75-ohm coaxial cable (round) 300-ohm twin-lead cable (flat) OUTDOOR ANTENNA CONNECTION Use one of the scrambled channels.
... normal viewing of the following is necessary for black & white television reception. A 75-ohm system is strongly recommended. For this reason, a good quality outdoor antenna is generally a round cable with F-type connector that are more specific instructions on the RF switch (not supplied) : You can easily be F-type connector 75-ohm coaxial cable (round) 300-ohm twin-lead cable (flat) OUTDOOR ANTENNA CONNECTION Use one of the scrambled channels.
User Manual
Page 9
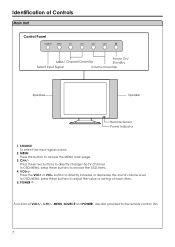
... to adjust the value or setting of Controls Main Unit Control Panel SOURCE MENU CH CH VOL VOL MENU Channel Down/Up Power On/ Standby Select Input Signal Volume Down/Up Speaker Speaker Remote Sensor Power Indicator 1. This 7 In OSD MENU, press these buttons to directly change the TV channel; VOL+/Press the VOL+ or VOL- button to access the MENU main page. 3. Identification of each item. 5. MENU Press this button to directly increase or decrease the sound volume level...
... to adjust the value or setting of Controls Main Unit Control Panel SOURCE MENU CH CH VOL VOL MENU Channel Down/Up Power On/ Standby Select Input Signal Volume Down/Up Speaker Speaker Remote Sensor Power Indicator 1. This 7 In OSD MENU, press these buttons to directly change the TV channel; VOL+/Press the VOL+ or VOL- button to access the MENU main page. 3. Identification of each item. 5. MENU Press this button to directly increase or decrease the sound volume level...
User Manual
Page 10
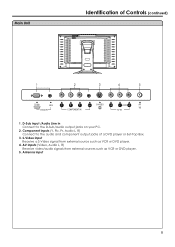
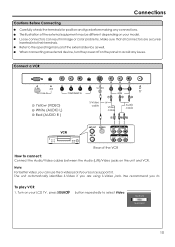
...S-Video input Receive a S-Video signal from external sources such as VCR or DVD player. 4. Component inputs (Y, Pb, Pr, Audio L, R) Connect to the D-Sub/audio output jacks on your PC. 2. Antenna input 8 D-Sub input /Audio Line in Connect to the audio and component output jacks of Controls (continued) 1 2 3 4 5 D-Sub LINE IN Y Pb Pr AUDIO S-VIDEO VIDEO L AUDIO R RF D-Sub IN COMPONENT IN AV IN 1. AV inputs (Video, Audio L, R) Receive video/audio signals from external source such as VCR or DVD player. 5. Main Unit Identification of a DVD player or Set-Top Box...
...S-Video input Receive a S-Video signal from external sources such as VCR or DVD player. 4. Component inputs (Y, Pb, Pr, Audio L, R) Connect to the D-Sub/audio output jacks on your PC. 2. Antenna input 8 D-Sub input /Audio Line in Connect to the audio and component output jacks of Controls (continued) 1 2 3 4 5 D-Sub LINE IN Y Pb Pr AUDIO S-VIDEO VIDEO L AUDIO R RF D-Sub IN COMPONENT IN AV IN 1. AV inputs (Video, Audio L, R) Receive video/audio signals from external source such as VCR or DVD player. 5. Main Unit Identification of a DVD player or Set-Top Box...
User Manual
Page 11
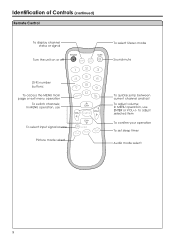
to adjust selected item To confirm your operation To set sleep timer Audio mode select 9 In MENU operation, use ENTER or VOL+/- In MENU operation, use To select input signal source Picture mode select To quickly jump between current channel and last To adjust volume; Identification of Controls (continued) Remote Control To display channel status or signal Turn the unit on or off To select Stereo mode Sound mute [0-9] number buttons: To access the MENU main page or exit menu operation To switch channels;
to adjust selected item To confirm your operation To set sleep timer Audio mode select 9 In MENU operation, use ENTER or VOL+/- In MENU operation, use To select input signal source Picture mode select To quickly jump between current channel and last To adjust volume; Identification of Controls (continued) Remote Control To display channel status or signal Turn the unit on or off To select Stereo mode Sound mute [0-9] number buttons: To access the MENU main page or exit menu operation To switch channels;
User Manual
Page 12
... or color problems. Make sure that all connectors are using S-Video jack. Refer to the operating manual of the VCR How to select Video. Note: For better video, you are securely inserted into their terminals. Input Source Video Source-switch 10 We recommend you to avoid any connections. Connections Cautions Before Connecting Carefully check the terminals for position and type before making any issues. Turn on the panel to To play...
... or color problems. Make sure that all connectors are using S-Video jack. Refer to the operating manual of the VCR How to select Video. Note: For better video, you are securely inserted into their terminals. Input Source Video Source-switch 10 We recommend you to avoid any connections. Connections Cautions Before Connecting Carefully check the terminals for position and type before making any issues. Turn on the panel to To play...
User Manual
Page 13
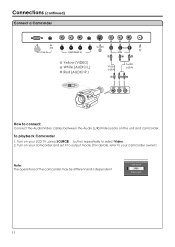
... and set it to output mode. (For details, refer to your LCD TV , press SOURCE button repeatedly to connect: Connect the Audio/Video cables between the Audio (L/R)/Video jacks on the unit and camcorder. Turn on your camcorder owner's Note: The operations of the camcorder may be different and is dependent Input Source Video Source-switch 11 Connections (continued) Connect a Camcorder D-Sub LINE IN D-Sub IN Y Pb Pr COMPONENT IN AUDIO S-VIDEO VIDEO L AUDIO R RF AV IN Y W R Y Yellow (VIDEO) W White (AUDIO L) R Red (AUDIO R ) Video cable Audio cable...
... and set it to output mode. (For details, refer to your LCD TV , press SOURCE button repeatedly to connect: Connect the Audio/Video cables between the Audio (L/R)/Video jacks on the unit and camcorder. Turn on your camcorder owner's Note: The operations of the camcorder may be different and is dependent Input Source Video Source-switch 11 Connections (continued) Connect a Camcorder D-Sub LINE IN D-Sub IN Y Pb Pr COMPONENT IN AUDIO S-VIDEO VIDEO L AUDIO R RF AV IN Y W R Y Yellow (VIDEO) W White (AUDIO L) R Red (AUDIO R ) Video cable Audio cable...
User Manual
Page 14
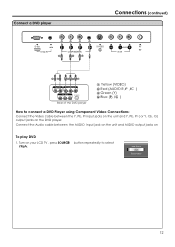
... player. Connect a DVD player Connections (continued) D-Sub LINE IN Y Pb Pr AUDIO S-VIDEO VIDEO L AUDIO R RF D-Sub IN COMPONENT IN AV IN G B R WR GB R AUDIO L AUDIO R COMPONENT Y Pb Pr AV OUT R AUDIO L VIDEO S-VIDEO Rear of the DVD player Y Yellow (VIDEO) R Red (AUDIO R, rP /rC ) G Green (Y) B Blue (Pb /Cb ) How to select Input Source YPbPr Source-switch 12 button repeatedly to connect a DVD Player using Component Video Connections: Connect the Video cable between the AUDIO input jack on the unit and AUDIO output jacks on To play DVD 1. Turn on your LCD...
... player. Connect a DVD player Connections (continued) D-Sub LINE IN Y Pb Pr AUDIO S-VIDEO VIDEO L AUDIO R RF D-Sub IN COMPONENT IN AV IN G B R WR GB R AUDIO L AUDIO R COMPONENT Y Pb Pr AV OUT R AUDIO L VIDEO S-VIDEO Rear of the DVD player Y Yellow (VIDEO) R Red (AUDIO R, rP /rC ) G Green (Y) B Blue (Pb /Cb ) How to select Input Source YPbPr Source-switch 12 button repeatedly to connect a DVD Player using Component Video Connections: Connect the Video cable between the AUDIO input jack on the unit and AUDIO output jacks on To play DVD 1. Turn on your LCD...
User Manual
Page 15
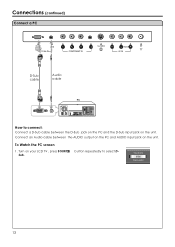
Connections (continued) Connect a PC D-Sub LINE IN Y Pb Pr AUDIO S-VIDEO VIDEO L AUDIO R RF D-Sub IN COMPONENT IN AV IN D-Sub cable Audio cable How to select D- Turn on the unit. Connect an Audio cable between the D-Sub jack on the PC and the D-Sub input jack on the unit. button repeatedly to connect: Connect a D-Sub cable between the AUDIO output on the PC and AUDIO input jack on your LCD TV , press SOURCE Sub. Input Source D-Sub Source-switch 13 To Watch the PC screen 1.
Connections (continued) Connect a PC D-Sub LINE IN Y Pb Pr AUDIO S-VIDEO VIDEO L AUDIO R RF D-Sub IN COMPONENT IN AV IN D-Sub cable Audio cable How to select D- Turn on the unit. Connect an Audio cable between the D-Sub jack on the PC and the D-Sub input jack on the unit. button repeatedly to connect: Connect a D-Sub cable between the AUDIO output on the PC and AUDIO input jack on your LCD TV , press SOURCE Sub. Input Source D-Sub Source-switch 13 To Watch the PC screen 1.
User Manual
Page 16
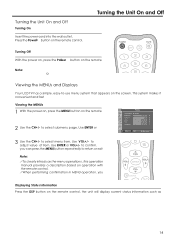
...: !To clearly introduce the menu operations , this operation manual provides a description based on operation with the remote control. !When performing confirmation in MENU operation, you Displaying Status Information Press the DSP button on the remote 2 Use the CH+/- Press the Power button on the screen. Turning the Unit On and Off Turning Off With the power on, press the Power button on the remote Note: Viewing the MENUs and Displays Your LCD TV has a simple, easy...
...: !To clearly introduce the menu operations , this operation manual provides a description based on operation with the remote control. !When performing confirmation in MENU operation, you Displaying Status Information Press the DSP button on the remote 2 Use the CH+/- Press the Power button on the screen. Turning the Unit On and Off Turning Off With the power on, press the Power button on the remote Note: Viewing the MENUs and Displays Your LCD TV has a simple, easy...
User Manual
Page 17
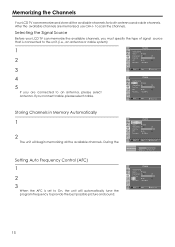
... automatically tune the program frequency to provide the best possible picture and sound. During the Channel Auto Searching Source Cable Channel Skip On Off Fine Tune AFC On Off Frequency 55.25 MHz Move Select Menu to exit Auto Searching CH No 11 Menu to exit Setting Auto Frequency Control (AFC) 1 2 3 When the AFC is connected to the unit. (i.e., an antenna or cable system) Channel 1 Auto Searching Source Cable Channel Skip On Off...
... automatically tune the program frequency to provide the best possible picture and sound. During the Channel Auto Searching Source Cable Channel Skip On Off Fine Tune AFC On Off Frequency 55.25 MHz Move Select Menu to exit Auto Searching CH No 11 Menu to exit Setting Auto Frequency Control (AFC) 1 2 3 When the AFC is connected to the unit. (i.e., an antenna or cable system) Channel 1 Auto Searching Source Cable Channel Skip On Off...

User Manual
Page 19
... the CH+ or CH-, the unit changes channels in sequence. Direct Accessing Channels Press the number buttons to go to the selected channel. Adjusting the Volume Using the volume buttons (VOL+ and VOL-) Using the MUTE button 1 2 Selecting a MENU Language 1 2 3 4 5 17 Display Language English Transparency Back Light Bright Factory Reset Yes DCDi On Off Captions Off CC When Mute Off Move Select Menu to change channels. Basic Operations Changing Channels Using the Channel Buttons (CH+ or CH-) Press the...
... the CH+ or CH-, the unit changes channels in sequence. Direct Accessing Channels Press the number buttons to go to the selected channel. Adjusting the Volume Using the volume buttons (VOL+ and VOL-) Using the MUTE button 1 2 Selecting a MENU Language 1 2 3 4 5 17 Display Language English Transparency Back Light Bright Factory Reset Yes DCDi On Off Captions Off CC When Mute Off Move Select Menu to change channels. Basic Operations Changing Channels Using the Channel Buttons (CH+ or CH-) Press the...
User Manual
Page 20
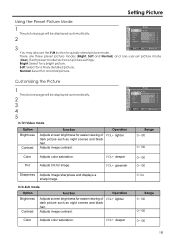
... picture. Picture Picture Mode User Brightness 55 Contrast 90 Color 50 Tint 49 Sharpness 12 Move Select Menu to quickly select picture mode. In D-Sub mode Option Function Operation Brightness Contrast Adjusts screen brightness for easier viewing of VOL+ lighter dark picture such as night scenes and black hair. Each preset mode has its own picture settings. Customizing the Picture 1 The picture page will be displayed automatically. 2 3 4 5 In TV/Video mode Option Brightness Contrast Function Operation Adjusts screen...
... picture. Picture Picture Mode User Brightness 55 Contrast 90 Color 50 Tint 49 Sharpness 12 Move Select Menu to quickly select picture mode. In D-Sub mode Option Function Operation Brightness Contrast Adjusts screen brightness for easier viewing of VOL+ lighter dark picture such as night scenes and black hair. Each preset mode has its own picture settings. Customizing the Picture 1 The picture page will be displayed automatically. 2 3 4 5 In TV/Video mode Option Brightness Contrast Function Operation Adjusts screen...
User Manual
Page 22
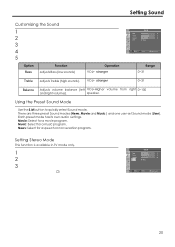
... conversation program. News: Select for a music program. Using the Preset Sound Mode Use the S.M button to exit 20 There are three preset Sound modes (News, Movie and Music ) and one user-set Sound mode (User). speaker. Setting Stereo Mode This function is available in TV mode only. 1 2 3 Sound Bass 14 Treble 16 Balance 43 MTS Mono Move Select Menu to quickly select Sound mode. Movie: Select for a movie program. VOL+ stronger 0~31 Balance Adjusts volume balance...
... conversation program. News: Select for a music program. Using the Preset Sound Mode Use the S.M button to exit 20 There are three preset Sound modes (News, Movie and Music ) and one user-set Sound mode (User). speaker. Setting Stereo Mode This function is available in TV mode only. 1 2 3 Sound Bass 14 Treble 16 Balance 43 MTS Mono Move Select Menu to quickly select Sound mode. Movie: Select for a movie program. VOL+ stronger 0~31 Balance Adjusts volume balance...
User Manual
Page 24
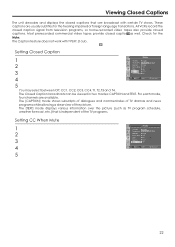
.... Setting Closed Caption Display 1 Language English Transparency 2 Back light Bright Factory Reset Yes DCDi On Off Captions CC1 3 CC When Mute Off 4 Move Select Menu to exit 22 These captions are usually subtitles for the Note: The Caption feature does not work with certain TV shows. The Closed Caption broadcasts can be viewed in two modes: CAPTION and TEXT. All VCRs record the closed caption signal from television programs, so home-recorded video...
.... Setting Closed Caption Display 1 Language English Transparency 2 Back light Bright Factory Reset Yes DCDi On Off Captions CC1 3 CC When Mute Off 4 Move Select Menu to exit 22 These captions are usually subtitles for the Note: The Caption feature does not work with certain TV shows. The Closed Caption broadcasts can be viewed in two modes: CAPTION and TEXT. All VCRs record the closed caption signal from television programs, so home-recorded video...
User Manual
Page 30
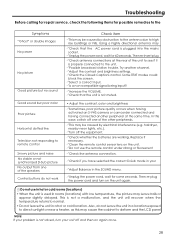
... the speakers Control buttons do not work • Adjust the contrast, color and brightness !Sometimes, poor picture quality occurs when having activated an S-VHS camera or camcorder connected and having connected another channel. !Adjust the contrast and brightness settings. !Check the Closed Captions control. Some TEXT modes could block the screen. !Select a correct input. !Is a non-compatible signal being input? !Increase the VOLUME. !Check that the AC power cord is used in the SOUND menu. !Unplug the power cord...
... the speakers Control buttons do not work • Adjust the contrast, color and brightness !Sometimes, poor picture quality occurs when having activated an S-VHS camera or camcorder connected and having connected another channel. !Adjust the contrast and brightness settings. !Check the Closed Captions control. Some TEXT modes could block the screen. !Select a correct input. !Is a non-compatible signal being input? !Increase the VOLUME. !Check that the AC power cord is used in the SOUND menu. !Unplug the power cord...


