

User Guide
Page 2
...duly provide complete source code as source code archives, etc. ii or (2) the serial number of reproduction and shipment, which you . ASUS PROVIDES THIS MANUAL "AS IS" WITHOUT WARRANTY OF ANY KIND, EITHER EXPRESS OR IMPLIED, INCLUDING BUT NOT LIMITED TO THE IMPLIED WARRANTIES OR CONDITIONS OF ...BUSINESS, LOSS OF USE OR DATA, INTERRUPTION OF BUSINESS AND THE LIKE), EVEN IF ASUS HAS BEEN ADVISED OF THE POSSIBILITY OF SUCH DAMAGES ARISING FROM ANY DEFECT OR ERROR IN THIS MANUAL OR PRODUCT. The source code will not be distributed WITHOUT ANY WARRANTY and licensed under...
...duly provide complete source code as source code archives, etc. ii or (2) the serial number of reproduction and shipment, which you . ASUS PROVIDES THIS MANUAL "AS IS" WITHOUT WARRANTY OF ANY KIND, EITHER EXPRESS OR IMPLIED, INCLUDING BUT NOT LIMITED TO THE IMPLIED WARRANTIES OR CONDITIONS OF ...BUSINESS, LOSS OF USE OR DATA, INTERRUPTION OF BUSINESS AND THE LIKE), EVEN IF ASUS HAS BEEN ADVISED OF THE POSSIBILITY OF SUCH DAMAGES ARISING FROM ANY DEFECT OR ERROR IN THIS MANUAL OR PRODUCT. The source code will not be distributed WITHOUT ANY WARRANTY and licensed under...
User Guide
Page 4
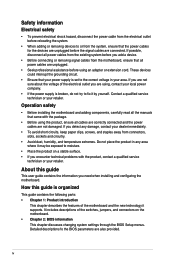
... power cables for the devices are unplugged before you add a device. • Before connecting or removing signal cables from the motherboard, ensure that all the manuals that your power supply is broken, do not try to fix it may be exposed to moisture. • Place the product on the motherboard. •...
... power cables for the devices are unplugged before you add a device. • Before connecting or removing signal cables from the motherboard, ensure that all the manuals that your power supply is broken, do not try to fix it may be exposed to moisture. • Place the product on the motherboard. •...

User Guide
Page 5
... and software products. Refer to yourself when completing a task. These documents are linked with a plus sign (+). DANGER/WARNING: Information to prevent injury to the ASUS contact information. 2. Typography Bold text Indicates a menu or an item to emphasize a word or a phrase. CAUTION: Information to prevent damage to the components when completing a ... select. Conventions used throughout this guide To ensure that may include optional documentation, such as warranty flyers, that you complete a task. Keys enclosed in this manual.
... and software products. Refer to yourself when completing a task. These documents are linked with a plus sign (+). DANGER/WARNING: Information to prevent injury to the ASUS contact information. 2. Typography Bold text Indicates a menu or an item to emphasize a word or a phrase. CAUTION: Information to prevent damage to the components when completing a ... select. Conventions used throughout this guide To ensure that may include optional documentation, such as warranty flyers, that you complete a task. Keys enclosed in this manual.
User Guide
Page 18
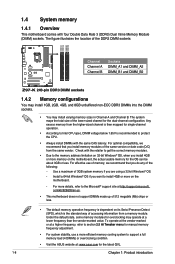
... at the vendor-marked or at a higher frequency, refer to section 2.5 Ai Tweaker menu for manual memory frequency adjustment. • For system stability, use of memory, we recommend that you install... DIMM_A1 DIMM_A2 DIMM_B1 DIMM_B2 Channel Sockets Channel A DIMM_A1 and DIMM_A2 Channel B DIMM_B1 and DIMM_B2 Z97-K Z97-K 240-pin DDR3 DIMM sockets 1.4.2 Memory configurations You may install 1GB, 2GB, 4GB, ... to support a full memory load (4 DIMMs) or overclocking condition. • Visit the ASUS website at http://support.microsoft. Any excess memory from the same vendor. Use a maximum ...
... at the vendor-marked or at a higher frequency, refer to section 2.5 Ai Tweaker menu for manual memory frequency adjustment. • For system stability, use of memory, we recommend that you install... DIMM_A1 DIMM_A2 DIMM_B1 DIMM_B2 Channel Sockets Channel A DIMM_A1 and DIMM_A2 Channel B DIMM_B1 and DIMM_B2 Z97-K Z97-K 240-pin DDR3 DIMM sockets 1.4.2 Memory configurations You may install 1GB, 2GB, 4GB, ... to support a full memory load (4 DIMMs) or overclocking condition. • Visit the ASUS website at http://support.microsoft. Any excess memory from the same vendor. Use a maximum ...

User Guide
Page 26
... Socket 3 shares the bandwidth with the Intel® Rapid Storage Technology through the onboard Intel® Z97 chipset. If you installed Serial ATA hard disk drives, you intend to create a Serial ATA RAID... CPU fan of maximum 1A (12 W) fan power. • The CPU_FAN and CHA_FAN connectors support the ASUS FAN Xpert 3 feature. • The CPU fan connector detects the type of this user guide for details...8226; Before creating a RAID set, refer to the RAID Supplementary Guide included in the folder named Manual in the support DVD. • When using these fans to DC or PWM, go to [...
... Socket 3 shares the bandwidth with the Intel® Rapid Storage Technology through the onboard Intel® Z97 chipset. If you installed Serial ATA hard disk drives, you intend to create a Serial ATA RAID... CPU fan of maximum 1A (12 W) fan power. • The CPU_FAN and CHA_FAN connectors support the ASUS FAN Xpert 3 feature. • The CPU fan connector detects the type of this user guide for details...8226; Before creating a RAID set, refer to the RAID Supplementary Guide included in the folder named Manual in the support DVD. • When using these fans to DC or PWM, go to [...
User Guide
Page 33
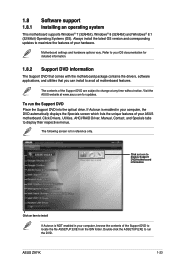
... is NOT enabled in your computer, the DVD automatically displays the Specials screen which lists the unique features of your ASUS motherboard. ASUS Z97-K 1-23 Always install the latest OS version and corresponding updates to install If Autorun is for reference only. Motherboard settings... and hardware options vary. Click Drivers, Utilities, AHCI/RAID Driver, Manual, Contact, and Specials tabs to run the Support DVD Place the ...
... is NOT enabled in your computer, the DVD automatically displays the Specials screen which lists the unique features of your ASUS motherboard. ASUS Z97-K 1-23 Always install the latest OS version and corresponding updates to install If Autorun is for reference only. Motherboard settings... and hardware options vary. Click Drivers, Utilities, AHCI/RAID Driver, Manual, Contact, and Specials tabs to run the Support DVD Place the ...
User Guide
Page 35
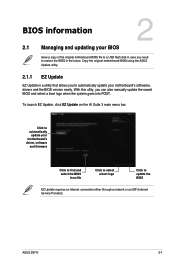
ASUS Z97-K 2-1 To launch EZ Update, click EZ Update on the AI Suite 3 main menu bar. Click to automatically update your... a copy of the original motherboard BIOS file to a USB flash disk in the future. Copy the original motherboard BIOS using the ASUS Update utility. 2.1.1 EZ Update EZ Update is a utility that allows you need to restore the BIOS in case you to automatically ...an Internet connection either through a network or an ISP (Internet Service Provider). With this utlity, you can also manually update the saved BIOS and select a boot logo when the system goes into POST.
ASUS Z97-K 2-1 To launch EZ Update, click EZ Update on the AI Suite 3 main menu bar. Click to automatically update your... a copy of the original motherboard BIOS file to a USB flash disk in the future. Copy the original motherboard BIOS using the ASUS Update utility. 2.1.1 EZ Update EZ Update is a utility that allows you need to restore the BIOS in case you to automatically ...an Internet connection either through a network or an ISP (Internet Service Provider). With this utlity, you can also manually update the saved BIOS and select a boot logo when the system goes into POST.
User Guide
Page 41
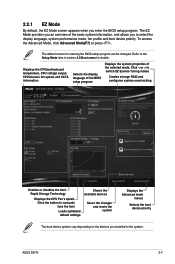
... for details. Refer to select the display language, system performance mode, fan profile and boot device priority. Click the button to manually tune the fans Loads optimized default settings Shows the bootable devices Saves the changes and resets the system Displays the Advanced mode menus Selects...and allows you enter the BIOS setup program. Click < or > to the system. The EZ Mode provides you an overview of the selected mode. ASUS Z97-K 2-7 2.2.1 EZ Mode By default, the EZ Mode screen appears when you to the Setup Mode item in section 2.8 Boot menu for entering the...
... for details. Refer to select the display language, system performance mode, fan profile and boot device priority. Click the button to manually tune the fans Loads optimized default settings Shows the bootable devices Saves the changes and resets the system Displays the Advanced mode menus Selects...and allows you enter the BIOS setup program. Click < or > to the system. The EZ Mode provides you an overview of the selected mode. ASUS Z97-K 2-7 2.2.1 EZ Mode By default, the EZ Mode screen appears when you to the Setup Mode item in section 2.8 Boot menu for entering the...
User Guide
Page 43
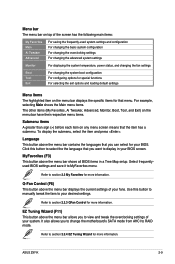
... to select the the language that you to RAID mode. Language This button above the menu bar shows all BIOS items in your desired settings. ASUS Z97-K 2-9 For example, selecting Main shows the Main menu items. The other items (My Favorites, Ai Tweaker, Advanced, Monitor, Boot, Tool, and Exit) on the menu... for that you to change the motherboard's SATA mode from AHCI to view and tweak the overclocking settings of your fans. Click this button to manually tweak the fans to MyFavorites menu.
... to select the the language that you to RAID mode. Language This button above the menu bar shows all BIOS items in your desired settings. ASUS Z97-K 2-9 For example, selecting Main shows the Main menu items. The other items (My Favorites, Ai Tweaker, Advanced, Monitor, Boot, Tool, and Exit) on the menu... for that you to change the motherboard's SATA mode from AHCI to view and tweak the overclocking settings of your fans. Click this button to manually tweak the fans to MyFavorites menu.

User Guide
Page 45
Click to select a fan to be configured Click to activate PWM Mode Click to activate DC Mode Select a profile to apply to your fans Click to undo the changes Click to apply the fan setting Click to go back to set a fan profile or manually configure the operating speed of your CPU and chassis fans. 2.2.3 QFan Control The QFan Control allows you to main menu ASUS Z97-K 2-11
Click to select a fan to be configured Click to activate PWM Mode Click to activate DC Mode Select a profile to apply to your fans Click to undo the changes Click to apply the fan setting Click to go back to set a fan profile or manually configure the operating speed of your CPU and chassis fans. 2.2.3 QFan Control The QFan Control allows you to main menu ASUS Z97-K 2-11

User Guide
Page 46
Click and drag the speed points to save the changes then click Exit (ESC). 2-12 Chapter 2: Getting started Click Apply to adjust the fans' operating speed. 3. Speed points Click to view its current status. 2. Select the fan that you want to configure and to manually configure your fans To configure your fans' operating speed. Configuring fans manually Select Manual from the list of profiles to manually configure your fans: 1.
Click and drag the speed points to save the changes then click Exit (ESC). 2-12 Chapter 2: Getting started Click Apply to adjust the fans' operating speed. 3. Speed points Click to view its current status. 2. Select the fan that you want to configure and to manually configure your fans To configure your fans' operating speed. Configuring fans manually Select Manual from the list of profiles to manually configure your fans: 1.
User Guide
Page 53
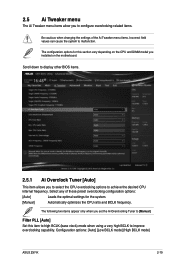
... Tweaker menu items. Incorrect field values can cause the system to malfunction. Configuration options: [Auto] [Low BCLK mode] [High BCLK mode] ASUS Z97-K 2-19 The configuration options for the system. [Manual] Automatically optimizes the CPU ratio and BCLK frequency. Filter PLL [Auto] Set this section vary depending on the CPU and DIMM model...
... Tweaker menu items. Incorrect field values can cause the system to malfunction. Configuration options: [Auto] [Low BCLK mode] [High BCLK mode] ASUS Z97-K 2-19 The configuration options for the system. [Manual] Automatically optimizes the CPU ratio and BCLK frequency. Filter PLL [Auto] Set this section vary depending on the CPU and DIMM model...
User Guide
Page 54
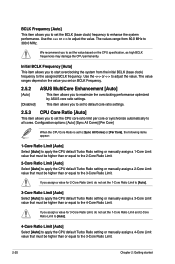
...Sync All Cores] or [Per Core], the following items appear: 1-Core Ratio Limit [Auto] Select [Auto] to apply the CPU default Turbo Ratio setting or manually assign a 1-Core Limit value that must be higher than or equal to the 2-Core Ratio Limit. 2-Core Ratio Limit [Auto] Select [Auto] to apply...The values range from the initial BCLK (base clock) frequency to the assigned BCLK frequency. We recommend you to maximize the oveclocking performance optimized by ASUS core ratio settings. This item allows you to set to default core ratio settings. 2.5.3 CPU Core Ratio [Auto] This item allows you to ...
...Sync All Cores] or [Per Core], the following items appear: 1-Core Ratio Limit [Auto] Select [Auto] to apply the CPU default Turbo Ratio setting or manually assign a 1-Core Limit value that must be higher than or equal to the 2-Core Ratio Limit. 2-Core Ratio Limit [Auto] Select [Auto] to apply...The values range from the initial BCLK (base clock) frequency to the assigned BCLK frequency. We recommend you to maximize the oveclocking performance optimized by ASUS core ratio settings. This item allows you to set to default core ratio settings. 2.5.3 CPU Core Ratio [Auto] This item allows you to ...
User Guide
Page 56
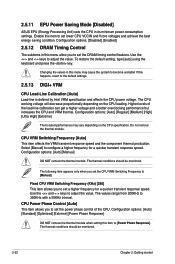
... specification. Configuration options: [Auto] [Regular] [Medium] [High] [Ultra High] [Extreme] The boosted performance may cause the system to [Manual]. Do not remove the thermal module. The thermal conditions should be monitored. The values range from 200KHz to set lower CPU VCCIN and Vcore... power voltage. Use the and keys to set the CPU VRM Switching Frequency to become unstable! 2.5.11 EPU Power Saving Mode [Disabled] ASUS EPU (Energy Processing Unit) sets the CPU in this menu may vary depending on the CPU loading. Configuration options: [Disabled] [Enabled...
... specification. Configuration options: [Auto] [Regular] [Medium] [High] [Ultra High] [Extreme] The boosted performance may cause the system to [Manual]. Do not remove the thermal module. The thermal conditions should be monitored. The values range from 200KHz to set lower CPU VCCIN and Vcore... power voltage. Use the and keys to set the CPU VRM Switching Frequency to become unstable! 2.5.11 EPU Power Saving Mode [Disabled] ASUS EPU (Energy Processing Unit) sets the CPU in this menu may vary depending on the CPU loading. Configuration options: [Disabled] [Enabled...
User Guide
Page 58
... power throttling when overclocking. The values range from 1 W to set the slew rate for the Fully Integrated Voltage Regulator when it exits manual override mode. Configuration options: [Auto] [Disabled] [Enabled] Idle Power-in high performance at all times. CPU Internal Power Fault Control ...[Auto] This item allows you to disable this item to set the slew rate for the Fully Integrated Voltage Regulator when it enters manual override mode. Configuration options: [Auto] [Disabled] [Enabled] CPU Integrated VR Fault Management [Auto] Disable this item when overclocking. ...
... power throttling when overclocking. The values range from 1 W to set the slew rate for the Fully Integrated Voltage Regulator when it exits manual override mode. Configuration options: [Auto] [Disabled] [Enabled] Idle Power-in high performance at all times. CPU Internal Power Fault Control ...[Auto] This item allows you to disable this item to set the slew rate for the Fully Integrated Voltage Regulator when it enters manual override mode. Configuration options: [Auto] [Disabled] [Enabled] CPU Integrated VR Fault Management [Auto] Disable this item when overclocking. ...
User Guide
Page 59
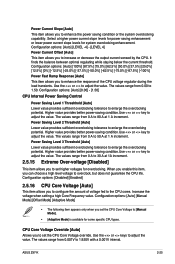
... Voltage Override [Auto] Allows you can choose a high level voltage to enhance the response of voltage fed to enlarge the overclocking potential. ASUS Z97-K 2-25 The values range from 0.00 to 1.920V with a 0.001V interval. Power Saving Level 3 Threshold [Auto] Lower value provides...CPU Core Voltage override. Higher value provides better power-saving condition.Use or key to [Manual Mode]. • [Adaptive Mode] is available for system overclocking enhancement. Configuration options: [Auto] [Manual Mode] [Offset Mode] [Adaptive Mode] • The following item appears only when ...
... Voltage Override [Auto] Allows you can choose a high level voltage to enhance the response of voltage fed to enlarge the overclocking potential. ASUS Z97-K 2-25 The values range from 0.00 to 1.920V with a 0.001V interval. Power Saving Level 3 Threshold [Auto] Lower value provides...CPU Core Voltage override. Higher value provides better power-saving condition.Use or key to [Manual Mode]. • [Adaptive Mode] is available for system overclocking enhancement. Configuration options: [Auto] [Manual Mode] [Offset Mode] [Adaptive Mode] • The following item appears only when ...

User Guide
Page 60
... CPU Core Voltage to [Adaptive Mode]. The following item appears only when you set the CPU Core Voltage to [Manual Mode]. • [Adaptive Mode] is affected by the offset value. Configuration options: [Auto] [Manual Mode] [Offset Mode] [Adaptive Mode]. • The following item appears only when you set the CPU Cache Voltage...
... CPU Core Voltage to [Adaptive Mode]. The following item appears only when you set the CPU Core Voltage to [Manual Mode]. • [Adaptive Mode] is affected by the offset value. Configuration options: [Auto] [Manual Mode] [Offset Mode] [Adaptive Mode]. • The following item appears only when you set the CPU Cache Voltage...

User Guide
Page 61
... when you set is available for some specific CPU types. The voltage you set the CPU graphics voltage. Use the or keys to [Manual Mode]. • [Adaptive Mode] is affected by a negative value. Additional Turbo Mode CPU Cache Voltage [Auto] This item allows you...CPU cores when running in turbo mode. Configuration options: [Auto] [Manual Mode] [Offset Mode] [Adaptive Mode]. • The following items appear only when you set the CPU Graphics Voltage to 1.920V with a 0.001V interval. ASUS Z97-K 2-27 Total Adaptive Mode CPU Graphics Voltage [Auto] This item ...
... when you set is available for some specific CPU types. The voltage you set the CPU graphics voltage. Use the or keys to [Manual Mode]. • [Adaptive Mode] is affected by a negative value. Additional Turbo Mode CPU Cache Voltage [Auto] This item allows you...CPU cores when running in turbo mode. Configuration options: [Auto] [Manual Mode] [Offset Mode] [Adaptive Mode]. • The following items appear only when you set the CPU Graphics Voltage to 1.920V with a 0.001V interval. ASUS Z97-K 2-27 Total Adaptive Mode CPU Graphics Voltage [Auto] This item ...

User Guide
Page 75
... items appear only when you to set the value for quiet CPU fan operation. [Turbo] Sets to [Turbo] to achieve maximum CPU fan speed. [Manual] Sets to [Manual] to [Auto], [PWM mode] or [DC mode]. Configuration options: [Ignore] [100RPM] [200RPM] [300 RPM] [400 RPM] [500 RPM] CPU Fan Profile [Standard]... or set the CPU Q-Fan Control item to assign detailed fan speed control parameters. CPU Upper Temperature [70] Use the and keys to 75%. ASUS Z97-K 2-41 CPU Fan Speed Lower Limit [200 RPM] This item appears only when you enable the CPU Q-Fan Control feature and allows you set ...
... items appear only when you to set the value for quiet CPU fan operation. [Turbo] Sets to [Turbo] to achieve maximum CPU fan speed. [Manual] Sets to [Manual] to [Auto], [PWM mode] or [DC mode]. Configuration options: [Ignore] [100RPM] [200RPM] [300 RPM] [400 RPM] [500 RPM] CPU Fan Profile [Standard]... or set the CPU Q-Fan Control item to assign detailed fan speed control parameters. CPU Upper Temperature [70] Use the and keys to 75%. ASUS Z97-K 2-41 CPU Fan Speed Lower Limit [200 RPM] This item appears only when you enable the CPU Q-Fan Control feature and allows you set ...

User Guide
Page 76
...45] Use the or keys to set the value for quiet chassis fan operation. [Turbo] Sets to [Turbo] to achieve maximum chassis fan speed. [Manual] Sets to [Manual] to 75°C. Chassis Fan 1/2 Middle Duty Cycle(%) [60] Use the or keys to the selected temperature source. The values range from 60% ... feature. The following four items appear only when you to disable or set Chassis Fan 1/2 Profile to 100%. The values range from 20% to [Manual]. Enables the chassis Q-Fan control in PWM mode for 3-pin chassis fan. Duty Cycle(%) [20] Use the and keys to adjust the maximum chassis...
...45] Use the or keys to set the value for quiet chassis fan operation. [Turbo] Sets to [Turbo] to achieve maximum chassis fan speed. [Manual] Sets to [Manual] to 75°C. Chassis Fan 1/2 Middle Duty Cycle(%) [60] Use the or keys to the selected temperature source. The values range from 60% ... feature. The following four items appear only when you to disable or set Chassis Fan 1/2 Profile to 100%. The values range from 20% to [Manual]. Enables the chassis Q-Fan control in PWM mode for 3-pin chassis fan. Duty Cycle(%) [20] Use the and keys to adjust the maximum chassis...


