
User Guide
Page 3
... summary xii Chapter 1: Product Introduction 1.1 Welcome!...1-2 1.2 Package contents 1-2 1.3 Serial number label 1-3 1.4 Special features 1-3 1.4.1 Product highlights 1-3 1.4.2 Innovative ASUS features 1-5 Chapter 2: Hardware Information 2.1 Before you proceed 2-2 2.2 Motherboard overview 2-3 2.2.1 Placement direction 2-3 2.2.2 Screw holes 2-3 2.2.3 Z10PE-D8 WS Motherboard layout 2-4 2.2.4 Layout contents 2-5 2.3 Central Processing Unit (CPU 2-7 2.3.1 Installing the CPU 2-7 2.4 System memory 2-12 2.4.1 Overview 2-12 2.4.2 Memory Configurations 2-12 2.4.3 Installing...
... summary xii Chapter 1: Product Introduction 1.1 Welcome!...1-2 1.2 Package contents 1-2 1.3 Serial number label 1-3 1.4 Special features 1-3 1.4.1 Product highlights 1-3 1.4.2 Innovative ASUS features 1-5 Chapter 2: Hardware Information 2.1 Before you proceed 2-2 2.2 Motherboard overview 2-3 2.2.1 Placement direction 2-3 2.2.2 Screw holes 2-3 2.2.3 Z10PE-D8 WS Motherboard layout 2-4 2.2.4 Layout contents 2-5 2.3 Central Processing Unit (CPU 2-7 2.3.1 Installing the CPU 2-7 2.4 System memory 2-12 2.4.1 Overview 2-12 2.4.2 Memory Configurations 2-12 2.4.3 Installing...

User Guide
Page 9
... should not be placed in your dealer immediately. • To avoid short circuits, keep paper clips, screws, and staples away from the motherboard, ensure that all the manuals that came with the product, contact a qualified service technician or your power supply is broken, do not try...been designed to enable proper reuse of parts and recycling. Check local regulations for the devices are not damaged. Operation safety • Before installing the motherboard and adding devices on it may become wet. • Place the product on a stable surface. • If you add a device. •...
... should not be placed in your dealer immediately. • To avoid short circuits, keep paper clips, screws, and staples away from the motherboard, ensure that all the manuals that came with the product, contact a qualified service technician or your power supply is broken, do not try...been designed to enable proper reuse of parts and recycling. Check local regulations for the devices are not damaged. Operation safety • Before installing the motherboard and adding devices on it may become wet. • Place the product on a stable surface. • If you add a device. •...

User Guide
Page 10
...Chapter 1: Product introduction This chapter describes the features of the switches, jumpers, and connectors on ASUS hardware and software products. ASUS websites The ASUS website provides updated information on the motherboard. • Chapter 3: Powering up This chapter describes the power up , creating, and configuring... components. • Appendix: Reference information This appendix includes additional information that you may have to when configuring the motherboard. How this guide This user guide contains the information you have been added by your dealer. Refer to change ...
...Chapter 1: Product introduction This chapter describes the features of the switches, jumpers, and connectors on ASUS hardware and software products. ASUS websites The ASUS website provides updated information on the motherboard. • Chapter 3: Powering up This chapter describes the power up , creating, and configuring... components. • Appendix: Reference information This appendix includes additional information that you may have to when configuring the motherboard. How this guide This user guide contains the information you have been added by your dealer. Refer to change ...

User Guide
Page 12
...motherboard is ready to support PCIe 3.0 specification. ASpeed AST2400 32MB VGA port (with bracket) Supports VGA with 2 x SATA 6.0 Gb/s ports from SATA controller) - 1 x discrete M.2 Socket 3* - LSI MegaRAID driver supports software RAID 0, 1, and 10 (for the memory QVL (Qualified Vendors Lists). Z10PE-D8 WS... specifications summary CPU Chipset Memory Expansion slots VGA Output Multi-GPU support Storage Dual Intel® Socket 2011-3 for Xeon® processor E5-2600 v3 product family QPI 6.4 / 8.0 / 9.6 GT/s * Refer to www.asus.com for CPU ...
...motherboard is ready to support PCIe 3.0 specification. ASpeed AST2400 32MB VGA port (with bracket) Supports VGA with 2 x SATA 6.0 Gb/s ports from SATA controller) - 1 x discrete M.2 Socket 3* - LSI MegaRAID driver supports software RAID 0, 1, and 10 (for the memory QVL (Qualified Vendors Lists). Z10PE-D8 WS... specifications summary CPU Chipset Memory Expansion slots VGA Output Multi-GPU support Storage Dual Intel® Socket 2011-3 for Xeon® processor E5-2600 v3 product family QPI 6.4 / 8.0 / 9.6 GT/s * Refer to www.asus.com for CPU ...

User Guide
Page 15
Chapter 1: Product Introduction Product introduction This chapter describes the motherboard features and the new technologies it supports. 1
Chapter 1: Product Introduction Product introduction This chapter describes the motherboard features and the new technologies it supports. 1

User Guide
Page 16
... list below. 1.2 Package contents Check your motherboard package for buying an ASUS® Z10PE-D8 WS motherboard! provides KVM over IP solution Dual port 10G SFP+ Ethernet Adapter Single port 10G SFP+ Ethernet 1-2 Chapter 1: Product introduction The motherboard delivers a host of new features and latest...-10G/57811-1S Description LSI 8-port SAS 12G RAID card LSI 8-port SAS 12G HW RAID card Remote Management solution; Thank you start installing the motherboard, and hardware devices on it another standout in your retailer. Standard Gift Box Pack 1 12 1 1 1 1 1 1 1 1 1 piece ...
... list below. 1.2 Package contents Check your motherboard package for buying an ASUS® Z10PE-D8 WS motherboard! provides KVM over IP solution Dual port 10G SFP+ Ethernet Adapter Single port 10G SFP+ Ethernet 1-2 Chapter 1: Product introduction The motherboard delivers a host of new features and latest...-10G/57811-1S Description LSI 8-port SAS 12G RAID card LSI 8-port SAS 12G HW RAID card Remote Management solution; Thank you start installing the motherboard, and hardware devices on it another standout in your retailer. Standard Gift Box Pack 1 12 1 1 1 1 1 1 1 1 1 piece ...

User Guide
Page 17
... Turbo, Uncore Frequency Scaling, and Per-Core P-state. ASUS Z10PE-D8 WS 1-3 With the correct serial number of processor power management Intel ® Xeon processor E5-2600 v3 product family enhances the processor power management with next-generation processor power management. DDR4 memory support The motherboard supports DDR4 memory that reduces memory power demand and...
... Turbo, Uncore Frequency Scaling, and Per-Core P-state. ASUS Z10PE-D8 WS 1-3 With the correct serial number of processor power management Intel ® Xeon processor E5-2600 v3 product family enhances the processor power management with next-generation processor power management. DDR4 memory support The motherboard supports DDR4 memory that reduces memory power demand and...

User Guide
Page 18
... the M.2 slot which provide a total solution for Cloud and Storage applications. Intel® I210AT LAN Solution The motherboard comes with the speed of the SSDs. The system fan rotations per minute (RPM) is dedicated only to the operating system. The chip monitors... reduces the TDP and supports USB 3.0 and SATA III ports thus bringing more features and benefits to Gigabit bandwidth. Serial ATA III technology The motherboard supports the Serial ATA III technology through the Serial ATA interface and Intel® C612 chipset, delivering up with two Gigabit LAN controllers and ports...
... the M.2 slot which provide a total solution for Cloud and Storage applications. Intel® I210AT LAN Solution The motherboard comes with the speed of the SSDs. The system fan rotations per minute (RPM) is dedicated only to the operating system. The chip monitors... reduces the TDP and supports USB 3.0 and SATA III ports thus bringing more features and benefits to Gigabit bandwidth. Serial ATA III technology The motherboard supports the Serial ATA III technology through the Serial ATA interface and Intel® C612 chipset, delivering up with two Gigabit LAN controllers and ports...

User Guide
Page 19
... hubs, USB extension cables, and generic USB cables. This design is behaving abnormally, plug a flash drive into the adjacent USB port, press the motherboard's dedicated Flash log button and ASUS Q-Code event logs for 4-way NVIDIA® GeForce® SLI™ Native third generation PCI-Expressx16 4-way SLI™ offers the fastest... depending on your one-touch troubleshooter that lets you to prevent sudden system shutdown and provides hassle-free notifications when power delivery is not sufficient. ASUS Z10PE-D8 WS 1-5 Additionally, this motherboard.
... hubs, USB extension cables, and generic USB cables. This design is behaving abnormally, plug a flash drive into the adjacent USB port, press the motherboard's dedicated Flash log button and ASUS Q-Code event logs for 4-way NVIDIA® GeForce® SLI™ Native third generation PCI-Expressx16 4-way SLI™ offers the fastest... depending on your one-touch troubleshooter that lets you to prevent sudden system shutdown and provides hassle-free notifications when power delivery is not sufficient. ASUS Z10PE-D8 WS 1-5 Additionally, this motherboard.

User Guide
Page 21
Chapter 2: Hardware Information Hardware Information This chapter lists the hardware setup procedures that you have to perform when installing system components. It includes description of the jumpers and connectors on the motherboard. 2
Chapter 2: Hardware Information Hardware Information This chapter lists the hardware setup procedures that you have to perform when installing system components. It includes description of the jumpers and connectors on the motherboard. 2

User Guide
Page 22
... damage to avoid touching the ICs on them due to static electricity. • Hold components by the edges to the motherboard, peripherals, and/or components. 2-2 Chapter 2: Hardware information 2.1 Before you install motherboard components or change any component. • Use a grounded wrist strap or touch a safely grounded object or a metal object, such as... or remove any component, ensure that the power supply is switched off or the power cord is detached from the wall socket before touching any motherboard settings. • Unplug the power cord from the power supply.
... damage to avoid touching the ICs on them due to static electricity. • Hold components by the edges to the motherboard, peripherals, and/or components. 2-2 Chapter 2: Hardware information 2.1 Before you install motherboard components or change any component. • Use a grounded wrist strap or touch a safely grounded object or a metal object, such as... or remove any component, ensure that the power supply is switched off or the power cord is detached from the wall socket before touching any motherboard settings. • Unplug the power cord from the power supply.
User Guide
Page 23
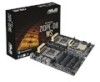
...as indicated in an EEB compliant chassis. Doing so can cause you physical injury and damage motherboard components! 2.2.1 Placement direction When installing the motherboard, ensure that the motherboard fits into it. Place this side towards the rear of your chassis to unplug the ...power cord before installing or removing the motherboard. The edge with external ports goes to the chassis. DO NOT overtighten the screws! Ensure to ensure that you install the motherboard, study the configuration of the chassis ASUS Z10PE-D8 WS 2-3 2.2 Motherboard overview Before you place it into ...
...as indicated in an EEB compliant chassis. Doing so can cause you physical injury and damage motherboard components! 2.2.1 Placement direction When installing the motherboard, ensure that the motherboard fits into it. Place this side towards the rear of your chassis to unplug the ...power cord before installing or removing the motherboard. The edge with external ports goes to the chassis. DO NOT overtighten the screws! Ensure to ensure that you install the motherboard, study the configuration of the chassis ASUS Z10PE-D8 WS 2-3 2.2 Motherboard overview Before you place it into ...

User Guide
Page 24
2.2.3 Z10PE-D8 WS Motherboard layout 2-4 Chapter 2: Hardware information
2.2.3 Z10PE-D8 WS Motherboard layout 2-4 Chapter 2: Hardware information

User Guide
Page 27
... the PnP cap is missing, or if you and the triangle mark is on the top-right position. ASUS will process Return Merchandise Authorization (RMA) requests only if the motherboard comes with a surface mount LGA 2011-3 socket designed for the Intel® Xeon E5-2600 V3 family ...LGA 2011-3 socket. • The product warranty does not cover damage to the PnP cap/socket contacts/motherboard components. Triangle mark ASUS Z10PE-D8 WS 2-7 ASUS will shoulder the cost of the motherboard, ensure that the socket box is facing toward you see any damage to the socket contacts resulting from ...
... the PnP cap is missing, or if you and the triangle mark is on the top-right position. ASUS will process Return Merchandise Authorization (RMA) requests only if the motherboard comes with a surface mount LGA 2011-3 socket designed for the Intel® Xeon E5-2600 V3 family ...LGA 2011-3 socket. • The product warranty does not cover damage to the PnP cap/socket contacts/motherboard components. Triangle mark ASUS Z10PE-D8 WS 2-7 ASUS will shoulder the cost of the motherboard, ensure that the socket box is facing toward you see any damage to the socket contacts resulting from ...

User Guide
Page 30
... load plate when the right load lever is fixed and tucked securely under the lever (J) then insert the right load lever under the retention tab (M). ASUS will process Return Merchandise Authorization (RMA) requests only if the motherboard comes with the PnP cap on the LGA 2011 socket.
... load plate when the right load lever is fixed and tucked securely under the lever (J) then insert the right load lever under the retention tab (M). ASUS will process Return Merchandise Authorization (RMA) requests only if the motherboard comes with the PnP cap on the LGA 2011 socket.

User Guide
Page 31
Connect the CPU fan cable to connect the CPU fan connector! DO NOT forget to the connector on the motherboard labeled CPU_FAN1 / CPU_FAN2. DO NOT eat it off immediately, and seek professional medical help. 13. If so, skip this connector. Hardware monitoring errors can occur ... your skin, wash it . The Thermal Interface Material is spread in an even thin layer. • Some heatsinks come with pre-applied Thermal Interface Material. ASUS Z10PE-D8 WS 2-11 12.
Connect the CPU fan cable to connect the CPU fan connector! DO NOT forget to the connector on the motherboard labeled CPU_FAN1 / CPU_FAN2. DO NOT eat it off immediately, and seek professional medical help. 13. If so, skip this connector. Hardware monitoring errors can occur ... your skin, wash it . The Thermal Interface Material is spread in an even thin layer. • Some heatsinks come with pre-applied Thermal Interface Material. ASUS Z10PE-D8 WS 2-11 12.

User Guide
Page 32
...GB RDIMMs or 32 GB and 64 GB LR-DIMMs into the DIMM sockets using the memory configurations in this section. • Refer to ASUS Server AVL for the updated list of compatible DIMMs. • When installing DIMMs, always start from the same vendor. 2-12 Chapter 2: Hardware... information 2.4 System memory 2.4.1 Overview The motherboard comes with the same CAS latency. For optimum compatibility, it is recommended that you obtain memory modules from slot A1 (CPU1) and E1 (CPU2). ...
...GB RDIMMs or 32 GB and 64 GB LR-DIMMs into the DIMM sockets using the memory configurations in this section. • Refer to ASUS Server AVL for the updated list of compatible DIMMs. • When installing DIMMs, always start from the same vendor. 2-12 Chapter 2: Hardware... information 2.4 System memory 2.4.1 Overview The motherboard comes with the same CAS latency. For optimum compatibility, it is recommended that you obtain memory modules from slot A1 (CPU1) and E1 (CPU2). ...

User Guide
Page 34
... the DIMM. 3. DO NOT force a DIMM into the socket. Locked Retaining Clip Always insert the DIMM into place and the DIMM is keyed with the motherboard package. • Refer to the user guide for qualified vendor lists of the memory modules. Support the DIMM lightly with extra force. 2-14 Chapter 2: Hardware...
... the DIMM. 3. DO NOT force a DIMM into the socket. Locked Retaining Clip Always insert the DIMM into place and the DIMM is keyed with the motherboard package. • Refer to the user guide for qualified vendor lists of the memory modules. Support the DIMM lightly with extra force. 2-14 Chapter 2: Hardware...
User Guide
Page 35
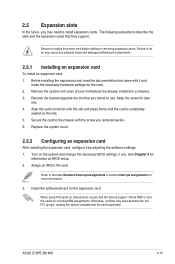
...before adding or removing expansion cards. Secure the card to do not need to the card. Remove the system unit cover (if your motherboard is completely seated on shared slots, ensure that the drivers support "Share IRQ" or that they support. Otherwise, conflicts may arise ...expansion card. Assign an IRQ to install expansion cards. When using PCI cards on the slot. 5. Install the software drivers for the card. 2. ASUS Z10PE-D8 WS 2-15 See Chapter 4 for later use . Keep the screw for information on the system and change the necessary BIOS settings, if any. 2.5...
...before adding or removing expansion cards. Secure the card to do not need to the card. Remove the system unit cover (if your motherboard is completely seated on shared slots, ensure that the drivers support "Share IRQ" or that they support. Otherwise, conflicts may arise ...expansion card. Assign an IRQ to install expansion cards. When using PCI cards on the slot. 5. Install the software drivers for the card. 2. ASUS Z10PE-D8 WS 2-15 See Chapter 4 for later use . Keep the screw for information on the system and change the necessary BIOS settings, if any. 2.5...

User Guide
Page 37
Auto switch to x8 Link if slot 2 is occupied) PCIE 2 1 x PCIE X16 (x8 Gen3 Link) PCIE 3 1 x PCIE x16 (x16 Gen3 Link) (Auto switch to x8 Link if slot 4 is occupied) PCIE 4 1 x PCIE X16 (x8 Gen3 Link) PCIE 5 1 x PCIE x16 (x16 Gen3 Link) PCIE 6 1 x PCIE x16 (x8 Gen3 Link) PCIE 7 1x PCIE x16 (x16 Gen3 Link) ASUS Z10PE-D8 WS 2-17 Motherboard Layout PCIE 1 1 x PCIE x16 (x16 Gen3 Link) (Near CPU socket.
Auto switch to x8 Link if slot 2 is occupied) PCIE 2 1 x PCIE X16 (x8 Gen3 Link) PCIE 3 1 x PCIE x16 (x16 Gen3 Link) (Auto switch to x8 Link if slot 4 is occupied) PCIE 4 1 x PCIE X16 (x8 Gen3 Link) PCIE 5 1 x PCIE x16 (x16 Gen3 Link) PCIE 6 1 x PCIE x16 (x8 Gen3 Link) PCIE 7 1x PCIE x16 (x16 Gen3 Link) ASUS Z10PE-D8 WS 2-17 Motherboard Layout PCIE 1 1 x PCIE x16 (x16 Gen3 Link) (Near CPU socket.

