User Guide
Page 2
... applicable license entitles you may be registered trademarks or copyrights of ASUSTeK COMPUTER INC. ("ASUS"). ASUS ASSUMES NO RESPONSIBILITY OR LIABILITY FOR ANY ERRORS OR INACCURACIES THAT MAY APPEAR IN THIS MANUAL, INCLUDING THE PRODUCTS AND SOFTWARE DESCRIBED IN IT. This offer is eager to : ...ASUSTeK Computer Inc. ASUS PROVIDES THIS MANUAL "AS IS" WITHOUT WARRANTY OF ANY KIND, EITHER EXPRESS OR IMPLIED,...
... applicable license entitles you may be registered trademarks or copyrights of ASUSTeK COMPUTER INC. ("ASUS"). ASUS ASSUMES NO RESPONSIBILITY OR LIABILITY FOR ANY ERRORS OR INACCURACIES THAT MAY APPEAR IN THIS MANUAL, INCLUDING THE PRODUCTS AND SOFTWARE DESCRIBED IN IT. This offer is eager to : ...ASUSTeK Computer Inc. ASUS PROVIDES THIS MANUAL "AS IS" WITHOUT WARRANTY OF ANY KIND, EITHER EXPRESS OR IMPLIED,...
User Guide
Page 5
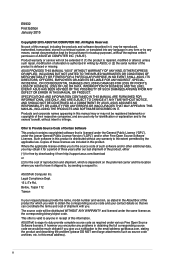
... and adding devices on a stable surface. • If you add a device. • Before connecting or removing signal cables from the motherboard, ensure that all the manuals that your local power company. • If the power supply is set to fix it , carefully read all power cables are unplugged. • Seek professional...
... and adding devices on a stable surface. • If you add a device. • Before connecting or removing signal cables from the motherboard, ensure that all the manuals that your local power company. • If the power supply is set to fix it , carefully read all power cables are unplugged. • Seek professional...
User Guide
Page 7
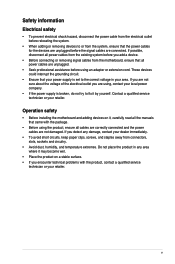
... or a phrase. Typography Bold text Indicates a menu or an item to help you must press the Enter or Return key. vii Conventions used throughout this manual.
... or a phrase. Typography Bold text Indicates a menu or an item to help you must press the Enter or Return key. vii Conventions used throughout this manual.
User Guide
Page 14
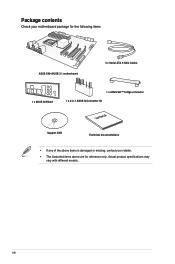
Package contents Check your motherboard package for the following items ASUS X99-A/USB 3.1 motherboard 4 x Serial ATA 6 Gb/s cables 1 x ASUS Q-Shield 1 x ASUS SLI™ bridge connector 1 x 2-in-1 ASUS Q-Connector kit User Manual Support DVD Technical documentations • If any of the above items is damaged or missing, contact your retailer. • The illustrated items above are for reference only. xiv Actual product specifications may vary with different models.
Package contents Check your motherboard package for the following items ASUS X99-A/USB 3.1 motherboard 4 x Serial ATA 6 Gb/s cables 1 x ASUS Q-Shield 1 x ASUS SLI™ bridge connector 1 x 2-in-1 ASUS Q-Connector kit User Manual Support DVD Technical documentations • If any of the above items is damaged or missing, contact your retailer. • The illustrated items above are for reference only. xiv Actual product specifications may vary with different models.

User Guide
Page 24
..., refer to section 3.5 Ai Tweaker menu for single-channel operation. • According to Intel® CPU spec, DIMM voltage below 1.65 V is then mapped for manual memory frequency adjustment. • For system stability, use of memory, we recommend that the DIMM fan fits to the Microsoft® support site at a lower...
..., refer to section 3.5 Ai Tweaker menu for single-channel operation. • According to Intel® CPU spec, DIMM voltage below 1.65 V is then mapped for manual memory frequency adjustment. • For system stability, use of memory, we recommend that the DIMM fan fits to the Microsoft® support site at a lower...

User Guide
Page 33
...; SATA Controller 2 shared - - - - - - - shared - - shared - shared - - - - - * PCIe x16_2 is manually switched to x4 mode, the IRQ assignment will be changed to x1 mode by default. PCIe x16_3 shared - - - - - - - shared - - - - Intel® EHCI 2 - - ASMedia U3 Controller - - When the bandwidth is set to A. Chapter 1 ASUS X99-A/USB 3.1 1-17 shared - - - - - SMBUS Controller - - Intel® SATA Controller 1 - shared...
...; SATA Controller 2 shared - - - - - - - shared - - shared - shared - - - - - * PCIe x16_2 is manually switched to x4 mode, the IRQ assignment will be changed to x1 mode by default. PCIe x16_3 shared - - - - - - - shared - - - - Intel® EHCI 2 - - ASMedia U3 Controller - - When the bandwidth is set to A. Chapter 1 ASUS X99-A/USB 3.1 1-17 shared - - - - - SMBUS Controller - - Intel® SATA Controller 1 - shared...
User Guide
Page 35
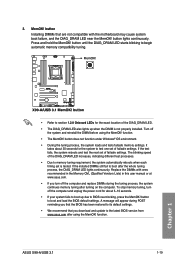
... The DIAG_DRAM LED also lights up due to memory tuning requirement, the system automatically reboots when each timing set is not properly installed. function. ASUS X99-A/USB 3.1 1-19 Chapter 1 MemOK! button lights continuously. function. • The MemOK! Replace the DIMMs with the motherboard may cause system boot ...• We recommend that are not compatible with ones recommended in the Memory QVL (Qualified Vendors Lists) in this user manual or at www.asus.com. • If you download and update to boot up when the DIMM is tested. button until the DIAG_DRAM LED ...
... The DIAG_DRAM LED also lights up due to memory tuning requirement, the system automatically reboots when each timing set is not properly installed. function. ASUS X99-A/USB 3.1 1-19 Chapter 1 MemOK! button lights continuously. function. • The MemOK! Replace the DIMMs with the motherboard may cause system boot ...• We recommend that are not compatible with ones recommended in the Memory QVL (Qualified Vendors Lists) in this user manual or at www.asus.com. • If you download and update to boot up when the DIMM is tested. button until the DIAG_DRAM LED ...

User Guide
Page 47
...manual bundled in the BIOS to [RAID Mode]. If you can support one SATA Express device or two SATA devices. • Due to create a Serial ATA RAID set using these connectors, set to Serial ATA 6 Gb/s hard disk drives via Serial ATA 6 Gb/s signal cables. ASUS X99-A/USB... 3.1 1-31 Intel® X99 Serial ATA 6 Gb/s connectors (7-pin SATA6G_12, SATA6G_34, SATA6G_5, SATA6G_6/SATAEXPRESS, SATA6G_78, SATA6G_910) These connectors connect to [AHCI Mode] ...
...manual bundled in the BIOS to [RAID Mode]. If you can support one SATA Express device or two SATA devices. • Due to create a Serial ATA RAID set using these connectors, set to Serial ATA 6 Gb/s hard disk drives via Serial ATA 6 Gb/s signal cables. ASUS X99-A/USB... 3.1 1-31 Intel® X99 Serial ATA 6 Gb/s connectors (7-pin SATA6G_12, SATA6G_34, SATA6G_5, SATA6G_6/SATAEXPRESS, SATA6G_78, SATA6G_910) These connectors connect to [AHCI Mode] ...
User Guide
Page 61
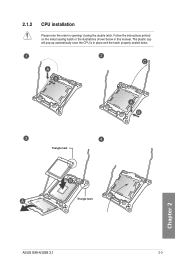
C A B A B Triangle mark B A Triangle mark Chapter 2 ASUS X99-A/USB 3.1 2-3 The plastic cap will pop up automatically once the CPU is in opening/ closing the double latch. 2.1.2 CPU installation Please note the order in place and the hatch properly sealed down. Follow the instructions printed on the metal sealing hatch or the illustrations shown below in this manual.
C A B A B Triangle mark B A Triangle mark Chapter 2 ASUS X99-A/USB 3.1 2-3 The plastic cap will pop up automatically once the CPU is in opening/ closing the double latch. 2.1.2 CPU installation Please note the order in place and the hatch properly sealed down. Follow the instructions printed on the metal sealing hatch or the illustrations shown below in this manual.
User Guide
Page 77
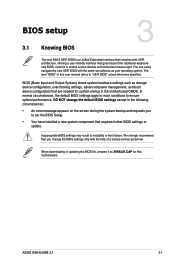
... or updating the BIOS file, rename it as X99AU31.CAP for system startup in the motherboard CMOS. Chapter 3 ASUS X99-A/USB 3.1 3-1 Chapter 3: BIOS setup BIOS setup 3.1 Knowing BIOS 3 The new ASUS UEFI BIOS is a Unified Extensible Interface that complies with UEFI architecture, offering a user-friendly interface that goes beyond... settings apply to most conditions to "UEFI BIOS" unless otherwise specified. We strongly recommend that are needed for this user manual refers to ensure optimal performance. Inappropriate BIOS settings may result to instability or boot failure.
... or updating the BIOS file, rename it as X99AU31.CAP for system startup in the motherboard CMOS. Chapter 3 ASUS X99-A/USB 3.1 3-1 Chapter 3: BIOS setup BIOS setup 3.1 Knowing BIOS 3 The new ASUS UEFI BIOS is a Unified Extensible Interface that complies with UEFI architecture, offering a user-friendly interface that goes beyond... settings apply to most conditions to "UEFI BIOS" unless otherwise specified. We strongly recommend that are needed for this user manual refers to ensure optimal performance. Inappropriate BIOS settings may result to instability or boot failure.
User Guide
Page 79
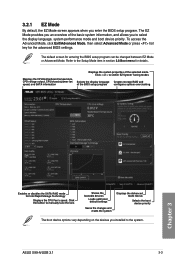
... the system properties of the basic system information, and allows you an overview of the selected mode. Click the button to manually tune the fans Shows the bootable devices Loads optimized default settings Saves the changes and resets the system Displays the Advanced mode menus...the BIOS setup program. Refer to the system. Click < or > to select the display language, system performance mode and boot device priority. ASUS X99-A/USB 3.1 3-3 The default screen for the advanced BIOS settings. To access the Advanced Mode, click Exit/Advanced Mode, then select Advanced Mode or...
... the system properties of the basic system information, and allows you an overview of the selected mode. Click the button to manually tune the fans Shows the bootable devices Loads optimized default settings Saves the changes and resets the system Displays the Advanced mode menus...the BIOS setup program. Refer to the system. Click < or > to select the display language, system performance mode and boot device priority. ASUS X99-A/USB 3.1 3-3 The default screen for the advanced BIOS settings. To access the Advanced Mode, click Exit/Advanced Mode, then select Advanced Mode or...
User Guide
Page 81
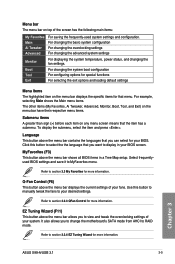
... menu bar shows all BIOS items in your BIOS screen. Refer to section 3.2.3 QFan Control for that you to display in a Tree Map setup. Chapter 3 ASUS X99-A/USB 3.1 3-5 Select frequentlyused BIOS settings and save it to your system. It also allows you want to view and tweak the overclocking settings of the screen... means that you to change the motherboard's SATA mode from AHCI to select the the language that the item has a submenu. Click this button to manually tweak the fans to MyFavorites menu. Menu bar The menu bar on top of your desired settings.
... menu bar shows all BIOS items in your BIOS screen. Refer to section 3.2.3 QFan Control for that you to display in a Tree Map setup. Chapter 3 ASUS X99-A/USB 3.1 3-5 Select frequentlyused BIOS settings and save it to your system. It also allows you want to view and tweak the overclocking settings of the screen... means that you to change the motherboard's SATA mode from AHCI to select the the language that the item has a submenu. Click this button to manually tweak the fans to MyFavorites menu. Menu bar The menu bar on top of your desired settings.
User Guide
Page 83
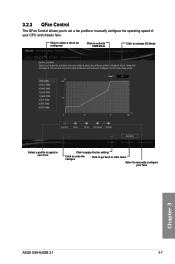
3.2.3 QFan Control The QFan Control allows you to manually configure your CPU and chassis fans. Click to select a fan to be configured Click to activate PWM Mode Click to activate DC Mode Chapter 3 Select a profile to apply to your fans Click to apply the fan setting Click to undo the changes Click to go back to main menu Select to set a fan profile or manually configure the operating speed of your fans ASUS X99-A/USB 3.1 3-7
3.2.3 QFan Control The QFan Control allows you to manually configure your CPU and chassis fans. Click to select a fan to be configured Click to activate PWM Mode Click to activate DC Mode Chapter 3 Select a profile to apply to your fans Click to apply the fan setting Click to undo the changes Click to go back to main menu Select to set a fan profile or manually configure the operating speed of your fans ASUS X99-A/USB 3.1 3-7
User Guide
Page 84
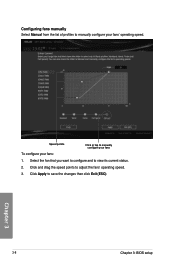
Click Apply to view its current status. 2. Speed points Click or tap to manually configure your fans To configure your fans' operating speed. Configuring fans manually Select Manual from the list of profiles to manually configure your fans: 1. Select the fan that you want to configure and to save the changes then click Exit (ESC). 3-8 Chapter 3: BIOS setup Chapter 3 Click and drag the speed points to adjust the fans' operating speed. 3.
Click Apply to view its current status. 2. Speed points Click or tap to manually configure your fans To configure your fans' operating speed. Configuring fans manually Select Manual from the list of profiles to manually configure your fans: 1. Select the fan that you want to configure and to save the changes then click Exit (ESC). 3-8 Chapter 3: BIOS setup Chapter 3 Click and drag the speed points to adjust the fans' operating speed. 3.
User Guide
Page 91
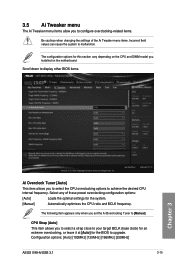
...[125MHz] [166MHz] [250MHz] ASUS X99-A/USB 3.1 3-15 3.5 Ai Tweaker menu The Ai Tweaker menu items allow you to configure overclocking-related items. Be cautious when changing the settings of these preset overclocking configuration options: [Auto] Loads the optimal settings for the system. [Manual] Automatically optimizes the CPU ratio ... [Auto] for this section vary depending on the CPU and DIMM model you to select the CPU overclocking options to [Manual]. The configuration options for the BIOS to malfunction. Select any of the Ai Tweaker menu items. Incorrect field values can cause...
...[125MHz] [166MHz] [250MHz] ASUS X99-A/USB 3.1 3-15 3.5 Ai Tweaker menu The Ai Tweaker menu items allow you to configure overclocking-related items. Be cautious when changing the settings of these preset overclocking configuration options: [Auto] Loads the optimal settings for the system. [Manual] Automatically optimizes the CPU ratio ... [Auto] for this section vary depending on the CPU and DIMM model you to select the CPU overclocking options to [Manual]. The configuration options for the BIOS to malfunction. Select any of the Ai Tweaker menu items. Incorrect field values can cause...

User Guide
Page 92
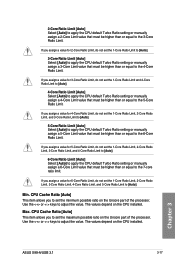
... [SB PLL] Filter PLL [Auto] Set this item to high BCLK (base clock) mode when using a very high BCLK to adjust the value. ASUS MultiCore Enhancement [Auto] [Auto] This item allows you to maximize the oveclocking performance optimized by default for a better overclocking capability. The values range from ...value you set the CPU Core Ratio to [Per Core]. 1-Core Ratio Limit [Auto] Select [Auto] to apply the CPU default Turbo Ratio setting or manually assign a 1-Core Limit value that need precise clock jitters. Use the or to 300.0 MHz. Configuration options: [Auto] [Low BCLK mode] [High...
... [SB PLL] Filter PLL [Auto] Set this item to high BCLK (base clock) mode when using a very high BCLK to adjust the value. ASUS MultiCore Enhancement [Auto] [Auto] This item allows you to maximize the oveclocking performance optimized by default for a better overclocking capability. The values range from ...value you set the CPU Core Ratio to [Per Core]. 1-Core Ratio Limit [Auto] Select [Auto] to apply the CPU default Turbo Ratio setting or manually assign a 1-Core Limit value that need precise clock jitters. Use the or to 300.0 MHz. Configuration options: [Auto] [Low BCLK mode] [High...
User Guide
Page 93
...Auto]. 4-Core Ratio Limit [Auto] Select [Auto] to apply the CPU default Turbo Ratio setting or manually assign a 4-Core Limit value that must be higher than or equal to the 4-Core Ratio Limit. Chapter 3 ASUS X99-A/USB 3.1 3-17 CPU Cache Ratio [Auto] This item allows you assign a value for 3-Core Ratio ...Core Ratio Limit, and 4-Core Ratio Limit to [Auto]. 6-Core Ratio Limit [Auto] Select [Auto] to apply the CPU default Turbo Ratio setting or manually assign a 6-Core Limit value that must be higher than or equal to the 6-Core Ratio Limit. Max. If you assign a value for 2-Core ...
...Auto]. 4-Core Ratio Limit [Auto] Select [Auto] to apply the CPU default Turbo Ratio setting or manually assign a 4-Core Limit value that must be higher than or equal to the 4-Core Ratio Limit. Chapter 3 ASUS X99-A/USB 3.1 3-17 CPU Cache Ratio [Auto] This item allows you assign a value for 3-Core Ratio ...Core Ratio Limit, and 4-Core Ratio Limit to [Auto]. 6-Core Ratio Limit [Auto] Select [Auto] to apply the CPU default Turbo Ratio setting or manually assign a 6-Core Limit value that must be higher than or equal to the 6-Core Ratio Limit. Max. If you assign a value for 2-Core ...
User Guide
Page 101
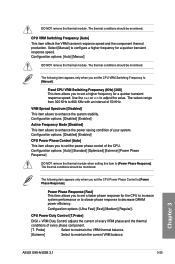
...Chapter 3 ASUS X99-A/USB 3.1 3-25 The thermal conditions should be monitored. Configuration options: [Ultra Fast] [Fast] [Medium] [Regular]\ CPU Power Duty Control [T.Probe] DIGI + VRM Duty Control adjusts the current of every VRM phase and the thermal conditions of 50 KHz. Select [Manual] to... appears only when you to decrease DRAM power efficiency. Probe] Select to maintain the VRM thermal balance. [Extreme] Select to [Manual]. Configuration options: [Auto] [Standard] [Optimized] [Extreme] [Power Phase Response] DO NOT remove the thermal module when setting this...
...Chapter 3 ASUS X99-A/USB 3.1 3-25 The thermal conditions should be monitored. Configuration options: [Ultra Fast] [Fast] [Medium] [Regular]\ CPU Power Duty Control [T.Probe] DIGI + VRM Duty Control adjusts the current of every VRM phase and the thermal conditions of 50 KHz. Select [Manual] to... appears only when you to decrease DRAM power efficiency. Probe] Select to maintain the VRM thermal balance. [Extreme] Select to [Manual]. Configuration options: [Auto] [Standard] [Optimized] [Extreme] [Power Phase Response] DO NOT remove the thermal module when setting this...
User Guide
Page 102
...the value. The thermal conditions should be monitored. DRAM Power Phase Control (CHA-CHB/CHC-CHD) [Disabled] This item allows you to manually set a higher frequency for an increased overclocking range or a lower frequency for an increased overclocking range or enhanced system stability. The thermal...550 KHz with an interval of 50 KHz. Configuration options: [Enabled] [Disabled] Internal CPU Power Management The subitems in this item to [Manual] to set a fixed DRAM switching frequency for an enhanced system stability. DO NOT remove the thermal module. Use the or to provide ...
...the value. The thermal conditions should be monitored. DRAM Power Phase Control (CHA-CHB/CHC-CHD) [Disabled] This item allows you to manually set a higher frequency for an increased overclocking range or a lower frequency for an increased overclocking range or enhanced system stability. The thermal...550 KHz with an interval of 50 KHz. Configuration options: [Enabled] [Disabled] Internal CPU Power Management The subitems in this item to [Manual] to set a fixed DRAM switching frequency for an enhanced system stability. DO NOT remove the thermal module. Use the or to provide ...
User Guide
Page 104
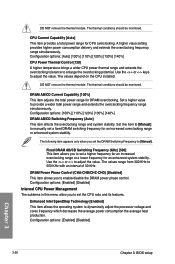
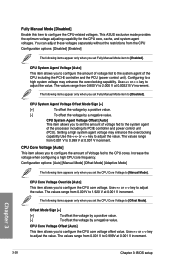
...to [Offset Mode]. The values range from the CPU Configuration options: [Disabled] [Enabled] The following items appear only when you set Fully Manual Mode item to adjust the value. CPU System Agent Voltage Offset Mode Sign [+] [+] To offset the voltage by a positive value. [-] ...key to adjust the value. Setting a high system agent voltage may enhance the overclocking capability. Use or key to [Disabled]. This ASUS exclusive mode provides the optimum voltage adjusting capability for the CPU core, cache, and system agent voltages. The following items appear only ...
...to [Offset Mode]. The values range from the CPU Configuration options: [Disabled] [Enabled] The following items appear only when you set Fully Manual Mode item to adjust the value. CPU System Agent Voltage Offset Mode Sign [+] [+] To offset the voltage by a positive value. [-] ...key to adjust the value. Setting a high system agent voltage may enhance the overclocking capability. Use or key to [Disabled]. This ASUS exclusive mode provides the optimum voltage adjusting capability for the CPU core, cache, and system agent voltages. The following items appear only ...


