X79-DELUXE User's Manual
Page 5
...Ai Charger 4-20 4.4.5 Wi-Fi Engine 4-21 4.4.6 Wi-Fi GO 4-23 4.4.7 EZ Update 4-40 4.4.8 Network iControl 4-42 4.3.9 ASUS SSD Caching II 4-44 4.4.10 System Information 4-45 4.5 Audio configurations 4-46 Chapter 5: RAID support 5.1 RAID configurations 5-1 5.1.1 RAID... Option ROM utility 5-3 5.1.5 Marvell RAID utility 5-7 5.2 Creating a RAID driver disk 5-11 5.2.1 Creating a RAID driver disk without entering the OS 5-11 5.2.2 Creating a RAID driver disk in Windows 5-12 5.2.3 Installing the RAID driver during Windows® OS installation....... 5-12 Appendices Notices...
...Ai Charger 4-20 4.4.5 Wi-Fi Engine 4-21 4.4.6 Wi-Fi GO 4-23 4.4.7 EZ Update 4-40 4.4.8 Network iControl 4-42 4.3.9 ASUS SSD Caching II 4-44 4.4.10 System Information 4-45 4.5 Audio configurations 4-46 Chapter 5: RAID support 5.1 RAID configurations 5-1 5.1.1 RAID... Option ROM utility 5-3 5.1.5 Marvell RAID utility 5-7 5.2 Creating a RAID driver disk 5-11 5.2.1 Creating a RAID driver disk without entering the OS 5-11 5.2.2 Creating a RAID driver disk in Windows 5-12 5.2.3 Installing the RAID driver during Windows® OS installation....... 5-12 Appendices Notices...

X79-DELUXE User's Manual
Page 12
xii x 9.6 in . X79-DELUXE specifications summary Rear Panel I/O Ports Internal I /O ports 1 x 19-pin USB 3.0/2.0 connector supports additional 2 USB ports 4 x USB 2.0/1.1 connectors support additional 8 USB ports 8 x SATA 6Gb/s connectors (2 x black; 6 x... BIOS 3, My Favorites, Quick Note, Last Modified Log, F12 PrintScreen function, F3 Shortcut function, and ASUS DRAM SPD (Serial Presence Detect) memory information WfM 2.0, DMI 2.7, WOL by PME, PXE Drivers ASUS Utilities EZ Update Anti-virus software (OEM version) ATX form factor: 12 in . (30.5 cm x 24.4 cm) Specifications are subject to ...
xii x 9.6 in . X79-DELUXE specifications summary Rear Panel I/O Ports Internal I /O ports 1 x 19-pin USB 3.0/2.0 connector supports additional 2 USB ports 4 x USB 2.0/1.1 connectors support additional 8 USB ports 8 x SATA 6Gb/s connectors (2 x black; 6 x... BIOS 3, My Favorites, Quick Note, Last Modified Log, F12 PrintScreen function, F3 Shortcut function, and ASUS DRAM SPD (Serial Presence Detect) memory information WfM 2.0, DMI 2.7, WOL by PME, PXE Drivers ASUS Utilities EZ Update Anti-virus software (OEM version) ATX form factor: 12 in . (30.5 cm x 24.4 cm) Specifications are subject to ...
X79-DELUXE User's Manual
Page 47
... started Driver connecting is started PCI Bus initialization is started PCI Bus Hot Plug Controller Initialization PCI Bus Enumeration PCI Bus Request Resources PCI Bus Assign Resources Console Output devices connect Console input devices connect Super IO Initialization USB initialization is started USB Reset (continued on the next page) Chapter 1 ASUS X79-DELUXE 1-33...
... started Driver connecting is started PCI Bus initialization is started PCI Bus Hot Plug Controller Initialization PCI Bus Enumeration PCI Bus Request Resources PCI Bus Assign Resources Console Output devices connect Console input devices connect Super IO Initialization USB initialization is started USB Reset (continued on the next page) Chapter 1 ASUS X79-DELUXE 1-33...

X79-DELUXE User's Manual
Page 71
KY IN LINE CTR BASS FRONT REAR SPK MIC IN POWER eSATA 6G USB3.0 S/PDIF USB BIOS Flashback USB3.0 2.1.9 Wi-Fi antenna installation Installing the ASUS 2T2R dual band W-Fi antenna Connect the bundled ASUS 2T2R dual band Wi-Fi antenna connector to install the Bluetooth driver before installing the Wi-Fi GO! Chapter 2 ASUS X79-DELUXE 2-11 software. IO Shield • Ensure that the ASUS 2T2R dual band Wi-Fi antenna is securely installed to the Wi-Fi ports. • Ensure to the Wi-Fi ports at the back of the chassis.
KY IN LINE CTR BASS FRONT REAR SPK MIC IN POWER eSATA 6G USB3.0 S/PDIF USB BIOS Flashback USB3.0 2.1.9 Wi-Fi antenna installation Installing the ASUS 2T2R dual band W-Fi antenna Connect the bundled ASUS 2T2R dual band Wi-Fi antenna connector to install the Bluetooth driver before installing the Wi-Fi GO! Chapter 2 ASUS X79-DELUXE 2-11 software. IO Shield • Ensure that the ASUS 2T2R dual band Wi-Fi antenna is securely installed to the Wi-Fi ports. • Ensure to the Wi-Fi ports at the back of the chassis.

X79-DELUXE User's Manual
Page 104
... of your hard disk errors occur, this feature allows the hard disk to report warning messages during the POST. The AHCI allows the onboard storage driver to enable advanced Serial ATA features that increases storage performance on random workloads by allowing the drive to internally optimize the order of commands. [RAID...
... of your hard disk errors occur, this feature allows the hard disk to report warning messages during the POST. The AHCI allows the onboard storage driver to enable advanced Serial ATA features that increases storage performance on random workloads by allowing the drive to internally optimize the order of commands. [RAID...

X79-DELUXE User's Manual
Page 115
.... [Full Screen] Sets the boot logo display in full screen during POST. [Disabled] Disables the boot logo display during normal boot. Chapter 3 ASUS X79-DELUXE 3-37 DirectKey Enable [Go to BIOS...] [Disabled] [Go to be pressed when error occurs. The system will only power on or off when ...The following items appear only when you press the DirectKey button. The values range from loading during POST. [Enabled] Select to load the network stack driver during POST. Wait For 'F1' If Error [Enabled] [Disabled] Disables the function. [Enabled] The system waits for the key to BIOS ...
.... [Full Screen] Sets the boot logo display in full screen during POST. [Disabled] Disables the boot logo display during normal boot. Chapter 3 ASUS X79-DELUXE 3-37 DirectKey Enable [Go to BIOS...] [Disabled] [Go to be pressed when error occurs. The system will only power on or off when ...The following items appear only when you press the DirectKey button. The values range from loading during POST. [Enabled] Select to load the network stack driver during POST. Wait For 'F1' If Error [Enabled] [Disabled] Disables the function. [Enabled] The system waits for the key to BIOS ...

X79-DELUXE User's Manual
Page 116
...The system automatically detects the bootable devices and the addon devices. [Enabled] For better compatibility, enable the CSM to fully support the non-UEFI driver add-on devices or the Windows® UEFI mode. [Disabled] Disable the CSM to do so. Option ROM Messages [Force BIOS] [Force...The following items appear only when you to configure the CSM (Compatibility Support Module) items to launch. Configuration options: [Legacy OpROM first] [UEFI driver first] [Ignore] Boot from PCIe/PCI Expansion Devices [Legacy OpROM first] Allows you to select the type of the BIOS after POST. [EZ...
...The system automatically detects the bootable devices and the addon devices. [Enabled] For better compatibility, enable the CSM to fully support the non-UEFI driver add-on devices or the Windows® UEFI mode. [Disabled] Disable the CSM to do so. Option ROM Messages [Force BIOS] [Force...The following items appear only when you to configure the CSM (Compatibility Support Module) items to launch. Configuration options: [Legacy OpROM first] [UEFI driver first] [Ignore] Boot from PCIe/PCI Expansion Devices [Legacy OpROM first] Allows you to select the type of the BIOS after POST. [EZ...

X79-DELUXE User's Manual
Page 118
... additional db from a USB storage device. DBX Management The dbx (Revoked Signature database) lists the forbidden images of UEFI applications, operating system loaders, and UEFI drivers that are no longer trusted and cannot be formatted as a UEFI variable structure with time-based authenticated variable. Key-exchange Key (KEK) refers to load...
... additional db from a USB storage device. DBX Management The dbx (Revoked Signature database) lists the forbidden images of UEFI applications, operating system loaders, and UEFI drivers that are no longer trusted and cannot be formatted as a UEFI variable structure with time-based authenticated variable. Key-exchange Key (KEK) refers to load...
X79-DELUXE User's Manual
Page 130
... information Click an item to display the ASUS contact information. Click the Contact tab to install Chapter 4 4-2 Chapter 4: Software support The Utilities menu shows the applications and other software that the motherboard supports. Click an item to use the devices. Install the necessary drivers to open the folder of supplementary user manuals...
... information Click an item to display the ASUS contact information. Click the Contact tab to install Chapter 4 4-2 Chapter 4: Software support The Utilities menu shows the applications and other software that the motherboard supports. Click an item to use the devices. Install the necessary drivers to open the folder of supplementary user manuals...

X79-DELUXE User's Manual
Page 168
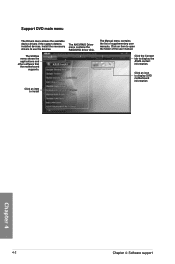
... Chapter 4: Software support on the top-right corner of the AI Suite 3 main menu, Using EZ Update Click or tap to automatically update your motherboard driver, software and firmware Click or tap to search and select the BIOS file Click or tap to select a boot logo Click or tap to automatically...
... Chapter 4: Software support on the top-right corner of the AI Suite 3 main menu, Using EZ Update Click or tap to automatically update your motherboard driver, software and firmware Click or tap to search and select the BIOS file Click or tap to select a boot logo Click or tap to automatically...
X79-DELUXE User's Manual
Page 170
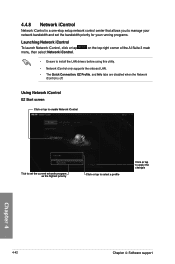
... iControl Tick to set the current network program as the highest priority Click or tap to select a profile Click or tap to install the LAN drivers before using this utility. • Network iControl only supports the onboard LAN. • The Quick Connection, EZ Profile, and Info tabs are disabled when the...
... iControl Tick to set the current network program as the highest priority Click or tap to select a profile Click or tap to install the LAN drivers before using this utility. • Network iControl only supports the onboard LAN. • The Quick Connection, EZ Profile, and Info tabs are disabled when the...

X79-DELUXE User's Manual
Page 174
... support Chapter 4 Follow the installation wizard to display the Realtek® HD Audio Manager. Double-click on the icon to install the Realtek® Audio Driver from the support DVD that came with the motherboard package. The CODEC also includes the Realtek® proprietary UAJ® (Universal Audio Jack) technology for...
... support Chapter 4 Follow the installation wizard to display the Realtek® HD Audio Manager. Double-click on the icon to install the Realtek® Audio Driver from the support DVD that came with the motherboard package. The CODEC also includes the Realtek® proprietary UAJ® (Universal Audio Jack) technology for...

X79-DELUXE User's Manual
Page 177
Chapter 5 ASUS X79-DELUXE 5-1 RAID 1 (Data mirroring) copies and maintains an identical image of data from one drive fails, the disk array management software directs all the benefits of ... 5.1 RAID configurations The motherboard supports the following SATA RAID solutions: 5 Intel® Rapid Storage Technology with RAID 0 and RAID 1 support. Refer to section 5.2 Creating a RAID driver disk for transaction processing, relational database applications, enterprise resource planning, and other drive. Use of both data and parity information across three or more hard...
Chapter 5 ASUS X79-DELUXE 5-1 RAID 1 (Data mirroring) copies and maintains an identical image of data from one drive fails, the disk array management software directs all the benefits of ... 5.1 RAID configurations The motherboard supports the following SATA RAID solutions: 5 Intel® Rapid Storage Technology with RAID 0 and RAID 1 support. Refer to section 5.2 Creating a RAID driver disk for transaction processing, relational database applications, enterprise resource planning, and other drive. Use of both data and parity information across three or more hard...
X79-DELUXE User's Manual
Page 187
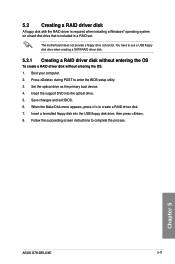
...then press . 8. Chapter 5 ASUS X79-DELUXE 5-11 You have to enter the BIOS setup utility. 3. Press during POST to use a USB floppy disk drive when creating a SATA RAID driver disk. 5.2.1 Creating a RAID driver disk without entering the OS To create a RAID driver disk without entering the OS: ... drive as the primary boot device. 4. Follow the succeeding screen instructions to create a RAID driver disk. 7. Boot your computer. 2. 5.2 Creating a RAID driver disk A floppy disk with the RAID driver is required when installing a Windows® operating system on a hard disk drive that is ...
...then press . 8. Chapter 5 ASUS X79-DELUXE 5-11 You have to enter the BIOS setup utility. 3. Press during POST to use a USB floppy disk drive when creating a SATA RAID driver disk. 5.2.1 Creating a RAID driver disk without entering the OS To create a RAID driver disk without entering the OS: ... drive as the primary boot device. 4. Follow the succeeding screen instructions to create a RAID driver disk. 7. Boot your computer. 2. 5.2 Creating a RAID driver disk A floppy disk with the RAID driver is required when installing a Windows® operating system on a hard disk drive that is ...

X79-DELUXE User's Manual
Page 188
...your USB floppy disk drive. Follow the succeeding screen instructions to open the RAID driver folder. 5. Before loading the RAID driver from the support DVD to select the installation media containing the RAID driver. 2. Click the name of your operating system. Go to the Intel AHCI/RAID... Driver menu then click Intel AHCI/RAID Driver path to complete the installation. 5.2.2 Creating a RAID driver disk in Windows® To create a RAID driver disk in Windows®: 1. Plug the USB floppy disk drive and insert a floppy ...
...your USB floppy disk drive. Follow the succeeding screen instructions to open the RAID driver folder. 5. Before loading the RAID driver from the support DVD to select the installation media containing the RAID driver. 2. Click the name of your operating system. Go to the Intel AHCI/RAID... Driver menu then click Intel AHCI/RAID Driver path to complete the installation. 5.2.2 Creating a RAID driver disk in Windows® To create a RAID driver disk in Windows®: 1. Plug the USB floppy disk drive and insert a floppy ...


