
User's Manual for English Edition
Page 5
Chapter 5: Power-on Self Test (POST) The Power-on Self Test (POST 78 Using POST to access BIOS and Troubleshoot 78 BIOS...78 Accessing BIOS...78 BIOS Settings...79 Troubleshoot...89 Refresh your PC...89 Reset your PC...90 Advanced options...91 Chapter 6: Upgrading your Notebook PC Installing a Random-access Memory module (...
Chapter 5: Power-on Self Test (POST) The Power-on Self Test (POST 78 Using POST to access BIOS and Troubleshoot 78 BIOS...78 Accessing BIOS...78 BIOS Settings...79 Troubleshoot...89 Refresh your PC...89 Reset your PC...90 Advanced options...91 Chapter 6: Upgrading your Notebook PC Installing a Random-access Memory module (...
User's Manual for English Edition
Page 78
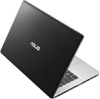
... PC then press during system bootup and requests you change the default BIOS settings except in the Notebook PC. We strongly recommend that are needed for more details. BIOS The Basic Input and Output System (BIOS) stores system hardware settings that you to most conditions of the Notebook... PC's architecture. Do not change the BIOS settings only with the help of a trained service personnel. Accessing BIOS Restart your Notebook PC. The Power-on Self Test (POST) The Power-on Self Test (POST) is installed as...
... PC then press during system bootup and requests you change the default BIOS settings except in the Notebook PC. We strongly recommend that are needed for more details. BIOS The Basic Input and Output System (BIOS) stores system hardware settings that you to most conditions of the Notebook... PC's architecture. Do not change the BIOS settings only with the help of a trained service personnel. Accessing BIOS Restart your Notebook PC. The Power-on Self Test (POST) The Power-on Self Test (POST) is installed as...
User's Manual for English Edition
Page 79
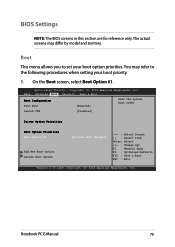
... Manager] →← : Select Screen ↑↓ : Select Item Enter: Select +/- : Change Opt. Copyright (C) 2012 American Megatrends, Inc. Copyright (C) 2012 American Megatrends, Inc. BIOS Settings NOTE: The BIOS screens in this section are for reference only. On the Boot screen, select Boot Option #1. The actual screens may refer to set your boot...
... Manager] →← : Select Screen ↑↓ : Select Item Enter: Select +/- : Change Opt. Copyright (C) 2012 American Megatrends, Inc. Copyright (C) 2012 American Megatrends, Inc. BIOS Settings NOTE: The BIOS screens in this section are for reference only. On the Boot screen, select Boot Option #1. The actual screens may refer to set your boot...

User's Manual for English Edition
Page 81
.... F1 : General Help F9 : Optimized Defaults F10 : Save & Exit ESC : Exit Version 2.15.1226. The password length must be prompted to input this before entering BIOS. Copyright (C) 2012 American Megatrends, Inc. Main Advanced Boot Security Save & Exit Password Description If ONLY the Administrator's password is set, then this only limits access...
.... F1 : General Help F9 : Optimized Defaults F10 : Save & Exit ESC : Exit Version 2.15.1226. The password length must be prompted to input this before entering BIOS. Copyright (C) 2012 American Megatrends, Inc. Main Advanced Boot Security Save & Exit Password Description If ONLY the Administrator's password is set, then this only limits access...

User's Manual for English Edition
Page 86
... : Optimized Defaults F10 : Save & Exit ESC : Exit Version 2.15.1226. Save & Exit To keep your configuration settings, select Save Changes and Exit before exiting the BIOS. Save Options Save Changes Discard Changes Restore Defaults Boot Override Windows Boot Manager Launch EFI Shell from filesystem device →← : Select Screen ↑↓...
... : Optimized Defaults F10 : Save & Exit ESC : Exit Version 2.15.1226. Save & Exit To keep your configuration settings, select Save Changes and Exit before exiting the BIOS. Save Options Save Changes Discard Changes Restore Defaults Boot Override Windows Boot Manager Launch EFI Shell from filesystem device →← : Select Screen ↑↓...

User's Manual for English Edition
Page 87
...Enabled] SATA Configuration Graphics Configuration Intel (R) Anti-Theft Technology Corporation USB Configuration Network Stack Press Enter to run the utility to select and update BIOS. →← : Select Screen ↑↓ : Select Item Enter: Select +/- : Change Opt. F1 : General Help F9 ... Defaults F10 : Save & Exit ESC : Exit Version 2.15.1226. To update the BIOS: 1. Aptio Setup Utility - Restart your model from the ASUS website. 2. Verify the Notebook PC's exact model then download the latest BIOS file for your Notebook PC then press during POST. 5.
...Enabled] SATA Configuration Graphics Configuration Intel (R) Anti-Theft Technology Corporation USB Configuration Network Stack Press Enter to run the utility to select and update BIOS. →← : Select Screen ↑↓ : Select Item Enter: Select +/- : Change Opt. F1 : General Help F9 ... Defaults F10 : Save & Exit ESC : Exit Version 2.15.1226. To update the BIOS: 1. Aptio Setup Utility - Restart your model from the ASUS website. 2. Verify the Notebook PC's exact model then download the latest BIOS file for your Notebook PC then press during POST. 5.
User's Manual for English Edition
Page 88
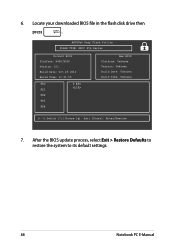
ASUSTek Easy Flash Utility FLASH TYPE: MXIC 25L Series Current BIOS Platform: X450/X550 Version: 101 Build Date: Oct 26 2012 Build Time: 11:51:05 FSO 0 EFI FS1 FS2 FS3 FS4 New BIOS Platform: Unknown Version: Unknown Build Date: Unknown Build Time: Unknown [←→]: Switch [↑↓]: Choose [q]: Exit [Enter]: Enter/Execute 7. After the BIOS update process, select Exit > Restore Defaults to restore the system to its default settings. 88 Notebook PC E-Manual 6. Locate your downloaded BIOS file in the flash disk drive then press .
ASUSTek Easy Flash Utility FLASH TYPE: MXIC 25L Series Current BIOS Platform: X450/X550 Version: 101 Build Date: Oct 26 2012 Build Time: 11:51:05 FSO 0 EFI FS1 FS2 FS3 FS4 New BIOS Platform: Unknown Version: Unknown Build Date: Unknown Build Time: Unknown [←→]: Switch [↑↓]: Choose [q]: Exit [Enter]: Enter/Execute 7. After the BIOS update process, select Exit > Restore Defaults to restore the system to its default settings. 88 Notebook PC E-Manual 6. Locate your downloaded BIOS file in the flash disk drive then press .

