User Guide
Page 2
...modified or altered, unless such repair, modification of ASUSTeK COMPUTER INC. ("ASUS"). ii Downloaded from ManualMonitor.com Manuals or (2) the serial number of the LCD monitor 1-4 Chapter 2: Setup 2.1 Adjusting the monitor 2-1 2.2 Detaching the arm/stand (for VESA wall mount 2-2 Chapter 3:...Welcome 1-1 1.2 Package contents 1-1 1.3 Assembling the monitor base 1-2 1.4 Monitor introduction 1-3 1.4.1 Front of the LCD monitor 1-3 1.4.2 Rear of the product is authorized in any form or by any means, except documentation kept by ASUS; ASUS PROVIDES THIS MANUAL "AS IS" WITHOUT WARRANTY OF...
...modified or altered, unless such repair, modification of ASUSTeK COMPUTER INC. ("ASUS"). ii Downloaded from ManualMonitor.com Manuals or (2) the serial number of the LCD monitor 1-4 Chapter 2: Setup 2.1 Adjusting the monitor 2-1 2.2 Detaching the arm/stand (for VESA wall mount 2-2 Chapter 3:...Welcome 1-1 1.2 Package contents 1-1 1.3 Assembling the monitor base 1-2 1.4 Monitor introduction 1-3 1.4.1 Front of the LCD monitor 1-3 1.4.2 Rear of the product is authorized in any form or by any means, except documentation kept by ASUS; ASUS PROVIDES THIS MANUAL "AS IS" WITHOUT WARRANTY OF...
User Guide
Page 5
... to make sure that you MUST follow to the nature of the monitor. Stubborn stains may be removed with a cloth dampened with the monitor: • The screen may drip inside the monitor and cause an electric shock. Turn off and unplug the power cord... prevent damage to the components when trying to disconnect the cables and power cord. When lifting or carrying the monitor, grasp the edges of the fluorescent light. Clean the monitor surface with the LCD. C A U T I M P O R T A N T : Information that the flicker disappears. • You may remain after switching the image. N ...
... to make sure that you MUST follow to the nature of the monitor. Stubborn stains may be removed with a cloth dampened with the monitor: • The screen may drip inside the monitor and cause an electric shock. Turn off and unplug the power cord... prevent damage to the components when trying to disconnect the cables and power cord. When lifting or carrying the monitor, grasp the edges of the fluorescent light. Clean the monitor surface with the LCD. C A U T I M P O R T A N T : Information that the flicker disappears. • You may remain after switching the image. N ...
User Guide
Page 7
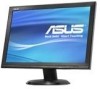
... your viewing experience. 1.1 Welcome! Thank you ! 1.2 Package contents Check your VW192 Series LCD package for the following items: LCD monitor User manual 1 x Power cord 1 x VGA cable 1 x DVI cable (Only for VW192T) 1 x Audio cable (Only for purchasing the ASUS® VW192 Series LCD monitor! With these features, you can enjoy the convenience and delightful visual experience that...
... your viewing experience. 1.1 Welcome! Thank you ! 1.2 Package contents Check your VW192 Series LCD package for the following items: LCD monitor User manual 1 x Power cord 1 x VGA cable 1 x DVI cable (Only for VW192T) 1 x Audio cable (Only for purchasing the ASUS® VW192 Series LCD monitor! With these features, you can enjoy the convenience and delightful visual experience that...
User Guide
Page 9
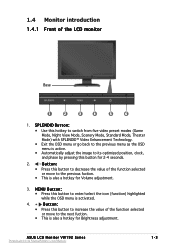
... of the function selected or move to the previous fuction. • This is activated. 4. S P L E N D I D B u t t o n : • Use this button to increase the value of the LCD monitor Base 1 2 3 4 5 6 1. ASUS LCD Monitor VW192 Series Downloaded from five video preset modes (Game Mode, Night View Mode, Scenery Mode, Standard Mode, Theater Mode) with SPLENDID™ Video Enhancement Technology...
... of the function selected or move to the previous fuction. • This is activated. 4. S P L E N D I D B u t t o n : • Use this button to increase the value of the LCD monitor Base 1 2 3 4 5 6 1. ASUS LCD Monitor VW192 Series Downloaded from five video preset modes (Game Mode, Night View Mode, Scenery Mode, Standard Mode, Theater Mode) with SPLENDID™ Video Enhancement Technology...
User Guide
Page 10
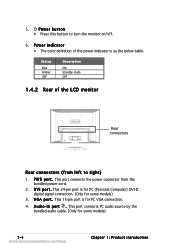
P o w e r i n d i c a t o r • The color definition of the LCD monitor Rear connectors Rear connectors (from left to turn the monitor on/off. 6. i n p o r t . P W R p o r t . This port connects the power connector from ManualMonitor.com Manuals Chapter 1: Product introduction This 15-pin port is for some models) 1-4 Downloaded from ...
P o w e r i n d i c a t o r • The color definition of the LCD monitor Rear connectors Rear connectors (from left to turn the monitor on/off. 6. i n p o r t . P W R p o r t . This port connects the power connector from ManualMonitor.com Manuals Chapter 1: Product introduction This 15-pin port is for some models) 1-4 Downloaded from ...
User Guide
Page 11
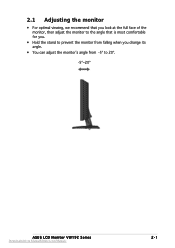
2.1 Adjusting the monitor • For optimal viewing, we recommend that you look at the full face of the monitor, then adjust the monitor to the angle that is most comfortable for you. • Hold the stand to prevent the monitor from falling when you change its angle. • You can adjust the monitor's angle from -5º to 20º. -5º~20º ASUS LCD Monitor VW192 Series Downloaded from ManualMonitor.com Manuals 2-1
2.1 Adjusting the monitor • For optimal viewing, we recommend that you look at the full face of the monitor, then adjust the monitor to the angle that is most comfortable for you. • Hold the stand to prevent the monitor from falling when you change its angle. • You can adjust the monitor's angle from -5º to 20º. -5º~20º ASUS LCD Monitor VW192 Series Downloaded from ManualMonitor.com Manuals 2-1
User Guide
Page 12
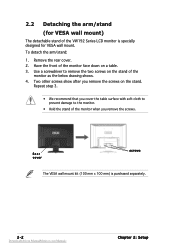
... the rear cover. 2. Two other screws show after you remove the screws on the stand of the monitor as the below drawing shows. 4. Use a screwdriver to the monitor. • Hold the stand of the monitor face down on a table. 3. Repeat step 3. • We recommend that you remove the screws.... VESA wall mount kit (100 mm x 100 mm) is specially designed for VESA wall mount) The detachable stand of the VW192 Series LCD monitor is purchased separately. 2-2 Downloaded from ManualMonitor.com Manuals Chapter 2: Setup To detach the arm/stand: 1. 2.2 Detaching the arm/stand (for VESA wall...
... the rear cover. 2. Two other screws show after you remove the screws on the stand of the monitor as the below drawing shows. 4. Use a screwdriver to the monitor. • Hold the stand of the monitor face down on a table. 3. Repeat step 3. • We recommend that you remove the screws.... VESA wall mount kit (100 mm x 100 mm) is specially designed for VESA wall mount) The detachable stand of the VW192 Series LCD monitor is purchased separately. 2-2 Downloaded from ManualMonitor.com Manuals Chapter 2: Setup To detach the arm/stand: 1. 2.2 Detaching the arm/stand (for VESA wall...
User Guide
Page 13
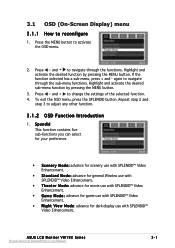
...; Video Enhancement. • Night View Mode: advance for dark-display use with SPLENDID™ Video Enhancement. To exit the OSD menu, press the SPLENDID button. ASUS LCD Monitor VW192 Series Downloaded from ManualMonitor.com Manuals 3-1 Highlight and activate the desired function by pressing the MENU button. 3. If the function selected has a sub-menu...
...; Video Enhancement. • Night View Mode: advance for dark-display use with SPLENDID™ Video Enhancement. To exit the OSD menu, press the SPLENDID button. ASUS LCD Monitor VW192 Series Downloaded from ManualMonitor.com Manuals 3-1 Highlight and activate the desired function by pressing the MENU button. 3. If the function selected has a sub-menu...

User Guide
Page 15
S y s t e m S e t u p Allow you to revert to the preset mode. is from 0 to 100. ASUS LCD Monitor VW192 Series Downloaded from 0 to 100. In the OSD Timeout selection, you can select either VGA or DVI input source. (For the ... languages for your selection, including English, German, Italian, French, Dutch, Spanish, Russian, Traditional Chinese, Simplified Chinese, and Japanese. • Information: shows the monitor information. • R e s e t : "Yes" allows you to • OSD Setup: adjusts the horizontal postition (H-Position) and the vertical position (V-Position) of the ...
S y s t e m S e t u p Allow you to revert to the preset mode. is from 0 to 100. ASUS LCD Monitor VW192 Series Downloaded from 0 to 100. In the OSD Timeout selection, you can select either VGA or DVI input source. (For the ... languages for your selection, including English, German, Italian, French, Dutch, Spanish, Russian, Traditional Chinese, Simplified Chinese, and Japanese. • Information: shows the monitor information. • R e s e t : "Yes" allows you to • OSD Setup: adjusts the horizontal postition (H-Position) and the vertical position (V-Position) of the ...

User Guide
Page 17
ASUS LCD Monitor VW192 Series Downloaded from ManualMonitor.com Manuals 3-5 For optimal resolution, we recommend that you choose a mode listed in the table may not be supported. 3.3 Supported ...
ASUS LCD Monitor VW192 Series Downloaded from ManualMonitor.com Manuals 3-5 For optimal resolution, we recommend that you choose a mode listed in the table may not be supported. 3.3 Supported ...


