
User Guide
Page 7
... that the VW192 Series brings you for VW192T and VW192S) 1 x Rear cover If any of features that enhance your retailer immediately. Thank you ! 1.2 Package contents Check your VW192 Series LCD package for the following items: LCD monitor User manual 1 x Power cord 1 x VGA cable 1 x DVI cable (Only for VW192T) 1 x Audio cable (Only for purchasing the ASUS® VW192 Series LCD monitor!
... that the VW192 Series brings you for VW192T and VW192S) 1 x Rear cover If any of features that enhance your retailer immediately. Thank you ! 1.2 Package contents Check your VW192 Series LCD package for the following items: LCD monitor User manual 1 x Power cord 1 x VGA cable 1 x DVI cable (Only for VW192T) 1 x Audio cable (Only for purchasing the ASUS® VW192 Series LCD monitor!
User Guide
Page 9
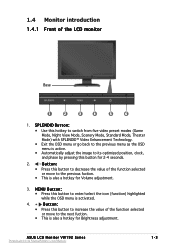
...• This is also a hotkey for Brightness adjustment. Button: • Press this button for Volume adjustment. 3. ASUS LCD Monitor VW192 Series Downloaded from five video preset modes (Game Mode, Night View Mode, Scenery Mode, Standard Mode, Theater Mode) with... : • Press this hotkey to enter/select the icon (function) highlighted while the OSD menu is also a hotkey for 2-4 seconds. 2. 1.4 Monitor introduction 1.4.1 Front of the LCD monitor Base 1 2 3 4 5 6 1. S P L E N D I D B u t t o n : • Use this button to switch from ManualMonitor.com Manuals 1-3
...• This is also a hotkey for Brightness adjustment. Button: • Press this button for Volume adjustment. 3. ASUS LCD Monitor VW192 Series Downloaded from five video preset modes (Game Mode, Night View Mode, Scenery Mode, Standard Mode, Theater Mode) with... : • Press this hotkey to enter/select the icon (function) highlighted while the OSD menu is also a hotkey for 2-4 seconds. 2. 1.4 Monitor introduction 1.4.1 Front of the LCD monitor Base 1 2 3 4 5 6 1. S P L E N D I D B u t t o n : • Use this button to switch from ManualMonitor.com Manuals 1-3
User Guide
Page 11
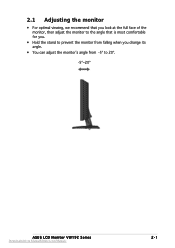
2.1 Adjusting the monitor • For optimal viewing, we recommend that you look at the full face of the monitor, then adjust the monitor to the angle that is most comfortable for you. • Hold the stand to prevent the monitor from falling when you change its angle. • You can adjust the monitor's angle from -5º to 20º. -5º~20º ASUS LCD Monitor VW192 Series Downloaded from ManualMonitor.com Manuals 2-1
2.1 Adjusting the monitor • For optimal viewing, we recommend that you look at the full face of the monitor, then adjust the monitor to the angle that is most comfortable for you. • Hold the stand to prevent the monitor from falling when you change its angle. • You can adjust the monitor's angle from -5º to 20º. -5º~20º ASUS LCD Monitor VW192 Series Downloaded from ManualMonitor.com Manuals 2-1
User Guide
Page 12
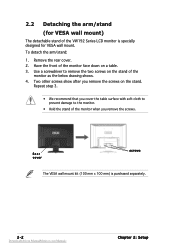
... on a table. 3. Repeat step 3. • We recommend that you remove the screws. Use a screwdriver to the monitor. • Hold the stand of the VW192 Series LCD monitor is purchased separately. 2-2 Downloaded from ManualMonitor.com Manuals Chapter 2: Setup Remove the rear cover. 2. Have the front of... the monitor as the below drawing shows. 4. Rear cover screws The VESA wall mount kit (100 mm x 100 ...
... on a table. 3. Repeat step 3. • We recommend that you remove the screws. Use a screwdriver to the monitor. • Hold the stand of the VW192 Series LCD monitor is purchased separately. 2-2 Downloaded from ManualMonitor.com Manuals Chapter 2: Setup Remove the rear cover. 2. Have the front of... the monitor as the below drawing shows. 4. Rear cover screws The VESA wall mount kit (100 mm x 100 ...
User Guide
Page 13
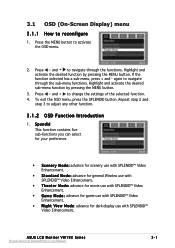
... the SPLENDID button. Press and to adjust any other function. 3.1.2 OSD Function Introduction 1. Repeat step 2 and step 3 to change the settings of the selected function. 4. ASUS LCD Monitor VW192 Series Downloaded from ManualMonitor.com Manuals 3-1 3.1 OSD (On-Screen Display) menu 3.1.1 How to activate the OSD menu. 2. Press the MENU button to reconfigure 1. Press and...
... the SPLENDID button. Press and to adjust any other function. 3.1.2 OSD Function Introduction 1. Repeat step 2 and step 3 to change the settings of the selected function. 4. ASUS LCD Monitor VW192 Series Downloaded from ManualMonitor.com Manuals 3-1 3.1 OSD (On-Screen Display) menu 3.1.1 How to activate the OSD menu. 2. Press the MENU button to reconfigure 1. Press and...

User Guide
Page 15
... this function, you can select either VGA or DVI input source. (For the models with a DVI port) 5. ASUS LCD Monitor VW192 Series Downloaded from 10 to 120. • Language: there are ten languages for your selection, including English, German..., Italian, French, Dutch, Spanish, Russian, Traditional Chinese, Simplified Chinese, and Japanese. • Information: shows the monitor information. • R e s e t : "Yes" allows you to adjust the system. • V o l u m e : the adjusting range is from 0 to 100. ...
... this function, you can select either VGA or DVI input source. (For the models with a DVI port) 5. ASUS LCD Monitor VW192 Series Downloaded from 10 to 120. • Language: there are ten languages for your selection, including English, German..., Italian, French, Dutch, Spanish, Russian, Traditional Chinese, Simplified Chinese, and Japanese. • Information: shows the monitor information. • R e s e t : "Yes" allows you to adjust the system. • V o l u m e : the adjusting range is from 0 to 100. ...

User Guide
Page 17
For optimal resolution, we recommend that you choose a mode listed in the table may not be supported. ASUS LCD Monitor VW192 Series Downloaded from ManualMonitor.com Manuals 3-5 3.3 Supported operating modes Standard Resolution Horizontal Frequency Vertical Frequency Pixel Frequency DOS VGA SVGA XGA SXGA VESA VESA (Primary) ...
For optimal resolution, we recommend that you choose a mode listed in the table may not be supported. ASUS LCD Monitor VW192 Series Downloaded from ManualMonitor.com Manuals 3-5 3.3 Supported operating modes Standard Resolution Horizontal Frequency Vertical Frequency Pixel Frequency DOS VGA SVGA XGA SXGA VESA VESA (Primary) ...