User Guide
Page 2
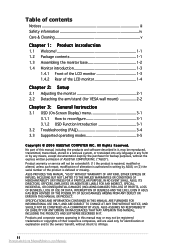
... for VESA wall mount 2-2 Chapter 3: General Instruction 3.1 OSD (On-Screen Display) menu 3-1 3.1.1 How to infringe. SPECIFICATIONS AND INFORMATION CONTAINED IN THIS MANUAL ARE FURNISHED FOR INFORMATIONAL USE ONLY, AND ARE SUBJECT TO CHANGE AT ANY TIME WITHOUT NOTICE, AND SHOULD NOT BE CONSTRUED AS A COMMITMENT BY ASUS. or (2) the serial number of the LCD monitor 1-4 Chapter 2: Setup 2.1 Adjusting the monitor 2-1 2.2 Detaching the arm/stand (for identification or explanation and to the owners...
... for VESA wall mount 2-2 Chapter 3: General Instruction 3.1 OSD (On-Screen Display) menu 3-1 3.1.1 How to infringe. SPECIFICATIONS AND INFORMATION CONTAINED IN THIS MANUAL ARE FURNISHED FOR INFORMATIONAL USE ONLY, AND ARE SUBJECT TO CHANGE AT ANY TIME WITHOUT NOTICE, AND SHOULD NOT BE CONSTRUED AS A COMMITMENT BY ASUS. or (2) the serial number of the LCD monitor 1-4 Chapter 2: Setup 2.1 Adjusting the monitor 2-1 2.2 Detaching the arm/stand (for identification or explanation and to the owners...
User Guide
Page 3
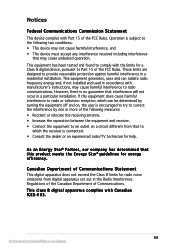
...connected. • Consult the dealer or an experienced radio/TV technician for radio noise emissions from ManualMonitor.com Manuals Canadian Department of Communications Statement This digital apparatus does not exceed the Class B limits for help. Notices Federal Communications Commission Statement This device complies with Part 15 of the FCC Rules. iii Downloaded from digital apparatus set...radiate radio frequency energy and, if not installed and used in accordance with manufacturer's instructions, may cause undesired operation. However, there is encouraged to try to Part 15 of...
...connected. • Consult the dealer or an experienced radio/TV technician for radio noise emissions from ManualMonitor.com Manuals Canadian Department of Communications Statement This digital apparatus does not exceed the Class B limits for help. Notices Federal Communications Commission Statement This device complies with Part 15 of the FCC Rules. iii Downloaded from digital apparatus set...radiate radio frequency energy and, if not installed and used in accordance with manufacturer's instructions, may cause undesired operation. However, there is encouraged to try to Part 15 of...

User Guide
Page 4
....com Manuals iv Downloaded from the type of power source indicated on the back or top of the cabinet are provided for a long period of power supply to your home, consult your dealer or local power company. • Use the appropriate power plug which ...fix it by yourself. Overloading can result in serious physical injury. • If the power supply is provided. • The monitor should be used for ventilation. Do not block these slots. Safety information • Before setting up the monitor, carefully read all cables are correctly connected and the power cables...
....com Manuals iv Downloaded from the type of power source indicated on the back or top of the cabinet are provided for a long period of power supply to your home, consult your dealer or local power company. • Use the appropriate power plug which ...fix it by yourself. Overloading can result in serious physical injury. • If the power supply is provided. • The monitor should be used for ventilation. Do not block these slots. Safety information • Before setting up the monitor, carefully read all cables are correctly connected and the power cables...
User Guide
Page 5
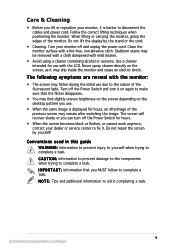
... not repair the screen by the stand or the cord. • Cleaning. v Downloaded from ManualMonitor.com Manuals The screen will recover slowly or you can turn it . N O T E : Tips and additional information to fix it on again to disconnect the cables and power cord. Turn your monitor off the Power Switch for use with a lint-free, non-abrasive cloth. Follow the correct lifting techniques when positioning the monitor. Do not lift the display...
... not repair the screen by the stand or the cord. • Cleaning. v Downloaded from ManualMonitor.com Manuals The screen will recover slowly or you can turn it . N O T E : Tips and additional information to fix it on again to disconnect the cables and power cord. Turn your monitor off the Power Switch for use with a lint-free, non-abrasive cloth. Follow the correct lifting techniques when positioning the monitor. Do not lift the display...
User Guide
Page 6
Refer to the following sources for additional information and for product and software updates. 1. These documents are not part of the standard package. Optional documentation Your product package may include optional documentation, such as warranty card, that may have been added by your dealer. Where to find more information Refer to http://www.asus.com 2. ASUS websites The ASUS websites worldwide provide updated information on ASUS hardware and software products. vi Downloaded from ManualMonitor.com Manuals
Refer to the following sources for additional information and for product and software updates. 1. These documents are not part of the standard package. Optional documentation Your product package may include optional documentation, such as warranty card, that may have been added by your dealer. Where to find more information Refer to http://www.asus.com 2. ASUS websites The ASUS websites worldwide provide updated information on ASUS hardware and software products. vi Downloaded from ManualMonitor.com Manuals
User Guide
Page 7
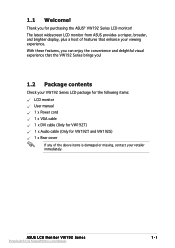
... VW192T and VW192S) 1 x Rear cover If any of features that enhance your viewing experience. 1.1 Welcome! ASUS LCD Monitor VW192 Series Downloaded from ASUS provides a crisper, broader, and brighter display, plus a host of the above items is damaged or missing, contact your VW192 Series LCD package for the following items: LCD monitor User manual 1 x Power cord 1 x VGA cable 1 x DVI cable (Only for VW192T) 1 x Audio cable (Only for purchasing the ASUS® VW192 Series LCD monitor! Thank you ! 1.2 Package...
... VW192T and VW192S) 1 x Rear cover If any of features that enhance your viewing experience. 1.1 Welcome! ASUS LCD Monitor VW192 Series Downloaded from ASUS provides a crisper, broader, and brighter display, plus a host of the above items is damaged or missing, contact your VW192 Series LCD package for the following items: LCD monitor User manual 1 x Power cord 1 x VGA cable 1 x DVI cable (Only for VW192T) 1 x Audio cable (Only for purchasing the ASUS® VW192 Series LCD monitor! Thank you ! 1.2 Package...
User Guide
Page 8
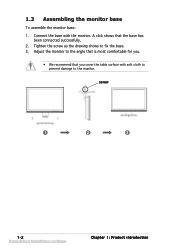
Adjust the monitor to the angle that is most comfortable for you. • We recommend that the base has been connected successfully. 2. screw 1 2 3 1-2 Downloaded from ManualMonitor.com Manuals Chapter 1: Product introduction 1.3 Assembling the monitor base To assemble the monitor base: 1. Tighten the screw as the drawing shows to the monitor. Connect the base with soft cloth to prevent damage to fix the base. 3. A click shows that you cover the table surface with the monitor.
Adjust the monitor to the angle that is most comfortable for you. • We recommend that the base has been connected successfully. 2. screw 1 2 3 1-2 Downloaded from ManualMonitor.com Manuals Chapter 1: Product introduction 1.3 Assembling the monitor base To assemble the monitor base: 1. Tighten the screw as the drawing shows to the monitor. Connect the base with soft cloth to prevent damage to fix the base. 3. A click shows that you cover the table surface with the monitor.
User Guide
Page 9
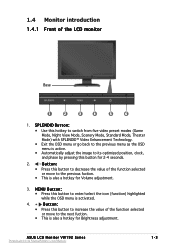
... previous menu as the OSD menu is also a hotkey for Volume adjustment. 3. Button: • Press this button to decrease the value of the function selected or move to the next fuction. • This is active. • Automatically adjust the image to its optimized position, clock, and phase by pressing this button for 2-4 seconds. 2. Button: • Press this button to increase the value of the LCD monitor Base 1 2 3 4 5 6 1. 1.4 Monitor...
... previous menu as the OSD menu is also a hotkey for Volume adjustment. 3. Button: • Press this button to decrease the value of the function selected or move to the next fuction. • This is active. • Automatically adjust the image to its optimized position, clock, and phase by pressing this button for 2-4 seconds. 2. Button: • Press this button to increase the value of the LCD monitor Base 1 2 3 4 5 6 1. 1.4 Monitor...
User Guide
Page 10
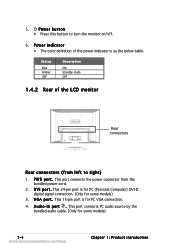
... 24-pin port is for PC (Personal Computer) DVI-D digital signal connection. (Only for some models) 3. i n p o r t . P o w e r i n d i c a t o r • The color definition of the LCD monitor Rear connectors Rear connectors (from the bundled power cord. 2. Status Blue Amber OFF Description ON Standby mode OFF 1.4.2 Rear of the power indicator is for PC VGA connection. 4. D V I p o r t . A u d i o - P W R p o r t . V G A p o r t . This port connects PC audio source by the bundled audio cable. (Only for some models) 1-4 Downloaded from ManualMonitor.com Manuals Chapter...
... 24-pin port is for PC (Personal Computer) DVI-D digital signal connection. (Only for some models) 3. i n p o r t . P o w e r i n d i c a t o r • The color definition of the LCD monitor Rear connectors Rear connectors (from the bundled power cord. 2. Status Blue Amber OFF Description ON Standby mode OFF 1.4.2 Rear of the power indicator is for PC VGA connection. 4. D V I p o r t . A u d i o - P W R p o r t . V G A p o r t . This port connects PC audio source by the bundled audio cable. (Only for some models) 1-4 Downloaded from ManualMonitor.com Manuals Chapter...
User Guide
Page 11
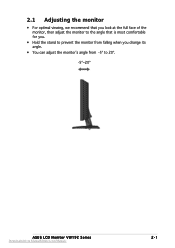
2.1 Adjusting the monitor • For optimal viewing, we recommend that you look at the full face of the monitor, then adjust the monitor to the angle that is most comfortable for you. • Hold the stand to prevent the monitor from falling when you change its angle. • You can adjust the monitor's angle from -5º to 20º. -5º~20º ASUS LCD Monitor VW192 Series Downloaded from ManualMonitor.com Manuals 2-1
2.1 Adjusting the monitor • For optimal viewing, we recommend that you look at the full face of the monitor, then adjust the monitor to the angle that is most comfortable for you. • Hold the stand to prevent the monitor from falling when you change its angle. • You can adjust the monitor's angle from -5º to 20º. -5º~20º ASUS LCD Monitor VW192 Series Downloaded from ManualMonitor.com Manuals 2-1
User Guide
Page 12
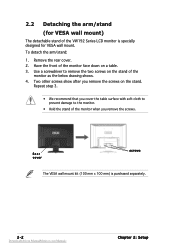
.../stand (for VESA wall mount. Have the front of the VW192 Series LCD monitor is purchased separately. 2-2 Downloaded from ManualMonitor.com Manuals Chapter 2: Setup Repeat step 3. • We recommend that you cover the table surface with soft cloth to prevent damage to remove the two screws on the stand of the monitor when you remove the screws on a table. 3. Two other screws show after you remove the screws. Rear cover screws The VESA wall mount...
.../stand (for VESA wall mount. Have the front of the VW192 Series LCD monitor is purchased separately. 2-2 Downloaded from ManualMonitor.com Manuals Chapter 2: Setup Repeat step 3. • We recommend that you cover the table surface with soft cloth to prevent damage to remove the two screws on the stand of the monitor when you remove the screws on a table. 3. Two other screws show after you remove the screws. Rear cover screws The VESA wall mount...
User Guide
Page 13
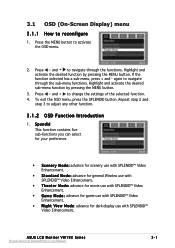
... use with SPLENDID™ Video Enhancement. • Standard Mode: advance for general Window use with SPLENDID™ Video Enhancement. • Theater Mode: advance for movie use with SPLENDID™ Video Enhancement. • Game Mode: advance for game use with SPLENDID™ Video Enhancement. • Night View Mode: advance for dark-display use with SPLENDID™ Video Enhancement. ASUS LCD Monitor VW192 Series Downloaded from ManualMonitor.com Manuals 3-1 Press the MENU button to adjust any other function. 3.1.2 OSD...
... use with SPLENDID™ Video Enhancement. • Standard Mode: advance for general Window use with SPLENDID™ Video Enhancement. • Theater Mode: advance for movie use with SPLENDID™ Video Enhancement. • Game Mode: advance for game use with SPLENDID™ Video Enhancement. • Night View Mode: advance for dark-display use with SPLENDID™ Video Enhancement. ASUS LCD Monitor VW192 Series Downloaded from ManualMonitor.com Manuals 3-1 Press the MENU button to adjust any other function. 3.1.2 OSD...
User Guide
Page 14
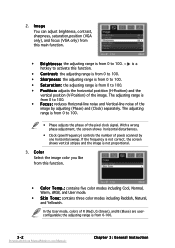
... the pixel clock signal. C o l o r Select the image color you like from 0 to 100. • Phase adjusts the phase of the image by one horizontal sweep. The adjusting range is from 0-100. 3-2 Downloaded from 0 to 100. • Position: adjusts the horizontal postition (H-Position) and the vertical position (V-Position) of R (Red), G (Green), and B (Bluee) are userconfigurable; the adjusting range is from ManualMonitor.com Manuals Chapter 3: General Instruction I m a g e You can adjust brightness, contrast, sharpness, saturation,position (VGA only), and focus (VGA only...
... the pixel clock signal. C o l o r Select the image color you like from 0 to 100. • Phase adjusts the phase of the image by one horizontal sweep. The adjusting range is from 0-100. 3-2 Downloaded from 0 to 100. • Position: adjusts the horizontal postition (H-Position) and the vertical position (V-Position) of R (Red), G (Green), and B (Bluee) are userconfigurable; the adjusting range is from ManualMonitor.com Manuals Chapter 3: General Instruction I m a g e You can adjust brightness, contrast, sharpness, saturation,position (VGA only), and focus (VGA only...

User Guide
Page 15
... to 100. The adjusting range is from 0 to • OSD Setup: adjusts the horizontal postition (H-Position) and the vertical position (V-Position) of the OSD. S y s t e m S e t u p Allow you to adjust the system. • V o l u m e : the adjusting range is from 0 to the preset mode. In the OSD Timeout selection, you can select either VGA or DVI input source. (For the models with a DVI port) 5. In p u t S e l e c t In this function. 4. ASUS LCD Monitor VW192 Series Downloaded from 10 to 120. • Language: there are ten...
... to 100. The adjusting range is from 0 to • OSD Setup: adjusts the horizontal postition (H-Position) and the vertical position (V-Position) of the OSD. S y s t e m S e t u p Allow you to adjust the system. • V o l u m e : the adjusting range is from 0 to the preset mode. In the OSD Timeout selection, you can select either VGA or DVI input source. (For the models with a DVI port) 5. In p u t S e l e c t In this function. 4. ASUS LCD Monitor VW192 Series Downloaded from 10 to 120. • Language: there are ten...

User Guide
Page 16
... mode. • Make sure the signal cable is properly connected the monitor and the computer. • Inspect the signal cable and make sure none of the pins are bent. • Connect the computer with another available monitor to check if the computer is properly working. • Adjust the Contrast and Brightness settings via OSD. • Press the SPLENDID button for two seconds to automatically adjust the image. • Adjust the H-Position or V-Position settings via OSD...
... mode. • Make sure the signal cable is properly connected the monitor and the computer. • Inspect the signal cable and make sure none of the pins are bent. • Connect the computer with another available monitor to check if the computer is properly working. • Adjust the Contrast and Brightness settings via OSD. • Press the SPLENDID button for two seconds to automatically adjust the image. • Adjust the H-Position or V-Position settings via OSD...

User Guide
Page 17
3.3 Supported operating modes Standard Resolution Horizontal Frequency Vertical Frequency Pixel Frequency DOS VGA SVGA XGA SXGA VESA VESA (Primary) 720 x 400 640 x 480 640 x 480 640 x 480 800 x 600 800 x 600 800 x 600 800 x 600 1024 x 768 1024 x 768 1024 x 768 1280 x... 31.50MHz 36.00MHz 40.00MHz 50.00MHz 49.50MHz 65.00MHz 75.00MHz 78.75MHz 108.00MHz 135.00MHz 108.00MHz 106.00MHz * Modes not listed in the table above. ASUS LCD Monitor VW192 Series Downloaded from ManualMonitor.com Manuals 3-5 For optimal resolution, we recommend that you choose a mode listed in the table may not be...
3.3 Supported operating modes Standard Resolution Horizontal Frequency Vertical Frequency Pixel Frequency DOS VGA SVGA XGA SXGA VESA VESA (Primary) 720 x 400 640 x 480 640 x 480 640 x 480 800 x 600 800 x 600 800 x 600 800 x 600 1024 x 768 1024 x 768 1024 x 768 1280 x... 31.50MHz 36.00MHz 40.00MHz 50.00MHz 49.50MHz 65.00MHz 75.00MHz 78.75MHz 108.00MHz 135.00MHz 108.00MHz 106.00MHz * Modes not listed in the table above. ASUS LCD Monitor VW192 Series Downloaded from ManualMonitor.com Manuals 3-5 For optimal resolution, we recommend that you choose a mode listed in the table may not be...

User Guide
Page 18
3-6 Downloaded from ManualMonitor.com Manuals Chapter 3: General Instruction
3-6 Downloaded from ManualMonitor.com Manuals Chapter 3: General Instruction


