User Manual
Page 3
... Running the support DVD 2-3 2.3.2 Utilities menu 2-4 2.3.3 Manual menu 2-5 2.3.4 ASUS Contact information 2-5 2.3.5 Other information 2-6 2.4 Software information 2-8 2.4.1 AI Suite II 2-8 2.4.2 ASUS AI Manager 2-16 Chapter 3 Motherboard info 3.1 Introduction 3-2 3.2 Motherboard layout 3-2 3.3 Jumper 3-3 3.4 Connectors 3-4 Chapter 4 BIOS setup 4.1 Managing and updating your BIOS 4-2 4.1.1 ASUS Update utility 4-3 4.1.2 ASUS EZ Flash 2 4-4 4.1.3 ASUS CrashFree BIOS 3 4-5 4.1.4 ASUS BIOS Updater 4-6 E6787 V6-P8H61ELX Manual.indb 3 iii 7/28/11 10:43:08 AM
... Running the support DVD 2-3 2.3.2 Utilities menu 2-4 2.3.3 Manual menu 2-5 2.3.4 ASUS Contact information 2-5 2.3.5 Other information 2-6 2.4 Software information 2-8 2.4.1 AI Suite II 2-8 2.4.2 ASUS AI Manager 2-16 Chapter 3 Motherboard info 3.1 Introduction 3-2 3.2 Motherboard layout 3-2 3.3 Jumper 3-3 3.4 Connectors 3-4 Chapter 4 BIOS setup 4.1 Managing and updating your BIOS 4-2 4.1.1 ASUS Update utility 4-3 4.1.2 ASUS EZ Flash 2 4-4 4.1.3 ASUS CrashFree BIOS 3 4-5 4.1.4 ASUS BIOS Updater 4-6 E6787 V6-P8H61ELX Manual.indb 3 iii 7/28/11 10:43:08 AM

User Manual
Page 4
Table of contents 4.2 BIOS setup program 4-9 BIOS menu screen 4-9 4.3 Main menu 4-13 4.3.1 System Language [English 4-13 4.3.2 System Date [Day xx/xx/xxxx 4-13 4.3.3 System Time [xx:xx:xx 4-13 4.3.4 Security 4-13 4.4 ...Voltage... 4-21 4.6 Boot menu 4-22 4.6.1 Bootup NumLock State [On 4-22 4.6.2 Full Screen Logo [Enabled 4-22 4.6.4 Option ROM Messages [Force BIOS 4-23 4.6.5 Setup Mode [EZ Mode 4-23 4.7 Tools menu 4-24 4.7.1 ASUS EZ Flash 2 4-24 4.7.2 ASUS SPD Information 4-24 4.8 Exit menu 4-25 ASUS contact information 4-26 iv E6787 V6-P8H61ELX Manual.indb 4 7/28/11 10:43:08 AM
Table of contents 4.2 BIOS setup program 4-9 BIOS menu screen 4-9 4.3 Main menu 4-13 4.3.1 System Language [English 4-13 4.3.2 System Date [Day xx/xx/xxxx 4-13 4.3.3 System Time [xx:xx:xx 4-13 4.3.4 Security 4-13 4.4 ...Voltage... 4-21 4.6 Boot menu 4-22 4.6.1 Bootup NumLock State [On 4-22 4.6.2 Full Screen Logo [Enabled 4-22 4.6.4 Option ROM Messages [Force BIOS 4-23 4.6.5 Setup Mode [EZ Mode 4-23 4.7 Tools menu 4-24 4.7.1 ASUS EZ Flash 2 4-24 4.7.2 ASUS SPD Information 4-24 4.8 Exit menu 4-25 ASUS contact information 4-26 iv E6787 V6-P8H61ELX Manual.indb 4 7/28/11 10:43:08 AM

User Manual
Page 7
... power up This chapter helps you MUST follow to the following parts: 1. These documents are not part of the ASUS V6-P8H61ELX. About this guide Audience This guide provides general information and installation instructions about the motherboard that comes with hardware knowledge ... and for experienced users and integrators with the system. Chapter 4: BIOS setup This chapter tells how to complete a task. Chapter 3: Motherboard info This chapter gives information about the ASUS Vintage V6-P8H61ELX barebone system. IMPORTANT: Instructions that may have been added by your...
... power up This chapter helps you MUST follow to the following parts: 1. These documents are not part of the ASUS V6-P8H61ELX. About this guide Audience This guide provides general information and installation instructions about the motherboard that comes with hardware knowledge ... and for experienced users and integrators with the system. Chapter 4: BIOS setup This chapter tells how to complete a task. Chapter 3: Motherboard info This chapter gives information about the ASUS Vintage V6-P8H61ELX barebone system. IMPORTANT: Instructions that may have been added by your...
User Manual
Page 26
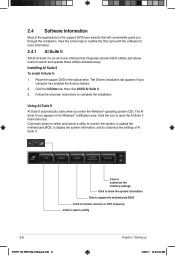
.... Click each button to select and launch a utility, to monitor the system, to update the motherboard BIOS, to display the system information, and to select a utility 2-8 E6787 V6-P8H61ELX Manual.indb 8 Chapter 2: Starting up 7/28/11 10:43:34 AM Place the support DVD in ...the support DVD have wizards that integrates several ASUS utilities and allows users to launch and operate these utilities simultaneously. Click the Utilities tab, then click ASUS AI Suite II. 3. 2.4 Software information Most of AI Suite II. Installing ...
.... Click each button to select and launch a utility, to monitor the system, to update the motherboard BIOS, to display the system information, and to select a utility 2-8 E6787 V6-P8H61ELX Manual.indb 8 Chapter 2: Starting up 7/28/11 10:43:34 AM Place the support DVD in ...the support DVD have wizards that integrates several ASUS utilities and allows users to launch and operate these utilities simultaneously. Click the Utilities tab, then click ASUS AI Suite II. 3. 2.4 Software information Most of AI Suite II. Installing ...
User Manual
Page 30
...;o�m���a�n� updated BIOS file, save , and update the motherboard BIOS in Windows® OS. The ASUS Update utility allows you to enable the BIOS downgradable function and auto BIOS backup function, check the checkboxs before the two items on the right side. 2-12 E6787 V6-P8H61ELX Manual.indb 12 Chapter 2: Starting up...
...;o�m���a�n� updated BIOS file, save , and update the motherboard BIOS in Windows® OS. The ASUS Update utility allows you to enable the BIOS downgradable function and auto BIOS backup function, check the checkboxs before the two items on the right side. 2-12 E6787 V6-P8H61ELX Manual.indb 12 Chapter 2: Starting up...

User Manual
Page 31
... logo, which is the image appearing on screen during the Power‑On Self-Tests (POST). Locate the BIOS file from file, and then click Next. 2. ASUS V6-P8H61ELX E6787 V6-P8H61ELX Manual.indb 13 2-13 7/28/11 10:43:40 AM Click Yes if you want to change the boot logo or No to continue...
... logo, which is the image appearing on screen during the Power‑On Self-Tests (POST). Locate the BIOS file from file, and then click Next. 2. ASUS V6-P8H61ELX E6787 V6-P8H61ELX Manual.indb 13 2-13 7/28/11 10:43:40 AM Click Yes if you want to change the boot logo or No to continue...

User Manual
Page 32
System Information The System Information section displays the information about the motherboard, CPU, and memory slots. • Click the MB tab to see the details on the motherboard manufacturer, product name, version, and BIOS. • Click the CPU tab to see the details on the processor and the Cache. • Click the SPD tab and then select the memory slot to see the details on the memory module installed on the corresponding slot. 2-14 E6787 V6-P8H61ELX Manual.indb 14 Chapter 2: Starting up 7/28/11 10:43:41 AM
System Information The System Information section displays the information about the motherboard, CPU, and memory slots. • Click the MB tab to see the details on the motherboard manufacturer, product name, version, and BIOS. • Click the CPU tab to see the details on the processor and the Cache. • Click the SPD tab and then select the memory slot to see the details on the memory module installed on the corresponding slot. 2-14 E6787 V6-P8H61ELX Manual.indb 14 Chapter 2: Starting up 7/28/11 10:43:41 AM
User Manual
Page 40
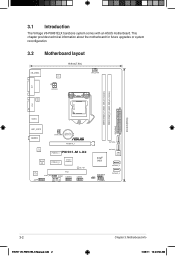
... Power PCIEX16_1 PCIEX1_1 P8H61-M LX2 Super I/O PCIEX1_2 asmedia ASM1083 VIA VT1708S AAFP SPDIF_OUT PCI1 COM1 USB910 SB_PWR USB78 SATA3G_1 Intel® H61 SATA3G_2 32Mb BIOS SATA3G_3 SPEAKER CLRTC F_PANEL SATA3G_4 3-2 E6787 V6-P8H61ELX Manual.indb 2 Chapter 3: Motherboard info 7/28/11 10:43:50 AM 3.1 Introduction The Vintage V6-P8H61ELX barebone system comes with an ASUS motherboard.
... Power PCIEX16_1 PCIEX1_1 P8H61-M LX2 Super I/O PCIEX1_2 asmedia ASM1083 VIA VT1708S AAFP SPDIF_OUT PCI1 COM1 USB910 SB_PWR USB78 SATA3G_1 Intel® H61 SATA3G_2 32Mb BIOS SATA3G_3 SPEAKER CLRTC F_PANEL SATA3G_4 3-2 E6787 V6-P8H61ELX Manual.indb 2 Chapter 3: Motherboard info 7/28/11 10:43:50 AM 3.1 Introduction The Vintage V6-P8H61ELX barebone system comes with an ASUS motherboard.
User Manual
Page 41
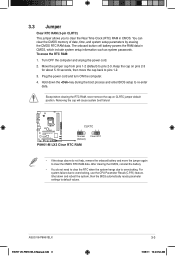
... Clock (RTC) RAM in CMOS, which include system setup information such as system passwords. Hold down and reboot the system, then the BIOS automatically resets parameter settings to re-enter data. Turn OFF the computer and unplug the power cord. 2. Shut down the key during the... boot process and enter BIOS setup to default values. To erase the RTC RAM: 1. Plug the power cord and turn ON the computer. 4. The onboard button cell battery powers the RAM data in CMOS. Removing the cap will cause system boot failure! ASUS V6-P8H61ELX E6787 V6-P8H61ELX Manual.indb 3 3-3 7/...
... Clock (RTC) RAM in CMOS, which include system setup information such as system passwords. Hold down and reboot the system, then the BIOS automatically resets parameter settings to re-enter data. Turn OFF the computer and unplug the power cord. 2. Shut down the key during the... boot process and enter BIOS setup to default values. To erase the RTC RAM: 1. Plug the power cord and turn ON the computer. 4. The onboard button cell battery powers the RAM data in CMOS. Removing the cap will cause system boot failure! ASUS V6-P8H61ELX E6787 V6-P8H61ELX Manual.indb 3 3-3 7/...

User Manual
Page 44
... back of the motherboard's high-definition audio capability. • By default, this connector is set the HD Audio Controller item in the BIOS to [Enabled]. If you connect a high-definition front panel audio module to this connector to HD Audio. COM1 PIN 1 P8H61-M LX2... section "4.4.6 Onboard Devices Configuration" for a serial (COM) port. Serial port connector (10-1 pin COM1) This connector is purchased separately. 3-6 E6787 V6-P8H61ELX Manual.indb 6 Chapter 3: Motherboard info 7/28/11 10:43:59 AM 5. Connect the serial port module cable to this connector, set to avail ...
... back of the motherboard's high-definition audio capability. • By default, this connector is set the HD Audio Controller item in the BIOS to [Enabled]. If you connect a high-definition front panel audio module to this connector to HD Audio. COM1 PIN 1 P8H61-M LX2... section "4.4.6 Onboard Devices Configuration" for a serial (COM) port. Serial port connector (10-1 pin COM1) This connector is purchased separately. 3-6 E6787 V6-P8H61ELX Manual.indb 6 Chapter 3: Motherboard info 7/28/11 10:43:59 AM 5. Connect the serial port module cable to this connector, set to avail ...

User Manual
Page 47
R BIOS setup E6787 V6-P8H61ELX Manual.indb 1 7/28/11 10:44:04 AM Chapter 4 This chapter tells how to change system settings through the BIOS Setup menus and describes the BIOS parameters.
R BIOS setup E6787 V6-P8H61ELX Manual.indb 1 7/28/11 10:44:04 AM Chapter 4 This chapter tells how to change system settings through the BIOS Setup menus and describes the BIOS parameters.
User Manual
Page 48
... a new system component that you need to restore the BIOS in using the ASUS Update utility. • Download the latest BIOS file from the ASUS website at www.asus.com 4-2 E6787 V6-P8H61ELX Manual.indb 2 Chapter 4: BIOS setup 7/28/11 10:44:05 AM In normal circumstances, the default BIOS settings apply to most conditions to system boot failure...
... a new system component that you need to restore the BIOS in using the ASUS Update utility. • Download the latest BIOS file from the ASUS website at www.asus.com 4-2 E6787 V6-P8H61ELX Manual.indb 2 Chapter 4: BIOS setup 7/28/11 10:44:05 AM In normal circumstances, the default BIOS settings apply to most conditions to system boot failure...

User Manual
Page 49
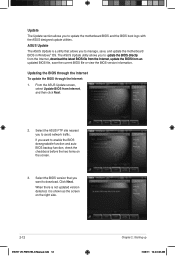
... from file, then click Next. Follow the onscreen instructions to complete the installation. ASUS V6-P8H61ELX E6787 V6-P8H61ELX Manual.indb 3 4-3 7/28/11 10:44:06 AM Select the ASUS FTP site nearest you update the BIOS using this utility. Always update the utility to avail all Windows® applications before you to avoid network traffic, then...
... from file, then click Next. Follow the onscreen instructions to complete the installation. ASUS V6-P8H61ELX E6787 V6-P8H61ELX Manual.indb 3 4-3 7/28/11 10:44:06 AM Select the ASUS FTP site nearest you update the BIOS using this utility. Always update the utility to avail all Windows® applications before you to avoid network traffic, then...

User Manual
Page 50
...the latest BIOS file from the ASUS website at www.asus.com To update the BIOS using an OS‑based utility. Before you to perform the BIOS update process. Go to the Tool menu to select ASUS EZ Flash Utility and press to prevent system boot failure! 4-4 Chapter 4: BIOS setup E6787 V6-P8H61ELX Manual....indb 4 7/28/11 10:44:08 AM Press the Up/Down arrow keys to find the USB flash disk that contains the latest BIOS file to the USB ...
...the latest BIOS file from the ASUS website at www.asus.com To update the BIOS using an OS‑based utility. Before you to perform the BIOS update process. Go to the Tool menu to select ASUS EZ Flash Utility and press to prevent system boot failure! 4-4 Chapter 4: BIOS setup E6787 V6-P8H61ELX Manual....indb 4 7/28/11 10:44:08 AM Press the Up/Down arrow keys to find the USB flash disk that contains the latest BIOS file to the USB ...

User Manual
Page 51
.... 3. You can cause system boot failure! ASUS V6-P8H61ELX E6787 V6-P8H61ELX Manual.indb 5 4-5 7/28/11 10:44:08 AM Download the latest BIOS file from the ASUS website at www.asus.com Recovering the BIOS To recover the BIOS: 1. To ensure system compatibility and stability, we recommend that contains the BIOS file to recover BIOS setting. The system requires you to...
.... 3. You can cause system boot failure! ASUS V6-P8H61ELX E6787 V6-P8H61ELX Manual.indb 5 4-5 7/28/11 10:44:08 AM Download the latest BIOS file from the ASUS website at www.asus.com Recovering the BIOS To recover the BIOS: 1. To ensure system compatibility and stability, we recommend that contains the BIOS file to recover BIOS setting. The system requires you to...

User Manual
Page 52
... latest BIOS file and BIOS Updater from the ASUS website at http://support.asus.com and save the BIOS file and BIOS Updater to show the BIOS Boot Device Select Menu. Insert the USB flash drive with the latest BIOS file and BIOS Updater to boot using defaults 4-6 E6787 V6-P8H61ELX Manual.indb 6 Chapter 4: BIOS setup ...7/28/11 10:44:09 AM The actual utility screen displays may not be same as shown. When the ASUS Logo appears, press to a hard disk...
... latest BIOS file and BIOS Updater from the ASUS website at http://support.asus.com and save the BIOS file and BIOS Updater to show the BIOS Boot Device Select Menu. Insert the USB flash drive with the latest BIOS file and BIOS Updater to boot using defaults 4-6 E6787 V6-P8H61ELX Manual.indb 6 Chapter 4: BIOS setup ...7/28/11 10:44:09 AM The actual utility screen displays may not be same as shown. When the ASUS Logo appears, press to a hard disk...

User Manual
Page 53
...] and press . D:\>bupdater /oOLDBIOS1.rom Filename Extension The [filename] is done, press any key to return to continue. Note Saving BIOS: ASUS V6-P8H61ELX E6787 V6-P8H61ELX Manual.indb 7 4-7 7/28/11 10:44:10 AM Press any user-assigned filename with no more than eight alphanumeric characters for the ...filename and three alphanumeric characters for DOS V1.07 Current ROM BOARD: V6-P8H61ELX VER: 0105 DATE: 07/22/2011 Update ROM BOARD: Unknown VER: Unknown DATE: Unknown PATH: A:\ BIOS backup is not write-protected and has at least 1024KB free space to save the...
...] and press . D:\>bupdater /oOLDBIOS1.rom Filename Extension The [filename] is done, press any key to return to continue. Note Saving BIOS: ASUS V6-P8H61ELX E6787 V6-P8H61ELX Manual.indb 7 4-7 7/28/11 10:44:10 AM Press any user-assigned filename with no more than eight alphanumeric characters for the ...filename and three alphanumeric characters for DOS V1.07 Current ROM BOARD: V6-P8H61ELX VER: 0105 DATE: 07/22/2011 Update ROM BOARD: Unknown VER: Unknown DATE: Unknown PATH: A:\ BIOS backup is not write-protected and has at least 1024KB free space to save the...

User Manual
Page 54
...utility automatically exits to the DOS prompt after updating BIOS. • Ensure to load the BIOS default settings to connect all SATA hard disk drives after updating the BIOS file if you have disconnected them. 4-8 E6787 V6-P8H61ELX Manual.indb 8 Chapter 4: BIOS setup 7/28/11 10:44:11 AM Select ...the Load Optimized Defaults item under the Exit menu. The BIOS Updater screen appears as below. Refer to confirm BIOS update. Are you to section 4.8 Exit menu for DOS V1.07 Current ROM BOARD: V6-P8H61ELX VER: 0105 DATE: 07/22/2011 Update ROM BOARD: Unknown VER...
...utility automatically exits to the DOS prompt after updating BIOS. • Ensure to load the BIOS default settings to connect all SATA hard disk drives after updating the BIOS file if you have disconnected them. 4-8 E6787 V6-P8H61ELX Manual.indb 8 Chapter 4: BIOS setup 7/28/11 10:44:11 AM Select ...the Load Optimized Defaults item under the Exit menu. The BIOS Updater screen appears as below. Refer to confirm BIOS update. Are you to section 4.8 Exit menu for DOS V1.07 Current ROM BOARD: V6-P8H61ELX VER: 0105 DATE: 07/22/2011 Update ROM BOARD: Unknown VER...

User Manual
Page 55
...always shut-down the system properly from the operating system. • The BIOS setup screens shown in the EZ Mode/Advanced Mode screen. ASUS V6-P8H61ELX E6787 V6-P8H61ELX Manual.indb 9 4-9 7/28/11 10:44:12 AM The BIOS screens include navigation keys and brief online help to guide you want to ...use the mouse to control the BIOS setup program. • The default BIOS settings for this motherboard apply for...
...always shut-down the system properly from the operating system. • The BIOS setup screens shown in the EZ Mode/Advanced Mode screen. ASUS V6-P8H61ELX E6787 V6-P8H61ELX Manual.indb 9 4-9 7/28/11 10:44:12 AM The BIOS screens include navigation keys and brief online help to guide you want to ...use the mouse to control the BIOS setup program. • The default BIOS settings for this motherboard apply for...

User Manual
Page 56
... the display language, system performance mode and boot device priority. Refer to the system. 4-10 E6787 V6-P8H61ELX Manual.indb 10 Chapter 4: BIOS setup 7/28/11 10:44:14 AM Exits the BIOS setup program without saving the changes, saves the changes and resets the system, or enters the Advanced ...boot device priority Power Saving mode Loads optimized default Displays the system properties of the selected mode on the right hand side Normal mode ASUS Optimal mode Selects the boot device priority • The boot device options vary depending on the devices you to decide the boot priority...
... the display language, system performance mode and boot device priority. Refer to the system. 4-10 E6787 V6-P8H61ELX Manual.indb 10 Chapter 4: BIOS setup 7/28/11 10:44:14 AM Exits the BIOS setup program without saving the changes, saves the changes and resets the system, or enters the Advanced ...boot device priority Power Saving mode Loads optimized default Displays the system properties of the selected mode on the right hand side Normal mode ASUS Optimal mode Selects the boot device priority • The boot device options vary depending on the devices you to decide the boot priority...


