User Manual
Page 13
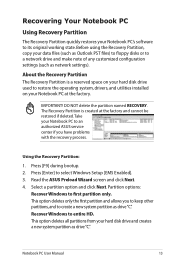
Press [F9] during bootup. 2. Read the ASUS Preload Wizard screen and click Next. 4. DO NOT delete the partition named RECOVERY. This option deletes only the first partition and allows you have problems with the recovery ... Partition The Recovery Partition quickly restores your Notebook PC at the factory and cannot be restored if deleted. Take your Notebook PC to an authorized ASUS service center if you to keep other partitions,and to a network drive and make note of any customized configuration settings (such as drive"C". The Recovery...
Press [F9] during bootup. 2. Read the ASUS Preload Wizard screen and click Next. 4. DO NOT delete the partition named RECOVERY. This option deletes only the first partition and allows you have problems with the recovery ... Partition The Recovery Partition quickly restores your Notebook PC at the factory and cannot be restored if deleted. Take your Notebook PC to an authorized ASUS service center if you to keep other partitions,and to a network drive and make note of any customized configuration settings (such as drive"C". The Recovery...

User Manual
Page 25
...presented with a boot menu with an operating system. 3 Getting Started Powering ON the Notebook PC The Notebook PC's power-ON message appears on the screen prompting you to boot from your available drives. Press [ESC] and you need to run Window's disk checking program: click Start > select Computer >... correctly detected and ready for more effective scan and repair but the process will be seen. If warnings are still given during the splash screen, standard boot information such as a permanent part of the Notebook PC's test routine and is not a problem with any critical hard disk...
...presented with a boot menu with an operating system. 3 Getting Started Powering ON the Notebook PC The Notebook PC's power-ON message appears on the screen prompting you to boot from your available drives. Press [ESC] and you need to run Window's disk checking program: click Start > select Computer >... correctly detected and ready for more effective scan and repair but the process will be seen. If warnings are still given during the splash screen, standard boot information such as a permanent part of the Notebook PC's test routine and is not a problem with any critical hard disk...

User Manual
Page 26
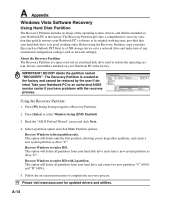
Screen captures shown here are examples only and may not reflect what you will be charged every three months to extend recovery capacity or else it ...
Screen captures shown here are examples only and may not reflect what you will be charged every three months to extend recovery capacity or else it ...

User Manual
Page 29
.... Special Keyboard Functions 3 Getting Started Colored Hot Keys The following defines the colored hot keys on sleep button setting in power management setup). stretches the screen area to use the wireless LAN or Bluetooth. "ZZ" Icon (F1): Places the Notebook PC in touchpad LOCKED (disabled) and UNLOCKED (enabled). Radio Tower (F2...
.... Special Keyboard Functions 3 Getting Started Colored Hot Keys The following defines the colored hot keys on sleep button setting in power management setup). stretches the screen area to use the wireless LAN or Bluetooth. "ZZ" Icon (F1): Places the Notebook PC in touchpad LOCKED (disabled) and UNLOCKED (enabled). Radio Tower (F2...

User Manual
Page 30
... PC to improve contrast, brightness, skin tone, and color saturation for red, green, and blue independently. You can see the current mode through the on -screen display (OSD). Applying or removing the power adapter will automatically switch the system between various power saving modes. You can see the current mode through...
... PC to improve contrast, brightness, skin tone, and color saturation for red, green, and blue independently. You can see the current mode through the on -screen display (OSD). Applying or removing the power adapter will automatically switch the system between various power saving modes. You can see the current mode through...

User Manual
Page 38
... left Slide finger right Slide finger backward 38 IMPORTANT! The touchpad's primary function is to move the pointer around or select items displayed on the screen with the tip of a standard desktop mouse. therefore, mechanical failures can be used in a direction to move the pointer. The following illustrations demonstrate proper use...
... left Slide finger right Slide finger backward 38 IMPORTANT! The touchpad's primary function is to move the pointer around or select items displayed on the screen with the tip of a standard desktop mouse. therefore, mechanical failures can be used in a direction to move the pointer. The following illustrations demonstrate proper use...
User Manual
Page 54
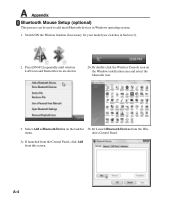
Select Add a Bluetooth Device on the Windows notification area and select the bluetooth icon. 3. Or Launch Bluetooth Devices from this screen. menu. dows Control Panel. 3c. If launched from the Control Panel, click Add from the Win- Or double click the Wireless Console icon on the ...
Select Add a Bluetooth Device on the Windows notification area and select the bluetooth icon. 3. Or Launch Bluetooth Devices from this screen. menu. dows Control Panel. 3c. If launched from the Control Panel, click Add from the Win- Or double click the Wireless Console icon on the ...
User Manual
Page 56
...to its customers the choice of a pre-installed Microsoft Windows operating system. Some of the factory pre-install. On the Boot screen, select Boot Device Priority. The support disc contains all drivers, utilities and software for web sites to provide additional software not ...Settings Configure Settings during System Boot. Boot Settings Configuration Boot Device Priority Hard Disk Drives Onboard LAN Boot ROM [Disabled] Select Screen Select Item Enter Go to enable hardware features, extend functionality, help manage your Notebook PC came pre-configured in good working ...
...to its customers the choice of a pre-installed Microsoft Windows operating system. Some of the factory pre-install. On the Boot screen, select Boot Device Priority. The support disc contains all drivers, utilities and software for web sites to provide additional software not ...Settings Configure Settings during System Boot. Boot Settings Configuration Boot Device Priority Hard Disk Drives Onboard LAN Boot ROM [Disabled] Select Screen Select Item Enter Go to enable hardware features, extend functionality, help manage your Notebook PC came pre-configured in good working ...
User Manual
Page 57
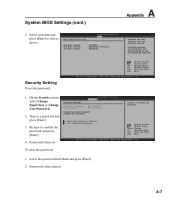
...Leave the password field blank and press [Enter]. 2. Type in the corresponding type menu. Hard Disk Security Setting I/O Interface Security Select Screen Select Item Enter Change F1 General Help F10 Save and Exit ESC Exit v02.59 (C)Copyright 1985-2005, American Megatrends, Inc. Security... ESC Exit v02.59 (C)Copyright 1985-2005, American Megatrends, Inc. 1. Password is then set the password: Select Screen Select Item +- Password is then cleared. A-7 A device enclosed in parenthesis has been disabled in a password and press [Enter]. 3. On the ...
...Leave the password field blank and press [Enter]. 2. Type in the corresponding type menu. Hard Disk Security Setting I/O Interface Security Select Screen Select Item Enter Change F1 General Help F10 Save and Exit ESC Exit v02.59 (C)Copyright 1985-2005, American Megatrends, Inc. Security... ESC Exit v02.59 (C)Copyright 1985-2005, American Megatrends, Inc. 1. Password is then set the password: Select Screen Select Item +- Password is then cleared. A-7 A device enclosed in parenthesis has been disabled in a password and press [Enter]. 3. On the ...

User Manual
Page 58
... (Always) or only when entering the BIOS setup utility (Setup). You must save changes to keep your configuration settings, you want to Sub Screen Tab Select Field F1 General Help F10 Save and Exit ESC Exit v02.59 (C)Copyright 1985-2005, American Megatrends, Inc. If you want to... keep the manufacture default settings. Select Screen Select Item Enter Change F1 General Help F10 Save and Exit ESC Exit Save Changes If you must then save changes before exiting the BIOS...
... (Always) or only when entering the BIOS setup utility (Setup). You must save changes to keep your configuration settings, you want to Sub Screen Tab Select Field F1 General Help F10 Save and Exit ESC Exit v02.59 (C)Copyright 1985-2005, American Megatrends, Inc. If you want to... keep the manufacture default settings. Select Screen Select Item Enter Change F1 General Help F10 Save and Exit ESC Exit Save Changes If you must then save changes before exiting the BIOS...

User Manual
Page 62
..., remove the additional memory, and power ON to see if the problem is due to protect yourself from the ASUS website. (WARNING: Ensure your system for assistance. Blue screen with white text A blue screen with Easy Flash in Windows or AFLASH in Windows Safe Mode. 3. Try to the Internet before you install the...
..., remove the additional memory, and power ON to see if the problem is due to protect yourself from the ASUS website. (WARNING: Ensure your system for assistance. Blue screen with white text A blue screen with Easy Flash in Windows or AFLASH in Windows Safe Mode. 3. Try to the Internet before you install the...

User Manual
Page 63
...3. A-13 USB HDD 3. Please verify the Notebook PC's exact model and download the latest BIOS file for your model from the ASUS website and save it in below sections may cause system to select and update BIOS. You must "Load Setup Defaults" on the ...BIOS. 1. BIOS SETUP UTILITY Main Advanced Security Power Boot Exit Advanced Settings WARNING: Setting wrong values in your flash disk drive to Sub Screen F1 General Help F10 Save and Exit ESC Exit v02.61 (C)Copyright 1985-2005, American Megatrends, Inc. 4. Internal Pointing Device [Enabled...
...3. A-13 USB HDD 3. Please verify the Notebook PC's exact model and download the latest BIOS file for your model from the ASUS website and save it in below sections may cause system to select and update BIOS. You must "Load Setup Defaults" on the ...BIOS. 1. BIOS SETUP UTILITY Main Advanced Security Power Boot Exit Advanced Settings WARNING: Setting wrong values in your flash disk drive to Sub Screen F1 General Help F10 Save and Exit ESC Exit v02.61 (C)Copyright 1985-2005, American Megatrends, Inc. 4. Internal Pointing Device [Enabled...
User Manual
Page 64
...by the user if deleted. Press [Enter] to complete the recovery process. Follow the on-screen instructions to select Windows Setup [EMS Enabled] 3. Please visit www.asus.com for updated drivers and utilities. The Recovery Partition provides a comprehensive recovery solution that quickly ...restores your Notebook PC's software to its original working order. DO NOT delete the partition named "RECOVERY". Read the "ASUS Preload Wizard" screen and click Next. 4. Select a partition option and click Next. This option will delete only the first partition, allowing you have...
...by the user if deleted. Press [Enter] to complete the recovery process. Follow the on-screen instructions to select Windows Setup [EMS Enabled] 3. Please visit www.asus.com for updated drivers and utilities. The Recovery Partition provides a comprehensive recovery solution that quickly ...restores your Notebook PC's software to its original working order. DO NOT delete the partition named "RECOVERY". Read the "ASUS Preload Wizard" screen and click Next. 4. Select a partition option and click Next. This option will delete only the first partition, allowing you have...


