User Manual
Page 2
... 11 Chapter 2: Knowing the parts Top Side...14 Bottom Side...17 Right Side...19 Left Side...21 Rear Side...23 Front Side...24 Chapter 3: Getting Started Power System...26 Using AC Power 26 Using Battery Power 28 Battery Care...29 Powering ON the Notebook PC 30 The Power-On Self Test...
... 11 Chapter 2: Knowing the parts Top Side...14 Bottom Side...17 Right Side...19 Left Side...21 Rear Side...23 Front Side...24 Chapter 3: Getting Started Power System...26 Using AC Power 26 Using Battery Power 28 Battery Care...29 Powering ON the Notebook PC 30 The Power-On Self Test...
User Manual
Page 6
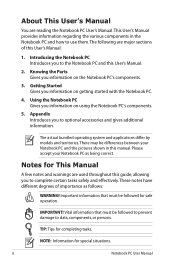
... be followed for This Manual A few notes and warnings are used throughout this guide, allowing you to the Notebook PC and this User's Manual. 2. Getting Started Gives you information on using the Notebook PC's components. 5. Using the Notebook PC Gives you information on the Notebook PC's components. 3. The actual bundled operating... as follows: WARNING! About This User's Manual You are major sections of importance as being correct. Introducing the Notebook PC Introduces you information on getting started with the Notebook PC. 4.
... be followed for This Manual A few notes and warnings are used throughout this guide, allowing you to the Notebook PC and this User's Manual. 2. Getting Started Gives you information on using the Notebook PC's components. 5. Using the Notebook PC Gives you information on the Notebook PC's components. 3. The actual bundled operating... as follows: WARNING! About This User's Manual You are major sections of importance as being correct. Introducing the Notebook PC Introduces you information on getting started with the Notebook PC. 4.

User Manual
Page 25
3 Chapter 3: Getting Started
3 Chapter 3: Getting Started
User Manual
Page 31
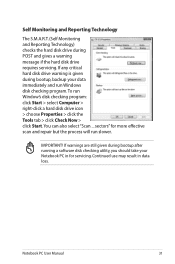
... for more effective scan and repair but the process will run Window's disk checking program: click Start > select Computer > right-click a hard disk drive icon > choose Properties > click the Tools tab > click Check Now > click Start.You can also select "Scan ... IMPORTANT! sectors" for servicing. If warnings are still given during bootup...
... for more effective scan and repair but the process will run Window's disk checking program: click Start > select Computer > right-click a hard disk drive icon > choose Properties > click the Tools tab > click Check Now > click Start.You can also select "Scan ... IMPORTANT! sectors" for servicing. If warnings are still given during bootup...

User Manual
Page 33
... as soon as the Notebook PC is connected to charge in the battery drops below 95%.This prevents the battery from external power. The battery starts charging when the charge remaining in the future. Charging the Battery Pack Before you will discharge over time.
... as soon as the Notebook PC is connected to charge in the battery drops below 95%.This prevents the battery from external power. The battery starts charging when the charge remaining in the future. Charging the Battery Pack Before you will discharge over time.

User Manual
Page 37
... User Manual 37 "Hibernate" saves more power compared to -Disk (STD) and stores your current data and status on the hard disk drive. Click the Start button and the arrowhead next to the lock icon to see this mode.) Thermal Power Control There are three power control methods for critical cooling...
... User Manual 37 "Hibernate" saves more power compared to -Disk (STD) and stores your current data and status on the hard disk drive. Click the Start button and the arrowhead next to the lock icon to see this mode.) Thermal Power Control There are three power control methods for critical cooling...
User Manual
Page 40
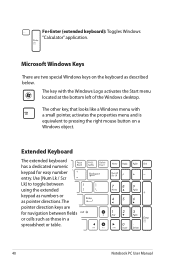
... as those in a spreadsheet or table. 40 Notebook PC User Manual The other key, that looks like a Windows menu with the Windows Logo activates the Start menu located at the bottom left of the Windows desktop. The key with a small pointer, activates the properties menu and is equivalent to toggle between...
... as those in a spreadsheet or table. 40 Notebook PC User Manual The other key, that looks like a Windows menu with the Windows Logo activates the Start menu located at the bottom left of the Windows desktop. The key with a small pointer, activates the properties menu and is equivalent to toggle between...

User Manual
Page 63
Click Close to finish the setting. The paired relationship is successfully built. Notebook PC User Manual 63 6. Select a Bluetooth-enabled device from the list and click Next. 7. Enter the Bluetooth security code into your device and start pairing. 8.
Click Close to finish the setting. The paired relationship is successfully built. Notebook PC User Manual 63 6. Select a Bluetooth-enabled device from the list and click Next. 7. Enter the Bluetooth security code into your device and start pairing. 8.
User Manual
Page 76
Connect your flash disk drive. 2. Aptio Setup Utility - Easy Flash Utility FLASH TYPE: Generic Flash Type Current Platform Platform: U56E Version: 103 Build Date: Sep 16 2010 New Platform Platform: Unkown Version: Unkown Build Date: Unkown FS0 FS1 FS2 [ ]: Switch [ ]... Manual Copyright (C) 2010 American Megatrends, Inc. �M���a��i�n� Advanced Boot Security Save & Exit ASUS FancyStart POST Logo Type Start Easy Flash Play POST Sound Speaker Volume Internal Pointing Device [Disabled] [Static] [No] [4] [Enabled] Press ENTER to run...
Connect your flash disk drive. 2. Aptio Setup Utility - Easy Flash Utility FLASH TYPE: Generic Flash Type Current Platform Platform: U56E Version: 103 Build Date: Sep 16 2010 New Platform Platform: Unkown Version: Unkown Build Date: Unkown FS0 FS1 FS2 [ ]: Switch [ ]... Manual Copyright (C) 2010 American Megatrends, Inc. �M���a��i�n� Advanced Boot Security Save & Exit ASUS FancyStart POST Logo Type Start Easy Flash Play POST Sound Speaker Volume Internal Pointing Device [Disabled] [Static] [No] [4] [Enabled] Press ENTER to run...
User Manual
Page 78
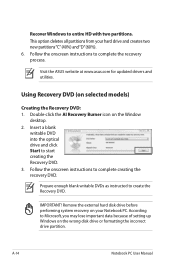
...selected models) Creating the Recovery DVD: 1. Prepare enough blank writable DVDs as instructed to start creating the Recovery DVD. 3. Insert a blank writable DVD into the optical drive and click Start to create the Recovery DVD. This option deletes all partitions from your Notebook PC. IMPORTANT...! Using Recovery DVD (on the Window desktop. 2. According to entire HD with two partitions. Visit the ASUS website at www.asus.com for updated drivers ...
...selected models) Creating the Recovery DVD: 1. Prepare enough blank writable DVDs as instructed to start creating the Recovery DVD. 3. Insert a blank writable DVD into the optical drive and click Start to create the Recovery DVD. This option deletes all partitions from your Notebook PC. IMPORTANT...! Using Recovery DVD (on the Window desktop. 2. According to entire HD with two partitions. Visit the ASUS website at www.asus.com for updated drivers ...
User Manual
Page 79
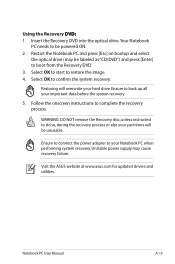
... on bootup and select the optical drive (may cause recovery failure. Select OK to complete the recovery process. Visit the ASUS website at www.asus.com for updated drivers and utilities. Restoring will overwrite your partitions will be powered ON. 2. Follow the onscreen instructions to... confirm the system recovery. Select OK to start to boot from the Recovery DVD. 3. Unstable power supply may be labeled as "CD/DVD...
... on bootup and select the optical drive (may cause recovery failure. Select OK to complete the recovery process. Visit the ASUS website at www.asus.com for updated drivers and utilities. Restoring will overwrite your partitions will be powered ON. 2. Follow the onscreen instructions to... confirm the system recovery. Select OK to start to boot from the Recovery DVD. 3. Unstable power supply may be labeled as "CD/DVD...


