
Sabertooth X58 user's manual
Page 9
... by yourself. Do not place the product in your area. These devices could interrupt the grounding circuit. • Ensure that your power supply is broken, do not try to the correct voltage in any damage, contact your dealer immediately. • To avoid short circuits,... dust, humidity, and temperature extremes. Contact a qualified service technician or your local power company. • If the power supply is set to fix it , carefully read all cables are correctly connected and the power cables are not damaged. If you encounter technical problems with the package. •...
... by yourself. Do not place the product in your area. These devices could interrupt the grounding circuit. • Ensure that your power supply is broken, do not try to the correct voltage in any damage, contact your dealer immediately. • To avoid short circuits,... dust, humidity, and temperature extremes. Contact a qualified service technician or your local power company. • If the power supply is set to fix it , carefully read all cables are correctly connected and the power cables are not damaged. If you encounter technical problems with the package. •...
Sabertooth X58 user's manual
Page 19
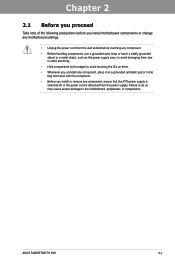
...ASUS SABERTOOTH X58 2-1 Failure to do so may cause severe damage to avoid touching the ICs on them. • Whenever you uninstall any component, place it on a grounded antistatic pad or in the bag that came with the component. • Before you install or remove any component, ensure that the ATX power supply... is switched off or the power cord is detached from the wall socket before you install motherboard components or change any motherboard settings. • Unplug ...
...ASUS SABERTOOTH X58 2-1 Failure to do so may cause severe damage to avoid touching the ICs on them. • Whenever you uninstall any component, place it on a grounded antistatic pad or in the bag that came with the component. • Before you install or remove any component, ensure that the ATX power supply... is switched off or the power cord is detached from the wall socket before you install motherboard components or change any motherboard settings. • Unplug ...
Sabertooth X58 user's manual
Page 35
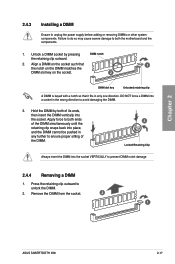
... in only one direction. Failure to do so may cause severe damage to avoid damaging the DIMM. 3. Remove the DIMM from the socket. 2 1 ASUS SABERTOOTH X58 2-17 Unlock a DIMM socket by both the motherboard and the components. 1. Chapter 2 2.4.3 Installing a DIMM Ensure to unplug the power supply before adding or removing DIMMs or other system components.
... in only one direction. Failure to do so may cause severe damage to avoid damaging the DIMM. 3. Remove the DIMM from the socket. 2 1 ASUS SABERTOOTH X58 2-17 Unlock a DIMM socket by both the motherboard and the components. 1. Chapter 2 2.4.3 Installing a DIMM Ensure to unplug the power supply before adding or removing DIMMs or other system components.
Sabertooth X58 user's manual
Page 40
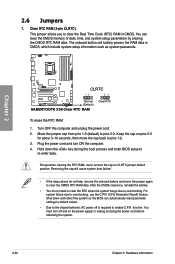
...) SABERTOOTH X58 Clear RTC RAM Clear RTC To erase the RTC RAM 1. Move the jumper cap from pins 1-2 (default) to clear the CMOS RTC RAM data. Plug the power cord and turn off is required to re-enter data. Except when clearing the RTC RAM, never remove the cap on the power supply or... unplug and plug the power cord before rebooting the system. 2-22 Chapter 2: Hardware information Removing the cap will cause system boot failure! • If the steps above ...
...) SABERTOOTH X58 Clear RTC RAM Clear RTC To erase the RTC RAM 1. Move the jumper cap from pins 1-2 (default) to clear the CMOS RTC RAM data. Plug the power cord and turn off is required to re-enter data. Except when clearing the RTC RAM, never remove the cap on the power supply or... unplug and plug the power cord before rebooting the system. 2-22 Chapter 2: Hardware information Removing the cap will cause system boot failure! • If the steps above ...

Sabertooth X58 user's manual
Page 53
... ASUS SABERTOOTH X58 2-35 Chapter 2 • For a fully configured system, we recommend that you use a PSU with higher power output when configuring a system with ATX 12 V Specification 2.0 (or later version) and provides a minimum power of 350 W. • Do not forget to connect the 8-pin EATX12 V power plug; com/PowerSupplyCalculator/PSCalculator.aspx?SLanguage=en-us for ATX power supply...
... ASUS SABERTOOTH X58 2-35 Chapter 2 • For a fully configured system, we recommend that you use a PSU with higher power output when configuring a system with ATX 12 V Specification 2.0 (or later version) and provides a minimum power of 350 W. • Do not forget to connect the 8-pin EATX12 V power plug; com/PowerSupplyCalculator/PSCalculator.aspx?SLanguage=en-us for ATX power supply...
Sabertooth X58 user's manual
Page 57
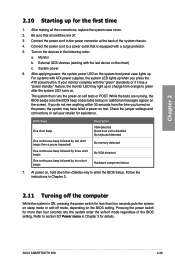
...table below) or additional messages appear on . After applying power, the system power LED on test. Check the jumper settings and connections or call your monitor complies with a surge protector. 5. Pressing the power switch for details. ASUS SABERTOOTH X58 2-39 If your retailer for the first time 1. ... or if it has a "power standby" feature, the monitor LED may have failed a power-on the system front panel case lights up. External SCSI devices (starting with ATX power supplies, the system LED lights up when you turned on the power, the system may light up ...
...table below) or additional messages appear on . After applying power, the system power LED on test. Check the jumper settings and connections or call your monitor complies with a surge protector. 5. Pressing the power switch for details. ASUS SABERTOOTH X58 2-39 If your retailer for the first time 1. ... or if it has a "power standby" feature, the monitor LED may have failed a power-on the system front panel case lights up. External SCSI devices (starting with ATX power supplies, the system LED lights up when you turned on the power, the system may light up ...
Sabertooth X58 user's manual
Page 86
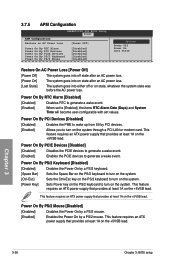
... feature requires an ATX power supply that provides at least 1A on the +5VSB lead. Power On By PCI Devices [Disabled] [Disabled] Disables the PME to turn on state, whatever the system state was before the AC power loss. 3.7.5 APM Configuration SABERTOOTH X58 BIOS Setup Power APM Configuration Restore on AC Power Loss [Power Off] Power On By RTC Alarm...
... feature requires an ATX power supply that provides at least 1A on the +5VSB lead. Power On By PCI Devices [Disabled] [Disabled] Disables the PME to turn on state, whatever the system state was before the AC power loss. 3.7.5 APM Configuration SABERTOOTH X58 BIOS Setup Power APM Configuration Restore on AC Power Loss [Power Off] Power On By RTC Alarm...
Sabertooth X58 user's manual
Page 117
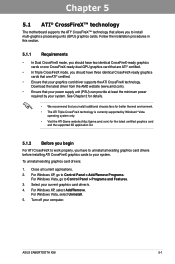
...-ready graphics cards or one CrossFireX-ready dual-GPU graphics card that are ATI® certified. • Ensure that your power supply unit (PSU) can provide at least the minimum power required by Windows® Vista operating system only. • Visit the ATI Game website (http://game.amd.com) for... (GPU) graphics cards. Close all existing graphics card drivers before installing ATI CrossFireX graphics cards to Control Panel > Programs and Features. 3. ASUS SABERTOOTH X58 5-1 Download the latest driver from the AMD website (www.amd.com). • Ensure that your system.
...-ready graphics cards or one CrossFireX-ready dual-GPU graphics card that are ATI® certified. • Ensure that your power supply unit (PSU) can provide at least the minimum power required by Windows® Vista operating system only. • Visit the ATI Game website (http://game.amd.com) for... (GPU) graphics cards. Close all existing graphics card drivers before installing ATI CrossFireX graphics cards to Control Panel > Programs and Features. 3. ASUS SABERTOOTH X58 5-1 Download the latest driver from the AMD website (www.amd.com). • Ensure that your system.

Sabertooth X58 user's manual
Page 118
... that the connector is firmly in this user manual for the locations of the PCIEX16 slots recommended for reference only. Connect two independent auxiliary power sources from the power supply to the graphics card. Connect a VGA or a DVI cable to the two graphics cards separately. 6. Ensure that the cards are for multi-graphics...
... that the connector is firmly in this user manual for the locations of the PCIEX16 slots recommended for reference only. Connect two independent auxiliary power sources from the power supply to the graphics card. Connect a VGA or a DVI cable to the two graphics cards separately. 6. Ensure that the cards are for multi-graphics...

Sabertooth X58 user's manual
Page 119
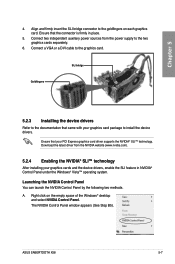
... graphics card into the PCIEX16 slots. Align and firmly insert the two CrossFireX bridge connectors to the three graphics cards separately. 6. Connect three independent auxiliary power sources from the power supply to the goldfingers on the slots. 4. ASUS SABERTOOTH X58 5-3 Prepare three CrossFireX-ready graphics cards. 2.
... graphics card into the PCIEX16 slots. Align and firmly insert the two CrossFireX bridge connectors to the three graphics cards separately. 6. Connect three independent auxiliary power sources from the power supply to the goldfingers on the slots. 4. ASUS SABERTOOTH X58 5-3 Prepare three CrossFireX-ready graphics cards. 2.
Sabertooth X58 user's manual
Page 122
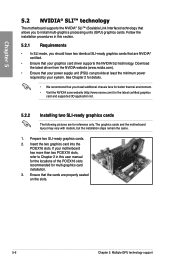
... slots. Chapter 5 5.2 NVIDIA® SLI™ technology The motherboard supports the NVIDIA® SLI™ (Scalable Link Interface) technology that your power supply unit (PSU) can provide at least the minimum power required by your system. If your motherboard has more than two PCIEX16 slots, refer to install multi-graphics processing units (GPU...
... slots. Chapter 5 5.2 NVIDIA® SLI™ technology The motherboard supports the NVIDIA® SLI™ (Scalable Link Interface) technology that your power supply unit (PSU) can provide at least the minimum power required by your system. If your motherboard has more than two PCIEX16 slots, refer to install multi-graphics processing units (GPU...
Sabertooth X58 user's manual
Page 123
Connect two independent auxiliary power sources from the NVIDIA website (www.nvidia.com). 5.2.4 Enabling the NVIDIA® SLI™ technology After installing your PCI Express graphics card driver supports the ... latest driver from the power supply to the goldfingers on the empty space of the Windows® desktop and select NVIDIA Control Panel. The NVIDIA Control Panel window appears (See Step B5). Launching the NVIDIA Control Panel You can launch the NVIDIA Control Panel by the following two methods. ASUS SABERTOOTH X58 5-7 SLI bridge Goldfingers...
Connect two independent auxiliary power sources from the NVIDIA website (www.nvidia.com). 5.2.4 Enabling the NVIDIA® SLI™ technology After installing your PCI Express graphics card driver supports the ... latest driver from the power supply to the goldfingers on the empty space of the Windows® desktop and select NVIDIA Control Panel. The NVIDIA Control Panel window appears (See Step B5). Launching the NVIDIA Control Panel You can launch the NVIDIA Control Panel by the following two methods. ASUS SABERTOOTH X58 5-7 SLI bridge Goldfingers...


