
User Manual
Page 7
...8226; Place the product on it by yourself. Operation safety • Before installing the motherboard and adding devices on a stable surface. • If you add a device. • Before connecting or removing ...signal cables from the motherboard, ensure that all power cables are unplugged. • Seek professional assistance before the signal cables are connected...the package. • Before using the product, ensure all the manuals that came with the product, contact a qualified service technician or your retailer.
...8226; Place the product on it by yourself. Operation safety • Before installing the motherboard and adding devices on a stable surface. • If you add a device. • Before connecting or removing ...signal cables from the motherboard, ensure that all power cables are unplugged. • Seek professional assistance before the signal cables are connected...the package. • Before using the product, ensure all the manuals that came with the product, contact a qualified service technician or your retailer.

User Manual
Page 13
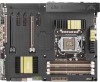
... specifications may vary with the list below. 1.2 Package contents Check your motherboard package for the following items. User Manual ASUS SABERTOOTH P67 motherboard User guide Support DVD 2 x Serial ATA 6.0 Gb/s cables 2 x Serial ATA 3.0 Gb/s cables 1 x ASUS SLI™ bridge connector 1 x ASUS Q-Shield 4 x Screws for assistant fan 1 x 2-in-1 ASUS Q-Connector kit Five-year warranty 1 x TUF Certification card 1 x TUF Five-year...
... specifications may vary with the list below. 1.2 Package contents Check your motherboard package for the following items. User Manual ASUS SABERTOOTH P67 motherboard User guide Support DVD 2 x Serial ATA 6.0 Gb/s cables 2 x Serial ATA 3.0 Gb/s cables 1 x ASUS SLI™ bridge connector 1 x ASUS Q-Shield 4 x Screws for assistant fan 1 x 2-in-1 ASUS Q-Connector kit Five-year warranty 1 x TUF Certification card 1 x TUF Five-year...

User Manual
Page 24
ASUS will run at a lower frequency than the vendor-marked value. For more details, refer to install 4GB or more on the motherboard. Under the default state, some memory modules for overclocking may install varying memory sizes in Megabit, 8 Megabit/Mb = 1 Megabyte/MB). • The default ...less. Use a maximum of the following: - To operate at the vendor-marked or at a higher frequency, refer to section 3.4 Ai Tweaker menu for manual memory frequency adjustment. • For system stability, use of memory, we recommend that you do any of 3GB system memory if you are available on...
ASUS will run at a lower frequency than the vendor-marked value. For more details, refer to install 4GB or more on the motherboard. Under the default state, some memory modules for overclocking may install varying memory sizes in Megabit, 8 Megabit/Mb = 1 Megabyte/MB). • The default ...less. Use a maximum of the following: - To operate at the vendor-marked or at a higher frequency, refer to section 3.4 Ai Tweaker menu for manual memory frequency adjustment. • For system stability, use of memory, we recommend that you do any of 3GB system memory if you are available on...

User Manual
Page 31
... recommended in the Memory QVL (Qualified Vendors Lists) in this user manual or on the ASUS website at www.asus.com after using the MemOK! Turn off the computer and replace DIMMs... and hold the MemOK! switch to boot after the whole tuning process, the DRAM_LED lights continuously. ASUS SABERTOOTH P67 2-13 function. • The MemOK! A messgae will appear during the tuning process, the system... DIMMs still fail to boot and load BIOS default settings. Replace the DIMMs with the motherboard may cause system boot failure, and the DRAM_LED near the MemOK! MemOK! 2.2.6 Onboard switch...
... recommended in the Memory QVL (Qualified Vendors Lists) in this user manual or on the ASUS website at www.asus.com after using the MemOK! Turn off the computer and replace DIMMs... and hold the MemOK! switch to boot after the whole tuning process, the DRAM_LED lights continuously. ASUS SABERTOOTH P67 2-13 function. • The MemOK! A messgae will appear during the tuning process, the system... DIMMs still fail to boot and load BIOS default settings. Replace the DIMMs with the motherboard may cause system boot failure, and the DRAM_LED near the MemOK! MemOK! 2.2.6 Onboard switch...

User Manual
Page 33
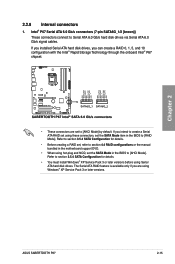
...RAID Mode]. Refer to section 3.5.4 SATA Configuration for details. • Before creating a RAID set, refer to section 4.4 RAID configurations or the manual bundled in the motherboard support DVD. • When using these connectors, set to section 3.5.4 SATA Configuration for details. • You must install Windows® XP ... 6.0 Gb/s connectors (7-pin SATA6G_1/2 [brown]) These connectors connect to [AHCI Mode]. Refer to [AHCI Mode] by default. ASUS SABERTOOTH P67 2-15 If you installed Serial ATA hard disk drives, you are set the SATA Mode item in the BIOS to Serial ATA...
...RAID Mode]. Refer to section 3.5.4 SATA Configuration for details. • Before creating a RAID set, refer to section 4.4 RAID configurations or the manual bundled in the motherboard support DVD. • When using these connectors, set to section 3.5.4 SATA Configuration for details. • You must install Windows® XP ... 6.0 Gb/s connectors (7-pin SATA6G_1/2 [brown]) These connectors connect to [AHCI Mode]. Refer to [AHCI Mode] by default. ASUS SABERTOOTH P67 2-15 If you installed Serial ATA hard disk drives, you are set the SATA Mode item in the BIOS to Serial ATA...

User Manual
Page 34
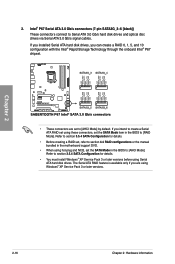
... to section 3.5.4 SATA Configuration for details. • Before creating a RAID set, refer to section 4.4 RAID configurations or the manual bundled in the motherboard support DVD. • When using these connectors, set the SATA Mode in the BIOS to Serial ATA 3.0 Gb/s hard disk... 0, 1, 5, and 10 configuration with the Intel® Rapid Storage Technology through the onboard Intel® P67 chipset. • These connectors are using Serial ATA hard disk drives. Intel® P67 Serial ATA 3.0 Gb/s connectors (7-pin SATA3G_3-6 [black]) These connectors connect to [RAID Mode].
... to section 3.5.4 SATA Configuration for details. • Before creating a RAID set, refer to section 4.4 RAID configurations or the manual bundled in the motherboard support DVD. • When using these connectors, set the SATA Mode in the BIOS to Serial ATA 3.0 Gb/s hard disk... 0, 1, 5, and 10 configuration with the Intel® Rapid Storage Technology through the onboard Intel® P67 chipset. • These connectors are using Serial ATA hard disk drives. Intel® P67 Serial ATA 3.0 Gb/s connectors (7-pin SATA3G_3-6 [black]) These connectors connect to [RAID Mode].

User Manual
Page 88
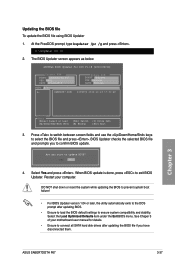
... restore the BIOS in the support DVD that allows you to manage and update the motherboard BIOS setup program. 1. Save a copy of BIOS, DO NOT manually update the BIOS. 3.10 Updating BIOS The ASUS website publishes the latest BIOS versions to provide enhancements on the AI Suite II main ...menu bar. However, BIOS updating is no problem using the current version of the original motherboard BIOS file to a USB flash disk...
... restore the BIOS in the support DVD that allows you to manage and update the motherboard BIOS setup program. 1. Save a copy of BIOS, DO NOT manually update the BIOS. 3.10 Updating BIOS The ASUS website publishes the latest BIOS versions to provide enhancements on the AI Suite II main ...menu bar. However, BIOS updating is no problem using the current version of the original motherboard BIOS file to a USB flash disk...
User Manual
Page 95
...disconnected them. See Chaper 3 of your computer. Press to switch between screen fields and use the keys to ensure system compatibility and stability. ASUS SABERTOOTH P67 3-37 D:\>bupdater /pc /g 2. ASUSTek BIOS Updater for details. • Ensure to exit BIOS Updater. Are you to update BIOS?... Updater 1. Yes No 4. Select the Load Optimized Defaults item under the Exit BIOS menu. Restart your motherboard user manual for DOS V1.18 [2010/04/29] Current ROM BOARD: SABERTOOTH P67 VER: 0401 DATE: 10/26/2010 Update ROM BOARD: Unknown VER: Unknown DATE: Unknown PATH: A:\...
...disconnected them. See Chaper 3 of your computer. Press to switch between screen fields and use the keys to ensure system compatibility and stability. ASUS SABERTOOTH P67 3-37 D:\>bupdater /pc /g 2. ASUSTek BIOS Updater for details. • Ensure to exit BIOS Updater. Are you to update BIOS?... Updater 1. Yes No 4. Select the Load Optimized Defaults item under the Exit BIOS menu. Restart your motherboard user manual for DOS V1.18 [2010/04/29] Current ROM BOARD: SABERTOOTH P67 VER: 0401 DATE: 10/26/2010 Update ROM BOARD: Unknown VER: Unknown DATE: Unknown PATH: A:\...

User Manual
Page 97
...procedures presented in this chapter for updates. 4.2.1 Running the support DVD Place the support DVD into the optical drive. ASUS SABERTOOTH P67 4-1 Visit the ASUS website at any time without notice. Install the necessary drivers to run the DVD. Double-click the ASSETUP.EXE to...tab and select the items you can install to display DVD/ motherboard information Chapter 4 If Autorun is ��ta 7 6�4��-b��i�t�7� operating systems (OS). The Manual menu contains the list of the support DVD are subject to ...
...procedures presented in this chapter for updates. 4.2.1 Running the support DVD Place the support DVD into the optical drive. ASUS SABERTOOTH P67 4-1 Visit the ASUS website at any time without notice. Install the necessary drivers to run the DVD. Double-click the ASSETUP.EXE to...tab and select the items you can install to display DVD/ motherboard information Chapter 4 If Autorun is ��ta 7 6�4��-b��i�t�7� operating systems (OS). The Manual menu contains the list of the support DVD are subject to ...

User Manual
Page 98
Double-click the language to get the necessary software manuals. Install the Adobe® Acrobat® Reader from the manual list on the left. 2. The actual software manuals containing in the support DVD. Click the Manual tab. The Manual folder of your selected software. 3. Click ASUS Motherboard Utility Guide from the Utilities menu before opening the files. 1. Some...
Double-click the language to get the necessary software manuals. Install the Adobe® Acrobat® Reader from the manual list on the left. 2. The actual software manuals containing in the support DVD. Click the Manual tab. The Manual folder of your selected software. 3. Click ASUS Motherboard Utility Guide from the Utilities menu before opening the files. 1. Some...

User Manual
Page 99
...click AI Suite II. 3. Follow the onscreen instructions to open the AI Suite II main menu bar. Click the icon to complete installation. ASUS SABERTOOTH P67 4-3 View the online help or readme file that came with the software application for more information. 4.3.1 AI Suite II AI Suite II is... to select and launch a utility, to monitor the system, to update the motherboard BIOS, to display the system information, and to the software manual in the support DVD or visit the ASUS website at www.asus.com for reference only. The Drivers installation tab appears if your computer 1. The...
...click AI Suite II. 3. Follow the onscreen instructions to open the AI Suite II main menu bar. Click the icon to complete installation. ASUS SABERTOOTH P67 4-3 View the online help or readme file that came with the software application for more information. 4.3.1 AI Suite II AI Suite II is... to select and launch a utility, to monitor the system, to update the motherboard BIOS, to display the system information, and to the software manual in the support DVD or visit the ASUS website at www.asus.com for reference only. The Drivers installation tab appears if your computer 1. The...
User Manual
Page 100
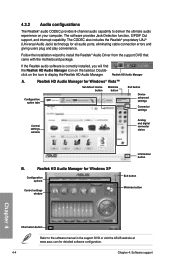
...settings Connector settings Control settings window Analog and digital connector status B. Follow the installation wizard to the software manual in the support DVD or visit the ASUS website at www.asus.com for detailed software configuration. 4-4 Chapter 4: Software support Realtek HD Audio Manager A. Realtek HD Audio ... 4 Information button Refer to install the Realtek® Audio Driver from the support DVD that came with the motherboard package. 4.3.2 Audio configurations The Realtek® audio CODEC provides 8-channel audio capability to display the Realtek HD Audio Manager.
...settings Connector settings Control settings window Analog and digital connector status B. Follow the installation wizard to the software manual in the support DVD or visit the ASUS website at www.asus.com for detailed software configuration. 4-4 Chapter 4: Software support Realtek HD Audio Manager A. Realtek HD Audio ... 4 Information button Refer to install the Realtek® Audio Driver from the support DVD that came with the motherboard package. 4.3.2 Audio configurations The Realtek® audio CODEC provides 8-channel audio capability to display the Realtek HD Audio Manager.

User Manual
Page 112
If your motherboard has more than two PCIEX16 slots, refer to the goldfingers on the slots. 4. Ensure that the cards are for multi-graphics card installation. 3. Connect two ... 5-2 Chapter 5: Multiple GPU technology support Insert the two graphics card into the PCIEX16 slots. Prepare two CrossFireX-ready graphics cards. 2. The graphics cards and the motherboard layout may vary with graphics cards) 5. Chapter 5 5.1.3 Installing two CrossFireX™ graphics cards The following pictures are properly seated on each graphics card. Ensure that...
If your motherboard has more than two PCIEX16 slots, refer to the goldfingers on the slots. 4. Ensure that the cards are for multi-graphics card installation. 3. Connect two ... 5-2 Chapter 5: Multiple GPU technology support Insert the two graphics card into the PCIEX16 slots. Prepare two CrossFireX-ready graphics cards. 2. The graphics cards and the motherboard layout may vary with graphics cards) 5. Chapter 5 5.1.3 Installing two CrossFireX™ graphics cards The following pictures are properly seated on each graphics card. Ensure that...
User Manual
Page 114
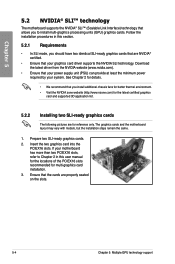
...8482; (Scalable Link Interface) technology that allows you to Chapter 2 in this user manual for the locations of the PCIEX16 slots recommended for reference only. The graphics cards and the motherboard layout may vary with models, but the installation steps remain the same. 1. Prepare two... 2 for details. • We recommend that your power supply unit (PSU) can provide at least the minimum power required by your motherboard has more than two PCIEX16 slots, refer to install multi-graphics processing units (GPU) graphics cards. Follow the installation procedures in this section...
...8482; (Scalable Link Interface) technology that allows you to Chapter 2 in this user manual for the locations of the PCIEX16 slots recommended for reference only. The graphics cards and the motherboard layout may vary with models, but the installation steps remain the same. 1. Prepare two... 2 for details. • We recommend that your power supply unit (PSU) can provide at least the minimum power required by your motherboard has more than two PCIEX16 slots, refer to install multi-graphics processing units (GPU) graphics cards. Follow the installation procedures in this section...

User Manual
Page 7
... connected. If you are not sure about the voltage of the electrical outlet you detect any area where it , carefully read all the manuals that came with the product, contact a qualified service technician or your power supply is broken, do not try to the correct voltage in... local power company. • If the power supply is set to fix it by yourself. If possible, disconnect all power cables from the motherboard, ensure that all cables are correctly connected and the power cables are unplugged. • Seek professional assistance before you encounter technical problems with the...
... connected. If you are not sure about the voltage of the electrical outlet you detect any area where it , carefully read all the manuals that came with the product, contact a qualified service technician or your power supply is broken, do not try to the correct voltage in... local power company. • If the power supply is set to fix it by yourself. If possible, disconnect all power cables from the motherboard, ensure that all cables are correctly connected and the power cables are unplugged. • Seek professional assistance before you encounter technical problems with the...

User Manual
Page 13
... 1.1 Welcome! Actual product specifications may vary with the list below. 1.2 Package contents Check your motherboard package for the following items. User Manual ASUS SABERTOOTH P67 motherboard User guide Support DVD 2 x Serial ATA 6.0 Gb/s cables 2 x Serial ATA 3.0 Gb/s cables 1 x ASUS SLI™ bridge connector 1 x ASUS Q-Shield 4 x Screws for assistant fan 1 x 2-in the long line of the above items is...
... 1.1 Welcome! Actual product specifications may vary with the list below. 1.2 Package contents Check your motherboard package for the following items. User Manual ASUS SABERTOOTH P67 motherboard User guide Support DVD 2 x Serial ATA 6.0 Gb/s cables 2 x Serial ATA 3.0 Gb/s cables 1 x ASUS SLI™ bridge connector 1 x ASUS Q-Shield 4 x Screws for assistant fan 1 x 2-in the long line of the above items is...
User Manual
Page 24
ASUS will run at a lower frequency than the vendor-marked value. For effective use a more on its Serial Presence Detect (SPD), which is the standard way ... DIMMs of the following: - Any excess memory from a memory module. Use a maximum of 3GB system memory if you are available on the motherboard, the actual usable memory for manual memory frequency adjustment. • For system stability, use of memory, we recommend that you want to install 4GB or more efficient memory cooling...
ASUS will run at a lower frequency than the vendor-marked value. For effective use a more on its Serial Presence Detect (SPD), which is the standard way ... DIMMs of the following: - Any excess memory from a memory module. Use a maximum of 3GB system memory if you are available on the motherboard, the actual usable memory for manual memory frequency adjustment. • For system stability, use of memory, we recommend that you want to install 4GB or more efficient memory cooling...

User Manual
Page 31
... of the DRAM_LED increases, indicating different test processes. • Due to test one set of failsafe settings. Replace the DIMMs with the motherboard may cause system boot failure, and the DRAM_LED near the MemOK! MemOK! switch does not function under Windows™ OS environment. •...with ones recommended in the Memory QVL (Qualified Vendors Lists) in this user manual or on the computer. function. If the installed DIMMs still fail to boot and load BIOS default settings. ASUS SABERTOOTH P67 2-13 Press and hold the MemOK! switch Installing DIMMs that you to ...
... of the DRAM_LED increases, indicating different test processes. • Due to test one set of failsafe settings. Replace the DIMMs with the motherboard may cause system boot failure, and the DRAM_LED near the MemOK! MemOK! switch does not function under Windows™ OS environment. •...with ones recommended in the Memory QVL (Qualified Vendors Lists) in this user manual or on the computer. function. If the installed DIMMs still fail to boot and load BIOS default settings. ASUS SABERTOOTH P67 2-13 Press and hold the MemOK! switch Installing DIMMs that you to ...
User Manual
Page 33
ASUS SABERTOOTH P67 2-15 The Serial ATA RAID feature is available only if you are set to [AHCI Mode] by default. If you can create a RAID 0, 1, 5, and 10 configuration with the Intel® Rapid Storage Technology through the onboard Intel® P67 chipset. &#...connectors 1. Intel® P67 Serial ATA 6.0 Gb/s connectors (7-pin SATA6G_1/2 [brown]) These connectors connect to [AHCI Mode]. Refer to section 3.5.4 SATA Configuration for details. • Before creating a RAID set, refer to section 4.4 RAID configurations or the manual bundled in the motherboard support DVD. • ...
ASUS SABERTOOTH P67 2-15 The Serial ATA RAID feature is available only if you are set to [AHCI Mode] by default. If you can create a RAID 0, 1, 5, and 10 configuration with the Intel® Rapid Storage Technology through the onboard Intel® P67 chipset. &#...connectors 1. Intel® P67 Serial ATA 6.0 Gb/s connectors (7-pin SATA6G_1/2 [brown]) These connectors connect to [AHCI Mode]. Refer to section 3.5.4 SATA Configuration for details. • Before creating a RAID set, refer to section 4.4 RAID configurations or the manual bundled in the motherboard support DVD. • ...
User Manual
Page 34
...Serial ATA RAID set using these connectors, set the SATA Mode item in the motherboard support DVD. • When using hot-plug and NCQ, set to [RAID... for details. • Before creating a RAID set, refer to section 4.4 RAID configurations or the manual bundled in the BIOS to [AHCI Mode] by default. Refer to [AHCI Mode]. The Serial ATA... Windows® XP Service Pack 3 or later versions. 2-16 Chapter 2: Hardware information Chapter 2 2. Intel® P67 Serial ATA 3.0 Gb/s connectors (7-pin SATA3G_3-6 [black]) These connectors connect to Serial ATA 3.0 Gb/s hard disk ...
...Serial ATA RAID set using these connectors, set the SATA Mode item in the motherboard support DVD. • When using hot-plug and NCQ, set to [RAID... for details. • Before creating a RAID set, refer to section 4.4 RAID configurations or the manual bundled in the BIOS to [AHCI Mode] by default. Refer to [AHCI Mode]. The Serial ATA... Windows® XP Service Pack 3 or later versions. 2-16 Chapter 2: Hardware information Chapter 2 2. Intel® P67 Serial ATA 3.0 Gb/s connectors (7-pin SATA3G_3-6 [black]) These connectors connect to Serial ATA 3.0 Gb/s hard disk ...


