User Manual
Page 3
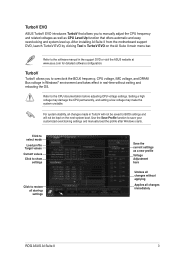
...up . After installing AI Suite II from the motherboard support DVD, launch TurboV EVO by clicking Tool > TurboV EVO on the next system boot. Refer to the software manual in real-time without applying Applies all changes made in TurboV will not be saved to BIOS settings and will...frequency and related voltages as well as a new profile Voltage Adjustment bars Undoes all changes without exiting and rebooting the OS. TurboV EVO ASUS TurboV EVO introduces TurboV that offers automatic and easy overclocking and system level up settings Save the current settings as CPU Level Up function ...
...up . After installing AI Suite II from the motherboard support DVD, launch TurboV EVO by clicking Tool > TurboV EVO on the next system boot. Refer to the software manual in real-time without applying Applies all changes made in TurboV will not be saved to BIOS settings and will...frequency and related voltages as well as a new profile Voltage Adjustment bars Undoes all changes without exiting and rebooting the OS. TurboV EVO ASUS TurboV EVO introduces TurboV that offers automatic and easy overclocking and system level up settings Save the current settings as CPU Level Up function ...
User Manual
Page 20
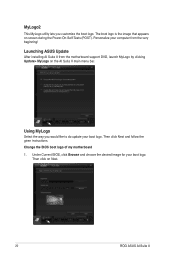
MyLogo2 This MyLogo utility lets you would like to do update your boot logo. The boot logo is the image that appears on Next. 20 ROG ASUS AI Suite II Using MyLogo Select the way you customize the boot logo. Under Current BIOS, click Browse and choose the desired image for your computer ... on the AI Suite II main menu bar. Change the BIOS boot logo of my motherboard 1. Then click Next and follow the given instructions. Then click on screen during the Power‑On‑Self-Tests (POST). Launching ASUS Update After installing AI Suite II from the very beginning! Personalize ...
MyLogo2 This MyLogo utility lets you would like to do update your boot logo. The boot logo is the image that appears on Next. 20 ROG ASUS AI Suite II Using MyLogo Select the way you customize the boot logo. Under Current BIOS, click Browse and choose the desired image for your computer ... on the AI Suite II main menu bar. Change the BIOS boot logo of my motherboard 1. Then click Next and follow the given instructions. Then click on screen during the Power‑On‑Self-Tests (POST). Launching ASUS Update After installing AI Suite II from the very beginning! Personalize ...
User Manual
Page 21
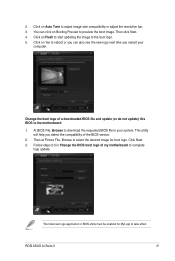
... of the BIOS version. 2. Click Next. 3. 2. Follow steps 2-5 in BIOS utility must be enabled for boot logo. The fullscreen logo application in Change the BIOS boot logo of my motherboard to the motherboard 1. This utility will help you detect the compatibility of a downloaded BIOS file and update (or do... You can also see the new logo next time you can click on Flash to start updating the image to preview the boot image. Click on Booting Preview to the boot logo. 5. Click on Yes to adjust image size compatibility or adjust the resolution bar. 3. Click on Auto Tune to ...
... of the BIOS version. 2. Click Next. 3. 2. Follow steps 2-5 in BIOS utility must be enabled for boot logo. The fullscreen logo application in Change the BIOS boot logo of my motherboard to the motherboard 1. This utility will help you detect the compatibility of a downloaded BIOS file and update (or do... You can also see the new logo next time you can click on Flash to start updating the image to preview the boot image. Click on Booting Preview to the boot logo. 5. Click on Yes to adjust image size compatibility or adjust the resolution bar. 3. Click on Auto Tune to ...
User Manual
Page 4
... 2-58 2.4 Starting up for the first time 2-61 2.5 Turning off the computer 2-61 Chapter 3: BIOS setup 3.1 Knowing BIOS 3-1 3.2 BIOS setup program 3-1 3.2.1 Advanced Mode 3-2 3.2.2 EZ Mode 3-4 3.3 Extreme Tweaker menu 3-5 3.4 Main menu 3-19 3.4.1 System Language [English 3-19 3.4.2 System Date [Day xx/xx/xxxx 3-19 3.4.3 System Time [xx:xx:xx 3-19 3.4.4 Security 3-20 3.5 Advanced...
... 2-58 2.4 Starting up for the first time 2-61 2.5 Turning off the computer 2-61 Chapter 3: BIOS setup 3.1 Knowing BIOS 3-1 3.2 BIOS setup program 3-1 3.2.1 Advanced Mode 3-2 3.2.2 EZ Mode 3-4 3.3 Extreme Tweaker menu 3-5 3.4 Main menu 3-19 3.4.1 System Language [English 3-19 3.4.2 System Date [Day xx/xx/xxxx 3-19 3.4.3 System Time [xx:xx:xx 3-19 3.4.4 Security 3-20 3.5 Advanced...
User Manual
Page 17
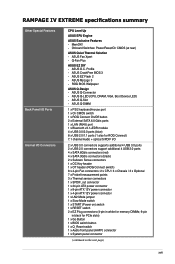
ASUS Fan Xpert - Profile - ASUS MyLogo 3 - ASUS Q-LED (CPU, DRAM, VGA, Boot Device LED) - Onboard Switches: Power/Reset/Clr CMOS (at rear) ASUS Quiet Thermal Solution - ASUS O.C. ASUS Q-Slot - ASUS CrashFree BIOS 3 - ASUS EZ Flash 2 - Q-Fan Plus ASUS EZ DIY - RAMPAGE IV EXTREME specifications summary Other Special Features Back Panel I/O Ports Internal I /O 2 x USB 3.0 connectors supports additional 4 USB 3.0 ports 2 x USB 2.0 connectors support additional 4 USB 2.0 ports...
ASUS Fan Xpert - Profile - ASUS MyLogo 3 - ASUS Q-LED (CPU, DRAM, VGA, Boot Device LED) - Onboard Switches: Power/Reset/Clr CMOS (at rear) ASUS Quiet Thermal Solution - ASUS O.C. ASUS Q-Slot - ASUS CrashFree BIOS 3 - ASUS EZ Flash 2 - Q-Fan Plus ASUS EZ DIY - RAMPAGE IV EXTREME specifications summary Other Special Features Back Panel I/O Ports Internal I /O 2 x USB 3.0 connectors supports additional 4 USB 3.0 ports 2 x USB 2.0 connectors support additional 4 USB 2.0 ports...

User Manual
Page 45
... run 5.8GHz, which means about -75̊C idle in order to stay stable at this simply flip the switch over to boot into the OS at their highest frequency. It will however remain stable at slower frequencies at much colder or warmer temperatures. Chapter 2 ROG RAMPAGE IV EXTREME 2-21 Going colder or warmer crashes.
... run 5.8GHz, which means about -75̊C idle in order to stay stable at this simply flip the switch over to boot into the OS at their highest frequency. It will however remain stable at slower frequencies at much colder or warmer temperatures. Chapter 2 ROG RAMPAGE IV EXTREME 2-21 Going colder or warmer crashes.

User Manual
Page 48
4. Q LED Q LEDs check key components (CPU, DRAM, VGA card, and booting devices) in OS. 5. If an error is found , the corresponding LED will continue lighting until the problem is enabled before POST. This user-friendly design provides an intuitional way to locate the root problem within a second. Lighting: Indicates that MemOK! is solved. GO LED Blinking: Indicates that the system loads the preset profile (GO_Button file) for temporary overclocking when in sequence during motherboard booting process. Chapter 2 2-24 Chapter 2: Hardware information
4. Q LED Q LEDs check key components (CPU, DRAM, VGA card, and booting devices) in OS. 5. If an error is found , the corresponding LED will continue lighting until the problem is enabled before POST. This user-friendly design provides an intuitional way to locate the root problem within a second. Lighting: Indicates that MemOK! is solved. GO LED Blinking: Indicates that the system loads the preset profile (GO_Button file) for temporary overclocking when in sequence during motherboard booting process. Chapter 2 2-24 Chapter 2: Hardware information

User Manual
Page 51
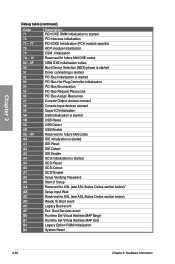
... error codes S3 Resume is stared (S3 Resume PPI is called by the DXE IPL) S3 Boot Script execution Video repost OS S3 wake vector call Reserved for future AMI progress codes S3 Resume... Failed S3 Resume PPI not Found S3 Resume Boot Script Error S3 OS Wake Error Reserved for future AMI error codes Recovery condition triggered by firmware... initialization is started System Agent DXE initialization (System Agent module specific) PCH DXE initialization is started ROG RAMPAGE IV EXTREME 2-27 EF F0 F1 F2 F3 F4 F5-F7 F8 F9 FA FB-FF 60 61 62 63...
... error codes S3 Resume is stared (S3 Resume PPI is called by the DXE IPL) S3 Boot Script execution Video repost OS S3 wake vector call Reserved for future AMI progress codes S3 Resume... Failed S3 Resume PPI not Found S3 Resume Boot Script Error S3 OS Wake Error Reserved for future AMI error codes Recovery condition triggered by firmware... initialization is started System Agent DXE initialization (System Agent module specific) PCH DXE initialization is started ROG RAMPAGE IV EXTREME 2-27 EF F0 F1 F2 F3 F4 F5-F7 F8 F9 FA FB-FF 60 61 62 63...
User Manual
Page 52
... PCH DXE Initialization (PCH module specific) ACPI module initialization CSM initialization Reserved for future AMI DXE codes OEM DXE initialization codes Boot Device Selection (BDS) phase is started Driver connecting is started PCI Bus initialization is started PCI Bus Hot Plug Controller Initialization ... ASL Status Codes section below)* Setup Input Wait Reserved for ASL (see ASL Status Codes section below) Ready To Boot event Legacy Boot event Exit Boot Services event Runtime Set Virtual Address MAP Begin Runtime Set Virtual Address MAP End Legacy Option ROM Initialization System Reset 2-28...
... PCH DXE Initialization (PCH module specific) ACPI module initialization CSM initialization Reserved for future AMI DXE codes OEM DXE initialization codes Boot Device Selection (BDS) phase is started Driver connecting is started PCI Bus initialization is started PCI Bus Hot Plug Controller Initialization ... ASL Status Codes section below)* Setup Input Wait Reserved for ASL (see ASL Status Codes section below) Ready To Boot event Legacy Boot event Exit Boot Services event Runtime Set Virtual Address MAP Begin Runtime Set Virtual Address MAP End Legacy Option ROM Initialization System Reset 2-28...

User Manual
Page 53
... initialization codes CPU initialization error System Agent initialization error PCH initialization error Some of the Architectural Protocols are found Invalid password Error loading Boot Option (LoadImage returned error) Boot Option is failed (StartImage returned error) Flash update is failed Reset protocol is not available *ASL Status Codes Status Code 01 02 03...) Code B4 B5 B6 B7 B8- Interrupt controller is in PIC mode System has transitioned into ACPI mode. Interrupt controller is in APIC mode ROG RAMPAGE IV EXTREME 2-29 BF C0-
... initialization codes CPU initialization error System Agent initialization error PCH initialization error Some of the Architectural Protocols are found Invalid password Error loading Boot Option (LoadImage returned error) Boot Option is failed (StartImage returned error) Flash update is failed Reset protocol is not available *ASL Status Codes Status Code 01 02 03...) Code B4 B5 B6 B7 B8- Interrupt controller is in PIC mode System has transitioned into ACPI mode. Interrupt controller is in APIC mode ROG RAMPAGE IV EXTREME 2-29 BF C0-

User Manual
Page 54
2.2.7 Jumper 1. LN2 Mode Jumper (3-pin LN2) With LN2 mode activated, the ROG motherboard is optimized to quickly enable/disable the OC Key feature without using the ROG Connect On/Off button on the rear I/O port. OT header (ROG Connect switch) The OT header allows connection of a 2-pin cable switch (purchased separately) for users to remedy the coldboot bug during POST at an extremely low temperature and help the system boot successfully. 2. Chapter 2 2-30 Chapter 2: Hardware information
2.2.7 Jumper 1. LN2 Mode Jumper (3-pin LN2) With LN2 mode activated, the ROG motherboard is optimized to quickly enable/disable the OC Key feature without using the ROG Connect On/Off button on the rear I/O port. OT header (ROG Connect switch) The OT header allows connection of a 2-pin cable switch (purchased separately) for users to remedy the coldboot bug during POST at an extremely low temperature and help the system boot successfully. 2. Chapter 2 2-30 Chapter 2: Hardware information

User Manual
Page 63
... details. PSU Suggested List AcBel PC7030 AcBel API5PC36 AcBel PC6018 AMA AA1200U-C AMA AA1000U-C Antec SG-850 Antec EA-380 ASUS P-50GA ASUS P-55GA ASUS U-65GA ASUS U-75HA Be quiet BN073 Be quiet BN077 Be quiet P6-PRO-850W Bubalus PE600WJD CoolerMaster RS-650 CoolerMaster RS-750 CoolerMaster ...TG1100-U33 Tagan BZII1200 Thermaltake W0133RU Thermaltake W0133RE TOPower TOP-500P5 Zalman ZM600-HP Zippy HP2-6500PE (G1) ROG RAMPAGE IV EXTREME 2-39 The system may become unstable or may not boot up if the power is recommended when configuring a system with more high-end PCI Express x16 cards, use...
... details. PSU Suggested List AcBel PC7030 AcBel API5PC36 AcBel PC6018 AMA AA1200U-C AMA AA1000U-C Antec SG-850 Antec EA-380 ASUS P-50GA ASUS P-55GA ASUS U-65GA ASUS U-75HA Be quiet BN073 Be quiet BN077 Be quiet P6-PRO-850W Bubalus PE600WJD CoolerMaster RS-650 CoolerMaster RS-750 CoolerMaster ...TG1100-U33 Tagan BZII1200 Thermaltake W0133RU Thermaltake W0133RE TOPower TOP-500P5 Zalman ZM600-HP Zippy HP2-6500PE (G1) ROG RAMPAGE IV EXTREME 2-39 The system may become unstable or may not boot up if the power is recommended when configuring a system with more high-end PCI Express x16 cards, use...
User Manual
Page 85
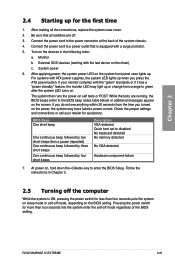
... short beeps then a pause (repeated) One continuous beep followed by three short beeps One continuous beep followed by four short beeps Description VGA detected Quick boot set to enter the BIOS Setup. Pressing the power switch for assistance. Connect the power cord to the power connector at the back of the... LED on test. Chapter 2 2.4 Starting up for less than four seconds lets the system enter the soft-off mode regardless of the system chassis. 4. ROG RAMPAGE IV EXTREME 2-61
... short beeps then a pause (repeated) One continuous beep followed by three short beeps One continuous beep followed by four short beeps Description VGA detected Quick boot set to enter the BIOS Setup. Pressing the power switch for assistance. Connect the power cord to the power connector at the back of the... LED on test. Chapter 2 2.4 Starting up for less than four seconds lets the system enter the soft-off mode regardless of the system chassis. 4. ROG RAMPAGE IV EXTREME 2-61
User Manual
Page 87
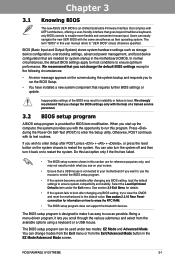
...configuration, overclocking settings, advanced power management, and boot device configuration that are for reference purposes only, and may result to instability or failure to enable more flexible and convenient mouse input. Chapter 3 ROG RAMPAGE IV EXTREME 3-1 Users can also turn the system off and...8226; An error message appears on how to restart the system. Chapter 3 Chapter 3: 3.1 Knowing BIOS BIOS setup The new ASUS UEFI BIOS is an Unified Extensible Firmware Interface that complies with UEFI architecture, offering a user-friendly interface that goes beyond traditional ...
...configuration, overclocking settings, advanced power management, and boot device configuration that are for reference purposes only, and may result to instability or failure to enable more flexible and convenient mouse input. Chapter 3 ROG RAMPAGE IV EXTREME 3-1 Users can also turn the system off and...8226; An error message appears on how to restart the system. Chapter 3 Chapter 3: 3.1 Knowing BIOS BIOS setup The new ASUS UEFI BIOS is an Unified Extensible Firmware Interface that complies with UEFI architecture, offering a user-friendly interface that goes beyond traditional ...

User Manual
Page 88
To access the EZ Mode, click Exit, then select ASUS EZ Mode. Boot Tool Exit For changing the system boot configuration For configuring options for the detailed configurations. Refer to configure the BIOS settings. The figure below shows an example of ... top of the Advanced Mode. 3.2.1 Advanced Mode The Advanced Mode provides advanced options for experienced end-users to the following main items: Extreme Tweaker Main Advanced For changing the overclocking settings For changing the basic system configuration For changing the advanced system settings Monitor For displaying the...
To access the EZ Mode, click Exit, then select ASUS EZ Mode. Boot Tool Exit For changing the system boot configuration For configuring options for the detailed configurations. Refer to configure the BIOS settings. The figure below shows an example of ... top of the Advanced Mode. 3.2.1 Advanced Mode The Advanced Mode provides advanced options for experienced end-users to the following main items: Extreme Tweaker Main Advanced For changing the overclocking settings For changing the basic system configuration For changing the advanced system settings Monitor For displaying the...

User Manual
Page 89
... items. The other items on any menu screen means that menu. Pop-up window Select a menu item and press to display the other items (Extreme Tweaker, Advanced, Monitor, Boot, Tool, and Exit) on the menu bar have their respective menu items. Back button This button appears when entering a submenu. Use the navigation... to the previous menu screen. Configuration fields These fields show the values for the BIOS setup program. A configurable field is not user-configurable. Chapter 3 ROG RAMPAGE IV EXTREME 3-3
... items. The other items on any menu screen means that menu. Pop-up window Select a menu item and press to display the other items (Extreme Tweaker, Advanced, Monitor, Boot, Tool, and Exit) on the menu bar have their respective menu items. Back button This button appears when entering a submenu. Use the navigation... to the previous menu screen. Configuration fields These fields show the values for the BIOS setup program. A configurable field is not user-configurable. Chapter 3 ROG RAMPAGE IV EXTREME 3-3
User Manual
Page 90
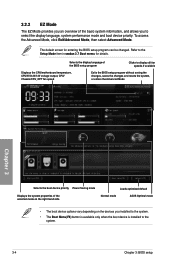
...Power Saving mode Displays the system properties of the basic system information, and allows you installed to the system. • The Boot Menu(F8) button is available only when the boot device is installed to the system. 3-4 Chapter 3: BIOS setup The default screen for details. 3.2.2 EZ Mode The EZ ...Mode provides you an overview of the selected mode on the right hand side Loads optimized default Normal mode ASUS Optimal mode • The boot device options vary depending on the devices you to select the display language, system performance mode and...
...Power Saving mode Displays the system properties of the basic system information, and allows you installed to the system. • The Boot Menu(F8) button is available only when the boot device is installed to the system. 3-4 Chapter 3: BIOS setup The default screen for details. 3.2.2 EZ Mode The EZ ...Mode provides you an overview of the selected mode on the right hand side Loads optimized default Normal mode ASUS Optimal mode • The boot device options vary depending on the devices you to select the display language, system performance mode and...

User Manual
Page 98
...VTT power. PCH 1.1V PCH 1.1v Switching Freq. [Auto] This item allows you to remove over -current protection. Set 1.3x for CPU VSA at initial boot. CPU VSA Bootup Voltage�[�A��u�t�o�] This item controls the voltage for cleaner power. Configuration options: [Auto] [1x] [1.3x]...65533;�] �[m��a��n�u�a�l�] DRAM-AB/DRAM-CD Power Phase control [Auto] [Optimized] Allows you to set ASUS optimized phase tuning profile. [Extreme] Allows you to set the VCCSA current capability.
...VTT power. PCH 1.1V PCH 1.1v Switching Freq. [Auto] This item allows you to remove over -current protection. Set 1.3x for CPU VSA at initial boot. CPU VSA Bootup Voltage�[�A��u�t�o�] This item controls the voltage for cleaner power. Configuration options: [Auto] [1x] [1.3x]...65533;�] �[m��a��n�u�a�l�] DRAM-AB/DRAM-CD Power Phase control [Auto] [Optimized] Allows you to set ASUS optimized phase tuning profile. [Extreme] Allows you to set the VCCSA current capability.

User Manual
Page 110
.... [Disabled] Disables this function. [Enabled] Enables the C1E support function. CPU C3 Report [Auto] Allows you to disable or enable the CPU C6 report to boot even without support for CPUs with extended CPUID functions. [Disabled] Disables this function. [Enabled] Allows processor cores to run multiple operating systems separately and simultaneously...
.... [Disabled] Disables this function. [Enabled] Enables the C1E support function. CPU C3 Report [Auto] Allows you to disable or enable the CPU C6 report to boot even without support for CPUs with extended CPUID functions. [Disabled] Disables this function. [Enabled] Allows processor cores to run multiple operating systems separately and simultaneously...

User Manual
Page 121
...-party ROM messages will be pressed when error occurs. ROG RAMPAGE IV EXTREME 3-35 Full Screen Logo [Enabled] [Enabled] Enables the full screen logo display feature. [Disabled] Disables the full screen logo display feature. 3.7 Boot menu The Boot menu items allow you to use the ASUS MyLogo 2™ feature. Wait For 'F1' If Error [Enabled] [Disabled...
...-party ROM messages will be pressed when error occurs. ROG RAMPAGE IV EXTREME 3-35 Full Screen Logo [Enabled] [Enabled] Enables the full screen logo display feature. [Disabled] Disables the full screen logo display feature. 3.7 Boot menu The Boot menu items allow you to use the ASUS MyLogo 2™ feature. Wait For 'F1' If Error [Enabled] [Disabled...


