Users Manual
Page 3
Table of Contents About this manual...7 Conventions used in this manual 9 Icons...9 Typography...9 Safety precautions...10 Using your Notebook PC 10 Caring for your Notebook PC 11 Proper disposal...12 Chapter 1: Hardware Setup Getting to know your Notebook PC 14 Top View...14 Bottom...18 Right Side...20 Left Side...22 Chapter 2: Using your Notebook PC Getting started...26 Charge your Notebook PC 26 Lift to open the display panel 28 Press the power button 28 Using the touchpad 29 Using the keyboard...36 HotKeys...36 Function keys...37 Windows® 10 keys...37 Notebook PC E-Manual 3
Table of Contents About this manual...7 Conventions used in this manual 9 Icons...9 Typography...9 Safety precautions...10 Using your Notebook PC 10 Caring for your Notebook PC 11 Proper disposal...12 Chapter 1: Hardware Setup Getting to know your Notebook PC 14 Top View...14 Bottom...18 Right Side...20 Left Side...22 Chapter 2: Using your Notebook PC Getting started...26 Charge your Notebook PC 26 Lift to open the display panel 28 Press the power button 28 Using the touchpad 29 Using the keyboard...36 HotKeys...36 Function keys...37 Windows® 10 keys...37 Notebook PC E-Manual 3
Users Manual
Page 4
......48 Action Center...50 Other keyboard shortcuts 51 Connecting to wireless networks 53 Wi-Fi...53 Bluetooth...54 Airplane mode...55 Connecting to wired networks 56 Turning your Notebook PC off 58 Putting your Notebook PC to sleep 59 Chapter 4: Power-On Self-Test (POST) The Power-On Self-Test (POST 62 Using POST to access BIOS and Troubleshoot 62 BIOS...62 Accessing BIOS...63 Recovering your system 64 Performing a recovery option 65 4 Notebook PC E-Manual
......48 Action Center...50 Other keyboard shortcuts 51 Connecting to wireless networks 53 Wi-Fi...53 Bluetooth...54 Airplane mode...55 Connecting to wired networks 56 Turning your Notebook PC off 58 Putting your Notebook PC to sleep 59 Chapter 4: Power-On Self-Test (POST) The Power-On Self-Test (POST 62 Using POST to access BIOS and Troubleshoot 62 BIOS...62 Accessing BIOS...63 Recovering your system 64 Performing a recovery option 65 4 Notebook PC E-Manual

Users Manual
Page 5
Chapter 5: RAID Configuration Intel® RAID configurations 68 RAID definitions...68 Creating a RAID set...69 Deleting a RAID set...72 Tips and FAQs Useful tips for your Notebook PC 74 Hardware FAQs...75 Software FAQs...78 Appendices Internal Modem Compliancy 82 Overview...82 Network Compatibility Declaration 83 Non-Voice Equipment...83 Federal Communications Commission Interference ... (ISED 88 Radiation Exposure Statement 89 Déclaration relative à l'exposition aux radiations 89 UL Safety Notices...90 Power Safety Requirement 91 TV Notices...91 Notebook PC E-Manual 5
Chapter 5: RAID Configuration Intel® RAID configurations 68 RAID definitions...68 Creating a RAID set...69 Deleting a RAID set...72 Tips and FAQs Useful tips for your Notebook PC 74 Hardware FAQs...75 Software FAQs...78 Appendices Internal Modem Compliancy 82 Overview...82 Network Compatibility Declaration 83 Non-Voice Equipment...83 Federal Communications Commission Interference ... (ISED 88 Radiation Exposure Statement 89 Déclaration relative à l'exposition aux radiations 89 UL Safety Notices...90 Power Safety Requirement 91 TV Notices...91 Notebook PC E-Manual 5
Users Manual
Page 7
... the following chapters: Chapter 1: Hardware Setup This chapter details the hardware components of using Windows® 10 in your Notebook PC. Chapter 3: Working with Windows® 10 This chapter provides an overview of your Notebook PC. Notebook PC E-Manual 7 Chapter 4: Power-On Self-Test (POST) This chapter shows you how to change the settings of your Notebook PC. Chapter 2: Using your Notebook PC This chapter shows you...
... the following chapters: Chapter 1: Hardware Setup This chapter details the hardware components of using Windows® 10 in your Notebook PC. Chapter 3: Working with Windows® 10 This chapter provides an overview of your Notebook PC. Notebook PC E-Manual 7 Chapter 4: Power-On Self-Test (POST) This chapter shows you how to change the settings of your Notebook PC. Chapter 2: Using your Notebook PC This chapter shows you...

Users Manual
Page 11
... not use your Notebook PC using a dry cloth. Remove any extra moisture from your Notebook PC near gas leaks. Do not place objects on or near liquids, rain, or moisture. Do not use strong solvents such as thinners, benzene, or other chemicals on top of warm water. Caring for your Notebook PC Disconnect the AC power and remove the battery...
... not use your Notebook PC using a dry cloth. Remove any extra moisture from your Notebook PC near gas leaks. Do not place objects on or near liquids, rain, or moisture. Do not use strong solvents such as thinners, benzene, or other chemicals on top of warm water. Caring for your Notebook PC Disconnect the AC power and remove the battery...

Users Manual
Page 13
Chapter 1: Hardware Setup Notebook PC E-Manual 13
Chapter 1: Hardware Setup Notebook PC E-Manual 13

Users Manual
Page 15
... use the function keys, allows quick access to type capitalized letters (such as A, B, C) using your Notebook PC. Notebook PC E-Manual 15 Capital lock indicator This indicator lights up when the capital lock function is activated. NOTE: The keyboard layout differs by model or territory. Keyboard The keyboard provides full-sized QWERTY keys with a comfortable travel depth for photos, videos, and other multimedia functions. Display panel This high-definition display panel provides excellent viewing features for typing. It also enables you to Windows...
... use the function keys, allows quick access to type capitalized letters (such as A, B, C) using your Notebook PC. Notebook PC E-Manual 15 Capital lock indicator This indicator lights up when the capital lock function is activated. NOTE: The keyboard layout differs by model or territory. Keyboard The keyboard provides full-sized QWERTY keys with a comfortable travel depth for photos, videos, and other multimedia functions. Display panel This high-definition display panel provides excellent viewing features for typing. It also enables you to Windows...

Users Manual
Page 27
... use a grounded wall socket while using your Notebook PC on your power adapter. Notebook PC E-Manual 27 WARNING! IMPORTANT! • Locate the input/output rating label on your Notebook PC and ensure that it on for the first time. Read the following precautions for your Notebook PC's battery: • Only ASUS-authorized technicians should remove the battery inside the device (for non-removable battery only). • The battery used...
... use a grounded wall socket while using your Notebook PC on your power adapter. Notebook PC E-Manual 27 WARNING! IMPORTANT! • Locate the input/output rating label on your Notebook PC and ensure that it on for the first time. Read the following precautions for your Notebook PC's battery: • Only ASUS-authorized technicians should remove the battery inside the device (for non-removable battery only). • The battery used...

Users Manual
Page 36
Using the keyboard HotKeys The HotKeys on your Notebook PC's keyboard can trigger the following commands: Turns the speaker on or off Turns the speaker volume down Turns the speaker volume up Decreases display brightness Increases display brightness Enables or disables the touchpad Adjusts brightness for the backlit keyboard Toggles the display mode NOTE: Ensure that the second display is connected to your Notebook PC. 36 Notebook PC E-Manual
Using the keyboard HotKeys The HotKeys on your Notebook PC's keyboard can trigger the following commands: Turns the speaker on or off Turns the speaker volume down Turns the speaker volume up Decreases display brightness Increases display brightness Enables or disables the touchpad Adjusts brightness for the backlit keyboard Toggles the display mode NOTE: Ensure that the second display is connected to your Notebook PC. 36 Notebook PC E-Manual
Users Manual
Page 37
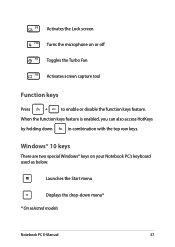
When the function keys feature is enabled, you can also access HotKeys by holding down menu* * On selected models Notebook PC E-Manual 37 Activates the Lock screen Turns the microphone on your Notebook PC's keyboard used as below: Launches the Start menu Displays the drop-down in combination with the top row keys. Windows® 10 keys There are two special Windows® keys on or off Toggles the Turbo Fan Activates screen capture tool Function keys Press to enable or disable the function keys feature.
When the function keys feature is enabled, you can also access HotKeys by holding down menu* * On selected models Notebook PC E-Manual 37 Activates the Lock screen Turns the microphone on your Notebook PC's keyboard used as below: Launches the Start menu Displays the drop-down in combination with the top row keys. Windows® 10 keys There are two special Windows® keys on or off Toggles the Turbo Fan Activates screen capture tool Function keys Press to enable or disable the function keys feature.
Users Manual
Page 41
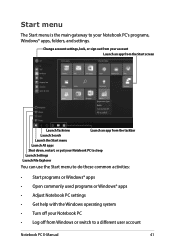
... Start menu to a different user account Notebook PC E-Manual 41 Change account settings, lock, or sign out from your account Launch an app from the Start screen Launch Taskview Launch an app from Windows or switch to do these common activities: • Start programs or Windows® apps • Open commonly used programs or Windows® apps • Adjust Notebook PC settings • Get help with the Windows operating system • Turn off your Notebook...
... Start menu to a different user account Notebook PC E-Manual 41 Change account settings, lock, or sign out from your account Launch an app from the Start screen Launch Taskview Launch an app from Windows or switch to do these common activities: • Start programs or Windows® apps • Open commonly used programs or Windows® apps • Adjust Notebook PC settings • Get help with the Windows operating system • Turn off your Notebook...
Users Manual
Page 57
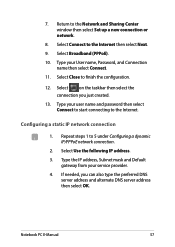
... User name, Password, and Connection name then select Connect. 11. Type your service provider. 4. Select Use the following IP address. 3. 7. Configuring a static IP network connection 1. Notebook PC E-Manual 57 Select Broadband (PPPoE). 10. Select Close to the Network and Sharing Center window then select Set up a new connection or network. 8. Return to finish the configuration. 12. Select Connect to the Internet. If needed, you just created. 13. Type your user name and password then select Connect to start connecting...
... User name, Password, and Connection name then select Connect. 11. Type your service provider. 4. Select Use the following IP address. 3. 7. Configuring a static IP network connection 1. Notebook PC E-Manual 57 Select Broadband (PPPoE). 10. Select Close to the Network and Sharing Center window then select Set up a new connection or network. 8. Return to finish the configuration. 12. Select Connect to the Internet. If needed, you just created. 13. Type your user name and password then select Connect to start connecting...
Users Manual
Page 62
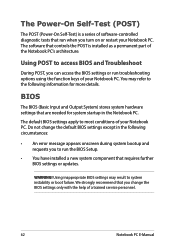
... your Notebook PC. We strongly recommend that you turn on or restart your Notebook PC. The Power-On Self-Test (POST) The POST (Power-On Self-Test) is installed as a permanent part of the Notebook PC's architecture. Using POST to run the BIOS Setup. • You have installed a new system component that controls the POST is a series of software-controlled diagnostic tests that run troubleshooting options using the function keys of your Notebook...
... your Notebook PC. We strongly recommend that you turn on or restart your Notebook PC. The Power-On Self-Test (POST) The POST (Power-On Self-Test) is installed as a permanent part of the Notebook PC's architecture. Using POST to run the BIOS Setup. • You have installed a new system component that controls the POST is a series of software-controlled diagnostic tests that run troubleshooting options using the function keys of your Notebook...
Users Manual
Page 64
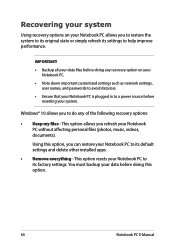
... settings such as network settings, user names, and passwords to avoid data loss. • Ensure that your Notebook PC is plugged in to a power source before resetting your system. Using this option. 64 Notebook PC E-Manual You must backup your data before doing this option, you can restore your Notebook PC allows you refresh your Notebook PC to its default settings and delete other installed apps. • Remove everything - IMPORTANT! • Backup...
... settings such as network settings, user names, and passwords to avoid data loss. • Ensure that your Notebook PC is plugged in to a power source before resetting your system. Using this option. 64 Notebook PC E-Manual You must backup your data before doing this option, you can restore your Notebook PC allows you refresh your Notebook PC to its default settings and delete other installed apps. • Remove everything - IMPORTANT! • Backup...
Users Manual
Page 68
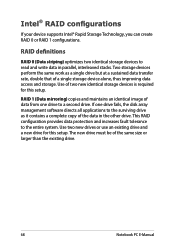
... use an existing drive and a new drive for this setup. Two storage devices perform the same work as it contains a complete copy of a single storage device alone, thus improving data access and storage. If one drive to read and write data in the other drive. RAID 1 (Data mirroring) copies and maintains an identical image of data from one drive fails, the disk array management software...
... use an existing drive and a new drive for this setup. Two storage devices perform the same work as it contains a complete copy of a single storage device alone, thus improving data access and storage. If one drive to read and write data in the other drive. RAID 1 (Data mirroring) copies and maintains an identical image of data from one drive fails, the disk array management software...

Users Manual
Page 71
When the Create Volume item is selected, enter the RAID volume capacity that you want and press . Notebook PC E-Manual 71 When the Capacity (MB) item is selected, press to create the RAID volume and return to the Intel(R) Rapid Storage Technology menu. 11. Save your changes and exit the BIOS Setup. 9. The default value indicates the maximum allowed capacity. 10.
When the Create Volume item is selected, enter the RAID volume capacity that you want and press . Notebook PC E-Manual 71 When the Capacity (MB) item is selected, press to create the RAID volume and return to the Intel(R) Rapid Storage Technology menu. 11. Save your changes and exit the BIOS Setup. 9. The default value indicates the maximum allowed capacity. 10.

Users Manual
Page 74
... Notebook PC: - Backup data - Internet connection information 74 Notebook PC E-Manual Product key for a long period of time (at extremely high temperatures. If you have the latest security settings. • Use an anti-virus software to protect your data and keep this updated too. • Unless absolutely necessary, refrain from using force shutdown to turn off your Notebook PC. • Always backup your data and make...
... Notebook PC: - Backup data - Internet connection information 74 Notebook PC E-Manual Product key for a long period of time (at extremely high temperatures. If you have the latest security settings. • Use an anti-virus software to protect your data and keep this updated too. • Unless absolutely necessary, refrain from using force shutdown to turn off your Notebook PC. • Always backup your data and make...
Users Manual
Page 75
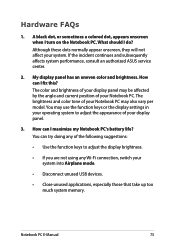
... ASUS service center. 2. The color and brightness of your display panel may be affected by the angle and current position of your Notebook PC may use the function keys or the display settings in your operating system to adjust the display brightness. • If you are not using any of the following suggestions: • Use the function keys to adjust the appearance of your system into Airplane mode. • Disconnect unused USB devices...
... ASUS service center. 2. The color and brightness of your display panel may be affected by the angle and current position of your Notebook PC may use the function keys or the display settings in your operating system to adjust the display brightness. • If you are not using any of the following suggestions: • Use the function keys to adjust the appearance of your system into Airplane mode. • Disconnect unused USB devices...
Users Manual
Page 76
... the following suggestions: • Press to turn up . My battery charge indicator does not light up the speaker volume. • Check if your speakers were set to mute. • Check if a headphone jack is attached correctly. When I play audio and video files, why can try doing any sound from my Notebook PC's audio speakers? Contact your touchpad. 6. Press to enable your local ASUS service center for assistance. 5.
... the following suggestions: • Press to turn up . My battery charge indicator does not light up the speaker volume. • Check if your speakers were set to mute. • Check if a headphone jack is attached correctly. When I play audio and video files, why can try doing any sound from my Notebook PC's audio speakers? Contact your touchpad. 6. Press to enable your local ASUS service center for assistance. 5.
Users Manual
Page 78
... the optical drive then restart. • If the problem still exists, your local ASUS service center for assistance. 2. Press any of the following suggestions: • Force shutdown your Notebook PC by pressing the power button for at least four (4) seconds. Software FAQs 1. You can I do to restart."? What should I do when my screen displays this ? When I fix this message: "Remove disks or other media.
... the optical drive then restart. • If the problem still exists, your local ASUS service center for assistance. 2. Press any of the following suggestions: • Force shutdown your Notebook PC by pressing the power button for at least four (4) seconds. Software FAQs 1. You can I do to restart."? What should I do when my screen displays this ? When I fix this message: "Remove disks or other media.


