
User Manual
Page 4
... the BIOS 4-2 4.2 BIOS Setup program 4-3 4.2.1 BIOS menu screen 4-4 4.2.2 Menu bar 4-4 4.2.3 Navigation keys 4-5 4.2.4 General help 4-5 4.2.5 Sub-menu 4-5 4.2.6 Scroll bar 4-5 4.2.7 Pop-up window 4-5 4.3 Main menu 4-6 4.3.1 Primary IDE Master 4-7 4.3.2 Primary IDE Slave 4-10 4.3.3 Secondary IDE Master 4-10 4.3.4 Secondary IDE Slave 4-10 4.3.5 Third IDE Master 4-11 4.3.6 Fourth IDE Master ... 4-33 4.6.3 Removable Device Priority 4-33 4.6.4 Boot Settings Configuration 4-34 4.6.5 Security 4-35 4.7 Exit menu 4-37 Appendix: Reference information A.1 PCH-DL block diagram A-1 iv
... the BIOS 4-2 4.2 BIOS Setup program 4-3 4.2.1 BIOS menu screen 4-4 4.2.2 Menu bar 4-4 4.2.3 Navigation keys 4-5 4.2.4 General help 4-5 4.2.5 Sub-menu 4-5 4.2.6 Scroll bar 4-5 4.2.7 Pop-up window 4-5 4.3 Main menu 4-6 4.3.1 Primary IDE Master 4-7 4.3.2 Primary IDE Slave 4-10 4.3.3 Secondary IDE Master 4-10 4.3.4 Secondary IDE Slave 4-10 4.3.5 Third IDE Master 4-11 4.3.6 Fourth IDE Master ... 4-33 4.6.3 Removable Device Priority 4-33 4.6.4 Boot Settings Configuration 4-34 4.6.5 Security 4-35 4.7 Exit menu 4-37 Appendix: Reference information A.1 PCH-DL block diagram A-1 iv
User Manual
Page 9
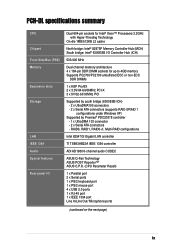
...audio CODEC ASUS Q-Fan Technology ASUS POST Reporter™ ASUS C.P.R. (CPU Parameter Recall) 1 x Parallel port 2 x Serial ports 1 x PS/2 keyboard port 1 x PS/2 mouse port 4 x USB 2.0 ports 1 x RJ-45 port 1 x IEEE 1394 port Line In/Line Out/ Microphone ports (continued on the next page) ix PCH-DL specifications summary ...bit/33MHz PCI Supported by south bridge (6300ESB ICH) - 2 x UltraDMA100 connectors - 2 x Serial ATA connectors (supports RAID 0/RAID 1 configurations under Windows XP) Supported by Promise® PDC20378 controller - 1 x UltraDMA 133 connector - 2 x Serial ATA connectors -
...audio CODEC ASUS Q-Fan Technology ASUS POST Reporter™ ASUS C.P.R. (CPU Parameter Recall) 1 x Parallel port 2 x Serial ports 1 x PS/2 keyboard port 1 x PS/2 mouse port 4 x USB 2.0 ports 1 x RJ-45 port 1 x IEEE 1394 port Line In/Line Out/ Microphone ports (continued on the next page) ix PCH-DL specifications summary ...bit/33MHz PCI Supported by south bridge (6300ESB ICH) - 2 x UltraDMA100 connectors - 2 x Serial ATA connectors (supports RAID 0/RAID 1 configurations under Windows XP) Supported by Promise® PDC20378 controller - 1 x UltraDMA 133 connector - 2 x Serial ATA connectors -
User Manual
Page 41
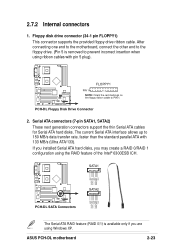
If you installed Serial ATA hard disks, you are using Windows XP. ASUS PCH-DL motherboard 2-23 FLOPPY1 PIN 1 NOTE: Orient the red markings on the floppy ribbon cable to prevent incorrect insertion when using the RAID feature ...the other end to 150 MB/s data transfer rate, faster than the standard parallel ATA with pin 5 plug). PCH-DL PCH-DL Floppy Disk Drive Connector 2. SATA1 GND RSATA_TXP1 RSATA_TXN1 GND RSATA_RXN1 RSATA_RXP1 GND PCH-DL PCH-DL SATA Connectors GND RSATA_TXP2 RSATA_TXN2 GND RSATA_RXN2 RSATA_RXP2 GND SATA2 The Serial ATA RAID feature (RAID 0/1) is removed to...
If you installed Serial ATA hard disks, you are using Windows XP. ASUS PCH-DL motherboard 2-23 FLOPPY1 PIN 1 NOTE: Orient the red markings on the floppy ribbon cable to prevent incorrect insertion when using the RAID feature ...the other end to 150 MB/s data transfer rate, faster than the standard parallel ATA with pin 5 plug). PCH-DL PCH-DL Floppy Disk Drive Connector 2. SATA1 GND RSATA_TXP1 RSATA_TXN1 GND RSATA_RXN1 RSATA_RXP1 GND PCH-DL PCH-DL SATA Connectors GND RSATA_TXP2 RSATA_TXN2 GND RSATA_RXN2 RSATA_RXP2 GND SATA2 The Serial ATA RAID feature (RAID 0/1) is removed to...
User Manual
Page 56
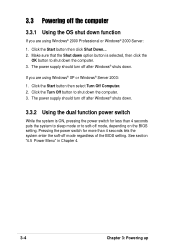
...less than 4 seconds lets the system enter the soft-off mode regardless of the BIOS setting. The power supply should turn off after Windows® shuts down. See section "4.5 Power Menu" in Chapter 4. 3-4 Chapter 3: Powering up The power supply should turn off after... dual function power switch While the system is selected, then click the OK button to shut down the computer. 3. If you are using Windows® 2000 Professional or Windows® 2000 Server: 1. Click the Start button then select Turn Off Computer. 2. 3.3 Powering off the computer 3.3.1 Using the OS shut down...
...less than 4 seconds lets the system enter the soft-off mode regardless of the BIOS setting. The power supply should turn off after Windows® shuts down. See section "4.5 Power Menu" in Chapter 4. 3-4 Chapter 3: Powering up The power supply should turn off after... dual function power switch While the system is selected, then click the OK button to shut down the computer. 3. If you are using Windows® 2000 Professional or Windows® 2000 Server: 1. Click the Start button then select Turn Off Computer. 2. 3.3 Powering off the computer 3.3.1 Using the OS shut down...
User Manual
Page 59
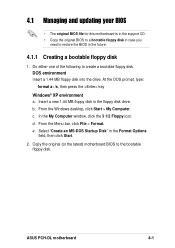
... Computer. From the Menu bar, click File > Format. e. In the My Computer window, click the 3 1/2 Floppy icon. Select "Create an MS-DOS Startup Disk" in the floppy disk drive. DOS environment Insert a 1.44 MB floppy disk into the drive. ASUS PCH-DL motherboard 4-1 Insert a new 1.44 MB floppy disk in the Format Options field... in case you need to restore the BIOS in the future. 4.1.1 Creating a bootable floppy disk 1. At the DOS prompt, type: format a: /s, then press the key Windows® XP environment a.
... Computer. From the Menu bar, click File > Format. e. In the My Computer window, click the 3 1/2 Floppy icon. Select "Create an MS-DOS Startup Disk" in the floppy disk drive. DOS environment Insert a 1.44 MB floppy disk into the drive. ASUS PCH-DL motherboard 4-1 Insert a new 1.44 MB floppy disk in the Format Options field... in case you need to restore the BIOS in the future. 4.1.1 Creating a bootable floppy disk 1. At the DOS prompt, type: format a: /s, then press the key Windows® XP environment a.
User Manual
Page 63
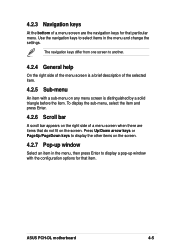
... the selected item. 4.2.5 Sub-menu An item with a sub-menu on the screen. 4.2.7 Pop-up window Select an item in the menu, then press Enter to select items in the menu and change the settings. ASUS PCH-DL motherboard 4-5 4.2.3 Navigation keys At the bottom of a menu screen are items that item. Use the navigation...
... the selected item. 4.2.5 Sub-menu An item with a sub-menu on the screen. 4.2.7 Pop-up window Select an item in the menu, then press Enter to select items in the menu and change the settings. ASUS PCH-DL motherboard 4-5 4.2.3 Navigation keys At the bottom of a menu screen are items that item. Use the navigation...
User Manual
Page 71
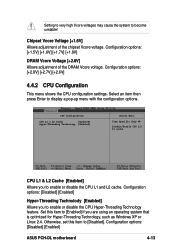
... become unstable! Configuration options: [Disabled] [Enabled] ASUS PCH-DL motherboard 4-13 Chipset Vcore Voltage [+1.6V] Allows adjustment of the DRAM Vcore voltage. Select an item then press Enter to [Enabled] if you are using an operating system that is optimized for Hyper-Threading Technology, such as Windows XP or Linux 2.4. CPU L1 & L2 Cache...
... become unstable! Configuration options: [Disabled] [Enabled] ASUS PCH-DL motherboard 4-13 Chipset Vcore Voltage [+1.6V] Allows adjustment of the DRAM Vcore voltage. Select an item then press Enter to [Enabled] if you are using an operating system that is optimized for Hyper-Threading Technology, such as Windows XP or Linux 2.4. CPU L1 & L2 Cache...
User Manual
Page 79
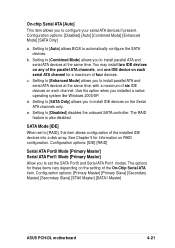
... the same time. Use ths option when you installed a native operating system like Windows 2000/XP. Setting to configure your serial ATA devices if present. e. Configuration options: [Primary Master] [Primary Slave] [Secondary Master] [Secondary Slave] [STA0 Master] [SATA1 Master] ASUS PCH-DL motherboard 4-21 b. Setting to [SATA Only] allows you to automatically configure the...
... the same time. Use ths option when you installed a native operating system like Windows 2000/XP. Setting to configure your serial ATA devices if present. e. Configuration options: [Primary Master] [Primary Slave] [Secondary Master] [Secondary Slave] [STA0 Master] [SATA1 Master] ASUS PCH-DL motherboard 4-21 b. Setting to [SATA Only] allows you to automatically configure the...
User Manual
Page 95
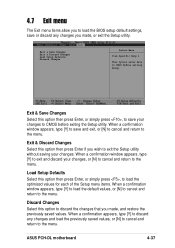
... Load Setup Defaults Discard Changes Select Menu Item Specific Help This option saves data to CMOS before exiting the Setup utility. When a confirmation window appears, type [Y] to exit and discard your changes to the menu. Exit & Discard Changes Select this option then press Enter, or ... values for each of the Setup menu items. When a confirmation window appears, type [Y] to load the default values, or [N] to cancel and return to discard the changes that you made , or exit the Setup utility. ASUS PCH-DL motherboard 4-37 Load Setup Defaults Select this option to the menu...
... Load Setup Defaults Discard Changes Select Menu Item Specific Help This option saves data to CMOS before exiting the Setup utility. When a confirmation window appears, type [Y] to exit and discard your changes to the menu. Exit & Discard Changes Select this option then press Enter, or ... values for each of the Setup menu items. When a confirmation window appears, type [Y] to load the default values, or [N] to cancel and return to discard the changes that you made , or exit the Setup utility. ASUS PCH-DL motherboard 4-37 Load Setup Defaults Select this option to the menu...


