

User Guide
Page 5
Contents Chapter 5: Driver installation 5.1 Support CD contents 5-1 5.1.1 Drivers 5-1 5.1.2 Management Sofware 5-1 5.1.3 Utilities 5-2 5.1.4 Contact 5-2 5.2 Winbond Voice Editor 5-3 5.3 SoundMAX® 4 XL software 5-7 5.4 Promise® RAID configurations 5-10 5.4.1 Install the hard disks 5-11 5.4.2 Enter the MBFastBuild™ ...
Contents Chapter 5: Driver installation 5.1 Support CD contents 5-1 5.1.1 Drivers 5-1 5.1.2 Management Sofware 5-1 5.1.3 Utilities 5-2 5.1.4 Contact 5-2 5.2 Winbond Voice Editor 5-3 5.3 SoundMAX® 4 XL software 5-7 5.4 Promise® RAID configurations 5-10 5.4.1 Install the hard disks 5-11 5.4.2 Enter the MBFastBuild™ ...

User Guide
Page 8
... have to perform when installing system components. Detailed description of the BIOS parameters are also provided. • Chapter 5: Driver installation This chapter tells how to change system settings through the BIOS Setup menus. It includes description of the jumpers and...setup This chapter tells how to install various drivers under supported operating systems. viii About this guide is organized This manual contains the following parts: • Chapter 1: Product introduction This chapter describes the features of the PC-DL Deluxe motherboard. It includes brief descriptions of the ...
... have to perform when installing system components. Detailed description of the BIOS parameters are also provided. • Chapter 5: Driver installation This chapter tells how to change system settings through the BIOS Setup menus. It includes description of the jumpers and...setup This chapter tells how to install various drivers under supported operating systems. viii About this guide is organized This manual contains the following parts: • Chapter 1: Product introduction This chapter describes the features of the PC-DL Deluxe motherboard. It includes brief descriptions of the ...
User Guide
Page 12
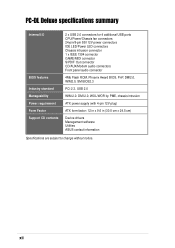
PC-DL Deluxe specifications summary Internal I/O BIOS features Industry standard Manageability Power requirement Form Factor Support CD contents 2 x USB 2.0 connectors for 4 additional USB ports CPU/Power/Chassis fan ... 2.0. DMI 2.0, WOL/WOR by PME, chassis intrusion ATX power supply (with 4-pin 12V plug) ATX form factor: 12 in x 9.6 in (30.5 cm x 24.5 cm) Device drivers Management software Utilities ASUS contact information Specifications are subject to change without notice. xii
PC-DL Deluxe specifications summary Internal I/O BIOS features Industry standard Manageability Power requirement Form Factor Support CD contents 2 x USB 2.0 connectors for 4 additional USB ports CPU/Power/Chassis fan ... 2.0. DMI 2.0, WOL/WOR by PME, chassis intrusion ATX power supply (with 4-pin 12V plug) ATX form factor: 12 in x 9.6 in (30.5 cm x 24.5 cm) Device drivers Management software Utilities ASUS contact information Specifications are subject to change without notice. xii
User Guide
Page 40
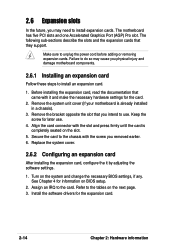
... is completely seated on BIOS setup. 2. Align the card connector with it by adjusting the software settings. 1. Turn on the next page. 3. Install the software drivers for information on the slot. 5. Keep the screw for the card. 2. The following sub-sections describe the slots and the expansion cards that came with...
... is completely seated on BIOS setup. 2. Align the card connector with it by adjusting the software settings. 1. Turn on the next page. 3. Install the software drivers for information on the slot. 5. Keep the screw for the card. 2. The following sub-sections describe the slots and the expansion cards that came with...

User Guide
Page 41
When using PCI cards on shared slots, ensure that the drivers support "Share IRQ" or that the cards do not need IRQ assignments. ASUS PC-DL Deluxe motherboard 2-15 Standard Interrupt Assignments IRQ Priority Standard Function 0 1 System Timer 1 2 Keyboard Controller 2 N/A Programmable Interrupt 3* 11 Communications Port (COM2) 4* 12 Communications Port (COM1) 5* 13 Sound ...
When using PCI cards on shared slots, ensure that the drivers support "Share IRQ" or that the cards do not need IRQ assignments. ASUS PC-DL Deluxe motherboard 2-15 Standard Interrupt Assignments IRQ Priority Standard Function 0 1 System Timer 1 2 Keyboard Controller 2 N/A Programmable Interrupt 3* 11 Communications Port (COM2) 4* 12 Communications Port (COM1) 5* 13 Sound ...

User Guide
Page 101
Chapter 5 This chapter tells how to install various drivers under supported operating systems. Driver installation
Chapter 5 This chapter tells how to install various drivers under supported operating systems. Driver installation

User Guide
Page 103
...is enabled in your computer. ASUS PC-DL Deluxe motherboard 5-1 The CD automatically displays the welcome screen and the installation menus if Autorun is NOT enabled in each of the support CD to run the CD. 5.1.1 Drivers This screen displays the drivers available for the onboard devices. ... useful software and several utility drivers that enhance the motherboard features. To begin using the support CD, simply insert the CD into your computer, browse the contents of the driver folders. 5.1.2 Management Sofware This screen displays the ASUS proprietary server management software.
...is enabled in your computer. ASUS PC-DL Deluxe motherboard 5-1 The CD automatically displays the welcome screen and the installation menus if Autorun is NOT enabled in each of the support CD to run the CD. 5.1.1 Drivers This screen displays the drivers available for the onboard devices. ... useful software and several utility drivers that enhance the motherboard features. To begin using the support CD, simply insert the CD into your computer, browse the contents of the driver folders. 5.1.2 Management Sofware This screen displays the ASUS proprietary server management software.

User Guide
Page 104
5.1.3 Utilities This screen displays the available system utilities that you can install. 5.1.4 Contact This screen displays the ASUS worldwide contact information. 5-2 Chapter 5: Driver installation
5.1.3 Utilities This screen displays the available system utilities that you can install. 5.1.4 Contact This screen displays the ASUS worldwide contact information. 5-2 Chapter 5: Driver installation
User Guide
Page 106
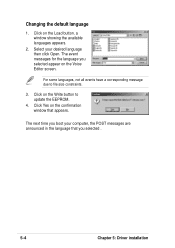
... boot your desired language then click Open. Click on the Write button to file size constraints. 3. The event messages for the language you selected . 5-4 Chapter 5: Driver installation For some languages, not all events have a corresponding message due to update the EEPROM. 4.
... boot your desired language then click Open. Click on the Write button to file size constraints. 3. The event messages for the language you selected . 5-4 Chapter 5: Driver installation For some languages, not all events have a corresponding message due to update the EEPROM. 4.
User Guide
Page 108
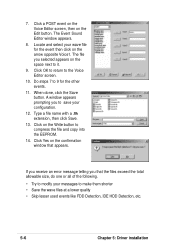
... 7 to make them shorter • Save the wave files at a lower quality • Skip lesser used events like FDD Detection, IDE HDD Detection, etc. 5-6 Chapter 5: Driver installation A window appears prompting you that appears. When done, click the Save button. Locate and select your wave file for the other events. 11. Click...
... 7 to make them shorter • Save the wave files at a lower quality • Skip lesser used events like FDD Detection, IDE HDD Detection, etc. 5-6 Chapter 5: Driver installation A window appears prompting you that appears. When done, click the Save button. Locate and select your wave file for the other events. 11. Click...

User Guide
Page 109
... is installed before installing SoundMAX. Follow the installation wizard install the AD1985 Audio Driver and Application from the support CD that one of these operating systems is correctly installed, you will find the SoundMAX4 XL icon on your PC. ASUS PC-DL Deluxe motherboard 5-7 SoundMAX 4 XL requires Microsoft Winodws 98SE/ME/2000/XP. SoundMAX4 XL icon...
... is installed before installing SoundMAX. Follow the installation wizard install the AD1985 Audio Driver and Application from the support CD that one of these operating systems is correctly installed, you will find the SoundMAX4 XL icon on your PC. ASUS PC-DL Deluxe motherboard 5-7 SoundMAX 4 XL requires Microsoft Winodws 98SE/ME/2000/XP. SoundMAX4 XL icon...

User Guide
Page 110
You may launch the setup wizards by clicking the Configuration button when AudioESP detects and verifies a newly connected peripheral, or by clicking on the icon from the SoundMAX control panel. Microphone wizard Follow the screen instructions to configure the microphone to your desired settings. 5-8 Chapter 5: Driver installation Speaker wizard Follow the screen instructions to configure the speakers to your desired settings. Setup wizards Use the speaker and microphone setup wizards to fine tune the gain/ attenuation of the inputs/outputs for optimal audio performance.
You may launch the setup wizards by clicking the Configuration button when AudioESP detects and verifies a newly connected peripheral, or by clicking on the icon from the SoundMAX control panel. Microphone wizard Follow the screen instructions to configure the microphone to your desired settings. 5-8 Chapter 5: Driver installation Speaker wizard Follow the screen instructions to configure the speakers to your desired settings. Setup wizards Use the speaker and microphone setup wizards to fine tune the gain/ attenuation of the inputs/outputs for optimal audio performance.

User Guide
Page 112
...detailed information on the PRI_RAID interface, you use either Windows XP or Windows 2000 operating system (OS), copy first the Promise FastTrak 378 Driver from one drive to a second drive. The advantage of RAID 0 + 1 is data striping and data mirroring combined without parity (... ATA hard disks on SATA_RAID1/SATA_RAID2 interfaces, and two ATA133 hard disks on RAID configurations under different operating systems. 5-10 Chapter 5: Driver installation Use the MBFastTrak378™ BIOS and the FastBuild™ utility to a floppy disk before creating RAID configurations. 2. If you may...
...detailed information on the PRI_RAID interface, you use either Windows XP or Windows 2000 operating system (OS), copy first the Promise FastTrak 378 Driver from one drive to a second drive. The advantage of RAID 0 + 1 is data striping and data mirroring combined without parity (... ATA hard disks on SATA_RAID1/SATA_RAID2 interfaces, and two ATA133 hard disks on RAID configurations under different operating systems. 5-10 Chapter 5: Driver installation Use the MBFastTrak378™ BIOS and the FastBuild™ utility to a floppy disk before creating RAID configurations. 2. If you may...
User Guide
Page 114
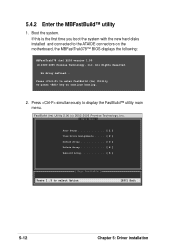
Boot the system. All Rights Reserved. Press to enter FastBuild (tm) Utility Or press key to select Option [ESC] Exit 5-12 Chapter 5: Driver installation FastBuild (tm) Utility 2.00 (c) 2002-2005 Promise Technology, Inc. [ Main Menu ] Auto Setup 1 ] View Drive Assignments . . . . [ 2 ] Define Array 3 ] Delete Array 4 ] Rebuild Array 5 ] [ Keys Available ] ...
Boot the system. All Rights Reserved. Press to enter FastBuild (tm) Utility Or press key to select Option [ESC] Exit 5-12 Chapter 5: Driver installation FastBuild (tm) Utility 2.00 (c) 2002-2005 Promise Technology, Inc. [ Main Menu ] Auto Setup 1 ] View Drive Assignments . . . . [ 2 ] Define Array 3 ] Delete Array 4 ] Rebuild Array 5 ] [ Keys Available ] ...
User Guide
Page 115
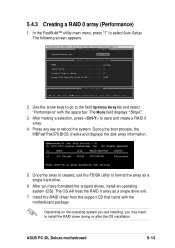
...Up [ ] Down [ , ,Space] Change Option [ESC] Exit [CTRL-Y] Save [ ] Up [ ] Down [ , ,Space] Change Option [ESC] Exit [CTRL-Y] Save 2. Install the RAID driver from the support CD that came with the space bar. Depending on the operating system you are installing, you have formatted the arrayed drives, install... 0 array as a single hard drive. 6. After making a selection, press to format the array as a single drive unit. 7. ASUS PC-DL Deluxe motherboard 5-13 The following screen appears. Once the array is created, use the FDISK utility to save and create a RAID 0 array. 4.
...Up [ ] Down [ , ,Space] Change Option [ESC] Exit [CTRL-Y] Save [ ] Up [ ] Down [ , ,Space] Change Option [ESC] Exit [CTRL-Y] Save 2. Install the RAID driver from the support CD that came with the space bar. Depending on the operating system you are installing, you have formatted the arrayed drives, install... 0 array as a single hard drive. 6. After making a selection, press to format the array as a single drive unit. 7. ASUS PC-DL Deluxe motherboard 5-13 The following screen appears. Once the array is created, use the FDISK utility to save and create a RAID 0 array. 4.

User Guide
Page 116
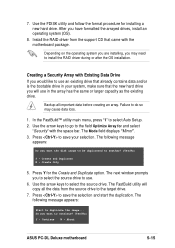
... been created. 6. Press any key to another? (Yes/No) Y - During the boot process, the MBFastTrak376 BIOS checks and displays the disk array information. 5-14 Chapter 5: Driver installation The Mode field displays "Mirror". 3. The following message appears: Do you want the disk image to be duplicated to reboot the system. FastBuild (tm...
... been created. 6. Press any key to another? (Yes/No) Y - During the boot process, the MBFastTrak376 BIOS checks and displays the disk array information. 5-14 Chapter 5: Driver installation The Mode field displays "Mirror". 3. The following message appears: Do you want the disk image to be duplicated to reboot the system. FastBuild (tm...
User Guide
Page 117
... 5. The FastBuild utility will use . 6. Press to select the source drive. Continue N - After you want to install the RAID driver during or after the OS installation. Create and Duplicate N - Use the arrow keys to save your system, make sure that already contains...driver from the source drive to another? (Yes/No) Y - Failure to select Auto Setup. 2. In the FastBuild™ utility main menu, press "1" to do so may need to continue? (Yes/No) Y - The Mode field displays "Mirror". 3. Press to save the selection and start the duplication. Abort ASUS PC-DL Deluxe...
... 5. The FastBuild utility will use . 6. Press to select the source drive. Continue N - After you want to install the RAID driver during or after the OS installation. Create and Duplicate N - Use the arrow keys to save your system, make sure that already contains...driver from the source drive to another? (Yes/No) Y - Failure to select Auto Setup. 2. In the FastBuild™ utility main menu, press "1" to do so may need to continue? (Yes/No) Y - The Mode field displays "Mirror". 3. Press to save the selection and start the duplication. Abort ASUS PC-DL Deluxe...

User Guide
Page 118
...but they are useful for Rebuild Array. Press Enter to continue. Select Y to select. 5-16 Chapter 5: Driver installation When the duplication process is already installed), the RAID driver installation sequence may vary. 5.4.5 Other FastBuild Utility Commands Command options 3-6 on the operating system you to rebuild and... to view the drive assignments of hard disks in the array: 1. Select for reconfiguring an array. Install the RAID driver from the support CD that your Security array has been created. 10. Deleting an array does not remove information on RAID 1 arrays. ...
...but they are useful for Rebuild Array. Press Enter to continue. Select Y to select. 5-16 Chapter 5: Driver installation When the duplication process is already installed), the RAID driver installation sequence may vary. 5.4.5 Other FastBuild Utility Commands Command options 3-6 on the operating system you to rebuild and... to view the drive assignments of hard disks in the array: 1. Select for reconfiguring an array. Install the RAID driver from the support CD that your Security array has been created. 10. Deleting an array does not remove information on RAID 1 arrays. ...
User Guide
Page 120
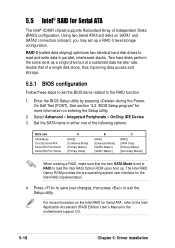
... (RAID) configuration. For more information on the Intel RAID for Serial ATA , refer to read and write data in the motherboard support CD. 5-18 Chapter 5: Driver installation Press to save your changes, then press to set up . Select Advanced > Integrated Peripherals > OnChip IDE Device 3. RAID 0 (called data striping) optimizes two identical...
... (RAID) configuration. For more information on the Intel RAID for Serial ATA , refer to read and write data in the motherboard support CD. 5-18 Chapter 5: Driver installation Press to save your changes, then press to set up . Select Advanced > Integrated Peripherals > OnChip IDE Device 3. RAID 0 (called data striping) optimizes two identical...
User Guide
Page 122
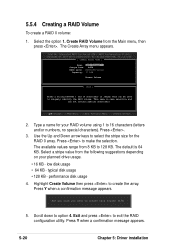
... 16 characters in length that can not contain special characters. [ ]-Change [TAB]-Next [ESC] Previous Menu [Enter]-Select 2. Press Y when a confirmation message appears. 5-20 Chapter 5: Driver installation low disk usage • 64 KB - performance disk usage 4. Are you sure you want to select the stripe size for the RAID 0 array. Select...
... 16 characters in length that can not contain special characters. [ ]-Change [TAB]-Next [ESC] Previous Menu [Enter]-Select 2. Press Y when a confirmation message appears. 5-20 Chapter 5: Driver installation low disk usage • 64 KB - performance disk usage 4. Are you sure you want to select the stripe size for the RAID 0 array. Select...