

User Guide
Page 5
Contents Chapter 5: Driver installation 5.1 Support CD contents 5-1 5.1.1 Drivers 5-1 5.1.2 Management Sofware 5-1 5.1.3 Utilities 5-2 5.1.4 Contact 5-2 5.2 Winbond Voice Editor 5-3 5.3 SoundMAX® 4 XL software 5-7 5.4 Promise® RAID configurations 5-10 5.4.1 Install the hard disks 5-11 5.4.2 Enter the MBFastBuild™ ...
Contents Chapter 5: Driver installation 5.1 Support CD contents 5-1 5.1.1 Drivers 5-1 5.1.2 Management Sofware 5-1 5.1.3 Utilities 5-2 5.1.4 Contact 5-2 5.2 Winbond Voice Editor 5-3 5.3 SoundMAX® 4 XL software 5-7 5.4 Promise® RAID configurations 5-10 5.4.1 Install the hard disks 5-11 5.4.2 Enter the MBFastBuild™ ...

User Guide
Page 8
... information on the BIOS beep codes. • Chapter 4: BIOS setup This chapter tells how to install various drivers under supported operating systems. viii Detailed description of the BIOS parameters are also provided. • Chapter 5: Driver installation This chapter tells how to change system settings through the BIOS Setup menus. How this guide... configuring the motherboard. About this guide is organized This manual contains the following parts: • Chapter 1: Product introduction This chapter describes the features of the PC-DL Deluxe motherboard.
... information on the BIOS beep codes. • Chapter 4: BIOS setup This chapter tells how to install various drivers under supported operating systems. viii Detailed description of the BIOS parameters are also provided. • Chapter 5: Driver installation This chapter tells how to change system settings through the BIOS Setup menus. How this guide... configuring the motherboard. About this guide is organized This manual contains the following parts: • Chapter 1: Product introduction This chapter describes the features of the PC-DL Deluxe motherboard.
User Guide
Page 12
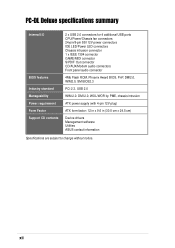
... intrusion ATX power supply (with 4-pin 12V plug) ATX form factor: 12 in x 9.6 in (30.5 cm x 24.5 cm) Device drivers Management software Utilities ASUS contact information Specifications are subject to change without notice. PC-DL Deluxe specifications summary Internal I/O BIOS features Industry standard Manageability Power requirement Form Factor Support CD contents 2 x USB 2.0 connectors for 4 additional...
... intrusion ATX power supply (with 4-pin 12V plug) ATX form factor: 12 in x 9.6 in (30.5 cm x 24.5 cm) Device drivers Management software Utilities ASUS contact information Specifications are subject to change without notice. PC-DL Deluxe specifications summary Internal I/O BIOS features Industry standard Manageability Power requirement Form Factor Support CD contents 2 x USB 2.0 connectors for 4 additional...
User Guide
Page 40
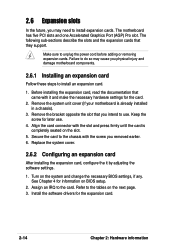
... with the screw you physical injury and damage motherboard components. 2.6.1 Installing an expansion card Follow these steps to install an expansion card. 1. Install the software drivers for later use . Failure to do so may need to install expansion cards. Keep the screw for the expansion card. 2-14 Chapter 2: Hardware information Turn...
... with the screw you physical injury and damage motherboard components. 2.6.1 Installing an expansion card Follow these steps to install an expansion card. 1. Install the software drivers for later use . Failure to do so may need to install expansion cards. Keep the screw for the expansion card. 2-14 Chapter 2: Hardware information Turn...

User Guide
Page 41
ASUS PC-DL Deluxe motherboard 2-15 IRQ assignments for ISA or PCI devices. Otherwise, conflicts will arise between the two PCI groups, making the system unstable and the card inoperable. When using PCI cards on shared slots, ensure that the drivers support "Share IRQ" or that the cards do not need IRQ assignments. Standard Interrupt Assignments...
ASUS PC-DL Deluxe motherboard 2-15 IRQ assignments for ISA or PCI devices. Otherwise, conflicts will arise between the two PCI groups, making the system unstable and the card inoperable. When using PCI cards on shared slots, ensure that the drivers support "Share IRQ" or that the cards do not need IRQ assignments. Standard Interrupt Assignments...

User Guide
Page 101
Chapter 5 This chapter tells how to install various drivers under supported operating systems. Driver installation
Chapter 5 This chapter tells how to install various drivers under supported operating systems. Driver installation

User Guide
Page 103
ASUS PC-DL Deluxe motherboard 5-1 Double-click the ASSETUP.EXE to locate the file ASSETUP.EXE from the BIN folder. If Autorun is enabled in your computer. To begin using the support CD, simply insert the CD into your computer, browse the contents of the driver folders. 5.1.2 Management Sofware This screen displays the ASUS proprietary server management...
ASUS PC-DL Deluxe motherboard 5-1 Double-click the ASSETUP.EXE to locate the file ASSETUP.EXE from the BIN folder. If Autorun is enabled in your computer. To begin using the support CD, simply insert the CD into your computer, browse the contents of the driver folders. 5.1.2 Management Sofware This screen displays the ASUS proprietary server management...

User Guide
Page 104
5.1.3 Utilities This screen displays the available system utilities that you can install. 5.1.4 Contact This screen displays the ASUS worldwide contact information. 5-2 Chapter 5: Driver installation
5.1.3 Utilities This screen displays the available system utilities that you can install. 5.1.4 Contact This screen displays the ASUS worldwide contact information. 5-2 Chapter 5: Driver installation
User Guide
Page 106
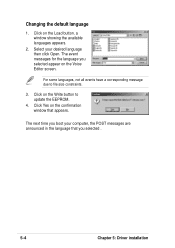
... message due to update the EEPROM. 4. Click Yes on the Write button to file size constraints. 3. Click on the confirmation window that you selected . 5-4 Chapter 5: Driver installation Changing the default language 1. Click on the Voice Editor screen. Select your computer, the POST messages are announced in the language that appears. The...
... message due to update the EEPROM. 4. Click Yes on the Write button to file size constraints. 3. Click on the confirmation window that you selected . 5-4 Chapter 5: Driver installation Changing the default language 1. Click on the Voice Editor screen. Select your computer, the POST messages are announced in the language that appears. The...
User Guide
Page 108
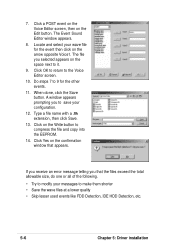
... 7 to make them shorter • Save the wave files at a lower quality • Skip lesser used events like FDD Detection, IDE HDD Detection, etc. 5-6 Chapter 5: Driver installation 7. Click a POST event on the Voice Editor screen, then on the arrow opposite Voice1. If you receive an error message telling you to it. 9.
... 7 to make them shorter • Save the wave files at a lower quality • Skip lesser used events like FDD Detection, IDE HDD Detection, etc. 5-6 Chapter 5: Driver installation 7. Click a POST event on the Voice Editor screen, then on the arrow opposite Voice1. If you receive an error message telling you to it. 9.

User Guide
Page 109
...-input technologies. SoundMAX4 XL icon From the taskbar, double-click on your PC. If the SoundMAX4 XL software is installed before installing SoundMAX. Follow the installation wizard install the AD1985 Audio Driver and Application from the support CD that one of these operating systems is ...correctly installed, you will find the SoundMAX4 XL icon on the taskbar. You must use 4-channel or 6-channel speakers for this setup. ASUS PC-DL Deluxe motherboard 5-7 SoundMAX 4 XL ...
...-input technologies. SoundMAX4 XL icon From the taskbar, double-click on your PC. If the SoundMAX4 XL software is installed before installing SoundMAX. Follow the installation wizard install the AD1985 Audio Driver and Application from the support CD that one of these operating systems is ...correctly installed, you will find the SoundMAX4 XL icon on the taskbar. You must use 4-channel or 6-channel speakers for this setup. ASUS PC-DL Deluxe motherboard 5-7 SoundMAX 4 XL ...

User Guide
Page 110
You may launch the setup wizards by clicking the Configuration button when AudioESP detects and verifies a newly connected peripheral, or by clicking on the icon from the SoundMAX control panel. Setup wizards Use the speaker and microphone setup wizards to your desired settings. 5-8 Chapter 5: Driver installation Speaker wizard Follow the screen instructions to configure the speakers to fine tune the gain/ attenuation of the inputs/outputs for optimal audio performance. Microphone wizard Follow the screen instructions to configure the microphone to your desired settings.
You may launch the setup wizards by clicking the Configuration button when AudioESP detects and verifies a newly connected peripheral, or by clicking on the icon from the SoundMAX control panel. Setup wizards Use the speaker and microphone setup wizards to your desired settings. 5-8 Chapter 5: Driver installation Speaker wizard Follow the screen instructions to configure the speakers to fine tune the gain/ attenuation of the inputs/outputs for optimal audio performance. Microphone wizard Follow the screen instructions to configure the microphone to your desired settings.

User Guide
Page 112
... information on the PRI_RAID interface, you use either Windows XP or Windows 2000 operating system (OS), copy first the Promise FastTrak 378 Driver from one drive to configure a disk array. RAID 0+1 is fast data access (like RAID 1). 1. RAID 0 (called data ... ATA hard disks on SATA_RAID1/SATA_RAID2 interfaces, and two ATA133 hard disks on RAID configurations under different operating systems. 5-10 Chapter 5: Driver installation Use the MBFastTrak378™ BIOS and the FastBuild™ utility to a second drive. The advantage of Independent Disks (RAID) configurations...
... information on the PRI_RAID interface, you use either Windows XP or Windows 2000 operating system (OS), copy first the Promise FastTrak 378 Driver from one drive to configure a disk array. RAID 0+1 is fast data access (like RAID 1). 1. RAID 0 (called data ... ATA hard disks on SATA_RAID1/SATA_RAID2 interfaces, and two ATA133 hard disks on RAID configurations under different operating systems. 5-10 Chapter 5: Driver installation Use the MBFastTrak378™ BIOS and the FastBuild™ utility to a second drive. The advantage of Independent Disks (RAID) configurations...
User Guide
Page 114
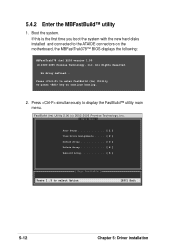
... 5 ] [ Keys Available ] Press 1..5 to continue booting. 2. All Rights Reserved. Press to enter FastBuild (tm) Utility Or press key to select Option [ESC] Exit 5-12 Chapter 5: Driver installation Press simultaneously to the ATAIDE connectors on the motherboard, the MBFastTrak378™ BIOS displays the following: MBFastTrak378 (tm) BIOS version 1.00 (c)2000-2005 Promise...
... 5 ] [ Keys Available ] Press 1..5 to continue booting. 2. All Rights Reserved. Press to enter FastBuild (tm) Utility Or press key to select Option [ESC] Exit 5-12 Chapter 5: Driver installation Press simultaneously to the ATAIDE connectors on the motherboard, the MBFastTrak378™ BIOS displays the following: MBFastTrak378 (tm) BIOS version 1.00 (c)2000-2005 Promise...
User Guide
Page 115
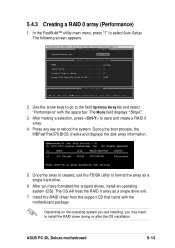
...] Down [ , ,Space] Change Option [ESC] Exit [CTRL-Y] Save [ ] Up [ ] Down [ , ,Space] Change Option [ESC] Exit [CTRL-Y] Save 2. Install the RAID driver from the support CD that came with the space bar. 5.4.3 Creating a RAID 0 array (Performance) 1. Use the arrow keys to go to install the RAID... system. Depending on the operating system you are installing, you have formatted the arrayed drives, install an operating system (OS). ASUS PC-DL Deluxe motherboard 5-13 During the boot process, the MBFastTrak378 BIOS checks and displays the disk array information. 5. Press any key to ...
...] Down [ , ,Space] Change Option [ESC] Exit [CTRL-Y] Save [ ] Up [ ] Down [ , ,Space] Change Option [ESC] Exit [CTRL-Y] Save 2. Install the RAID driver from the support CD that came with the space bar. 5.4.3 Creating a RAID 0 array (Performance) 1. Use the arrow keys to go to install the RAID... system. Depending on the operating system you are installing, you have formatted the arrayed drives, install an operating system (OS). ASUS PC-DL Deluxe motherboard 5-13 During the boot process, the MBFastTrak378 BIOS checks and displays the disk array information. 5. Press any key to ...

User Guide
Page 116
...™ utility main menu, press "1" to reboot the system. During the boot process, the MBFastTrak376 BIOS checks and displays the disk array information. 5-14 Chapter 5: Driver installation The following message appears: Do you want the disk image to be duplicated to the field Optimize Array for and select "Security" with New...
...™ utility main menu, press "1" to reboot the system. During the boot process, the MBFastTrak376 BIOS checks and displays the disk array information. 5-14 Chapter 5: Driver installation The following message appears: Do you want the disk image to be duplicated to the field Optimize Array for and select "Security" with New...
User Guide
Page 117
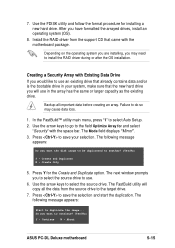
... data before creating an array. The FastBuild utility will use . 6. Press to the target drive. 7. Continue N - Install the RAID driver from the source drive to save your system, make sure that came with the motherboard package. Use the arrow keys to go to the... are installing, you have formatted the arrayed drives, install an operating system (OS). 8. Press Y for installing a new hard drive. Abort ASUS PC-DL Deluxe motherboard 5-15 Creating a Security Array with the space bar. The following message appears: Start to save the selection and start the duplication. In...
... data before creating an array. The FastBuild utility will use . 6. Press to the target drive. 7. Continue N - Install the RAID driver from the source drive to save your system, make sure that came with the motherboard package. Use the arrow keys to go to the... are installing, you have formatted the arrayed drives, install an operating system (OS). 8. Press Y for installing a new hard drive. Abort ASUS PC-DL Deluxe motherboard 5-15 Creating a Security Array with the space bar. The following message appears: Start to save the selection and start the duplication. In...

User Guide
Page 118
Install the RAID driver from the support CD that came with an identical model. 5. Depending on the operating system you to verify the ...the hard disk with the motherboard package. When the duplication process is completed, a message appears confirming that is already installed), the RAID driver installation sequence may vary. 5.4.5 Other FastBuild Utility Commands Command options 3-6 on the FastBuild™ Utility main menu are useful for setting up... by mistake, recover it immediately by redefining it as the deleted array. Press Enter to select. 5-16 Chapter 5: Driver installation
Install the RAID driver from the support CD that came with an identical model. 5. Depending on the operating system you to verify the ...the hard disk with the motherboard package. When the duplication process is completed, a message appears confirming that is already installed), the RAID driver installation sequence may vary. 5.4.5 Other FastBuild Utility Commands Command options 3-6 on the FastBuild™ Utility main menu are useful for setting up... by mistake, recover it immediately by redefining it as the deleted array. Press Enter to select. 5-16 Chapter 5: Driver installation
User Guide
Page 120
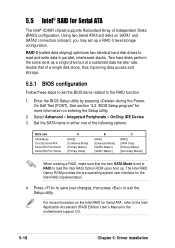
... more information on SATA1 and SATA2 connectors onboard, you may set to RAID to read and write data in the motherboard support CD. 5-18 Chapter 5: Driver installation Using two Serial ATA hard disks on entering the Setup utility. 2. Two hard disks perform the same work as a single drive but at a sustained...
... more information on SATA1 and SATA2 connectors onboard, you may set to RAID to read and write data in the motherboard support CD. 5-18 Chapter 5: Driver installation Using two Serial ATA hard disks on entering the Setup utility. 2. Two hard disks perform the same work as a single drive but at a sustained...
User Guide
Page 122
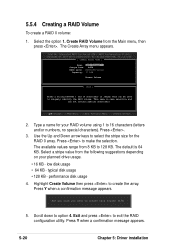
... KB - Select the option 1. Highlight Create Volume then press to make the selection. Press Y when a confirmation message appears. Press Y when a confirmation message appears. 5-20 Chapter 5: Driver installation Press . 3. The available values range from the following suggestions depending on your RAID volume using 1 to 16 characters (letters and/or numbers, no special...
... KB - Select the option 1. Highlight Create Volume then press to make the selection. Press Y when a confirmation message appears. Press Y when a confirmation message appears. 5-20 Chapter 5: Driver installation Press . 3. The available values range from the following suggestions depending on your RAID volume using 1 to 16 characters (letters and/or numbers, no special...