User Manual
Page 12
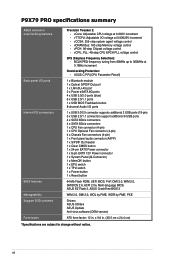
... Optional Fan connector (4-pin) 4 x Chassis Fan connectors (4-pin) 1 x Front panel audio connector (AAFP) 1 x S/PDIF Out header 1 x Clear CMOS button 1 x 24-pin EATX Power connector 1 x 8-pin EATX 12V Power connector 1 x System Panel (Q-Connector) 1 x MemOK! xii vDRAM Bus: ...blue) 6 x USB 2.0/1.1 ports 1 x USB BIOS Flashback button 8-channel Audio I /O voltage at 0.00625V increment - P9X79 PRO specifications summary ASUS exclusive overclocking features Back panel I/O ports Internal I/O connectors BIOS features Manageability Support DVD contents Form factor Precision Tweaker 2: - ...
... Optional Fan connector (4-pin) 4 x Chassis Fan connectors (4-pin) 1 x Front panel audio connector (AAFP) 1 x S/PDIF Out header 1 x Clear CMOS button 1 x 24-pin EATX Power connector 1 x 8-pin EATX 12V Power connector 1 x System Panel (Q-Connector) 1 x MemOK! xii vDRAM Bus: ...blue) 6 x USB 2.0/1.1 ports 1 x USB BIOS Flashback button 8-channel Audio I /O voltage at 0.00625V increment - P9X79 PRO specifications summary ASUS exclusive overclocking features Back panel I/O ports Internal I/O connectors BIOS features Manageability Support DVD contents Form factor Precision Tweaker 2: - ...
User Manual
Page 23
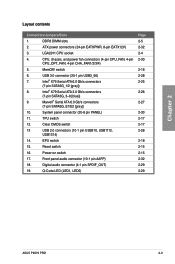
...LED2) Page 2-5 2-32 2-4 2-30 2-16 2-28 2-25 2-26 2-27 2-33 2-17 2-17 2-28 2-18 2-15 2-15 2-32 2-29 2-29 ASUS P9X79 PRO 2-3 USB 3.0 connector (20-1 pin USB3_56) 7. Marvell® Serial ATA 6.0 Gb/s connectors (7-pin SATA6G_E1/E2 [gray]) 10. System panel connector (20-8 pin... 18. switch 6. TPU switch 12. LGA2011 CPU socket 4. EPU switch 15. ATX power connectors (24-pin EATXPWR, 8-pin EATX12V) 3. Clear CMOS switch 13 USB 2.0 connectors (10-1 pin USB910, USB1112, USB1314) 14. DDR3 DIMM slots 2. Chapter 2 Layout contents Connectors/Jumpers/Slots 1....
...LED2) Page 2-5 2-32 2-4 2-30 2-16 2-28 2-25 2-26 2-27 2-33 2-17 2-17 2-28 2-18 2-15 2-15 2-32 2-29 2-29 ASUS P9X79 PRO 2-3 USB 3.0 connector (20-1 pin USB3_56) 7. Marvell® Serial ATA 6.0 Gb/s connectors (7-pin SATA6G_E1/E2 [gray]) 10. System panel connector (20-8 pin... 18. switch 6. TPU switch 12. LGA2011 CPU socket 4. EPU switch 15. ATX power connectors (24-pin EATXPWR, 8-pin EATX12V) 3. Clear CMOS switch 13 USB 2.0 connectors (10-1 pin USB910, USB1112, USB1314) 14. DDR3 DIMM slots 2. Chapter 2 Layout contents Connectors/Jumpers/Slots 1....
User Manual
Page 69
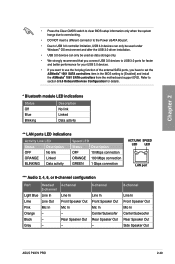
... Out - 8-channel Line In Front Speaker Out Mic In Center/Subwoofer Rear Speaker Out Side Speaker Out ASUS P9X79 PRO 2-49 Gray - 4-channel Line In Front Speaker Out Mic In - Chapter 2 • Press the Clear CMOS switch to clear BIOS setup information only when the system hangs due to overclocking. • DO NOT insert a different connector...
... Out - 8-channel Line In Front Speaker Out Mic In Center/Subwoofer Rear Speaker Out Side Speaker Out ASUS P9X79 PRO 2-49 Gray - 4-channel Line In Front Speaker Out Mic In - Chapter 2 • Press the Clear CMOS switch to clear BIOS setup information only when the system hangs due to overclocking. • DO NOT insert a different connector...
User Manual
Page 73
... the RTC RAM. • The BIOS setup program does not support the bluetooth devices. You can be used under the Exit menu. Chapter 3 ASUS P9X79 PRO 3-1 Users can also turn the system off and then turn it back on the system chassis to restart the system. The term "BIOS" in ... to use the mouse to control the BIOS setup program. • If the system becomes unstable after changing any BIOS setting, try to clear the CMOS and reset the motherboard to the default value. �S�e�e��s�e��c�ti�o�n� 2.3.10 Rear ...
... the RTC RAM. • The BIOS setup program does not support the bluetooth devices. You can be used under the Exit menu. Chapter 3 ASUS P9X79 PRO 3-1 Users can also turn the system off and then turn it back on the system chassis to restart the system. The term "BIOS" in ... to use the mouse to control the BIOS setup program. • If the system becomes unstable after changing any BIOS setting, try to clear the CMOS and reset the motherboard to the default value. �S�e�e��s�e��c�ti�o�n� 2.3.10 Rear ...

User Manual
Page 77
... [16:46:15] Administrator > Security Boot Tool Choose the system default language Security The Security menu items allow you to clear the BIOS password. In Setup the User will have Administrator rights Administrator Password User Password Administrator Password User Password Monitor Not Installed...Mode of the basic system information, and allows you have forgotten your BIOS password, erase the CMOS Real Time Clock (RTC) RAM to change the system security settings. Chapter 3 ASUS P9X79 PRO 3-5 3.3 Main menu The Main menu screen appears when you set the system date, time,...
... [16:46:15] Administrator > Security Boot Tool Choose the system default language Security The Security menu items allow you to clear the BIOS password. In Setup the User will have Administrator rights Administrator Password User Password Administrator Password User Password Monitor Not Installed...Mode of the basic system information, and allows you have forgotten your BIOS password, erase the CMOS Real Time Clock (RTC) RAM to change the system security settings. Chapter 3 ASUS P9X79 PRO 3-5 3.3 Main menu The Main menu screen appears when you set the system date, time,...


