User Manual
Page 5
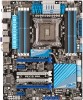
...Xpert 4-11 4.3.6 Sensor Recorder 4-12 4.3.7 Probe II 4-13 4.3.8 BT GO 4-14 4.3.9 USB 3.0 Boost 4-15 4.3.10 ASUS SSD Caching 4-16 4.3.11 ASUS Update 4-17 4.3.11 MyLogo2 4-18 4.3.12 Audio configurations 4-20 4.4 RAID configurations 4-21 4.4.1 RAID definitions 4-21 4.4.2 Installing Serial...4.4.5 Marvell RAID utility 4-26 4.5 Creating a RAID driver disk 4-30 4.5.1 Creating a RAID driver disk without entering the OS 4-30 4.5.2 Creating a RAID driver disk in Windows 4-30 4.5.3 Installing the RAID driver during Windows® OS installation....... 4-31 4.5.4 Using a USB ...
...Xpert 4-11 4.3.6 Sensor Recorder 4-12 4.3.7 Probe II 4-13 4.3.8 BT GO 4-14 4.3.9 USB 3.0 Boost 4-15 4.3.10 ASUS SSD Caching 4-16 4.3.11 ASUS Update 4-17 4.3.11 MyLogo2 4-18 4.3.12 Audio configurations 4-20 4.4 RAID configurations 4-21 4.4.1 RAID definitions 4-21 4.4.2 Installing Serial...4.4.5 Marvell RAID utility 4-26 4.5 Creating a RAID driver disk 4-30 4.5.1 Creating a RAID driver disk without entering the OS 4-30 4.5.2 Creating a RAID driver disk in Windows 4-30 4.5.3 Installing the RAID driver during Windows® OS installation....... 4-31 4.5.4 Using a USB ...
User Manual
Page 46
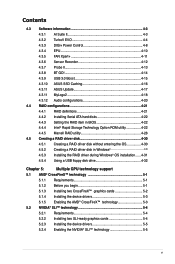
... to detect the storage devices. 2.2.7 Internal connectors 1. IRST driver note for OS installation • Windows XP: 32 bit: Intel IRST driver for the system to [IDE Mode] for details. • You must load IRST Driver during OS Windows XP 64 bit installation for X79 platform will not run. ... connected to the USB Flash Drive before using Windows® XP SP3 or later versions. For details, please refer to the section "4.5 Create a RAID driver disk". • Windows 7 & Vista: When [SATA Mode] is necessary to load IRST Driver from SCD to the Intel SATA ports), or...
... to detect the storage devices. 2.2.7 Internal connectors 1. IRST driver note for OS installation • Windows XP: 32 bit: Intel IRST driver for the system to [IDE Mode] for details. • You must load IRST Driver during OS Windows XP 64 bit installation for X79 platform will not run. ... connected to the USB Flash Drive before using Windows® XP SP3 or later versions. For details, please refer to the section "4.5 Create a RAID driver disk". • Windows 7 & Vista: When [SATA Mode] is necessary to load IRST Driver from SCD to the Intel SATA ports), or...
User Manual
Page 47
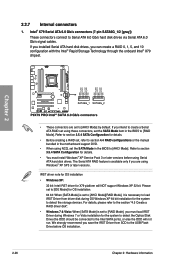
...is available only if you are set to the USB Flash Drive before using Windows® XP SP3 or later versions. ASUS P9X79 PRO 2-27 IRST driver note for OS installation • Windows XP: 32 bit: Intel IRST driver for OS installation. 64 bit: When [SATA Mode] is set to [RAID... Mode], you save the IRST Driver from driver disk during Windows 7 or Vista installation for details. • Before...
...is available only if you are set to the USB Flash Drive before using Windows® XP SP3 or later versions. ASUS P9X79 PRO 2-27 IRST driver note for OS installation • Windows XP: 32 bit: Intel IRST driver for OS installation. 64 bit: When [SATA Mode] is set to [RAID... Mode], you save the IRST Driver from driver disk during Windows 7 or Vista installation for details. • Before...

User Manual
Page 48
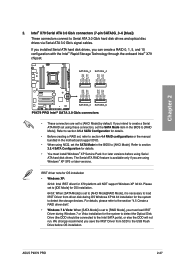
... or delete a RAID configuration. • If you want to install a Windows operating system to a RAID configuration created using the Marvell SATA controller, you have to create a RAID driver disk using NCQ, set the Marvell Storage Controller item in the BIOS to ...the motherboard support DVD and load the driver during OS installation. For 32/64bit Windows XP OS, load first the Marvell shared library driver, and then load Marvell 91xx SATA Controller Driver. For Windows Vista / Windows 7 OS, load only the Marvell 91xx SATA Controller Driver. 2-28 Chapter 2: Hardware information Chapter...
... or delete a RAID configuration. • If you want to install a Windows operating system to a RAID configuration created using the Marvell SATA controller, you have to create a RAID driver disk using NCQ, set the Marvell Storage Controller item in the BIOS to ...the motherboard support DVD and load the driver during OS installation. For 32/64bit Windows XP OS, load first the Marvell shared library driver, and then load Marvell 91xx SATA Controller Driver. For Windows Vista / Windows 7 OS, load only the Marvell 91xx SATA Controller Driver. 2-28 Chapter 2: Hardware information Chapter...
User Manual
Page 69
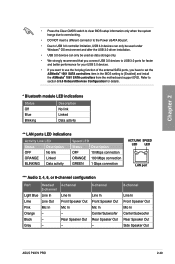
... Out Mic In Center/Subwoofer Rear Speaker Out - 8-channel Line In Front Speaker Out Mic In Center/Subwoofer Rear Speaker Out Side Speaker Out ASUS P9X79 PRO 2-49 Gray - 4-channel Line In Front Speaker Out Mic In - Black - Refer to [Enabled] and install the ASMedia® 1061 ...connector to the Power eSATA 6G port. • Due to USB 3.0 controller limitation, USB 3.0 devices can only be used under Windows® OS environment and after the USB 3.0 driver installation. • USB 3.0 devices can only be used as data storage only. • We strongly recommend that you connect USB...
... Out Mic In Center/Subwoofer Rear Speaker Out - 8-channel Line In Front Speaker Out Mic In Center/Subwoofer Rear Speaker Out Side Speaker Out ASUS P9X79 PRO 2-49 Gray - 4-channel Line In Front Speaker Out Mic In - Black - Refer to [Enabled] and install the ASMedia® 1061 ...connector to the Power eSATA 6G port. • Due to USB 3.0 controller limitation, USB 3.0 devices can only be used under Windows® OS environment and after the USB 3.0 driver installation. • USB 3.0 devices can only be used as data storage only. • We strongly recommend that you connect USB...
User Manual
Page 125
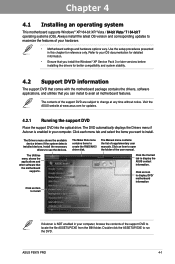
... displays the Drivers menu if Autorun is ��ta 7 6�4��-b��i�t�7� operating systems (OS). ASUS P9X79 PRO 4-1 Click the Contact tab to run the DVD. Double-click the ASSETUP.EXE to display the ASUS contact information. Chapter 4: Chapter 4 Software support 4.1 Installing an operating system This motherboard supports Windows®...
... displays the Drivers menu if Autorun is ��ta 7 6�4��-b��i�t�7� operating systems (OS). ASUS P9X79 PRO 4-1 Click the Contact tab to run the DVD. Double-click the ASSETUP.EXE to display the ASUS contact information. Chapter 4: Chapter 4 Software support 4.1 Installing an operating system This motherboard supports Windows®...
User Manual
Page 127
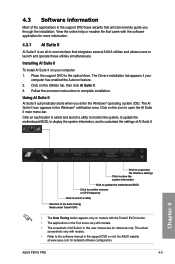
... the system, to update the motherboard BIOS, to display the system information, and to open the AI Suite II main menu bar. The Drivers installation tab appears if your computer 1. Click on your computer has enabled the Autorun feature. 2. Chapter 4 Click to customize the interface settings.... Using AI Suite II AI Suite II automatically starts when you through the installation. The AI Suite II icon appears in the Windows® notification area. ASUS P9X79 PRO 4-3 Click on the Utilities tab, then click AI Suite II. 3. View the online help or readme file that came with models...
... the system, to update the motherboard BIOS, to display the system information, and to open the AI Suite II main menu bar. The Drivers installation tab appears if your computer 1. Click on your computer has enabled the Autorun feature. 2. Chapter 4 Click to customize the interface settings.... Using AI Suite II AI Suite II automatically starts when you through the installation. The AI Suite II icon appears in the Windows® notification area. ASUS P9X79 PRO 4-3 Click on the Utilities tab, then click AI Suite II. 3. View the online help or readme file that came with models...
User Manual
Page 144
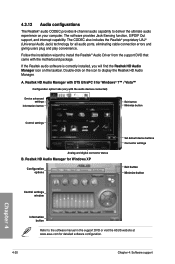
Follow the installation wizard to the software manual in the support DVD or visit the ASUS website at www.asus.com for Windows® 7™ / Vista™ Configuration option tabs (vary with the motherboard package. The software provides Jack-Sensing function, ... proprietary UAJ® (Universal Audio Jack) technology for Windows XP Configuration options Set default device buttons Connector settings Exit button Minimize button Control settings window Chapter 4 Information button Refer to install the Realtek® Audio Driver from the support DVD that came with the audio devices...
Follow the installation wizard to the software manual in the support DVD or visit the ASUS website at www.asus.com for Windows® 7™ / Vista™ Configuration option tabs (vary with the motherboard package. The software provides Jack-Sensing function, ... proprietary UAJ® (Universal Audio Jack) technology for Windows XP Configuration options Set default device buttons Connector settings Exit button Minimize button Control settings window Chapter 4 Information button Refer to install the Realtek® Audio Driver from the support DVD that came with the audio devices...
User Manual
Page 145
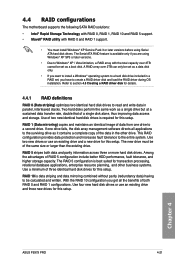
...and RAID 5 support. • Mavell® RAID utility with the total capacity over 2TB can only be set , you want to install a Windows® operating system to a hard disk drive included in parallel, interleaved stacks. The Serial ATA RAID feature is available only if you get all ... RAID driver disk for details. 4.4.1 RAID definitions RAID 0 (Data striping) optimizes two identical hard disk drives to read and write data in a RAID set as a boot disk. A RAID array over 2TB cannot be set as a data disk only. • If you have to the entire system. Chapter 4 ASUS P9X79 PRO 4-21...
...and RAID 5 support. • Mavell® RAID utility with the total capacity over 2TB can only be set , you want to install a Windows® operating system to a hard disk drive included in parallel, interleaved stacks. The Serial ATA RAID feature is available only if you get all ... RAID driver disk for details. 4.4.1 RAID definitions RAID 0 (Data striping) optimizes two identical hard disk drives to read and write data in a RAID set as a boot disk. A RAID array over 2TB cannot be set as a data disk only. • If you have to the entire system. Chapter 4 ASUS P9X79 PRO 4-21...

User Manual
Page 154
... to enter the BIOS setup utility. 3. You have to use a USB floppy disk drive when creating a SATA RAID driver disk. • Windows® XP may not recognize the USB floppy disk drive due to section 4.5.4 Using a USB floppy disk drive. 4.5.1 Creating a RAID...floppy disk. 3. Follow the succeeding screen instructions to create a RAID driver disk. 5. 4.5 Creating a RAID driver disk A floppy disk with the RAID driver is required when installing a Windows® operating system on a hard disk drive that is included in Windows®: 1. Insert the support DVD into the optical drive. 5....
... to enter the BIOS setup utility. 3. You have to use a USB floppy disk drive when creating a SATA RAID driver disk. • Windows® XP may not recognize the USB floppy disk drive due to section 4.5.4 Using a USB floppy disk drive. 4.5.1 Creating a RAID...floppy disk. 3. Follow the succeeding screen instructions to create a RAID driver disk. 5. 4.5 Creating a RAID driver disk A floppy disk with the RAID driver is required when installing a Windows® operating system on a hard disk drive that is included in Windows®: 1. Insert the support DVD into the optical drive. 5....
User Manual
Page 155
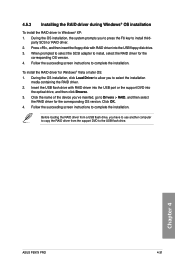
... prompts you have to use another computer to copy the RAID driver from the support DVD to install third- Chapter 4 ASUS P9X79 PRO 4-31 During the OS installation, click Load Driver to allow you 've inserted, go to select the installation ...media containing the RAID driver. 2. Click the name of the device you to Drivers > RAID, and then select the RAID driver for the corresponding OS version. 4.5.3 Installing the RAID driver during Windows...
... prompts you have to use another computer to copy the RAID driver from the support DVD to install third- Chapter 4 ASUS P9X79 PRO 4-31 During the OS installation, click Load Driver to allow you 've inserted, go to select the installation ...media containing the RAID driver. 2. Click the name of the device you to Drivers > RAID, and then select the RAID driver for the corresponding OS version. 4.5.3 Installing the RAID driver during Windows...
User Manual
Page 156
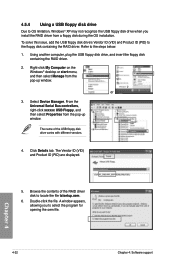
.... Using another computer, plug the USB floppy disk drive, and insert the floppy disk containing the RAID driver. 2. A window appears, allowing you install the RAID driver from the pop-up window. Right-click My Computer on the Windows® desktop or start menu, and then select Manage from a floppy disk during the OS installation. Refer...
.... Using another computer, plug the USB floppy disk drive, and insert the floppy disk containing the RAID driver. 2. A window appears, allowing you install the RAID driver from the pop-up window. Right-click My Computer on the Windows® desktop or start menu, and then select Manage from a floppy disk during the OS installation. Refer...

User Manual
Page 159
...Programs. For Windows Vista, go to uninstall all current applications. 2. For Windows Vista, select Uninstall. 5. ASUS P9X79 PRO 5-1 To uninstall existing graphics card drivers: 1. For Windows XP, select Add/Remove. Turn off your current graphics card driver/s. 4. Close all existing graphics card drivers before installing ...in this section. 5.1.1 Requirements • In Dual CrossFireX mode, you to your graphics card driver supports the AMD CrossFireX technology. Download the latest driver from the AMD website (www.amd.com). • We recommend that you install additional ...
...Programs. For Windows Vista, go to uninstall all current applications. 2. For Windows Vista, select Uninstall. 5. ASUS P9X79 PRO 5-1 To uninstall existing graphics card drivers: 1. For Windows XP, select Add/Remove. Turn off your current graphics card driver/s. 4. Close all existing graphics card drivers before installing ...in this section. 5.1.1 Requirements • In Dual CrossFireX mode, you to your graphics card driver supports the AMD CrossFireX technology. Download the latest driver from the AMD website (www.amd.com). • We recommend that you install additional ...
User Manual
Page 161
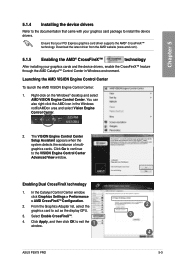
... the window. 1 ASUS P9X79 PRO 2 3 4 5-3 In the Catalyst Control Center window, click Graphics Settings > Performance > AMD CrossFireXTM Configuration. 2. From the Graphics Adapter list, select the graphics card to install the device drivers. You can also right-click the AMD icon in Windows environment....the existance of multigraphics cards. Right-click on the Windows® desktop and select AMD VISION Engine Control Center. Select Enable CrossFireXTM. 4. Enabling Dual CrossFireX technology 1. Download the latest driver from the AMD website (www.amd.com). 5.1.5 Enabling...
... the window. 1 ASUS P9X79 PRO 2 3 4 5-3 In the Catalyst Control Center window, click Graphics Settings > Performance > AMD CrossFireXTM Configuration. 2. From the Graphics Adapter list, select the graphics card to install the device drivers. You can also right-click the AMD icon in Windows environment....the existance of multigraphics cards. Right-click on the Windows® desktop and select AMD VISION Engine Control Center. Select Enable CrossFireXTM. 4. Enabling Dual CrossFireX technology 1. Download the latest driver from the AMD website (www.amd.com). 5.1.5 Enabling...
User Manual
Page 163
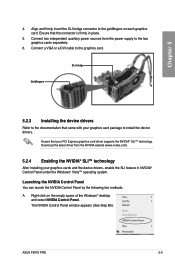
...Windows® Vista™ operating system. Launching the NVIDIA Control Panel You can launch the NVIDIA Control Panel by the following two methods. ASUS P9X79 PRO 5-5 Chapter 5 4. Align and firmly insert the SLI bridge connector to the documentation that your graphics cards and the device drivers..., enable the SLI feature in place. 5. Download the latest driver from the power supply to the ...
...Windows® Vista™ operating system. Launching the NVIDIA Control Panel You can launch the NVIDIA Control Panel by the following two methods. ASUS P9X79 PRO 5-5 Chapter 5 4. Align and firmly insert the SLI bridge connector to the documentation that your graphics cards and the device drivers..., enable the SLI feature in place. 5. Download the latest driver from the power supply to the ...

