P8Z77-V User's Manual
Page 5
Contents 4.3.6 Sensor Recorder 4-14 4.3.7 USB 3.0 Boost 4-15 4.3.8 USB BIOS Flashback 4-16 4.3.9 ASUS Update 4-18 4.3.10 MyLogo2 4-19 4.3.11 Audio configurations 4-21 4.4 RAID configurations 4-22 4.4.1 RAID ...174; CrossFireX™ technology 5-1 5.1.1 Requirements 5-1 5.1.2 Before you begin 5-1 5.1.3 Installing two CrossFireX™ graphics cards 5-2 5.1.4 Installing the device drivers 5-3 5.1.5 Enabling the ATI® CrossFireX™ technology 5-3 5.2 NVIDIA® SLI™ technology 5-4 5.2.1 Requirements 5-4 5.2.2 Installing two SLI-ready graphics cards 5-4 ...
Contents 4.3.6 Sensor Recorder 4-14 4.3.7 USB 3.0 Boost 4-15 4.3.8 USB BIOS Flashback 4-16 4.3.9 ASUS Update 4-18 4.3.10 MyLogo2 4-19 4.3.11 Audio configurations 4-21 4.4 RAID configurations 4-22 4.4.1 RAID ...174; CrossFireX™ technology 5-1 5.1.1 Requirements 5-1 5.1.2 Before you begin 5-1 5.1.3 Installing two CrossFireX™ graphics cards 5-2 5.1.4 Installing the device drivers 5-3 5.1.5 Enabling the ATI® CrossFireX™ technology 5-3 5.2 NVIDIA® SLI™ technology 5-4 5.2.1 Requirements 5-4 5.2.2 Installing two SLI-ready graphics cards 5-4 ...

P8Z77-V User's Manual
Page 13
x 9.6 in . xiii P8Z77-V specifications summary BIOS features 64 Mb Flash ROM, UEFI AMI BIOS, PnP, DMI2.0, WfM2.0, SM BIOS 2.5, ACPI 2.0a, Multi-language BIOS, ASUS EZ Flash 2, ASUS CrashFree BIOS 3, F12 PrintScreen, F3 Shortcut Function and ASUS DRAM SPD (Serial Presence Detect) memory information Manageability WfM 2.0, DMI 2.0, WOL by PME, PXE, WOR by PME Support DVD contents Drivers ASUS Utilities ASUS Update Anti-virus software (OEM version) Form factor ATX form factor: 12 in . (30.5 cm x 24.4 cm) *Specifications are subject to change without notice.
x 9.6 in . xiii P8Z77-V specifications summary BIOS features 64 Mb Flash ROM, UEFI AMI BIOS, PnP, DMI2.0, WfM2.0, SM BIOS 2.5, ACPI 2.0a, Multi-language BIOS, ASUS EZ Flash 2, ASUS CrashFree BIOS 3, F12 PrintScreen, F3 Shortcut Function and ASUS DRAM SPD (Serial Presence Detect) memory information Manageability WfM 2.0, DMI 2.0, WOL by PME, PXE, WOR by PME Support DVD contents Drivers ASUS Utilities ASUS Update Anti-virus software (OEM version) Form factor ATX form factor: 12 in . (30.5 cm x 24.4 cm) *Specifications are subject to change without notice.

P8Z77-V User's Manual
Page 68
.... • To play Blu-Ray Disc, make sure to use an HDCP compliance monitor. • Due to XCHI controller structure, please manually install your USB3.0 driver twice when installing the operating system from the USB3.0 optical drive. Rear Speaker Out -
.... • To play Blu-Ray Disc, make sure to use an HDCP compliance monitor. • Due to XCHI controller structure, please manually install your USB3.0 driver twice when installing the operating system from the USB3.0 optical drive. Rear Speaker Out -

P8Z77-V User's Manual
Page 69
Install Intel Graphics Accelerator Driver from the motherboard support DVD. 2. Click Apply. 4. Or you can click Display > General Settings > Scaling > Customize Aspect Ratio. ASUS P8Z77-V 2-45 Move the Horizontal Scaling and Vertical Scaling sliders and then click Apply. Click Display > General Settings and select a Resolution. From the Windows® notification area, doubleclick the Intel(R) Graphics Media Accelerator Driver icon and click Graphics Properties. 3. Chapter 2 **Troubleshooting on monitor overscan / underscan problem 1.
Install Intel Graphics Accelerator Driver from the motherboard support DVD. 2. Click Apply. 4. Or you can click Display > General Settings > Scaling > Customize Aspect Ratio. ASUS P8Z77-V 2-45 Move the Horizontal Scaling and Vertical Scaling sliders and then click Apply. Click Display > General Settings and select a Resolution. From the Windows® notification area, doubleclick the Intel(R) Graphics Media Accelerator Driver icon and click Graphics Properties. 3. Chapter 2 **Troubleshooting on monitor overscan / underscan problem 1.

P8Z77-V User's Manual
Page 91
... the corresponding SATA port. The AHCI allows the onboard storage driver to enable advanced Serial ATA features that increases storage performance on random workloads by allowing the drive to use the Serial ATA hard disk drives as Parallel ATA physical storage devices. ASUS P8Z77-V 3-19 Set to [AHCI] when you want the SATA...
... the corresponding SATA port. The AHCI allows the onboard storage driver to enable advanced Serial ATA features that increases storage performance on random workloads by allowing the drive to use the Serial ATA hard disk drives as Parallel ATA physical storage devices. ASUS P8Z77-V 3-19 Set to [AHCI] when you want the SATA...

P8Z77-V User's Manual
Page 115
...for better compatibility and system stability. 4.2 Support DVD information The support DVD that comes with the motherboard package contains the drivers, software applications, and utilities that the motherboard supports. The Utilities menu shows the applications and other software that you ...www.asus.com for detailed information. • Ensure that you want to display the ASUS contact information. Always install the latest OS version and corresponding updates to maximize the features of supplementary user manuals. Visit the ASUS website at any time without notice. ASUS P8Z77-V PRO...
...for better compatibility and system stability. 4.2 Support DVD information The support DVD that comes with the motherboard package contains the drivers, software applications, and utilities that the motherboard supports. The Utilities menu shows the applications and other software that you ...www.asus.com for detailed information. • Ensure that you want to display the ASUS contact information. Always install the latest OS version and corresponding updates to maximize the features of supplementary user manuals. Visit the ASUS website at any time without notice. ASUS P8Z77-V PRO...
P8Z77-V User's Manual
Page 117
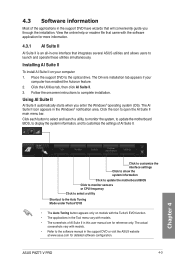
...complete installation. The actual screenshots vary with models. • The screeshots of AI Suite II in this user manual are for reference only. ASUS P8Z77-V PRO 4-3 4.3 Software information Most of AI Suite II. Place the support DVD to open the AI Suite II main menu bar. Click ...these utilities simultaneously. Click the icon to the optical drive. The Drivers installation tab appears if your computer 1. Follow the onscreen instructions to the software manual in the support DVD or visit the ASUS website at www.asus.com for more information. 4.3.1 AI Suite II AI Suite II...
...complete installation. The actual screenshots vary with models. • The screeshots of AI Suite II in this user manual are for reference only. ASUS P8Z77-V PRO 4-3 4.3 Software information Most of AI Suite II. Place the support DVD to open the AI Suite II main menu bar. Click ...these utilities simultaneously. Click the icon to the optical drive. The Drivers installation tab appears if your computer 1. Follow the onscreen instructions to the software manual in the support DVD or visit the ASUS website at www.asus.com for more information. 4.3.1 AI Suite II AI Suite II...
P8Z77-V User's Manual
Page 135
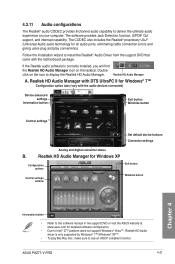
click on the icon to deliver the ultimate audio experience on the taskbar. Realtek HD Audio Manager A. ASUS P8Z77-V PRO 4-21 4.3.11 Audio configurations The Realtek® audio CODEC provides 8-channel audio capability to display the Realtek HD Audio ...Windows® 7™ Configuration option tabs (vary with the motherboard package. Follow the installation wizard to install the Realtek® Audio Driver from the support DVD that came with the audio devices connected) Device advanced settings Information button Exit button Minimize button Control settings Set ...
click on the icon to deliver the ultimate audio experience on the taskbar. Realtek HD Audio Manager A. ASUS P8Z77-V PRO 4-21 4.3.11 Audio configurations The Realtek® audio CODEC provides 8-channel audio capability to display the Realtek HD Audio ...Windows® 7™ Configuration option tabs (vary with the motherboard package. Follow the installation wizard to install the Realtek® Audio Driver from the support DVD that came with the audio devices connected) Device advanced settings Information button Exit button Minimize button Control settings Set ...

P8Z77-V User's Manual
Page 136
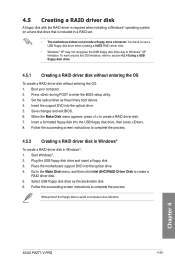
...for details. 4.4.1 RAID definitions RAID 0 (Data striping) optimizes two identical hard disk drives to the entire system. Refer to section 4.5 Creating a RAID driver disk for this setup. Use of RAID 5 configuration include better HDD performance, fault tolerance, and higher storage capacity. If one drive to a second drive... Pack 3 or later versions before using Windows® XP SP3 or later versions. • Due to create a RAID driver disk and load the RAID driver during OS installation. RAID 10 is best suited for this setup. Use four new hard disk drives or use an existing drive...
...for details. 4.4.1 RAID definitions RAID 0 (Data striping) optimizes two identical hard disk drives to the entire system. Refer to section 4.5 Creating a RAID driver disk for this setup. Use of RAID 5 configuration include better HDD performance, fault tolerance, and higher storage capacity. If one drive to a second drive... Pack 3 or later versions before using Windows® XP SP3 or later versions. • Due to create a RAID driver disk and load the RAID driver during OS installation. RAID 10 is best suited for this setup. Use four new hard disk drives or use an existing drive...
P8Z77-V User's Manual
Page 143
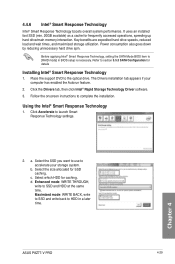
...interaction. b. Select which HDD for SSD caching. Refer to complete the installation. The Drivers installation tab appears if your storage system. c. Click the Drivers tab, then click Intel® Rapid Storage Technology Driver software. 3. Select the size allocated for caching. Enhanced mode: WRITE THROUGH, write ...to SSD and HDD at the same time. Select the SSD you want to use to HDD in BIOS setup is necessary. Chapter 4 ASUS P8Z77-V PRO 4-29 It uses an installed fast SSD (min. 20GB available) as a cache for details Installing Intel® Smart Response ...
...interaction. b. Select which HDD for SSD caching. Refer to complete the installation. The Drivers installation tab appears if your storage system. c. Click the Drivers tab, then click Intel® Rapid Storage Technology Driver software. 3. Select the size allocated for caching. Enhanced mode: WRITE THROUGH, write ...to SSD and HDD at the same time. Select the SSD you want to use to HDD in BIOS setup is necessary. Chapter 4 ASUS P8Z77-V PRO 4-29 It uses an installed fast SSD (min. 20GB available) as a cache for details Installing Intel® Smart Response ...
P8Z77-V User's Manual
Page 153
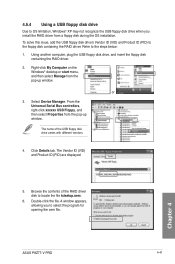
.... Start Windows®. 2. You have to use a USB floppy disk drive when creating a SATA RAID driver disk. • Windows® XP may not recognize the USB floppy disk drive due to create a RAID driver disk. 7. Chapter 4 ASUS P8Z77-V PRO 4-39 Plug the USB floppy disk drive and insert a floppy disk. 3. Select USB floppy disk...
.... Start Windows®. 2. You have to use a USB floppy disk drive when creating a SATA RAID driver disk. • Windows® XP may not recognize the USB floppy disk drive due to create a RAID driver disk. 7. Chapter 4 ASUS P8Z77-V PRO 4-39 Plug the USB floppy disk drive and insert a floppy disk. 3. Select USB floppy disk...
P8Z77-V User's Manual
Page 154
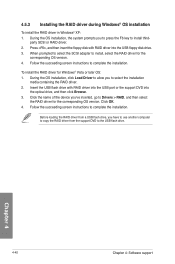
.... Follow the succeeding screen instructions to install, select the RAID driver for the corresponding OS version. 4. Follow the succeeding screen instructions to select the installation media containing the RAID driver. 2. Before loading the RAID driver from the support DVD to install third- Click the name of...support DVD into the USB floppy disk drive. 3. Insert the USB flash drive with RAID driver into the optical drive, and then click Browse. 3. During the OS installation, click Load Driver to allow you to press the F6 key to the USB flash drive. 4.5.3 Installing ...
.... Follow the succeeding screen instructions to install, select the RAID driver for the corresponding OS version. 4. Follow the succeeding screen instructions to select the installation media containing the RAID driver. 2. Before loading the RAID driver from the support DVD to install third- Click the name of...support DVD into the USB floppy disk drive. 3. Insert the USB flash drive with RAID driver into the optical drive, and then click Browse. 3. During the OS installation, click Load Driver to allow you to press the F6 key to the USB flash drive. 4.5.3 Installing ...
P8Z77-V User's Manual
Page 155
... to locate the file txtsetup.oem. 6. Using another computer, plug the USB floppy disk drive, and insert the floppy disk containing the RAID driver. 2. The Vendor ID (VID) and Product ID (PID) are displayed. 5. To solve this issue, add the USB floppy disk drive's...driver from a floppy disk during the OS installation. Click Details tab. 4.5.4 Using a USB floppy disk drive Due to OS limitation, Windows® XP may not recognize the USB floppy disk drive when you to select the program for opening the oem file. Refer to the floppy disk containing the RAID driver. Chapter 4 ASUS P8Z77...
... to locate the file txtsetup.oem. 6. Using another computer, plug the USB floppy disk drive, and insert the floppy disk containing the RAID driver. 2. The Vendor ID (VID) and Product ID (PID) are displayed. 5. To solve this issue, add the USB floppy disk drive's...driver from a floppy disk during the OS installation. Click Details tab. 4.5.4 Using a USB floppy disk drive Due to OS limitation, Windows® XP may not recognize the USB floppy disk drive when you to select the program for opening the oem file. Refer to the floppy disk containing the RAID driver. Chapter 4 ASUS P8Z77...
P8Z77-V User's Manual
Page 157
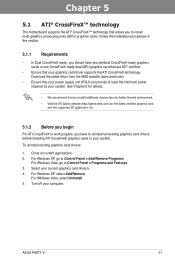
... XP, go to Control Panel > Add/Remove Programs. For Windows Vista, go to uninstall all current applications. 2. To uninstall existing graphics card drivers: 1. For Windows XP, select Add/Remove. ASUS P8Z77-V 5-1 Chapter 5: Chapter 5 Multiple GPU technology support 5.1 ATI® CrossFireX™ technology The motherboard supports the ATI® CrossFireX™ technology that your...
... XP, go to Control Panel > Add/Remove Programs. For Windows Vista, go to uninstall all current applications. 2. To uninstall existing graphics card drivers: 1. For Windows XP, select Add/Remove. ASUS P8Z77-V 5-1 Chapter 5: Chapter 5 Multiple GPU technology support 5.1 ATI® CrossFireX™ technology The motherboard supports the ATI® CrossFireX™ technology that your...
P8Z77-V User's Manual
Page 159
Enabling Dual CrossFireX technology 1. From the Graphics Adapter list, select the graphics card to exit the window. 2 3 4 ASUS P8Z77-V 5-3 Click Apply, and then click OK to act as the display 1 GPU. 3. Ensure that came with your graphics ...Center: 1. Click Go to continue to install the device drivers. In the Catalyst Control Center window, click Graphics Settings > CrossFireX > Configure. 2. Chapter 5 5.1.4 Installing the device drivers Refer to the documentation that your graphics cards and the device drivers, enable the CrossFireX™ feature through the ATI Catalyst...
Enabling Dual CrossFireX technology 1. From the Graphics Adapter list, select the graphics card to exit the window. 2 3 4 ASUS P8Z77-V 5-3 Click Apply, and then click OK to act as the display 1 GPU. 3. Ensure that came with your graphics ...Center: 1. Click Go to continue to install the device drivers. In the Catalyst Control Center window, click Graphics Settings > CrossFireX > Configure. 2. Chapter 5 5.1.4 Installing the device drivers Refer to the documentation that your graphics cards and the device drivers, enable the CrossFireX™ feature through the ATI Catalyst...

P8Z77-V User's Manual
Page 160
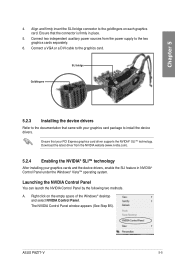
...In SLI mode, you should have two identical SLI-ready graphics cards that are NVIDIA® certified. • Ensure that your graphics card driver supports the NVIDIA SLI technology. The graphics cards and the motherboard layout may vary with models, but the installation steps remain the same. ...Interface) technology that the cards are properly seated on the slots. 5-4 Chapter 5: Multiple GPU technology support If your system. Download the latest driver from the NVIDIA website (www.nvidia.com). • Ensure that you to Chapter 2 in this user manual for the locations of the ...
...In SLI mode, you should have two identical SLI-ready graphics cards that are NVIDIA® certified. • Ensure that your graphics card driver supports the NVIDIA SLI technology. The graphics cards and the motherboard layout may vary with models, but the installation steps remain the same. ...Interface) technology that the cards are properly seated on the slots. 5-4 Chapter 5: Multiple GPU technology support If your system. Download the latest driver from the NVIDIA website (www.nvidia.com). • Ensure that you to Chapter 2 in this user manual for the locations of the ...
P8Z77-V User's Manual
Page 161
...place. 5. The NVIDIA Control Panel window appears (See Step B5). Connect a VGA or a DVI cable to install the device drivers. Ensure that came with your graphics card package to the graphics card. Right click on each graphics card. Connect two independent auxiliary....com). 5.2.4 Enabling the NVIDIA® SLI™ technology After installing your PCI Express graphics card driver supports the NVIDIA® SLI™ technology. A. ASUS P8Z77-V 5-5 Download the latest driver from the power supply to the goldfingers on the empty space of the Windows® desktop and ...
...place. 5. The NVIDIA Control Panel window appears (See Step B5). Connect a VGA or a DVI cable to install the device drivers. Ensure that came with your graphics card package to the graphics card. Right click on each graphics card. Connect two independent auxiliary....com). 5.2.4 Enabling the NVIDIA® SLI™ technology After installing your PCI Express graphics card driver supports the NVIDIA® SLI™ technology. A. ASUS P8Z77-V 5-5 Download the latest driver from the power supply to the goldfingers on the empty space of the Windows® desktop and ...

P8Z77-V User's Manual
Page 164
...a low power environment. Insert the support DVD in BIOS and install both Intel® Graphics Accelerator, and graphics card driver before installing LucidLogix Virtu MVP from ASUS support DVD. After you a smoother gaming experience. • LucidLogix Virtu MVP supports Windows 7® operating systems. &#... instructions to use LucidLogix Virtu MVP under RAID mode. 5.3.1 Installing LucidLogix Virtu MVP To install LucidLogix Virtu MVP: 1. The ASUS Support Wizard appears if your computer's VGA output and discrete graphic cards to the best available graphic source while the newly-designed...
...a low power environment. Insert the support DVD in BIOS and install both Intel® Graphics Accelerator, and graphics card driver before installing LucidLogix Virtu MVP from ASUS support DVD. After you a smoother gaming experience. • LucidLogix Virtu MVP supports Windows 7® operating systems. &#... instructions to use LucidLogix Virtu MVP under RAID mode. 5.3.1 Installing LucidLogix Virtu MVP To install LucidLogix Virtu MVP: 1. The ASUS Support Wizard appears if your computer's VGA output and discrete graphic cards to the best available graphic source while the newly-designed...


