P8Z77-V PRO user's manual
Page 48
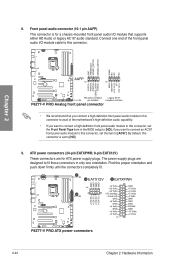
...; If you want to connect a high-definition front panel audio module to this connector. • We recommend that supports either HD Audio or legacy AC`97 audio standard. The power supply plugs are for a chassis-mounted front panel audio I /O module cable to this connector, set the Front..., this connector, set to [AC97]. if you want to connect an AC'97 front panel audio module to this connector is for ATX power supply plugs. Find the proper orientation and push down firmly until the connectors completely fit. 2-24 Chapter 2: Hardware information Chapter 2 8. Front panel...
...; If you want to connect a high-definition front panel audio module to this connector. • We recommend that supports either HD Audio or legacy AC`97 audio standard. The power supply plugs are for a chassis-mounted front panel audio I /O module cable to this connector, set the Front..., this connector, set to [AC97]. if you want to connect an AC'97 front panel audio module to this connector is for ATX power supply plugs. Find the proper orientation and push down firmly until the connectors completely fit. 2-24 Chapter 2: Hardware information Chapter 2 8. Front panel...
P8Z77-V PRO user's manual
Page 49
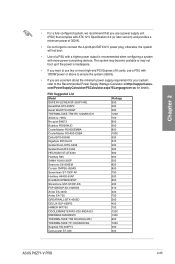
... For a fully configured system, we recommend that you use a power supply unit (PSU) that complies with ATX 12 V Specification 2.0 (or later version) and provides a minimum power of a PSU with 1000W power or above to the Recommended Power Supply Wattage Calculator at http://support.asus. PSU Suggested List Model SUPER FLOWER ...750 300 450 750 1200 1300 650 1050 400 320 ASUS P8Z77-V PRO 2-25 otherwise, the system will not boot. • Use of 350 W. • Do not forget to connect the 4-pin/8-pin EATX12 V power plug; com/PowerSupplyCalculator/PSCalculator.aspx?SLanguage=en-us for...
... For a fully configured system, we recommend that you use a power supply unit (PSU) that complies with ATX 12 V Specification 2.0 (or later version) and provides a minimum power of a PSU with 1000W power or above to the Recommended Power Supply Wattage Calculator at http://support.asus. PSU Suggested List Model SUPER FLOWER ...750 300 450 750 1200 1300 650 1050 400 320 ASUS P8Z77-V PRO 2-25 otherwise, the system will not boot. • Use of 350 W. • Do not forget to connect the 4-pin/8-pin EATX12 V power plug; com/PowerSupplyCalculator/PSCalculator.aspx?SLanguage=en-us for...
P8Z77-V PRO user's manual
Page 147
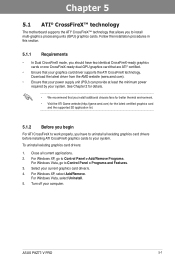
...graphics card drivers before installing ATI CrossFireX graphics cards to install multi-graphics processing units (GPU) graphics cards. ASUS P8Z77-V PRO 5-1 See Chapter 2 for details. • We recommend that you install additional chassis fans for better thermal environment. • Visit the ATI Game website (http://... CrossFireX-ready dual-GPU graphics card that are ATI® certified. • Ensure that your power supply unit (PSU) can provide at least the minimum power required by your graphics card driver supports the ATI CrossFireX technology. Download the latest driver from the...
...graphics card drivers before installing ATI CrossFireX graphics cards to install multi-graphics processing units (GPU) graphics cards. ASUS P8Z77-V PRO 5-1 See Chapter 2 for details. • We recommend that you install additional chassis fans for better thermal environment. • Visit the ATI Game website (http://... CrossFireX-ready dual-GPU graphics card that are ATI® certified. • Ensure that your power supply unit (PSU) can provide at least the minimum power required by your graphics card driver supports the ATI CrossFireX technology. Download the latest driver from the...
P8Z77-V PRO user's manual
Page 148
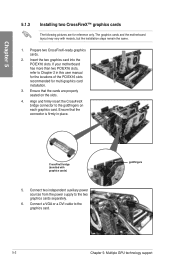
...the two graphics cards separately. 6. Ensure that the cards are for multi-graphics card installation. 3. Connect two independent auxiliary power sources from the power supply to the graphics card. CrossFireX bridge (bundled with models, but the installation steps remain the same. 1. goldfingers 5-2 ...graphics cards) 5. Ensure that the connector is firmly in this user manual for the locations of the PCIEX16 slots recommended for reference only. Chapter 5 5.1.3 Installing two CrossFireX™ graphics cards The following pictures are properly seated on each...
...the two graphics cards separately. 6. Ensure that the cards are for multi-graphics card installation. 3. Connect two independent auxiliary power sources from the power supply to the graphics card. CrossFireX bridge (bundled with models, but the installation steps remain the same. 1. goldfingers 5-2 ...graphics cards) 5. Ensure that the connector is firmly in this user manual for the locations of the PCIEX16 slots recommended for reference only. Chapter 5 5.1.3 Installing two CrossFireX™ graphics cards The following pictures are properly seated on each...

P8Z77-V PRO user's manual
Page 150
...graphics card into the PCIEX16 slots. If your system. Prepare two SLI-ready graphics cards. 2. Ensure that your power supply unit (PSU) can provide at least the minimum power required by your motherboard has more than two PCIEX16 slots, refer to install multi-graphics processing units (GPU) ... pictures are for multi-graphics card installation. 3. See Chapter 2 for details. • We recommend that you to Chapter 2 in this user manual for the locations of the PCIEX16 slots recommended for reference only. Download the latest driver from the NVIDIA website (www.nvidia.com). •...
...graphics card into the PCIEX16 slots. If your system. Prepare two SLI-ready graphics cards. 2. Ensure that your power supply unit (PSU) can provide at least the minimum power required by your motherboard has more than two PCIEX16 slots, refer to install multi-graphics processing units (GPU) ... pictures are for multi-graphics card installation. 3. See Chapter 2 for details. • We recommend that you to Chapter 2 in this user manual for the locations of the PCIEX16 slots recommended for reference only. Download the latest driver from the NVIDIA website (www.nvidia.com). •...


