P8Z77-V PRO user's manual
Page 41
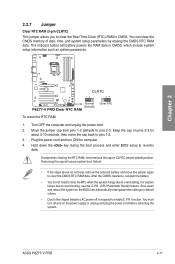
...plug the power cord before rebooting the system. For system failure due to enable C.P.R. Shut down the key during the boot process and enter BIOS setup to overclocking. Move the jumper cap from pins 1-2 (default) to clear the CMOS RTC RAM data. Removing the cap will cause system... system so the BIOS can clear the CMOS memory of date, time, and system setup parameters by erasing the CMOS RTC RAM data. ASUS P8Z77-V PRO 2-17 Keep the cap on pins 2-3 for about 5-10 seconds, then move the jumper again to pins 2-3. function. You can automatically reset parameter settings to ...
...plug the power cord before rebooting the system. For system failure due to enable C.P.R. Shut down the key during the boot process and enter BIOS setup to overclocking. Move the jumper cap from pins 1-2 (default) to clear the CMOS RTC RAM data. Removing the cap will cause system... system so the BIOS can clear the CMOS memory of date, time, and system setup parameters by erasing the CMOS RTC RAM data. ASUS P8Z77-V PRO 2-17 Keep the cap on pins 2-3 for about 5-10 seconds, then move the jumper again to pins 2-3. function. You can automatically reset parameter settings to ...
P8Z77-V PRO user's manual
Page 50
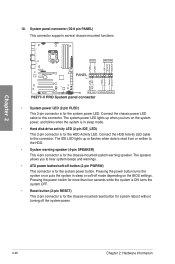
... the power switch for more than four seconds while the system is ON turns the system OFF. • Reset button (2-pin RESET) This 2-pin connector is for the chassis-mounted reset button for system reboot without turning off button (2-pin PWRSW) This connector is for the chassis-mounted system warning...This connector supports several chassis-mounted functions. 10. Connect the HDD Activity LED cable to this connector. The speaker allows you turn on the BIOS settings. Pressing the power button turns the system on or puts the system in sleep or soft-off mode depending on the system power,...
... the power switch for more than four seconds while the system is ON turns the system OFF. • Reset button (2-pin RESET) This 2-pin connector is for the chassis-mounted reset button for system reboot without turning off button (2-pin PWRSW) This connector is for the chassis-mounted system warning...This connector supports several chassis-mounted functions. 10. Connect the HDD Activity LED cable to this connector. The speaker allows you turn on the BIOS settings. Pressing the power button turns the system on or puts the system in sleep or soft-off mode depending on the system power,...
P8Z77-V PRO user's manual
Page 73
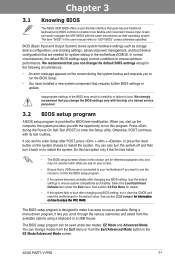
...CMOS. When you start up the computer, the system provides you wish to enter Setup after changing any BIOS setting, try to clear the CMOS and reset the motherboard to ensure system compatibility and stability. If you with the same smoothness as possible. Press ... or failure to ensure optimum performance. Users can change the BIOS settings only with its test routines. Select the Load Optimized Defaults item under two modes: EZ Mode and Advanced Mode. In normal circumstances, the default BIOS settings apply to most conditions to boot. Chapter 3 ASUS P8Z77-V PRO 3-1
...CMOS. When you start up the computer, the system provides you wish to enter Setup after changing any BIOS setting, try to clear the CMOS and reset the motherboard to ensure system compatibility and stability. If you with the same smoothness as possible. Press ... or failure to ensure optimum performance. Users can change the BIOS settings only with its test routines. Select the Load Optimized Defaults item under two modes: EZ Mode and Advanced Mode. In normal circumstances, the default BIOS settings apply to most conditions to boot. Chapter 3 ASUS P8Z77-V PRO 3-1
P8Z77-V PRO user's manual
Page 74
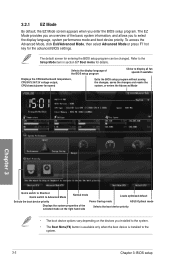
...Displays the CPU/motherboard temperature, CPU/5V/3.3V/12V voltage output, CPU/chassis/power fan speed Exits the BIOS setup program without saving the changes, saves the changes and resets the system, or enters the Advanced Mode Chapter 3 Quick switch to Shortcut Quick switch to Advanced Mode... Normal mode Loads optimized default Selects the boot device priority Power Saving mode ASUS Optimal mode Displays the system properties of the...
...Displays the CPU/motherboard temperature, CPU/5V/3.3V/12V voltage output, CPU/chassis/power fan speed Exits the BIOS setup program without saving the changes, saves the changes and resets the system, or enters the Advanced Mode Chapter 3 Quick switch to Shortcut Quick switch to Advanced Mode... Normal mode Loads optimized default Selects the boot device priority Power Saving mode ASUS Optimal mode Displays the system properties of the...
P8Z77-V PRO user's manual
Page 106
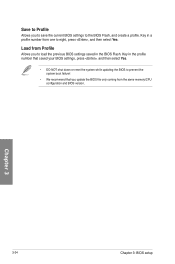
... Allows you to the BIOS Flash, and create a profile. Key in the BIOS Flash. Chapter 3 3-34 Chapter 3: BIOS setup Key in the profile number that saved your BIOS settings, press , and then select Yes. • DO NOT shut down or reset the system while updating the BIOS to prevent the system boot... failure! • We recommend that you to save the current BIOS settings to load the previous BIOS settings saved in a ...
... Allows you to the BIOS Flash, and create a profile. Key in the BIOS Flash. Chapter 3 3-34 Chapter 3: BIOS setup Key in the profile number that saved your BIOS settings, press , and then select Yes. • DO NOT shut down or reset the system while updating the BIOS to prevent the system boot... failure! • We recommend that you to save the current BIOS settings to load the previous BIOS settings saved in a ...

P8Z77-V PRO user's manual
Page 107
... device Load Optimized Defaults This option allows you to load the default values for the BIOS items, and save changes and exit. Chapter 3 ASUS P8Z77-V PRO 3-35 ASUS EZ Mode This option allows you press , a confirmation window appears. Select Yes to... save or discard your changes to the BIOS items. You can access the EZ Mode from the Exit menu to ensure the values you selected are finished making your changes. Exit Load Optimized Defaults Save Changes & Reset...
... device Load Optimized Defaults This option allows you to load the default values for the BIOS items, and save changes and exit. Chapter 3 ASUS P8Z77-V PRO 3-35 ASUS EZ Mode This option allows you press , a confirmation window appears. Select Yes to... save or discard your changes to the BIOS items. You can access the EZ Mode from the Exit menu to ensure the values you selected are finished making your changes. Exit Load Optimized Defaults Save Changes & Reset...
P8Z77-V PRO user's manual
Page 112
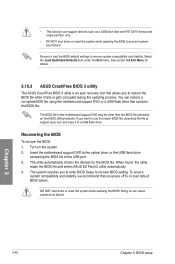
... stability, we recommend that contains the BIOS file. DO NOT shut down or reset the system while updating the BIOS to ensure system compatibility and stability. The utility automatically checks the devices for details. 3.10.3 ASUS CrashFree BIOS 3 utility The ASUS CrashFree BIOS 3 utility is an auto recovery tool...disk with FAT 32/16 format and single partition only. • DO NOT shut down or reset the system while updating the BIOS! When found, the utility reads the BIOS file and enters ASUS EZ Flash 2 utility automatically. 4. Select the Load Optimized Defaults item under the Exit menu....
... stability, we recommend that contains the BIOS file. DO NOT shut down or reset the system while updating the BIOS to ensure system compatibility and stability. The utility automatically checks the devices for details. 3.10.3 ASUS CrashFree BIOS 3 utility The ASUS CrashFree BIOS 3 utility is an auto recovery tool...disk with FAT 32/16 format and single partition only. • DO NOT shut down or reset the system while updating the BIOS! When found, the utility reads the BIOS file and enters ASUS EZ Flash 2 utility automatically. 4. Select the Load Optimized Defaults item under the Exit menu....
P8Z77-V PRO user's manual
Page 114
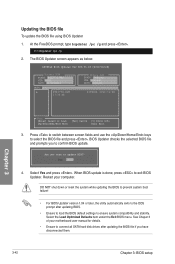
...ensure system compatibility and stability. Restart your motherboard user manual for DOS V1.18 [2010/04/29] Current ROM BOARD: P8Z77-V PRO VER: 0080 DATE: 11/08/2011 Update ROM BOARD: Unknown VER: Unknown DATE: Unknown PATH: A:\ A: P8Z77VD.ROM...BIOS. • Ensure to load the BIOS default settings to confirm BIOS update. Updating the BIOS file To update the BIOS file using BIOS Updater 1. When BIOS update is done, press to select the BIOS file and press . Select the Load Optimized Defaults item under the Exit BIOS menu. DO NOT shut down or reset the system while updating the BIOS...
...ensure system compatibility and stability. Restart your motherboard user manual for DOS V1.18 [2010/04/29] Current ROM BOARD: P8Z77-V PRO VER: 0080 DATE: 11/08/2011 Update ROM BOARD: Unknown VER: Unknown DATE: Unknown PATH: A:\ A: P8Z77VD.ROM...BIOS. • Ensure to load the BIOS default settings to confirm BIOS update. Updating the BIOS file To update the BIOS file using BIOS Updater 1. When BIOS update is done, press to select the BIOS file and press . Select the Load Optimized Defaults item under the Exit BIOS menu. DO NOT shut down or reset the system while updating the BIOS...
P8Z77-V PRO user's manual
Page 137
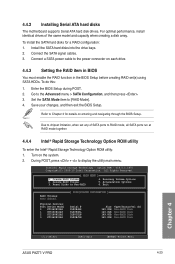
..., press + to the Advanced menu > SATA Configuration, and then press . 3. All Rights Reserved. [ MAIN MENU ] 1. Reset Disks to [RAID Mode]. 4. Exit RAID Volumes: None defined. Refer to the power connector on entering and navigating through the BIOS Setup. Option ROM - Recovery Volume Options 5. Delete RAID Volume 3. v10.5.1.1070 Copyright(C) 2003-10 Intel... Type/Status(Vol ID) Non-RAID Disk Non-RAID Disk Non-RAID Disk Non-RAID Disk Chapter 4 [↑↓]-Select [ESC]-Exit [ENTER]-Select Menu ASUS P8Z77-V PRO 4-23
..., press + to the Advanced menu > SATA Configuration, and then press . 3. All Rights Reserved. [ MAIN MENU ] 1. Reset Disks to [RAID Mode]. 4. Exit RAID Volumes: None defined. Refer to the power connector on entering and navigating through the BIOS Setup. Option ROM - Recovery Volume Options 5. Delete RAID Volume 3. v10.5.1.1070 Copyright(C) 2003-10 Intel... Type/Status(Vol ID) Non-RAID Disk Non-RAID Disk Non-RAID Disk Non-RAID Disk Chapter 4 [↑↓]-Select [ESC]-Exit [ENTER]-Select Menu ASUS P8Z77-V PRO 4-23


