
User Manual
Page 3
... information...vii About this guide...viii P8Z68-V PRO/GEN3 specifications summary x Chapter 1: Product introduction 1.1 Welcome!...1-1 1.2 Package contents 1-1 1.3 Special features 1-2 1.3.1 Product highlights 1-2 1.3.2 Dual Intelligent Processors 2 with DIGI+ VRM 1-3 1.3.3 ASUS Exclusive Features 1-4 1.3.4 ASUS Quiet Thermal Solution 1-4 1.3.5 ASUS EZ DIY 1-5 1.3.6 Other special features 1-6 Chapter 2: Hardware information 2.1 Before you proceed 2-1 2.2 Motherboard overview 2-2 2.2.1 Motherboard layout 2-2 2.2.2 Central Processing Unit (CPU 2-4 2.2.3 System...
... information...vii About this guide...viii P8Z68-V PRO/GEN3 specifications summary x Chapter 1: Product introduction 1.1 Welcome!...1-1 1.2 Package contents 1-1 1.3 Special features 1-2 1.3.1 Product highlights 1-2 1.3.2 Dual Intelligent Processors 2 with DIGI+ VRM 1-3 1.3.3 ASUS Exclusive Features 1-4 1.3.4 ASUS Quiet Thermal Solution 1-4 1.3.5 ASUS EZ DIY 1-5 1.3.6 Other special features 1-6 Chapter 2: Hardware information 2.1 Before you proceed 2-1 2.2 Motherboard overview 2-2 2.2.1 Motherboard layout 2-2 2.2.2 Central Processing Unit (CPU 2-4 2.2.3 System...

User Manual
Page 20
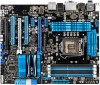
2.2 Motherboard overview 2.2.1 Motherboard layout Chapter 2 Refer to 2.2.8 Internal connectors and 2.3.10 Rear panel connection for more information about rear panel connectors and internal connectors. 2-2 Chapter 2: Hardware information
2.2 Motherboard overview 2.2.1 Motherboard layout Chapter 2 Refer to 2.2.8 Internal connectors and 2.3.10 Rear panel connection for more information about rear panel connectors and internal connectors. 2-2 Chapter 2: Hardware information

User Manual
Page 54
2.3.5 1 Motherboard installation The diagrams in this section are for reference only. The motherboard layout may vary with models, but the installation steps remain the same. 2 Chapter 2 2-36 Chapter 2: Hardware information
2.3.5 1 Motherboard installation The diagrams in this section are for reference only. The motherboard layout may vary with models, but the installation steps remain the same. 2 Chapter 2 2-36 Chapter 2: Hardware information

User Manual
Page 136
... following pictures are properly seated on each graphics card. If your motherboard has more than two PCIEX16 slots, refer to the goldfingers on the slots. 4. Prepare two CrossFireX-ready graphics cards. 2. Ensure that the cards are for multi-graphics card installation. 3. The graphics cards and the motherboard layout may vary with graphics cards) 5.
... following pictures are properly seated on each graphics card. If your motherboard has more than two PCIEX16 slots, refer to the goldfingers on the slots. 4. Prepare two CrossFireX-ready graphics cards. 2. Ensure that the cards are for multi-graphics card installation. 3. The graphics cards and the motherboard layout may vary with graphics cards) 5.

User Manual
Page 138
... cards and the motherboard layout may vary with models, but the installation steps remain the same. 1. Prepare two SLI-ready graphics cards. 2. Ensure that your power supply unit (PSU) can provide at least the minimum power required by your system. If your motherboard has more than two... certified. • Ensure that your graphics card driver supports the NVIDIA SLI technology. Chapter 5 5.2 NVIDIA® SLI™ technology The motherboard supports the NVIDIA® SLI™ (Scalable Link Interface) technology that allows you to Chapter 2 in this user manual for the locations of...
... cards and the motherboard layout may vary with models, but the installation steps remain the same. 1. Prepare two SLI-ready graphics cards. 2. Ensure that your power supply unit (PSU) can provide at least the minimum power required by your system. If your motherboard has more than two... certified. • Ensure that your graphics card driver supports the NVIDIA SLI technology. Chapter 5 5.2 NVIDIA® SLI™ technology The motherboard supports the NVIDIA® SLI™ (Scalable Link Interface) technology that allows you to Chapter 2 in this user manual for the locations of...


