
User Manual
Page 4
... the support DVD 4-1 4.2.2 Obtaining the software manuals 4-2 4.3 Software information 4-3 4.3.1 AI Suite II 4-3 4.3.2 DIGI+ VRM 4-4 4.3.3 BT GO 4-5 iv ASUS O.C. Contents 2.4 Starting up for the first time 2-48 2.5 Turning off the computer 2-48 Chapter 3: BIOS setup 3.1 Knowing BIOS 3-1 3.2 BIOS setup program 3-1 3.2.1 EZ Mode 3-2 3.2.2 Advanced Mode 3-3 3.3 Main menu 3-5 3.4 Ai Tweaker menu 3-7 3.5 Advanced menu 3-14 3.5.1 CPU Configuration 3-15...
... the support DVD 4-1 4.2.2 Obtaining the software manuals 4-2 4.3 Software information 4-3 4.3.1 AI Suite II 4-3 4.3.2 DIGI+ VRM 4-4 4.3.3 BT GO 4-5 iv ASUS O.C. Contents 2.4 Starting up for the first time 2-48 2.5 Turning off the computer 2-48 Chapter 3: BIOS setup 3.1 Knowing BIOS 3-1 3.2 BIOS setup program 3-1 3.2.1 EZ Mode 3-2 3.2.2 Advanced Mode 3-3 3.3 Main menu 3-5 3.4 Ai Tweaker menu 3-7 3.5 Advanced menu 3-14 3.5.1 CPU Configuration 3-15...

User Manual
Page 5
Contents 4.3.4 TurboV EVO 4-7 4.3.5 EPU 4-12 4.3.6 ASUS FAN Xpert 4-13 4.3.7 ASUS Probe II 4-14 4.3.8 Ai Charger 4-15 4.3.9 Audio configurations 4-16 4.4 RAID configurations 4-17 4.4.1 RAID definitions 4-17 4.4.2 Installing Serial ATA hard disks 4-18 4.4.3 Setting the RAID item in BIOS 4-18 4.4.4 Intel® Rapid Storage Technology Option ROM utility 4-18 4.5 Creating a RAID driver disk 4-24 4.5.1 Creating a RAID...
Contents 4.3.4 TurboV EVO 4-7 4.3.5 EPU 4-12 4.3.6 ASUS FAN Xpert 4-13 4.3.7 ASUS Probe II 4-14 4.3.8 Ai Charger 4-15 4.3.9 Audio configurations 4-16 4.4 RAID configurations 4-17 4.4.1 RAID definitions 4-17 4.4.2 Installing Serial ATA hard disks 4-18 4.4.3 Setting the RAID item in BIOS 4-18 4.4.4 Intel® Rapid Storage Technology Option ROM utility 4-18 4.5 Creating a RAID driver disk 4-24 4.5.1 Creating a RAID...

User Manual
Page 8
... setup procedures that may include optional documentation, such as warranty flyers, that you need when installing and configuring the motherboard. ASUS websites The ASUS website provides updated information on the motherboard. • Chapter 3: BIOS setup This chapter tells how to install and configure multiple ATI® CrossFireX™ and NVIDIA® SLI™...
... setup procedures that may include optional documentation, such as warranty flyers, that you need when installing and configuring the motherboard. ASUS websites The ASUS website provides updated information on the motherboard. • Chapter 3: BIOS setup This chapter tells how to install and configure multiple ATI® CrossFireX™ and NVIDIA® SLI™...
User Manual
Page 11
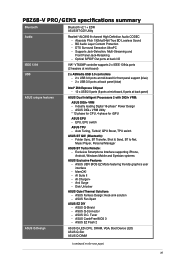
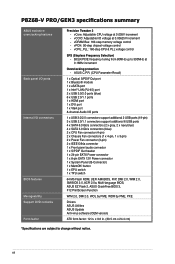
... at back panel) ASUS Dual Intelligent Processors 2 with DIGI+ VRM: ASUS DIGI+ VRM - DTS Surround Sensation UltraPC - ASUS Q-Connector - ASUS EZ Flash 2 ASUS Q-LED (CPU, DRAM, VGA, Boot Device LED) ASUS Q-Slot ASUS Q-DIMM (continued on the next page) xi P8Z68-V PRO/GEN3 specifications summary Bluetooth Audio IEEE 1394 USB ASUS unique features ASUS Q-Design Bluetooth v2.1 + EDR ASUS BT GO! BD Audio...
... at back panel) ASUS Dual Intelligent Processors 2 with DIGI+ VRM: ASUS DIGI+ VRM - DTS Surround Sensation UltraPC - ASUS Q-Connector - ASUS EZ Flash 2 ASUS Q-LED (CPU, DRAM, VGA, Boot Device LED) ASUS Q-Slot ASUS Q-DIMM (continued on the next page) xi P8Z68-V PRO/GEN3 specifications summary Bluetooth Audio IEEE 1394 USB ASUS unique features ASUS Q-Design Bluetooth v2.1 + EDR ASUS BT GO! BD Audio...
User Manual
Page 12
... (blue) 6 x USB 2.0/1.1 ports 1 x HDMI port 1 x DVI port 1 x VGA port 8-channel Audio I /O connectors BIOS features Manageability Support DVD contents Form factor Precision Tweaker 2 - vPCH: 90-step chipset voltage control - vCCIO: Adjustable I/O voltage at 0.1MHz increment Overclocking protection - P8Z68-V PRO/GEN3 specifications summary ASUS exclusive overclocking features Back panel I/O ports Internal I /O ports 1 x USB 3.0/2.0 connectors support additional 2 USB...
... (blue) 6 x USB 2.0/1.1 ports 1 x HDMI port 1 x DVI port 1 x VGA port 8-channel Audio I /O connectors BIOS features Manageability Support DVD contents Form factor Precision Tweaker 2 - vPCH: 90-step chipset voltage control - vCCIO: Adjustable I/O voltage at 0.1MHz increment Overclocking protection - P8Z68-V PRO/GEN3 specifications summary ASUS exclusive overclocking features Back panel I/O ports Internal I /O ports 1 x USB 3.0/2.0 connectors support additional 2 USB...
User Manual
Page 15
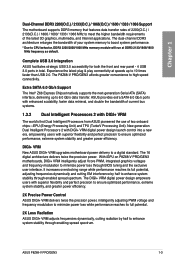
... full potential, adjusting frequencies dynamically and cutting EM interference by half to enhance system stability through BIOS tuning and the exclusive user interface. ASUS P8Z68-V PRO/GEN3 1-3 It increases overclocking range while performance reaches its full potential. 2X Less Radiation ASUS DIGI+ VRM adjusts frequencies dynamically, cutting radiation by half to enhance system stability through enabling...
... full potential, adjusting frequencies dynamically and cutting EM interference by half to enhance system stability through BIOS tuning and the exclusive user interface. ASUS P8Z68-V PRO/GEN3 1-3 It increases overclocking range while performance reaches its full potential. 2X Less Radiation ASUS DIGI+ VRM adjusts frequencies dynamically, cutting radiation by half to enhance system stability through enabling...
User Manual
Page 17
... electric conductivity, it ideally protects your DIY experience. ASUS P8Z68-V PRO/GEN3 1-5 ASUS EZ-Flash 2 ASUS EZ Flash 2 is for experienced performance enthusiasts that demand far more intricate system control, including detailed DRAM information. Supports hard drives over 2.2TB ASUS UEFI BIOS natively supports hard drives larger than traditional BIOS versions. The exclusive EZ Mode displays frequently-accessed setup...
... electric conductivity, it ideally protects your DIY experience. ASUS P8Z68-V PRO/GEN3 1-5 ASUS EZ-Flash 2 ASUS EZ Flash 2 is for experienced performance enthusiasts that demand far more intricate system control, including detailed DRAM information. Supports hard drives over 2.2TB ASUS UEFI BIOS natively supports hard drives larger than traditional BIOS versions. The exclusive EZ Mode displays frequently-accessed setup...
User Manual
Page 29
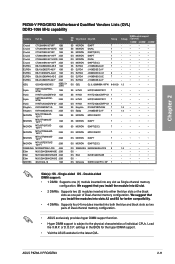
... subject to the physical characteristics of Dual-channel memory configuration. or D.O.C.P. ASUS P8Z68-V PRO/GEN3 2-11 Voltage - DS Qimonda IDSH51-03A1F1C-10F 7 - • • • 1.5 • • • - • • • - • • • - • • • - • • Side(s): SS - Load the X.M.P. settings in the BIOS for the hyper DIMM support. • Visit the...
... subject to the physical characteristics of Dual-channel memory configuration. or D.O.C.P. ASUS P8Z68-V PRO/GEN3 2-11 Voltage - DS Qimonda IDSH51-03A1F1C-10F 7 - • • • 1.5 • • • - • • • - • • • - • • • - • • Side(s): SS - Load the X.M.P. settings in the BIOS for the hyper DIMM support. • Visit the...
User Manual
Page 33
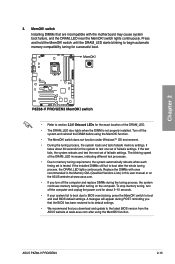
...Replace the DIMMs with the motherboard may cause system boot failure, and the DRAM_LED near the MemOK! function. ASUS P8Z68-V PRO/GEN3 2-15 switch until the DRAM_LED starts blinking to BIOS overclocking, press the MemOK! The blinking speed of failsafe settings. switch lights continuously. switch does not function under... reinstall the DIMM before using the MemOK! It takes about 30 seconds for the system to the latest BIOS version from the ASUS website at www.asus.com. • If you turn off the computer and replace DIMMs during POST reminding you download and...
...Replace the DIMMs with the motherboard may cause system boot failure, and the DRAM_LED near the MemOK! function. ASUS P8Z68-V PRO/GEN3 2-15 switch until the DRAM_LED starts blinking to BIOS overclocking, press the MemOK! The blinking speed of failsafe settings. switch lights continuously. switch does not function under... reinstall the DIMM before using the MemOK! It takes about 30 seconds for the system to the latest BIOS version from the ASUS website at www.asus.com. • If you turn off the computer and replace DIMMs during POST reminding you download and...

User Manual
Page 34
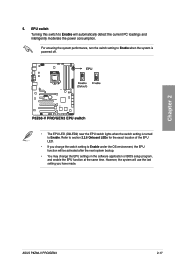
... you have made. 2-16 Chapter 2: Hardware information However, the system will use the TurboV and Auto Tuning feature in the TurboV EVO application, adjust the BIOS setup program, or enable the TPU switch at the same time. Refer to Enable. Chapter 2 4. For ensuring the system performance, turn the switch setting to...
... you have made. 2-16 Chapter 2: Hardware information However, the system will use the TurboV and Auto Tuning feature in the TurboV EVO application, adjust the BIOS setup program, or enable the TPU switch at the same time. Refer to Enable. Chapter 2 4. For ensuring the system performance, turn the switch setting to...
User Manual
Page 35
..., the system will automatically detect the current PC loadings and intelligently moderate the power consumption. ASUS P8Z68-V PRO/GEN3 2-17 Chapter 2 5. EPU switch Turning this switch to Enable will use the last setting you change the EPU settings in the software application or BIOS setup program, and enable the EPU function at the same time.
..., the system will automatically detect the current PC loadings and intelligently moderate the power consumption. ASUS P8Z68-V PRO/GEN3 2-17 Chapter 2 5. EPU switch Turning this switch to Enable will use the last setting you change the EPU settings in the software application or BIOS setup program, and enable the EPU function at the same time.
User Manual
Page 38
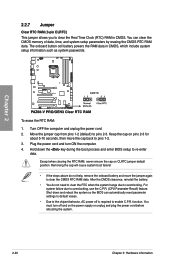
... unplug and plug the power cord before rebooting the system. 2-20 Chapter 2: Hardware information Shut down the key during the boot process and enter BIOS setup to re-enter data. Keep the cap on pins 2-3 for about 5-10 seconds, then move the jumper again to clear the CMOS RTC...passwords. Move the jumper cap from pins 1-2 (default) to overclocking, use the C.P.R. (CPU Parameter Recall) feature. Hold down and reboot the system so the BIOS can clear the CMOS memory of date, time, and system setup parameters by erasing the CMOS RTC RAM data. You can automatically reset parameter settings...
... unplug and plug the power cord before rebooting the system. 2-20 Chapter 2: Hardware information Shut down the key during the boot process and enter BIOS setup to re-enter data. Keep the cap on pins 2-3 for about 5-10 seconds, then move the jumper again to clear the CMOS RTC...passwords. Move the jumper cap from pins 1-2 (default) to overclocking, use the C.P.R. (CPU Parameter Recall) feature. Hold down and reboot the system so the BIOS can clear the CMOS memory of date, time, and system setup parameters by erasing the CMOS RTC RAM data. You can automatically reset parameter settings...
User Manual
Page 39
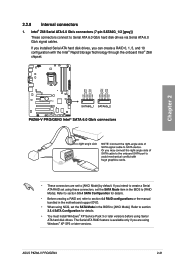
.../s hard disk drives via Serial ATA 6.0 Gb/s signal cables. If you installed Serial ATA hard disk drives, you are set the SATA Mode in the BIOS to [AHCI Mode] by default. 2.2.8 Internal connectors 1. The Serial ATA RAID feature is available only if you can create a RAID 0, 1, 5, and 10 configuration with... SATA Configuration for details. • You must install Windows® XP Service Pack 3 or later versions before using Windows® XP SP3 or later versions. ASUS P8Z68-V PRO/GEN3 2-21 Chapter 2 • These connectors are using Serial ATA hard disk drives.
.../s hard disk drives via Serial ATA 6.0 Gb/s signal cables. If you installed Serial ATA hard disk drives, you are set the SATA Mode in the BIOS to [AHCI Mode] by default. 2.2.8 Internal connectors 1. The Serial ATA RAID feature is available only if you can create a RAID 0, 1, 5, and 10 configuration with... SATA Configuration for details. • You must install Windows® XP Service Pack 3 or later versions before using Windows® XP SP3 or later versions. ASUS P8Z68-V PRO/GEN3 2-21 Chapter 2 • These connectors are using Serial ATA hard disk drives.

User Manual
Page 40
...Configuration for details. • You must install Windows® XP Service Pack 3 or later versions before using NCQ, please check the SATA Mode in the BIOS to [AHCI Mode] by default. Refer to section 3.5.4 SATA Configuration for details. • Before creating a RAID set, refer to section 4.4 RAID configurations...bundled in the motherboard support DVD. • When using Serial ATA hard disk drives. If you are set the SATA Mode item in the BIOS is available only if you intend to create a Serial ATA RAID set using Windows® XP SP3 or later versions. 2-22 Chapter 2: Hardware...
...Configuration for details. • You must install Windows® XP Service Pack 3 or later versions before using NCQ, please check the SATA Mode in the BIOS to [AHCI Mode] by default. Refer to section 3.5.4 SATA Configuration for details. • Before creating a RAID set, refer to section 4.4 RAID configurations...bundled in the motherboard support DVD. • When using Serial ATA hard disk drives. If you are set the SATA Mode item in the BIOS is available only if you intend to create a Serial ATA RAID set using Windows® XP SP3 or later versions. 2-22 Chapter 2: Hardware...
User Manual
Page 41
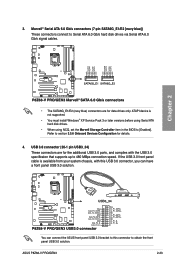
...When using NCQ, set the Marvell Storage Controller item in the BIOS to obtain the front panel USB 3.0 solution. Chapter 2 • The SATA6G_E1/E2 (navy blue) connectors are for data drives only. ASUS P8Z68-V PRO/GEN3 2-23 ATAPI device is available from your system chassis, with the... USB 3.0 specificaton that supports up to this USB 3.0 connector, you can have a front panel USB 3.0 solution. You can connect the ASUS front panel USB 3.0 bracket to...
...When using NCQ, set the Marvell Storage Controller item in the BIOS to obtain the front panel USB 3.0 solution. Chapter 2 • The SATA6G_E1/E2 (navy blue) connectors are for data drives only. ASUS P8Z68-V PRO/GEN3 2-23 ATAPI device is available from your system chassis, with the... USB 3.0 specificaton that supports up to this USB 3.0 connector, you can have a front panel USB 3.0 solution. You can connect the ASUS front panel USB 3.0 bracket to...

User Manual
Page 45
...;n�n�e��c�to��r,�s��e�t the Front Panel Type item in the BIOS setup to avail of the front panel audio I /O module that you want to connect an AC'97 front panel audio module to [AC97]. By default, this connector to [HD]; Chapter 2 ASUS P8Z68-V PRO/GEN3 2-27 9.
...;n�n�e��c�to��r,�s��e�t the Front Panel Type item in the BIOS setup to avail of the front panel audio I /O module that you want to connect an AC'97 front panel audio module to [AC97]. By default, this connector to [HD]; Chapter 2 ASUS P8Z68-V PRO/GEN3 2-27 9.
User Manual
Page 47
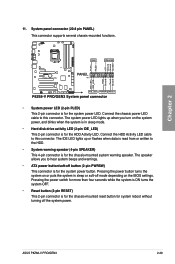
Connect the chassis power LED cable to hear system beeps and warnings. • ATX power button/soft-off the system power. ASUS P8Z68-V PRO/GEN3 2-29 The IDE LED lights up when you to this connector. The system power LED lights up or flashes when data is read from or ... power LED. Chapter 2 • System power LED (2-pin PLED) This 2-pin connector is for the system power button. The speaker allows you turn on the BIOS settings. Pressing the power button turns the system on or puts the system in sleep or soft-off mode depending on the system power, and...
Connect the chassis power LED cable to hear system beeps and warnings. • ATX power button/soft-off the system power. ASUS P8Z68-V PRO/GEN3 2-29 The IDE LED lights up when you to this connector. The system power LED lights up or flashes when data is read from or ... power LED. Chapter 2 • System power LED (2-pin PLED) This 2-pin connector is for the system power button. The speaker allows you turn on the BIOS settings. Pressing the power button turns the system on or puts the system in sleep or soft-off mode depending on the system power, and...

User Manual
Page 60
...; If you want to use the hot-plug function of the external SATA ports, you have to set the JMB Storage Controller item in the BIOS setting to section 3.5.6 Onboard Devices Configuration for details. 2-42 Chapter 2: Hardware information Optical S/PDIF Out port 5. External SATA port 8. Intel LAN (RJ-45) port 1** 7. USB...
...; If you want to use the hot-plug function of the external SATA ports, you have to set the JMB Storage Controller item in the BIOS setting to section 3.5.6 Onboard Devices Configuration for details. 2-42 Chapter 2: Hardware information Optical S/PDIF Out port 5. External SATA port 8. Intel LAN (RJ-45) port 1** 7. USB...

User Manual
Page 61
... two of the onboard VGA, DVI-D, and HDMI ports. Note that DVI-D/HDMI dual output works in OS environment only and that during POST or BIOS setup, only DVI-D output is a configuration example for VGA output. • This motherboard comes with multiple VGA output that your monitor does not support.... card on your motherboard, the system will automatically select the the add-on two monitors. Following is valid. • Due to enter Safe Mode. ASUS P8Z68-V PRO/GEN3 2-43 Refer to the next page for the system to return to its original setting or restart the system and press F8 to the Intel...
... two of the onboard VGA, DVI-D, and HDMI ports. Note that DVI-D/HDMI dual output works in OS environment only and that during POST or BIOS setup, only DVI-D output is a configuration example for VGA output. • This motherboard comes with multiple VGA output that your monitor does not support.... card on your motherboard, the system will automatically select the the add-on two monitors. Following is valid. • Due to enter Safe Mode. ASUS P8Z68-V PRO/GEN3 2-43 Refer to the next page for the system to return to its original setting or restart the system and press F8 to the Intel...
User Manual
Page 66
...continuous beep followed by three short beeps One continuous beep followed by four short beeps Description VGA detected Quick boot set to enter the BIOS Setup. At power on, hold down the key to disabled No keyboard detected No memory detected No VGA detected Hardware component failure 7.... Follow the instructions in the following order: a. After making all switches are running, the BIOS beeps (refer to green after the system LED turns on. Check the jumper settings and connections or call your monitor complies with ATX ...
...continuous beep followed by three short beeps One continuous beep followed by four short beeps Description VGA detected Quick boot set to enter the BIOS Setup. At power on, hold down the key to disabled No keyboard detected No memory detected No VGA detected Hardware component failure 7.... Follow the instructions in the following order: a. After making all switches are running, the BIOS beeps (refer to green after the system LED turns on. Check the jumper settings and connections or call your monitor complies with ATX ...


