User Manual
Page 7
...crossed out wheeled bin indicates that your power supply is broken, do not try to the correct voltage in municipal waste. DO NOT throw the mercury-containing button cell battery in our products at ASUS REACH website at http://csr.asus.com/english/REACH.htm. Safety information ...Electrical safety • To prevent electric shock hazard, disconnect the power cable from the system, ensure that all power cables are unplugged. •...
...crossed out wheeled bin indicates that your power supply is broken, do not try to the correct voltage in municipal waste. DO NOT throw the mercury-containing button cell battery in our products at ASUS REACH website at http://csr.asus.com/english/REACH.htm. Safety information ...Electrical safety • To prevent electric shock hazard, disconnect the power cable from the system, ensure that all power cables are unplugged. •...
User Manual
Page 11
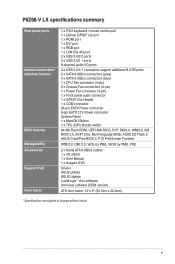
...P8Z68-V LX specifications summary Rear panel ports Internal connectors/ switches/ buttons BIOS features Manageability Accessories Support DVD Form factor 1 x PS/2 keyboard / mouse combo port 1 x Optical S/PDIF out port 1 x HDMI port 1 x DVI port 1 x RGB port 1 x LAN (RJ-45) port 2 x USB 3.0/2.0 ports 4 x USB 2.0/1.1 ports 8-channel audio I /O shield 1 x User Manual 1 x Support DVD Drivers ASUS utilities ASUS... 1 x Power Fan connector (3-pin) 1 x Front panel audio connector 1 x S/PDIF Out Header 1 x COM connector 24-pin EATX Power connector 8-pin EATX 12V Power connector System Panel 1 x MemOK!...
...P8Z68-V LX specifications summary Rear panel ports Internal connectors/ switches/ buttons BIOS features Manageability Accessories Support DVD Form factor 1 x PS/2 keyboard / mouse combo port 1 x Optical S/PDIF out port 1 x HDMI port 1 x DVI port 1 x RGB port 1 x LAN (RJ-45) port 2 x USB 3.0/2.0 ports 4 x USB 2.0/1.1 ports 8-channel audio I /O shield 1 x User Manual 1 x Support DVD Drivers ASUS utilities ASUS... 1 x Power Fan connector (3-pin) 1 x Front panel audio connector 1 x S/PDIF Out Header 1 x COM connector 24-pin EATX Power connector 8-pin EATX 12V Power connector System Panel 1 x MemOK!...
User Manual
Page 16
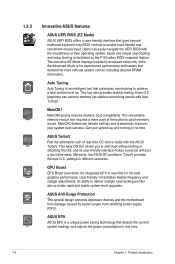
... MemOK! and its user-friendly interface makes overclock with the smoothness of their operating system. MemOK! ASUS TurboV Feel the adrenaline rush of the button to patch memory issues. Its ability to enable more intricate system control, including detailed DRAM information. ... O.C. Users can achieve extreme yet stable overclocking results with the ASUS TurboV. Quick and simple overclocking and setup sharing is a unique power saving technology that detects the current system loadings and adjusts the power consumption in real time. 1-4 Chapter 1: Product introduction MemOK!...
... MemOK! and its user-friendly interface makes overclock with the smoothness of their operating system. MemOK! ASUS TurboV Feel the adrenaline rush of the button to patch memory issues. Its ability to enable more intricate system control, including detailed DRAM information. ... O.C. Users can achieve extreme yet stable overclocking results with the ASUS TurboV. Quick and simple overclocking and setup sharing is a unique power saving technology that detects the current system loadings and adjusts the power consumption in real time. 1-4 Chapter 1: Product introduction MemOK!...
User Manual
Page 38
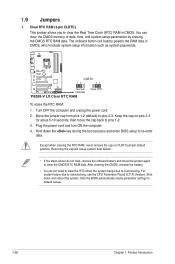
The onboard button cell battery powers the RAM data in CMOS. P8Z68-V LX CLRTC 12 23 Normal (Default) P8Z68-V LX Clear RTC RAM Clear RTC To erase the RTC RAM: 1. Removing the cap will cause system boot failure! • If the steps above do not... CLRTC jumper default position. Shut down the key during the boot process and enter BIOS setup to overclocking. Turn OFF the computer and unplug the power cord. 2. For system failure due to default values. 1-26 Chapter 1: Product introduction 1.9 Jumpers 1. Clear RTC RAM (3-pin CLRTC) This jumper allows you to pins 2-3. ...
The onboard button cell battery powers the RAM data in CMOS. P8Z68-V LX CLRTC 12 23 Normal (Default) P8Z68-V LX Clear RTC RAM Clear RTC To erase the RTC RAM: 1. Removing the cap will cause system boot failure! • If the steps above do not... CLRTC jumper default position. Shut down the key during the boot process and enter BIOS setup to overclocking. Turn OFF the computer and unplug the power cord. 2. For system failure due to default values. 1-26 Chapter 1: Product introduction 1.9 Jumpers 1. Clear RTC RAM (3-pin CLRTC) This jumper allows you to pins 2-3. ...

User Manual
Page 46
... PLED+ PLED+5V Ground Ground Speaker P8Z68-V LX PANEL PIN 1 IDE_LED+ IDE_LED- Connect the chassis power LED cable to this connector. The system power LED lights up or flashes when data is read from or written to hear system beeps and warnings. • ATX power button/soft-off the system power. 1-34 Chapter 1: Product introduction The IDE...
... PLED+ PLED+5V Ground Ground Speaker P8Z68-V LX PANEL PIN 1 IDE_LED+ IDE_LED- Connect the chassis power LED cable to this connector. The system power LED lights up or flashes when data is read from or written to hear system beeps and warnings. • ATX power button/soft-off the system power. 1-34 Chapter 1: Product introduction The IDE...
User Manual
Page 57
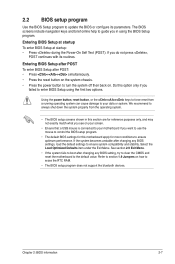
... or system. Do this motherboard apply for this option only if you do not press , POST continues with its parameters. Using the power button, reset button, or the ++ keys to force reset from the operating system. • The BIOS setup screens shown in using the first two options...back on. Entering BIOS Setup after POST To enter BIOS Setup after POST: • Press ++ simultaneously. • Press the reset button on the system chassis. • Press the power button to update the BIOS or configure its routines. Select the Load Optimized Defaults item under the Exit Menu.
... or system. Do this motherboard apply for this option only if you do not press , POST continues with its parameters. Using the power button, reset button, or the ++ keys to force reset from the operating system. • The BIOS setup screens shown in using the first two options...back on. Entering BIOS Setup after POST To enter BIOS Setup after POST: • Press ++ simultaneously. • Press the reset button on the system chassis. • Press the power button to update the BIOS or configure its routines. Select the Load Optimized Defaults item under the Exit Menu.
User Manual
Page 58
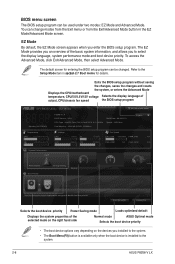
... Advanced Mode. The EZ Mode provides you to the system. 2-8 ASUS P8Z68-V LX EZ Mode By default, the EZ Mode screen appears when you installed to the system. • The Boot Menu(F8) button is available only when the boot device is installed to select the ...Power Saving mode Loads optimized default Displays the system properties of the selected mode on the right hand side Normal mode ASUS Optimal mode Selects the boot device priority • The boot device options vary depending on the devices you enter the BIOS setup program. EZ Mode Monday [12/27/2010] P8Z68-V LX...
... Advanced Mode. The EZ Mode provides you to the system. 2-8 ASUS P8Z68-V LX EZ Mode By default, the EZ Mode screen appears when you installed to the system. • The Boot Menu(F8) button is available only when the boot device is installed to select the ...Power Saving mode Loads optimized default Displays the system properties of the selected mode on the right hand side Normal mode ASUS Optimal mode Selects the boot device priority • The boot device options vary depending on the devices you enter the BIOS setup program. EZ Mode Monday [12/27/2010] P8Z68-V LX...
User Manual
Page 59
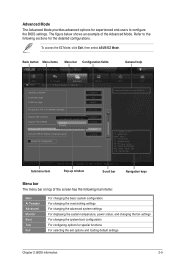
...bar Navigation keys Menu bar The menu bar on top of the Advanced Mode. Back button Menu items Menu bar Configuration fields EFI BIOS Utility - F1: General Help F2: ...Express x16_2 slot (Black) bandwidth 2,0,1,1 x2... To access the EZ Mode, click Exit, then select ASUS EZ Mode. Advanced Mode The Advanced Mode provides advanced options for experienced end-users to the following main...changing the advanced system settings For displaying the system temperature, power status, and changing the fan settings For changing the system boot configuration For configuring options for the...
...bar Navigation keys Menu bar The menu bar on top of the Advanced Mode. Back button Menu items Menu bar Configuration fields EFI BIOS Utility - F1: General Help F2: ...Express x16_2 slot (Black) bandwidth 2,0,1,1 x2... To access the EZ Mode, click Exit, then select ASUS EZ Mode. Advanced Mode The Advanced Mode provides advanced options for experienced end-users to the following main...changing the advanced system settings For displaying the system temperature, power status, and changing the fan settings For changing the system boot configuration For configuring options for the...


