
User Manual
Page 5
Contents 4.3.6 ASUS FAN Xpert 4-11 4.3.7 ASUS Probe II 4-12 4.3.8 Audio configurations 4-13 4.4 RAID configurations 4-14 4.4.1 RAID definitions 4-14 4.4.2 Installing Serial ATA hard disks 4-15 4.4.3 Setting the RAID item in BIOS 4-15 4.4.4 Intel® Rapid Storage Technology Option ROM utility 4-15 4.5 Creating a RAID driver disk 4-19 4.5.1 Creating a RAID driver disk without entering the OS 4-19 4.5.2 Creating...
Contents 4.3.6 ASUS FAN Xpert 4-11 4.3.7 ASUS Probe II 4-12 4.3.8 Audio configurations 4-13 4.4 RAID configurations 4-14 4.4.1 RAID definitions 4-14 4.4.2 Installing Serial ATA hard disks 4-15 4.4.3 Setting the RAID item in BIOS 4-15 4.4.4 Intel® Rapid Storage Technology Option ROM utility 4-15 4.5 Creating a RAID driver disk 4-19 4.5.1 Creating a RAID driver disk without entering the OS 4-19 4.5.2 Creating...
User Manual
Page 12
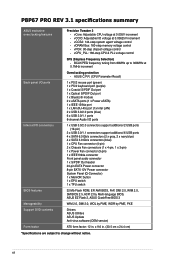
...up to change without notice. vCCSA: 144-step system agent voltage control - vCPU_PLL: 160-step CPU & PLL voltage control SFS (Stepless Frequency Selection) - ASUS C.P.R. (CPU Parameter Recall) 1 x PS/2 mouse port (green) 1 x PS/2 keyboard port (purple) 1 x Coaxial S/PDIF Out port 1 ...ASUS EZ Flash 2, ASUS CrashFree BIOS 3 WfM 2.0, DMI 2.0, WOL by PME, WOR by PME, PXE Drivers ASUS Utilities ASUS Update Anti-virus software (OEM version) ATX form factor: 12 in . (30.5 cm x 24.4 cm) *Specifications are subject to 300MHz at 0.005V increment - P8P67 PRO REV 3.1 specifications summary ASUS...
...up to change without notice. vCCSA: 144-step system agent voltage control - vCPU_PLL: 160-step CPU & PLL voltage control SFS (Stepless Frequency Selection) - ASUS C.P.R. (CPU Parameter Recall) 1 x PS/2 mouse port (green) 1 x PS/2 keyboard port (purple) 1 x Coaxial S/PDIF Out port 1 ...ASUS EZ Flash 2, ASUS CrashFree BIOS 3 WfM 2.0, DMI 2.0, WOL by PME, WOR by PME, PXE Drivers ASUS Utilities ASUS Update Anti-virus software (OEM version) ATX form factor: 12 in . (30.5 cm x 24.4 cm) *Specifications are subject to 300MHz at 0.005V increment - P8P67 PRO REV 3.1 specifications summary ASUS...
User Manual
Page 61
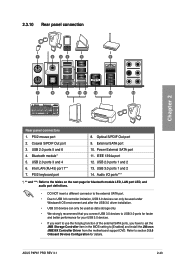
... • Due to USB 3.0 controller limitation, USB 3.0 devices can only be used under Windows® OS environment and after the USB 3.0 driver installation. • USB 3.0 devices can only be used as data storage only. • We strongly recommend that you have to set the ...plug function of the external SATA ports, you connect USB 3.0 devices to [Enabled] and install the JMicron JMB36X Controller Driver from the motherboard support DVD. Coaxial S/PDIF Out port 3. External SATA port 10. USB 3.0 ports 1 and 2 14. PS/2 mouse port 2. Bluetooth module* 5. ASUS P8P67 PRO REV 3.1 2-43
... • Due to USB 3.0 controller limitation, USB 3.0 devices can only be used under Windows® OS environment and after the USB 3.0 driver installation. • USB 3.0 devices can only be used as data storage only. • We strongly recommend that you have to set the ...plug function of the external SATA ports, you connect USB 3.0 devices to [Enabled] and install the JMicron JMB36X Controller Driver from the motherboard support DVD. Coaxial S/PDIF Out port 3. External SATA port 10. USB 3.0 ports 1 and 2 14. PS/2 mouse port 2. Bluetooth module* 5. ASUS P8P67 PRO REV 3.1 2-43
User Manual
Page 83
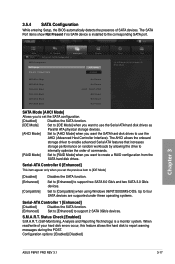
... S.M.A.R.T. (Self-Monitoring, Analysis and Reporting Technology) is installed to the corresponding SATA port. Configuration options: [Enabled] [Disabled] Chapter 3 ASUS P8P67 PRO REV 3.1 3-17 Set to [IDE Mode] [Disabled] [Enhanced] [Compatible] Disables the SATA function. The SATA Port items show Not ...Advanced Advanced\ SATA Configuration > Monitor SATA Configuration SATA Mode AHCI Mode S.M.A.R.T. The AHCI allows the onboard storage driver to enable advanced Serial ATA features that increases storage performance on random workloads by allowing the drive to internally...
... S.M.A.R.T. (Self-Monitoring, Analysis and Reporting Technology) is installed to the corresponding SATA port. Configuration options: [Enabled] [Disabled] Chapter 3 ASUS P8P67 PRO REV 3.1 3-17 Set to [IDE Mode] [Disabled] [Enhanced] [Compatible] Disables the SATA function. The SATA Port items show Not ...Advanced Advanced\ SATA Configuration > Monitor SATA Configuration SATA Mode AHCI Mode S.M.A.R.T. The AHCI allows the onboard storage driver to enable advanced Serial ATA features that increases storage performance on random workloads by allowing the drive to internally...
User Manual
Page 86
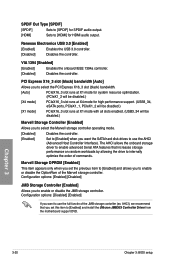
... SATA hard disk drives to enable or disable the OptionRom of the Marvell storage controller. The AHCI allows the onboard storage driver to enable advanced Serial ATA features that you to [HDMI] for HDMI audio output. AHCI), we recommend that increases storage... performance on random workloads by allowing the drive to [Enabled] and install the JMicron JMB36X Controller Driver from the motherboard support DVD. VIA 1394 [Enabled] [Enabled] Enables the onboard IEEE 1394a controller. [Disabled] Disables the controller. Configuration ...
... SATA hard disk drives to enable or disable the OptionRom of the Marvell storage controller. The AHCI allows the onboard storage driver to enable advanced Serial ATA features that you to [HDMI] for HDMI audio output. AHCI), we recommend that increases storage... performance on random workloads by allowing the drive to [Enabled] and install the JMicron JMB36X Controller Driver from the motherboard support DVD. VIA 1394 [Enabled] [Enabled] Enables the onboard IEEE 1394a controller. [Disabled] Disables the controller. Configuration ...
User Manual
Page 105
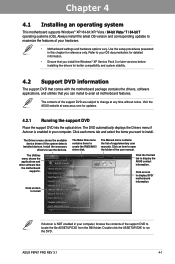
... better compatibility and system stability. 4.2 Support DVD information The support DVD that comes with the motherboard package contains the drivers, software applications, and utilities that the motherboard supports. ASUS P8P67 PRO REV 3.1 4-1 Visit the ASUS website at any time without notice. Click an item to open the folder of the support DVD are subject to...
... better compatibility and system stability. 4.2 Support DVD information The support DVD that comes with the motherboard package contains the drivers, software applications, and utilities that the motherboard supports. ASUS P8P67 PRO REV 3.1 4-1 Visit the ASUS website at any time without notice. Click an item to open the folder of the support DVD are subject to...
User Manual
Page 107
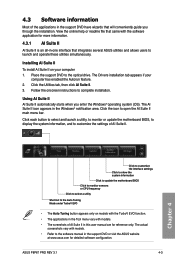
Click the Utilities tab, then click AI Suite II. 3. ASUS P8P67 PRO REV 3.1 4-3 4.3 Software information Most of AI Suite II. View the...4.3.1 AI Suite II AI Suite II is an all-in the support DVD have wizards that integrates several ASUS utilities and allows users to the software manual in the Windows® notification area. Click each button to..., to monitor or update the motherboard BIOS, to display the system information, and to complete installation. The Drivers installation tab appears if your computer 1. Using AI Suite II AI Suite II automatically starts when you through ...
Click the Utilities tab, then click AI Suite II. 3. ASUS P8P67 PRO REV 3.1 4-3 4.3 Software information Most of AI Suite II. View the...4.3.1 AI Suite II AI Suite II is an all-in the support DVD have wizards that integrates several ASUS utilities and allows users to the software manual in the Windows® notification area. Click each button to..., to monitor or update the motherboard BIOS, to display the system information, and to complete installation. The Drivers installation tab appears if your computer 1. Using AI Suite II AI Suite II automatically starts when you through ...
User Manual
Page 117
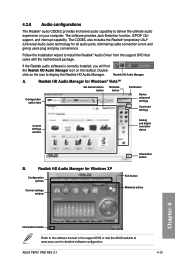
...™ Set default device button Minimize button Configuration option tabs Exit button Device advanced settings Connector settings Control settings window Analog and digital connector status B. ASUS P8P67 PRO REV 3.1 4-13 If the Realtek audio software is correctly installed, you will find the Realtek HD Audio Manager icon on your computer. Realtek HD Audio... for all audio ports, eliminating cable connection errors and giving users plug and play convenience. click on the icon to install the Realtek® Audio Driver from the support DVD that came with the motherboard package.
...™ Set default device button Minimize button Configuration option tabs Exit button Device advanced settings Connector settings Control settings window Analog and digital connector status B. ASUS P8P67 PRO REV 3.1 4-13 If the Realtek audio software is correctly installed, you will find the Realtek HD Audio Manager icon on your computer. Realtek HD Audio... for all audio ports, eliminating cable connection errors and giving users plug and play convenience. click on the icon to install the Realtek® Audio Driver from the support DVD that came with the motherboard package.
User Manual
Page 118
...software directs all the benefits of three identical hard disk drives for this setup. If one drive to section 4.5 Creating a RAID driver disk for transaction processing, relational database applications, enterprise resource planning, and other drive. Use two new drives or use an existing ... 2TB can only be calculated and written. This RAID configuration provides data protection and increases fault tolerance to create a RAID driver disk and load the RAID driver during OS installation. RAID 5 stripes both RAID 0 and RAID 1 configurations. The new drive must install Windows® ...
...software directs all the benefits of three identical hard disk drives for this setup. If one drive to section 4.5 Creating a RAID driver disk for transaction processing, relational database applications, enterprise resource planning, and other drive. Use two new drives or use an existing ... 2TB can only be calculated and written. This RAID configuration provides data protection and increases fault tolerance to create a RAID driver disk and load the RAID driver during OS installation. RAID 5 stripes both RAID 0 and RAID 1 configurations. The new drive must install Windows® ...
User Manual
Page 123
... enter the BIOS setup utility. 3. Select USB floppy disk drive as the primary boot device. 4. 4.5 Creating a RAID driver disk A floppy disk with the RAID driver is required when installing a Windows® operating system on a hard disk drive that is included in Windows®: 1....the process. 4.5.2 Creating a RAID driver disk in Windows® To create a RAID driver disk in a RAID set. • The motherboard does not provide a floppy drive connector. Insert a formatted floppy disk into the USB floppy disk drive, then press . 8. Chapter 4 ASUS P8P67 PRO REV 3.1 4-19 Plug the USB...
... enter the BIOS setup utility. 3. Select USB floppy disk drive as the primary boot device. 4. 4.5 Creating a RAID driver disk A floppy disk with the RAID driver is required when installing a Windows® operating system on a hard disk drive that is included in Windows®: 1....the process. 4.5.2 Creating a RAID driver disk in Windows® To create a RAID driver disk in a RAID set. • The motherboard does not provide a floppy drive connector. Insert a formatted floppy disk into the USB floppy disk drive, then press . 8. Chapter 4 ASUS P8P67 PRO REV 3.1 4-19 Plug the USB...
User Manual
Page 124
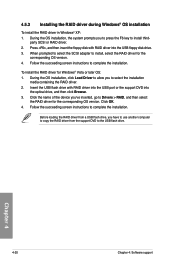
...Browse. 3. Chapter 4 4-20 Chapter 4: Software support Click OK. 4. To install the RAID driver for the corresponding OS version. Follow the succeeding screen instructions to select the installation media containing the RAID driver. 2. When prompted to select the SCSI adapter to the USB flash drive. Before loading the ...Click the name of the device you to press the F6 key to install third- Press , and then insert the floppy disk with RAID driver into the USB port or the support DVD into the USB floppy disk drive. 3. During the OS installation, the system prompts you 've...
...Browse. 3. Chapter 4 4-20 Chapter 4: Software support Click OK. 4. To install the RAID driver for the corresponding OS version. Follow the succeeding screen instructions to select the installation media containing the RAID driver. 2. When prompted to select the SCSI adapter to the USB flash drive. Before loading the ...Click the name of the device you to press the F6 key to install third- Press , and then insert the floppy disk with RAID driver into the USB port or the support DVD into the USB floppy disk drive. 3. During the OS installation, the system prompts you 've...
User Manual
Page 125
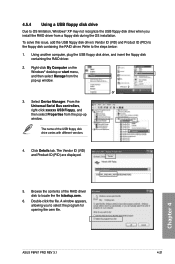
... floppy disk containing the RAID driver. To solve this issue, add the USB floppy disk drive's Vendor ID (VID) and Product ID (PID) to the steps below: 1. Browse the contents of the USB floppy disk drive varies with different vendors. 4. Chapter 4 ASUS P8P67 PRO REV 3.1 4-21 Right-click... My Computer on the Windows® desktop or start menu, and then select Manage from the pop-up window. The name of the RAID driver disk to locate the file txtsetup.oem. 6. 4.5.4 Using ...
... floppy disk containing the RAID driver. To solve this issue, add the USB floppy disk drive's Vendor ID (VID) and Product ID (PID) to the steps below: 1. Browse the contents of the USB floppy disk drive varies with different vendors. 4. Chapter 4 ASUS P8P67 PRO REV 3.1 4-21 Right-click... My Computer on the Windows® desktop or start menu, and then select Manage from the pop-up window. The name of the RAID driver disk to locate the file txtsetup.oem. 6. 4.5.4 Using ...

User Manual
Page 127
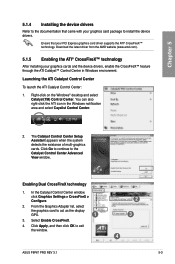
...For Windows Vista, select Uninstall. 5. Close all existing graphics card drivers before installing ATI CrossFireX graphics cards to your graphics card driver supports the ATI CrossFireX technology. To uninstall existing graphics card drivers: 1. For Windows XP, select Add/Remove. Download the latest driver from the AMD website (www.amd.com). • Ensure that... > Add/Remove Programs. For Windows Vista, go to install multi-graphics processing units (GPU) graphics cards. Turn off your current graphics card driver/s. 4. ASUS P8P67 PRO REV 3.1 5-1 Select your computer.
...For Windows Vista, select Uninstall. 5. Close all existing graphics card drivers before installing ATI CrossFireX graphics cards to your graphics card driver supports the ATI CrossFireX technology. To uninstall existing graphics card drivers: 1. For Windows XP, select Add/Remove. Download the latest driver from the AMD website (www.amd.com). • Ensure that... > Add/Remove Programs. For Windows Vista, go to install multi-graphics processing units (GPU) graphics cards. Turn off your current graphics card driver/s. 4. ASUS P8P67 PRO REV 3.1 5-1 Select your computer.
User Manual
Page 129
... card to the Catalyst Control Center Advanced View window. Click Apply, and then click OK to install the device drivers. Ensure that came with your graphics card package to exit the window. 2 3 4 ASUS P8P67 PRO REV 3.1 5-3 Launching the ATI Catalyst Control Center To launch the ATI Catalyst Control Center: 1. In the Catalyst Control Center...
... card to the Catalyst Control Center Advanced View window. Click Apply, and then click OK to install the device drivers. Ensure that came with your graphics card package to exit the window. 2 3 4 ASUS P8P67 PRO REV 3.1 5-3 Launching the ATI Catalyst Control Center To launch the ATI Catalyst Control Center: 1. In the Catalyst Control Center...
User Manual
Page 130
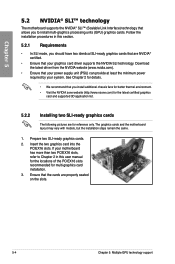
...PCIEX16 slots. The graphics cards and the motherboard layout may vary with models, but the installation steps remain the same. 1. Download the latest driver from the NVIDIA website (www.nvidia.com). • Ensure that you install additional chassis fans for better thermal environment. • Visit ... technology that allows you should have two identical SLI-ready graphics cards that are NVIDIA® certified. • Ensure that your graphics card driver supports the NVIDIA SLI technology. See Chapter 2 for details. • We recommend that your power supply unit (PSU) can provide at ...
...PCIEX16 slots. The graphics cards and the motherboard layout may vary with models, but the installation steps remain the same. 1. Download the latest driver from the NVIDIA website (www.nvidia.com). • Ensure that you install additional chassis fans for better thermal environment. • Visit ... technology that allows you should have two identical SLI-ready graphics cards that are NVIDIA® certified. • Ensure that your graphics card driver supports the NVIDIA SLI technology. See Chapter 2 for details. • We recommend that your power supply unit (PSU) can provide at ...
User Manual
Page 131
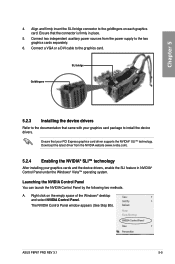
...each graphics card. Ensure that your PCI Express graphics card driver supports the NVIDIA® SLI™ technology. Download the latest driver from the power supply to the two graphics cards separately. 6. A. ASUS P8P67 PRO REV 3.1 5-5 Align and firmly insert the SLI bridge connector... to install the device drivers. Connect two independent auxiliary power sources from the NVIDIA...
...each graphics card. Ensure that your PCI Express graphics card driver supports the NVIDIA® SLI™ technology. Download the latest driver from the power supply to the two graphics cards separately. 6. A. ASUS P8P67 PRO REV 3.1 5-5 Align and firmly insert the SLI bridge connector... to install the device drivers. Connect two independent auxiliary power sources from the NVIDIA...


