
User Manual
Page 15
...reality with just a few clicks away. This easy OC tool allows you to patch memory issues. ASUS P8H61-M PRO 1-3 MemOK! User-friendly UI facilitates flexible frequency and voltage adjustments. Innovative ASUS features ASUS EFI BIOS (EZ Mode) ASUS brand new EFI BIOS offers a user-friendly interface that... and stable system-level upgrades. Its ability to enable more intricate system settings. ASUS EPU ASUS EPU is for durability, improved lifespan, and enhanced thermal capacity. ASUS TurboV Feel the adrenaline rush of the button to overclock without exiting or rebooting ...
...reality with just a few clicks away. This easy OC tool allows you to patch memory issues. ASUS P8H61-M PRO 1-3 MemOK! User-friendly UI facilitates flexible frequency and voltage adjustments. Innovative ASUS features ASUS EFI BIOS (EZ Mode) ASUS brand new EFI BIOS offers a user-friendly interface that... and stable system-level upgrades. Its ability to enable more intricate system settings. ASUS EPU ASUS EPU is for durability, improved lifespan, and enhanced thermal capacity. ASUS TurboV Feel the adrenaline rush of the button to overclock without exiting or rebooting ...

User Manual
Page 16
... the RTC data. All in one simple to use functions, with mobile devices via Bluetooth. ASUS CrashFree BIOS 3 ASUS CrashFree BIOS 3 is a utility that contains the latest BIOS file. ASUS EZ Flash 2 ASUS EZ Flash 2 is an auto-recovery tool that allows you to restore a corrupted BIOS file using the bundled support DVD or USB...
... the RTC data. All in one simple to use functions, with mobile devices via Bluetooth. ASUS CrashFree BIOS 3 ASUS CrashFree BIOS 3 is a utility that contains the latest BIOS file. ASUS EZ Flash 2 ASUS EZ Flash 2 is an auto-recovery tool that allows you to restore a corrupted BIOS file using the bundled support DVD or USB...

User Manual
Page 23
... assembly comes in a push-pin design and requires no tool to secure the heatsink and fan assembly in place. To install the CPU heatsink and fan: A 1. A B 1 1 B A The type of the installed CPU, ensuring that the four fasteners match the holes on the motherboard. ASUS P8H61-M PRO 1-11 B B Orient the heatsink and fan assembly A such...
... assembly comes in a push-pin design and requires no tool to secure the heatsink and fan assembly in place. To install the CPU heatsink and fan: A 1. A B 1 1 B A The type of the installed CPU, ensuring that the four fasteners match the holes on the motherboard. ASUS P8H61-M PRO 1-11 B B Orient the heatsink and fan assembly A such...

User Manual
Page 46
... [Up/Down/PageUp/PageDown/Home/End] Move [Esc] Exit [F2] Backup 2-2 ASUS P8H61-M PRO Before you to update the BIOS without using an OS‑based utility. Follow the onscreen instructions to avail all its features. Go to the Tool menu to select ASUS EZ Flash Utility and press to the USB port. 2. Always update...
... [Up/Down/PageUp/PageDown/Home/End] Move [Esc] Exit [F2] Backup 2-2 ASUS P8H61-M PRO Before you to update the BIOS without using an OS‑based utility. Follow the onscreen instructions to avail all its features. Go to the Tool menu to select ASUS EZ Flash Utility and press to the USB port. 2. Always update...
User Manual
Page 47
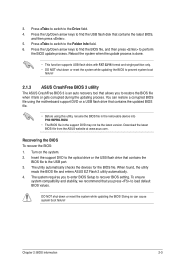
...updating process. DO NOT shut down or reset the system while updating the BIOS to prevent system boot failure! 2.1.3 ASUS CrashFree BIOS 3 utility The ASUS CrashFree BIOS 3 is an auto recovery tool that allows you to the optical drive or the USB flash drive that contains the updated BIOS file. • .../Down arrow keys to find the BIOS file, and then press to the USB port. 3. When found, the utility reads the BIOS file and enters ASUS EZ Flash 2 utility automatically. 4. Press to switch to the Drive field. 4. Turn on the system. 2. You can cause system boot failure! Press the...
...updating process. DO NOT shut down or reset the system while updating the BIOS to prevent system boot failure! 2.1.3 ASUS CrashFree BIOS 3 utility The ASUS CrashFree BIOS 3 is an auto recovery tool that allows you to the optical drive or the USB flash drive that contains the updated BIOS file. • .../Down arrow keys to find the BIOS file, and then press to the USB port. 3. When found, the utility reads the BIOS file and enters ASUS EZ Flash 2 utility automatically. 4. Press to switch to the Drive field. 4. Turn on the system. 2. You can cause system boot failure! Press the...

User Manual
Page 53
...Ratio Auto Intel Adaptive Thermal Monitor Enabled Active Processor Cores All Limit CPUID Maximum Disabled Execute Disable Bit Enabled Intel Virtualization Technology Disabled Boot Tool Includes TM1, TM2 and EMTTM →←: Select Screen ↑↓: Select Item Enter: Select +/-: Change Opt. Copyright (C) ...Optimized Defaults F10: Save ESC: Exit Menu items Version 2.00.1201. To access the EZ Mode, click Exit, then select ASUS EZ Mode. Advanced Mode The Advanced Mode provides advanced options for experienced end-users to the following main items: Main Ai ...
...Ratio Auto Intel Adaptive Thermal Monitor Enabled Active Processor Cores All Limit CPUID Maximum Disabled Execute Disable Bit Enabled Intel Virtualization Technology Disabled Boot Tool Includes TM1, TM2 and EMTTM →←: Select Screen ↑↓: Select Item Enter: Select +/-: Change Opt. Copyright (C) ...Optimized Defaults F10: Save ESC: Exit Menu items Version 2.00.1201. To access the EZ Mode, click Exit, then select ASUS EZ Mode. Advanced Mode The Advanced Mode provides advanced options for experienced end-users to the following main items: Main Ai ...

User Manual
Page 54
... display the other items (Ai Tweaker, Advanced, Monitor, Boot, Tool, and Exit) on any menu screen means that do not fit on the right side of the field opposite the item. Navigation keys At the bottom right corner of options. 2-10 ASUS P8H61-M PRO General help At the top right corner of the menu...
... display the other items (Ai Tweaker, Advanced, Monitor, Boot, Tool, and Exit) on any menu screen means that do not fit on the right side of the field opposite the item. Navigation keys At the bottom right corner of options. 2-10 ASUS P8H61-M PRO General help At the top right corner of the menu...

User Manual
Page 55
... Memory Speed 1024 MB 800 MHz System Language English System Date System Time Access Level [Thu 01/20/2011] [16:46:15] Administrator > Security Boot Tool Choose the system default language →←: Select Screen ↑↓: Select Item Enter: Select +/-: Change Opt. 2.3.1 System Language [English] Allows you to clear the...
... Memory Speed 1024 MB 800 MHz System Language English System Date System Time Access Level [Thu 01/20/2011] [16:46:15] Administrator > Security Boot Tool Choose the system default language →←: Select Screen ↑↓: Select Item Enter: Select +/-: Change Opt. 2.3.1 System Language [English] Allows you to clear the...

User Manual
Page 57
... Timing Control > CPU Power Management CPU Offset Mode Sign + CPU Voltage 1.165V Auto iGPU Offset Mode Sign + iGPU Voltage Auto DRAM Voltage 1.500v Auto Boot Tool [X.M.P.] When XMP is enabled BCLK frequency, CPU ratio and memory parameters will be auto optimized. →←: Select Screen ↑↓: Select Item Enter: Select...
... Timing Control > CPU Power Management CPU Offset Mode Sign + CPU Voltage 1.165V Auto iGPU Offset Mode Sign + iGPU Voltage Auto DRAM Voltage 1.500v Auto Boot Tool [X.M.P.] When XMP is enabled BCLK frequency, CPU ratio and memory parameters will be auto optimized. →←: Select Screen ↑↓: Select Item Enter: Select...

User Manual
Page 61
..., Inc. Advanced Mode Exit Main Ai Tweaker > CPU Configuration > System Agent Configuration > PCH Configuration > SATA Configuration > USB Configuration > Onboard Devices Configuration > APM Advanced Monitor Boot Tool CPU Configuration Parameters →←: Select Screen ↑↓: Select Item Enter: Select +/-: Change Opt. 2.5 Advanced menu The Advanced menu items allow you to malfunction...
..., Inc. Advanced Mode Exit Main Ai Tweaker > CPU Configuration > System Agent Configuration > PCH Configuration > SATA Configuration > USB Configuration > Onboard Devices Configuration > APM Advanced Monitor Boot Tool CPU Configuration Parameters →←: Select Screen ↑↓: Select Item Enter: Select +/-: Change Opt. 2.5 Advanced menu The Advanced menu items allow you to malfunction...

User Manual
Page 68
...Standard Chassis Q-Fan Control Enabled Chassis Fan Speed Low Limit 600 RPM Chassis Fan Profile Standard CPU Voltage +1.216 V 3.3V Voltage +3.328 V Boot CPU Temperature Tool →←: Select Screen ↑↓: Select Item Enter: Select +/-: Change Opt. Copyright (C) 2010 American Megatrends, Inc. F1: General Help F2: Previous... items: 5V Voltage +5.160 V 12V Voltage +12.000 V Anti Surge Support Enabled Version 2.00.1201. Copyright (C) 2010 American Megatrends, Inc. 2-24 ASUS P8H61-M PRO Scroll down to change the fan settings. EFI BIOS Utility -
...Standard Chassis Q-Fan Control Enabled Chassis Fan Speed Low Limit 600 RPM Chassis Fan Profile Standard CPU Voltage +1.216 V 3.3V Voltage +3.328 V Boot CPU Temperature Tool →←: Select Screen ↑↓: Select Item Enter: Select +/-: Change Opt. Copyright (C) 2010 American Megatrends, Inc. F1: General Help F2: Previous... items: 5V Voltage +5.160 V 12V Voltage +12.000 V Anti Surge Support Enabled Version 2.00.1201. Copyright (C) 2010 American Megatrends, Inc. 2-24 ASUS P8H61-M PRO Scroll down to change the fan settings. EFI BIOS Utility -

User Manual
Page 71
..., Inc. 2.7.1 [On] [Off] Bootup NumLock State [On] Sets the power-on state of the NumLock to use the ASUS MyLogo 2™ feature. Set this item to [Enabled] to [On]. Advanced Mode Exit Main Ai Tweaker Advanced Monitor Bootup NumLock... Option Priorities Boot Option #1 Boot Option #2 SATA: xxxxxxx SATA: xxxxxxx Boot Override > SATA: xxxxxxxxxxxx > SATA: xxxxxxxxxxxx > Hard Drive BBS Priorities Boot Tool Select the keyboard NumLock state →←: Select Screen ↑↓: Select Item Enter: Select +/-: Change Opt. Configuration options: [1 sec] [2 sec...
..., Inc. 2.7.1 [On] [Off] Bootup NumLock State [On] Sets the power-on state of the NumLock to use the ASUS MyLogo 2™ feature. Set this item to [Enabled] to [On]. Advanced Mode Exit Main Ai Tweaker Advanced Monitor Bootup NumLock... Option Priorities Boot Option #1 Boot Option #2 SATA: xxxxxxx SATA: xxxxxxx Boot Override > SATA: xxxxxxxxxxxx > SATA: xxxxxxxxxxxx > Hard Drive BBS Priorities Boot Tool Select the keyboard NumLock state →←: Select Screen ↑↓: Select Item Enter: Select +/-: Change Opt. Configuration options: [1 sec] [2 sec...

User Manual
Page 73
... The Tools menu items allow you update the BIOS file only coming from one to eight, press , and then select Yes. Select an item then press to section 2.1.2 ASUS EZ Flash 2. 2.8.2 ASUS SPD Information DIMM Slot # [Slot 1] Displays the Serial Presence Detect (SPD) ...information of the DIMM module installed on the selected slot. Advanced Mode Exit Main Ai Tweaker Advanced Monitor Boot Tool > ASUS EZ Flash Utility > ASUS SPD Information > ASUS O.C. The Setup...
... The Tools menu items allow you update the BIOS file only coming from one to eight, press , and then select Yes. Select an item then press to section 2.1.2 ASUS EZ Flash 2. 2.8.2 ASUS SPD Information DIMM Slot # [Slot 1] Displays the Serial Presence Detect (SPD) ...information of the DIMM module installed on the selected slot. Advanced Mode Exit Main Ai Tweaker Advanced Monitor Boot Tool > ASUS EZ Flash Utility > ASUS SPD Information > ASUS O.C. The Setup...