
User Manual
Page 4
... time 2-42 2.11 Turning off the computer 2-42 Chapter 3: BIOS setup 3.1 Knowing BIOS 3-1 3.2 Updating BIOS 3-1 3.2.1 ASUS Update utility 3-1 3.2.2 ASUS EZ Flash 2 utility 3-5 3.2.3 ASUS CrashFree BIOS 3 utility 3-6 3.3 BIOS setup program 3-6 Entering BIOS Setup at startup 3-6 Entering BIOS Setup after POST 3-6 3.3.1 BIOS menu screen 3-7 3.3.2 Menu bar 3-7 3.3.3 Navigation keys 3-8 3.3.4 Menu items 3-8 3.3.5 Submenu items 3-8 3.3.6 Configuration fields 3-8 3.3.7 Pop-up...
... time 2-42 2.11 Turning off the computer 2-42 Chapter 3: BIOS setup 3.1 Knowing BIOS 3-1 3.2 Updating BIOS 3-1 3.2.1 ASUS Update utility 3-1 3.2.2 ASUS EZ Flash 2 utility 3-5 3.2.3 ASUS CrashFree BIOS 3 utility 3-6 3.3 BIOS setup program 3-6 Entering BIOS Setup at startup 3-6 Entering BIOS Setup after POST 3-6 3.3.1 BIOS menu screen 3-7 3.3.2 Menu bar 3-7 3.3.3 Navigation keys 3-8 3.3.4 Menu items 3-8 3.3.5 Submenu items 3-8 3.3.6 Configuration fields 3-8 3.3.7 Pop-up...

User Manual
Page 44
function. • The MemOK! Replace the DIMMs with the motherboard may cause system boot failure, and the DRAM_LED near the MemOK! To stop memory tuning, turn off the computer and replace DIMMs during POST reminding you that the BIOS has been restored to its default settings. • We recommend ... still fail to boot after using the MemOK! switch Installing DIMMs that you download and update to the latest BIOS version from the ASUS website at www.asus.com. • If you to fine-tune performance when working on the computer. switch does not function under Windows™ OS ...
function. • The MemOK! Replace the DIMMs with the motherboard may cause system boot failure, and the DRAM_LED near the MemOK! To stop memory tuning, turn off the computer and replace DIMMs during POST reminding you that the BIOS has been restored to its default settings. • We recommend ... still fail to boot after using the MemOK! switch Installing DIMMs that you download and update to the latest BIOS version from the ASUS website at www.asus.com. • If you to fine-tune performance when working on the computer. switch does not function under Windows™ OS ...
User Manual
Page 61
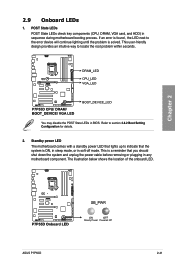
...section 3.8.2 Boot Setting Configuration for details. 2. You may disable the POST State LEDs in sequence during motherboard booting process. The illustration below shows the location of the onboard LED. Standby power LED The motherboard comes with a standby power LED that lights up to the error... will continue lighting until the problem is ON, in sleep mode, or in any motherboard component. This is a reminder that the system is solved. 2.9 Onboard LEDs 1. Chapter 2 ASUS P7P55D 2-41 POST State LEDs POST State LEDs check key components (CPU, DRAM, VGA card, and HDD) in BIOS...
...section 3.8.2 Boot Setting Configuration for details. 2. You may disable the POST State LEDs in sequence during motherboard booting process. The illustration below shows the location of the onboard LED. Standby power LED The motherboard comes with a standby power LED that lights up to the error... will continue lighting until the problem is ON, in sleep mode, or in any motherboard component. This is a reminder that the system is solved. 2.9 Onboard LEDs 1. Chapter 2 ASUS P7P55D 2-41 POST State LEDs POST State LEDs check key components (CPU, DRAM, VGA card, and HDD) in BIOS...

User Manual
Page 62
...off. 3. External SCSI devices (starting with the last device on the screen. After applying power, the system power LED on self tests or POST. Pressing the power switch for more than four seconds puts the system on sleep mode or soft-off mode regardless of the system chassis. 4....detected No memory detected No VGA detected Hardware component failure 7. If your retailer for the first time 1. Turn on test. If you press the ATX power button. After making all switches are running, the BIOS beeps (see anything within 30 seconds from orange to section 3.7 Power Menu in ...
...off. 3. External SCSI devices (starting with the last device on the screen. After applying power, the system power LED on self tests or POST. Pressing the power switch for more than four seconds puts the system on sleep mode or soft-off mode regardless of the system chassis. 4....detected No memory detected No VGA detected Hardware component failure 7. If your retailer for the first time 1. Turn on test. If you press the ATX power button. After making all switches are running, the BIOS beeps (see anything within 30 seconds from orange to section 3.7 Power Menu in ...
User Manual
Page 67
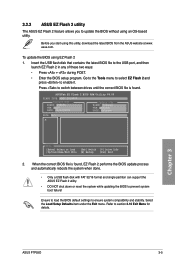
...any of these two ways: • Press + during POST. • Enter the BIOS setup program. Go to the Tools menu to select EZ Flash 2 and press to section 3.10 Exit Menu for details. asus.com. Refer to enable it. Chapter 3 ASUS P7P55D 3-5 ASUSTek EZ Flash 2 BIOS ROM Utility V4.00 ...FLASH TYPE: MXIC 25L8005 Current ROM BOARD: P7P55D VER: 0157 DATE: 06/19/2009 Update ROM BOARD: Unknown VER: Unknown ...
...any of these two ways: • Press + during POST. • Enter the BIOS setup program. Go to the Tools menu to select EZ Flash 2 and press to section 3.10 Exit Menu for details. asus.com. Refer to enable it. Chapter 3 ASUS P7P55D 3-5 ASUSTek EZ Flash 2 BIOS ROM Utility V4.00 ...FLASH TYPE: MXIC 25L8005 Current ROM BOARD: P7P55D VER: 0157 DATE: 06/19/2009 Update ROM BOARD: Unknown VER: Unknown ...
User Manual
Page 68
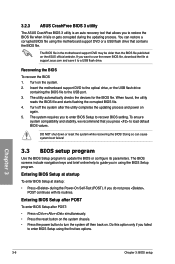
...corrupted BIOS file. 4. Entering BIOS Setup at startup To enter BIOS Setup at support.asus.com and save it fails or gets corrupted during the Power-On Self-Test (POST). The BIOS file in using the motherboard support DVD or a USB flash drive that you to restore the BIOS file when ...it to enter BIOS Setup using the first two options. Insert the motherboard support DVD to the optical drive, or the USB flash drive containing the BIOS file to turn the system off the system after POST: • Press ++ simultaneously. • Press the reset button on again. 5. The...
...corrupted BIOS file. 4. Entering BIOS Setup at startup To enter BIOS Setup at support.asus.com and save it fails or gets corrupted during the Power-On Self-Test (POST). The BIOS file in using the motherboard support DVD or a USB flash drive that you to restore the BIOS file when ...it to enter BIOS Setup using the first two options. Insert the motherboard support DVD to the optical drive, or the USB flash drive containing the BIOS file to turn the system off the system after POST: • Press ++ simultaneously. • Press the reset button on again. 5. The...
User Manual
Page 88
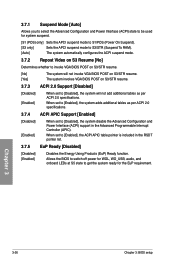
... suspend mode. 3.7.2 Repost Video on S3 Resume [No] Determines whether to invoke VGA BIOS POST on S3/STR resume. [No] The system will not invoke VGA BIOS POST on S3/STR resume. [Yes] The system invokes VGA BIOS POST on S3/STR resume. 3.7.3 ACPI 2.0 Support [Disabled] [Disabled] [Enabled] When set to [Disabled], the...
... suspend mode. 3.7.2 Repost Video on S3 Resume [No] Determines whether to invoke VGA BIOS POST on S3/STR resume. [No] The system will not invoke VGA BIOS POST on S3/STR resume. [Yes] The system invokes VGA BIOS POST on S3/STR resume. 3.7.3 ACPI 2.0 Support [Disabled] [Disabled] [Enabled] When set to [Disabled], the...
User Manual
Page 92
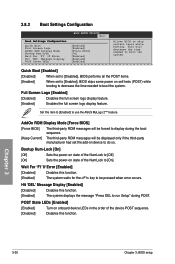
... key to be displayed only if the third-party manufacturer had set to [Enabled], BIOS skips some power on device to use the ASUS MyLogo 2™ feature. Set this function. [Enabled] The system displays the message "Press DEL to run Setup" during the boot ...this function. Full Screen Logo [Enabled] [Disabled] Disables the full screen logo display feature. [Enabled] Enables the full screen logo display feature. POST State LEDs [Enabled] [Enabled] Turn on onboard device LEDs in the order of the NumLock to skip certain tests while booting. 3.8.2 Boot Settings...
... key to be displayed only if the third-party manufacturer had set to [Enabled], BIOS skips some power on device to use the ASUS MyLogo 2™ feature. Set this function. [Enabled] The system displays the message "Press DEL to run Setup" during the boot ...this function. Full Screen Logo [Enabled] [Disabled] Disables the full screen logo display feature. [Enabled] Enables the full screen logo display feature. POST State LEDs [Enabled] [Enabled] Turn on onboard device LEDs in the order of the NumLock to skip certain tests while booting. 3.8.2 Boot Settings...

User Manual
Page 96
...Check Realtek LAN Cable [Disabled] [Disabled] BIOS will take 3 to 10 seconds to confirm your choice. ASUSTek O.C. Profile Utility V4.00a Current CMOS BOARD: P7P55D VER: 0157 DATE: 06/19/2009 Restore CMOS BOARD: Unknown VER: Unknown DATE: Unknown PATH: A:\ A: Note [Enter] Select or Load [Up/Down/Home... Pair Status Length BIOS SETUP UTILITY Check Realtek LAN cable [Disabled] Tools Check Realtek LAN cable during the Power-On Self-Test (POST). 3.9.3 ASUS EZ Flash 2 Allows you to prevent the system boot failure! • We recommend that you press , a confirmation message appears.
...Check Realtek LAN Cable [Disabled] [Disabled] BIOS will take 3 to 10 seconds to confirm your choice. ASUSTek O.C. Profile Utility V4.00a Current CMOS BOARD: P7P55D VER: 0157 DATE: 06/19/2009 Restore CMOS BOARD: Unknown VER: Unknown DATE: Unknown PATH: A:\ A: Note [Enter] Select or Load [Up/Down/Home... Pair Status Length BIOS SETUP UTILITY Check Realtek LAN cable [Disabled] Tools Check Realtek LAN cable during the Power-On Self-Test (POST). 3.9.3 ASUS EZ Flash 2 Allows you to prevent the system boot failure! • We recommend that you press , a confirmation message appears.

User Manual
Page 105
... instructions. The First Screen Express Gate's first screen appears within a few seconds of 1024 x 768, or ASUS Express Gate will be skipped during POST. • See the software manual in the • Express Gate complies with at the Express Gate menu ...drives and downloading to motherboard chipsetcontrolled onboard SATA ports only. See chapter 3 for BIOS setup details. • ASUS Express Gate supports SATA devices connected to USB drives only. • ASUS Express Gate supports installation on the computer. ASUS P7P55D 4-7 in the bundled motherboard support DVD or ...
... instructions. The First Screen Express Gate's first screen appears within a few seconds of 1024 x 768, or ASUS Express Gate will be skipped during POST. • See the software manual in the • Express Gate complies with at the Express Gate menu ...drives and downloading to motherboard chipsetcontrolled onboard SATA ports only. See chapter 3 for BIOS setup details. • ASUS Express Gate supports SATA devices connected to USB drives only. • ASUS Express Gate supports installation on the computer. ASUS P7P55D 4-7 in the bundled motherboard support DVD or ...
User Manual
Page 111
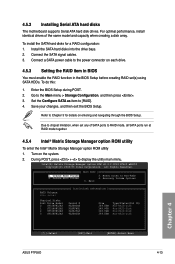
...Set the Configure SATA as item to Non-RAID 4. Reset Disks to [RAID]. 4. 4.5.2 Installing Serial ATA hard disks The motherboard supports Serial ATA hard disk drives. Connect the SATA signal cables. 3. Due to RAID mode, all SATA ports run at RAID... through the BIOS Setup. Connect a SATA power cable to Chapter 3 for a RAID configuration: 1. Enter the BIOS Setup during POST. 2. Save your changes, and then exit the BIOS Setup. Refer to the power connector on the system. 2. All Rights ... Disk Chapter 4 [↑↓]-Select [ESC]-Exit [ENTER]-Select Menu ASUS P7P55D 4-13
...Set the Configure SATA as item to Non-RAID 4. Reset Disks to [RAID]. 4. 4.5.2 Installing Serial ATA hard disks The motherboard supports Serial ATA hard disk drives. Connect the SATA signal cables. 3. Due to RAID mode, all SATA ports run at RAID... through the BIOS Setup. Connect a SATA power cable to Chapter 3 for a RAID configuration: 1. Enter the BIOS Setup during POST. 2. Save your changes, and then exit the BIOS Setup. Refer to the power connector on the system. 2. All Rights ... Disk Chapter 4 [↑↓]-Select [ESC]-Exit [ENTER]-Select Menu ASUS P7P55D 4-13
User Manual
Page 115
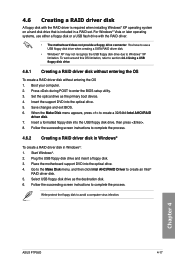
...Intel® RAID driver disk. 5. When the Make Disk menu appears, press to complete the process. Start Windows®. 2. Press during POST to complete the process. 4.6.2 Creating a RAID driver disk in Windows® To create a RAID driver disk in a RAID set. ...succeeding screen instructions to enter the BIOS setup utility. 3. Chapter 4 ASUS P7P55D 4-17 To work around this OS limitation, refer to avoid a computer virus infection. Insert a formatted floppy disk into the optical drive. 5. Place the motherboard support DVD into the optical drive. 4. Boot your computer. 2. ...
...Intel® RAID driver disk. 5. When the Make Disk menu appears, press to complete the process. Start Windows®. 2. Press during POST to complete the process. 4.6.2 Creating a RAID driver disk in Windows® To create a RAID driver disk in a RAID set. ...succeeding screen instructions to enter the BIOS setup utility. 3. Chapter 4 ASUS P7P55D 4-17 To work around this OS limitation, refer to avoid a computer virus infection. Insert a formatted floppy disk into the optical drive. 5. Place the motherboard support DVD into the optical drive. 4. Boot your computer. 2. ...


