User Manual
Page 8
... correct the interference by the party responsible for radio noise emissions from that the battery should not be placed in our products at ASUS REACH website at http://green.asus.com/english/REACH.htm. DO NOT throw the motherboard in municipal waste. DO NOT throw the mercury-containing button cell battery in municipal...
... correct the interference by the party responsible for radio noise emissions from that the battery should not be placed in our products at ASUS REACH website at http://green.asus.com/english/REACH.htm. DO NOT throw the motherboard in municipal waste. DO NOT throw the mercury-containing button cell battery in municipal...
User Manual
Page 12
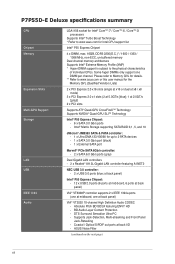
... for details. ** Refer to www.asus.com or this user manual for the Memory QVL (Qualified Vendors Lists) 2 x PCI Express 2.0 x16 slots (single at x16 or dual at x8 / x8 mode) 3 x PCI Express 2.0 x1 slots (2 at 5.0GT/s [blue]; 1 at midboard; Absolute Pitch BD192/24 featuring ENVY HD - P7P55D-E Deluxe specifications summary CPU Chipset Memory...
... for details. ** Refer to www.asus.com or this user manual for the Memory QVL (Qualified Vendors Lists) 2 x PCI Express 2.0 x16 slots (single at x16 or dual at x8 / x8 mode) 3 x PCI Express 2.0 x1 slots (2 at 5.0GT/s [blue]; 1 at midboard; Absolute Pitch BD192/24 featuring ENVY HD - P7P55D-E Deluxe specifications summary CPU Chipset Memory...

User Manual
Page 31
... memory address limitation on the motherboard. Under the default state, some memory modules for overclocking may install varying memory sizes in BIOS. ASUS P7P55D-E Deluxe 2-11 Profile feature in Channel A and Channel B. For optimum compatibility, we recommend that you install 4GB or more efficient memory cooling..., 2GB and 4GB unbuffered and non‑ECC DDR3 DIMMs into the DIMM sockets. • You may operate at http://support.microsoft.com/kb/929605/en-us. • This motherboard does not support DIMMs made up to support a full memory load (4 DIMMs) or overclocking...
... memory address limitation on the motherboard. Under the default state, some memory modules for overclocking may install varying memory sizes in BIOS. ASUS P7P55D-E Deluxe 2-11 Profile feature in Channel A and Channel B. For optimum compatibility, we recommend that you install 4GB or more efficient memory cooling..., 2GB and 4GB unbuffered and non‑ECC DDR3 DIMMs into the DIMM sockets. • You may operate at http://support.microsoft.com/kb/929605/en-us. • This motherboard does not support DIMMs made up to support a full memory load (4 DIMMs) or overclocking...

User Manual
Page 46
... switch until the DRAM_LED starts blinking to begin automatic memory compatibility tuning for the system to the latest BIOS version from the ASUS website at www.asus.com. • If you turn off the system and reinstall the DIMM before using the MemOK! Turn off the computer and unplug... timing set of the DRAM_LED. • The DRAM_LED also lights when the DIMM is tested. switch to boot after turning on the ASUS website at www.asus.com after using the MemOK! The blinking speed of the DRAM_LED increases, indicating different test processes. • Due to BIOS overclocking, press...
... switch until the DRAM_LED starts blinking to begin automatic memory compatibility tuning for the system to the latest BIOS version from the ASUS website at www.asus.com. • If you turn off the system and reinstall the DIMM before using the MemOK! Turn off the computer and unplug... timing set of the DRAM_LED. • The DRAM_LED also lights when the DIMM is tested. switch to boot after turning on the ASUS website at www.asus.com after using the MemOK! The blinking speed of the DRAM_LED increases, indicating different test processes. • Due to BIOS overclocking, press...

User Manual
Page 57
... is purchased separately. 9. Doing so will damage the motherboard! Serial port connector (10-1 pin COM1) This connector is for a serial (COM) port. ASUS P7P55D-E Deluxe 2-37 Connect the IEEE 1394a module cable to this connector, then install the module to the IEEE 1394a connector. Never connect a USB cable to a slot ...
... is purchased separately. 9. Doing so will damage the motherboard! Serial port connector (10-1 pin COM1) This connector is for a serial (COM) port. ASUS P7P55D-E Deluxe 2-37 Connect the IEEE 1394a module cable to this connector, then install the module to the IEEE 1394a connector. Never connect a USB cable to a slot ...

User Manual
Page 60
... a power supply unit (PSU) that complies with more high-end PCI Express x16 cards, use two or more power-consuming devices. com/PowerSupplyCalculator/PSCalculator.aspx?SLanguage=en-us for your system, refer to fit these connectors in only one orientation. 13. ATX power connectors (...24-pin EATXPWR; 8-pin EATX12V) These connectors are designed to the Recommended Power Supply Wattage Calculator at http://support.asus. The system may become unstable or may not boot up if the power is recommended when configuring a system with ATX 12 V Specification ...
... a power supply unit (PSU) that complies with more high-end PCI Express x16 cards, use two or more power-consuming devices. com/PowerSupplyCalculator/PSCalculator.aspx?SLanguage=en-us for your system, refer to fit these connectors in only one orientation. 13. ATX power connectors (...24-pin EATXPWR; 8-pin EATX12V) These connectors are designed to the Recommended Power Supply Wattage Calculator at http://support.asus. The system may become unstable or may not boot up if the power is recommended when configuring a system with ATX 12 V Specification ...

User Manual
Page 65
...ASUS website at www.asus.com to download the latest BIOS file for details on these utilities. If there is potentially risky. In normal circumstances, the default BIOS settings apply to most conditions to the corresponding sections for this chapter to boot. ASUS P7P55D-E Deluxe 3-1 ASUS ...EZ Flash 2: Updates the BIOS using the motherboard support DVD and a USB flash disk drive. Inappropriate settings of a trained service personnel. 3.2 Updating BIOS The ASUS website publishes the latest BIOS versions to...
...ASUS website at www.asus.com to download the latest BIOS file for details on these utilities. If there is potentially risky. In normal circumstances, the default BIOS settings apply to most conditions to the corresponding sections for this chapter to boot. ASUS P7P55D-E Deluxe 3-1 ASUS ...EZ Flash 2: Updates the BIOS using the motherboard support DVD and a USB flash disk drive. Inappropriate settings of a trained service personnel. 3.2 Updating BIOS The ASUS website publishes the latest BIOS versions to...

User Manual
Page 68
...based utility. To update the BIOS using EZ Flash 2 1. ASUSTek EZ Flash 2 BIOS ROM Utility V4.00 FLASH TYPE: MXIC 25L8005 Current ROM BOARD: P7P55D-E Deluxe VER: 0209 DATE: 07/28/2009 Update ROM BOARD: Unknown VER: Unknown DATE: Unknown PATH: A:\ A: Note [Enter] Select or Load [Up/Down... to switch between drives until the correct BIOS file is found . 3.2.2 ASUS EZ Flash 2 utility The ASUS EZ Flash 2 feature allows you start using this utility, download the latest BIOS from the ASUS website at www. asus.com. Press to section 3.10 Exit Menu for details. Ensure to load the...
...based utility. To update the BIOS using EZ Flash 2 1. ASUSTek EZ Flash 2 BIOS ROM Utility V4.00 FLASH TYPE: MXIC 25L8005 Current ROM BOARD: P7P55D-E Deluxe VER: 0209 DATE: 07/28/2009 Update ROM BOARD: Unknown VER: Unknown DATE: Unknown PATH: A:\ A: Note [Enter] Select or Load [Up/Down... to switch between drives until the correct BIOS file is found . 3.2.2 ASUS EZ Flash 2 utility The ASUS EZ Flash 2 feature allows you start using this utility, download the latest BIOS from the ASUS website at www. asus.com. Press to section 3.10 Exit Menu for details. Ensure to load the...
User Manual
Page 69
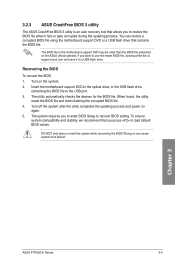
...system requires you want to use the newer BIOS file, download the file at support.asus.com and save it fails or gets corrupted during the updating process. 3.2.3 ASUS CrashFree BIOS 3 utility The ASUS CrashFree BIOS 3 utility is an auto recovery tool that you press to load default ...file published on the system. 2. Turn off the system after the utility completes the updating process and power on again. 5. Chapter 3 ASUS P7P55D-E Deluxe 3-5 Recovering the BIOS To recover the BIOS 1. To ensure system compatibility and stability, we recommend that allows you to restore the BIOS file...
...system requires you want to use the newer BIOS file, download the file at support.asus.com and save it fails or gets corrupted during the updating process. 3.2.3 ASUS CrashFree BIOS 3 utility The ASUS CrashFree BIOS 3 utility is an auto recovery tool that you press to load default ...file published on the system. 2. Turn off the system after the utility completes the updating process and power on again. 5. Chapter 3 ASUS P7P55D-E Deluxe 3-5 Recovering the BIOS To recover the BIOS 1. To ensure system compatibility and stability, we recommend that allows you to restore the BIOS file...
User Manual
Page 70
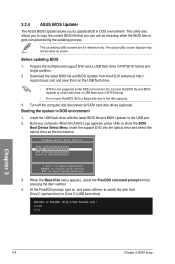
...flash drive in FAT32/16 format and single partition. 2. At the FreeDOS prompt, type d: and press to switch the disk from the ASUS website at http:// support.asus.com and save the BIOS file to a floppy disk due to update BIOS in DOS environment 1. C:\>d: D:\> Chapter 3 3-6 Chapter 3: ...BIOS setup The actual utility screen displays may not be same as the boot device. 3.2.4 ASUS BIOS Updater The ASUS BIOS Updater allows you can use...
...flash drive in FAT32/16 format and single partition. 2. At the FreeDOS prompt, type d: and press to switch the disk from the ASUS website at http:// support.asus.com and save the BIOS file to a floppy disk due to update BIOS in DOS environment 1. C:\>d: D:\> Chapter 3 3-6 Chapter 3: ...BIOS setup The actual utility screen displays may not be same as the boot device. 3.2.4 ASUS BIOS Updater The ASUS BIOS Updater allows you can use...
User Manual
Page 105
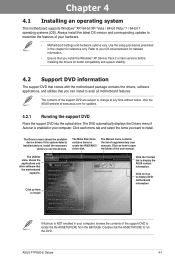
... Manual menu contains the list of your computer. The Utilities menu shows the applications and other software that you want to change at www.asus.com for reference only. ASUS P7P55D-E Deluxe 4-1 Chapter 4 Chapter 4: Software support 4.1 Installing an operating system This motherboard supports Windows® XP/ 64-bit XP/ Vista / 64-bit Vista / 7 / 64-bit...
... Manual menu contains the list of your computer. The Utilities menu shows the applications and other software that you want to change at www.asus.com for reference only. ASUS P7P55D-E Deluxe 4-1 Chapter 4 Chapter 4: Software support 4.1 Installing an operating system This motherboard supports Windows® XP/ 64-bit XP/ Vista / 64-bit Vista / 7 / 64-bit...

User Manual
Page 107
Launch PC Probe II by clicking Start > All Programs > ASUS > PC Probe II > PC Probe II v1.xx.xx. ASUS P7P55D-E Deluxe 4-3 4.3 Software information Most of any problem with the software application for detailed software configuration. Because PC Probe II is a utility that came with these ... are assured that will conveniently guide you of the applications in the support DVD have wizards that your computer is always at www.asus.com for more information. 4.3.1 ASUS PC Probe II PC Probe II is software-based, you can start monitoring your computer the moment you turn it on. The PC...
Launch PC Probe II by clicking Start > All Programs > ASUS > PC Probe II > PC Probe II v1.xx.xx. ASUS P7P55D-E Deluxe 4-3 4.3 Software information Most of any problem with the software application for detailed software configuration. Because PC Probe II is a utility that came with these ... are assured that will conveniently guide you of the applications in the support DVD have wizards that your computer is always at www.asus.com for more information. 4.3.1 ASUS PC Probe II PC Probe II is software-based, you can start monitoring your computer the moment you turn it on. The PC...
User Manual
Page 108
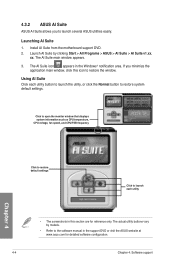
... launch each utility button to launch the utility, or click the Normal button to restore system default settings. If you to launch several ASUS utilities easily. Using AI Suite Click each utility • The screenshots in this icon to restore the window. Launching AI Suite 1. ... AI Suite icon appears in the support DVD or visit the ASUS website at www.asus.com for reference only. The actual utility buttons vary by clicking Start > All Programs > ASUS > AI Suite > AI Suite v1.xx. 4.3.2 ASUS AI Suite ASUS AI Suite allows you minimize the application main window, click this...
... launch each utility button to launch the utility, or click the Normal button to restore system default settings. If you to launch several ASUS utilities easily. Using AI Suite Click each utility • The screenshots in this icon to restore the window. Launching AI Suite 1. ... AI Suite icon appears in the support DVD or visit the ASUS website at www.asus.com for reference only. The actual utility buttons vary by clicking Start > All Programs > ASUS > AI Suite > AI Suite v1.xx. 4.3.2 ASUS AI Suite ASUS AI Suite allows you minimize the application main window, click this...
User Manual
Page 111
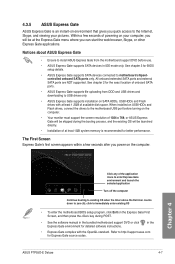
... enter existing OS • To enter the motherboard BIOS setup program, click Exit on your pictures. Refer to http://support.asus.com for BIOS setup details. • ASUS Express Gate supports SATA devices connected to zero (0); Chapter 4 Click any of at the Express Gate menu where you will... you power on the computer. Within a few seconds after you quick access to the motherboard USB port before use. • ASUS Express Gate supports SATA devices in the bundled motherboard support DVD or click Express Gate environment for better performance. ASUS P7P55D-E Deluxe 4-7
... enter existing OS • To enter the motherboard BIOS setup program, click Exit on your pictures. Refer to http://support.asus.com for BIOS setup details. • ASUS Express Gate supports SATA devices connected to zero (0); Chapter 4 Click any of at the Express Gate menu where you will... you power on the computer. Within a few seconds after you quick access to the motherboard USB port before use. • ASUS Express Gate supports SATA devices in the bundled motherboard support DVD or click Express Gate environment for better performance. ASUS P7P55D-E Deluxe 4-7
User Manual
Page 113
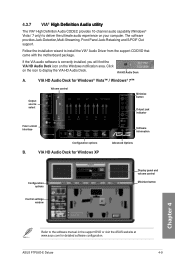
...Follow the installation wizard to deliver the ultimate audio experience on your computer. Click on the Windows notification area. ASUS P7P55D-E Deluxe 4-9 VIA HD Audio Deck for detailed software configuration. VIA HD Audio Deck A. VIA HD Audio Deck for Windows... package. 4.3.7 VIA® H��i�g�h��D��e�f�in the support DVD or visit the ASUS website at www.asus.com for Windows® Vista™ / Windows® 7™ Output source select Volume control Minimize button Output jack indicator Fold ...
...Follow the installation wizard to deliver the ultimate audio experience on your computer. Click on the Windows notification area. ASUS P7P55D-E Deluxe 4-9 VIA HD Audio Deck for detailed software configuration. VIA HD Audio Deck A. VIA HD Audio Deck for Windows... package. 4.3.7 VIA® H��i�g�h��D��e�f�in the support DVD or visit the ASUS website at www.asus.com for Windows® Vista™ / Windows® 7™ Output source select Volume control Minimize button Output jack indicator Fold ...

User Manual
Page 125
...uninstall existing graphics card drivers 1. For Windows XP, go to Control Panel > Add/Remove Programs. For Windows Vista, go to your system. ASUS P7P55D-E Deluxe 5-1 See Chapter 2 for details. • We recommend that you install additional chassis fans for better thermal environment. • Visit the ...ATI Game website (http://game.amd.com) for reference only. Select your current graphics card driver/s. 4. The graphics cards and the motherboard layout may vary with models, but...
...uninstall existing graphics card drivers 1. For Windows XP, go to Control Panel > Add/Remove Programs. For Windows Vista, go to your system. ASUS P7P55D-E Deluxe 5-1 See Chapter 2 for details. • We recommend that you install additional chassis fans for better thermal environment. • Visit the ...ATI Game website (http://game.amd.com) for reference only. Select your current graphics card driver/s. 4. The graphics cards and the motherboard layout may vary with models, but...

User Manual
Page 126
.... Download the latest driver from the power supply to install the device drivers. Connect two independent auxiliary power sources from the AMD website (www.amd.com). 5-2 Chapter 5: Multiple GPU technology support Ensure that your graphics card package to the two graphics cards separately. 6. 4.
.... Download the latest driver from the power supply to install the device drivers. Connect two independent auxiliary power sources from the AMD website (www.amd.com). 5-2 Chapter 5: Multiple GPU technology support Ensure that your graphics card package to the two graphics cards separately. 6. 4.

User Manual
Page 128
... • Ensure that your graphics card driver supports the NVIDIA SLI technology. Download the latest driver from the NVIDIA website (www.nvidia.com). • Ensure that your power supply unit (PSU) can provide at least the minimum power required by your motherboard has more than...• In SLI mode, you install additional chassis fans for better thermal environment. • Visit the NVIDIA zone website (http://www.nzone.com) for the latest certified graphics card and supported 3D application list. 5.2.2 Installing two SLI-ready graphics cards The following pictures are for reference ...
... • Ensure that your graphics card driver supports the NVIDIA SLI technology. Download the latest driver from the NVIDIA website (www.nvidia.com). • Ensure that your power supply unit (PSU) can provide at least the minimum power required by your motherboard has more than...• In SLI mode, you install additional chassis fans for better thermal environment. • Visit the NVIDIA zone website (http://www.nzone.com) for the latest certified graphics card and supported 3D application list. 5.2.2 Installing two SLI-ready graphics cards The following pictures are for reference ...
User Manual
Page 129
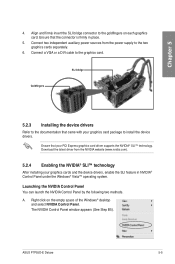
... the empty space of the Windows® desktop and select NVIDIA Control Panel. Connect two independent auxiliary power sources from the NVIDIA website (www.nvidia.com). 5.2.4 Enabling the NVIDIA® SLI™ technology After installing your PCI Express graphics card driver supports the NVIDIA® SLI™ technology. A. The NVIDIA Control... from the power supply to the graphics card. Launching the NVIDIA Control Panel You can launch the NVIDIA Control Panel by the following two methods. ASUS P7P55D-E Deluxe 5-5 Chapter 5 4.
... the empty space of the Windows® desktop and select NVIDIA Control Panel. Connect two independent auxiliary power sources from the NVIDIA website (www.nvidia.com). 5.2.4 Enabling the NVIDIA® SLI™ technology After installing your PCI Express graphics card driver supports the NVIDIA® SLI™ technology. A. The NVIDIA Control... from the power supply to the graphics card. Launching the NVIDIA Control Panel You can launch the NVIDIA Control Panel by the following two methods. ASUS P7P55D-E Deluxe 5-5 Chapter 5 4.


