
User Manual
Page 1
Motherboard
Motherboard

User Manual
Page 1
P6T Motherboard
P6T Motherboard

User Manual
Page 3
Contents Contents...iii Notices...viii Safety information ix About this guide x P6T specifications summary xii Chapter 1: Product introduction 1.1 Welcome 1-1 1.2 Package contents 1-1 1.3 Special features 1-2 1.3.1 Product highlights 1-2 1.3.2 ASUS Unique features 1-3 Chapter 2: Hardware information 2.1 Before you proceed 2-1 2.2 Motherboard overview 2-2 2.2.1 Motherboard layout 2-2 2.2.2 Layout contents 2-3 2.2.3 Placement direction 2-4 2.2.4 Screw holes 2-4 2.3 Central Processing Unit (CPU 2-5 2.3.1 Installing the CPU 2-6 2.3.2 Installing the CPU heatsink...
Contents Contents...iii Notices...viii Safety information ix About this guide x P6T specifications summary xii Chapter 1: Product introduction 1.1 Welcome 1-1 1.2 Package contents 1-1 1.3 Special features 1-2 1.3.1 Product highlights 1-2 1.3.2 ASUS Unique features 1-3 Chapter 2: Hardware information 2.1 Before you proceed 2-1 2.2 Motherboard overview 2-2 2.2.1 Motherboard layout 2-2 2.2.2 Layout contents 2-3 2.2.3 Placement direction 2-4 2.2.4 Screw holes 2-4 2.3 Central Processing Unit (CPU 2-5 2.3.1 Installing the CPU 2-6 2.3.2 Installing the CPU heatsink...
User Manual
Page 9
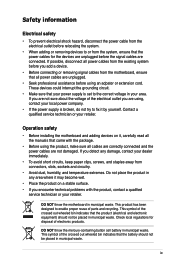
... indicates that your power supply is broken, do not try to enable proper reuse of parts and recycling. DO NOT throw the motherboard in municipal waste. Check local regulations for the devices are unplugged before you encounter technical problems with the package. • Before .... • To avoid short circuits, keep paper clips, screws, and staples away from the motherboard, ensure that the battery should not be placed in municipal waste. Operation safety • Before installing the motherboard and adding devices on a stable surface. • If you add a device. •...
... indicates that your power supply is broken, do not try to enable proper reuse of parts and recycling. DO NOT throw the motherboard in municipal waste. Check local regulations for the devices are unplugged before you encounter technical problems with the package. • Before .... • To avoid short circuits, keep paper clips, screws, and staples away from the motherboard, ensure that the battery should not be placed in municipal waste. Operation safety • Before installing the motherboard and adding devices on a stable surface. • If you add a device. •...
User Manual
Page 10
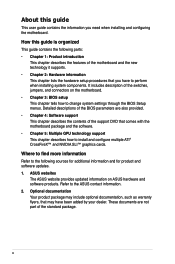
... 1. How this guide This user guide contains the information you have been added by your dealer. ASUS websites The ASUS website provides updated information on the motherboard. • Chapter 3: BIOS setup This chapter tells how to change system settings through the BIOS ...Chapter 2: Hardware information This chapter lists the hardware setup procedures that you need when installing and configuring the motherboard. Where to find more information Refer to the ASUS contact information. 2. Refer to the following parts: • Chapter 1: Product introduction This chapter describes the ...
... 1. How this guide This user guide contains the information you have been added by your dealer. ASUS websites The ASUS website provides updated information on the motherboard. • Chapter 3: BIOS setup This chapter tells how to change system settings through the BIOS ...Chapter 2: Hardware information This chapter lists the hardware setup procedures that you need when installing and configuring the motherboard. Where to find more information Refer to the ASUS contact information. 2. Refer to the following parts: • Chapter 1: Product introduction This chapter describes the ...

User Manual
Page 15
Chapter 1: 1Product introduction This chapter describes the motherboard features and the new technologies it supports.
Chapter 1: 1Product introduction This chapter describes the motherboard features and the new technologies it supports.
User Manual
Page 17
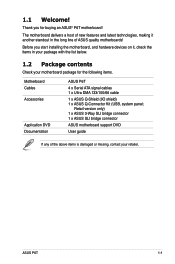
Retail version only) 1 x ASUS 3-Way SLI bridge connector 1 x ASUS SLI bridge connector ASUS motherboard support DVD User guide If any of ASUS quality motherboards! 1.1 Welcome! Before you for the following items. Motherboard Cables Accessories Application DVD Documentation ASUS P6T 4 x Serial ATA signal cables 1 x Ultra DMA 133/100/66 cable 1 x ASUS Q-Shield (I/O shield) 1 x ASUS Q-Connector Kit (USB, system panel; ASUS P6T 1-1 The motherboard delivers a host of...
Retail version only) 1 x ASUS 3-Way SLI bridge connector 1 x ASUS SLI bridge connector ASUS motherboard support DVD User guide If any of ASUS quality motherboards! 1.1 Welcome! Before you for the following items. Motherboard Cables Accessories Application DVD Documentation ASUS P6T 4 x Serial ATA signal cables 1 x Ultra DMA 133/100/66 cable 1 x ASUS Q-Shield (I/O shield) 1 x ASUS Q-Connector Kit (USB, system panel; ASUS P6T 1-1 The motherboard delivers a host of...
User Manual
Page 18
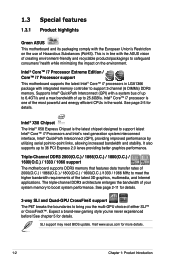
...® Core™ i7 Processor Extreme Edition / Core™ i7 Processor support This motherboard supports the latest Intel® Core™ i7 processors in line with the ASUS vision of the most powerful and energy efficient CPUs in the world. Intel® X58.... See chapter 5 for details. 3-way SLI and Quad-GPU CrossFireX support The P6T breaks the boundaries to -point links, allowing increased bandwidth and stability. 1.3 Special features 1.3.1 Product highlights Green ASUS This motherboard and its packaging comply with the European Union's Restriction on the environment. It also...
...® Core™ i7 Processor Extreme Edition / Core™ i7 Processor support This motherboard supports the latest Intel® Core™ i7 processors in line with the ASUS vision of the most powerful and energy efficient CPUs in the world. Intel® X58.... See chapter 5 for details. 3-way SLI and Quad-GPU CrossFireX support The P6T breaks the boundaries to -point links, allowing increased bandwidth and stability. 1.3 Special features 1.3.1 Product highlights Green ASUS This motherboard and its packaging comply with the European Union's Restriction on the environment. It also...

User Manual
Page 19
... most popular Instant Messengers (IM) like MSN, Skype, Google talk, QQ, and Yahoo! See page 4-26 for details. 1.3.2 ASUS Unique features ASUS TurboV Feel the adrenaline rush of real-time OC-now a reality with lower hysteresis loss, and high quality Japanese-made conductive polymer capacitors.... ASUS P6T 1-3 ASUS Express Gate Taking only 5 seconds to go online from bootup, Express Gate is the one-stop gateway to vDRAM/QPI controller inside CPU) leads the industry with friends, or quickly check on the system configuration. Messenger to keep in OS. It's a unique motherboard built...
... most popular Instant Messengers (IM) like MSN, Skype, Google talk, QQ, and Yahoo! See page 4-26 for details. 1.3.2 ASUS Unique features ASUS TurboV Feel the adrenaline rush of real-time OC-now a reality with lower hysteresis loss, and high quality Japanese-made conductive polymer capacitors.... ASUS P6T 1-3 ASUS Express Gate Taking only 5 seconds to go online from bootup, Express Gate is the one-stop gateway to vDRAM/QPI controller inside CPU) leads the industry with friends, or quickly check on the system configuration. Messenger to keep in OS. It's a unique motherboard built...

User Manual
Page 20
...flow fan or passive cooler. To wake the system and return to date. The purpose of the innovative heat pipe design on this motherboard is the most appropriate power usage via intelligent acceleration and overclocking - DO NOT uninstall the heat-pipe by existing airflow from CPU ...and intelligently moderating power in real-time. Doing so may bend the tubing and affect the heat dissipation performance. 1-4 Chapter 1: Product Introduction ASUS EPU-6 Engine The new ASUS EPU-the world's first power saving engine, has been upgraded to a new 6 engine version, which includes the CPU, VGA card,...
...flow fan or passive cooler. To wake the system and return to date. The purpose of the innovative heat pipe design on this motherboard is the most appropriate power usage via intelligent acceleration and overclocking - DO NOT uninstall the heat-pipe by existing airflow from CPU ...and intelligently moderating power in real-time. Doing so may bend the tubing and affect the heat dissipation performance. 1-4 Chapter 1: Product Introduction ASUS EPU-6 Engine The new ASUS EPU-the world's first power saving engine, has been upgraded to a new 6 engine version, which includes the CPU, VGA card,...

User Manual
Page 21
... (PCB) to install computer components, update the BIOS or back up your motherboard against static electricity damage and shields it in the incoming audio stream while recording. ASUS Crystal Sound This feature can enhance speech-centric applications like computer fans, air conditioners... repetitive and stationary noises (non-voice signals) like Skype, online game, video conference and recording. See page 2-25 for details. ASUS P6T 1-5 Without the usual "fingers" present, this exclusive onboard switch allows gamer to effortless fine-tune the performance without having to different...
... (PCB) to install computer components, update the BIOS or back up your motherboard against static electricity damage and shields it in the incoming audio stream while recording. ASUS Crystal Sound This feature can enhance speech-centric applications like computer fans, air conditioners... repetitive and stationary noises (non-voice signals) like Skype, online game, video conference and recording. See page 2-25 for details. ASUS P6T 1-5 Without the usual "fingers" present, this exclusive onboard switch allows gamer to effortless fine-tune the performance without having to different...
User Manual
Page 22
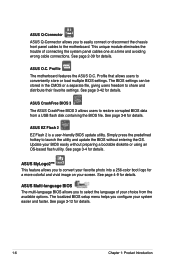
...BIOS settings can be stored in the CMOS or a separate file, giving users freedom to the motherboard. ASUS EZ Flash 2 EZ Flash 2 is a user-friendly BIOS update utility. ASUS Q-Connector ASUS Q-Connector allows you to easily connect or disconnect the chassis front panel cables to share and distribute ... details. This unique module eliminates the trouble of your system easier and faster. See page 2-39 for details. Profile The motherboard features the ASUS O.C. Profile that allows users to launch the utility and update the BIOS without preparing a bootable diskette or using an OS-based...
...BIOS settings can be stored in the CMOS or a separate file, giving users freedom to the motherboard. ASUS EZ Flash 2 EZ Flash 2 is a user-friendly BIOS update utility. ASUS Q-Connector ASUS Q-Connector allows you to easily connect or disconnect the chassis front panel cables to share and distribute ... details. This unique module eliminates the trouble of your system easier and faster. See page 2-39 for details. Profile The motherboard features the ASUS O.C. Profile that allows users to launch the utility and update the BIOS without preparing a bootable diskette or using an OS-based...

User Manual
Page 23
This chapter lists the hardware setup procedures that you have to perform when installing system components. It Chapter 2: includes description of the jumpers and connectors on the motherboard. 2 Hardware information
This chapter lists the hardware setup procedures that you have to perform when installing system components. It Chapter 2: includes description of the jumpers and connectors on the motherboard. 2 Hardware information

User Manual
Page 24
Chapter summary 2 2.1 Before you proceed 2-1 2.2 Motherboard overview 2-2 2.3 Central Processing Unit (CPU 2-5 2.4 System memory 2-11 2.5 Expansion slots 2-19 2.6 Jumpers 2-23 2.7 Onboard switches 2-25 2.8 Connectors 2-26 2.9 Starting up for the first time 2-40 2.10 Turning off the computer 2-41 ASUS P6T
Chapter summary 2 2.1 Before you proceed 2-1 2.2 Motherboard overview 2-2 2.3 Central Processing Unit (CPU 2-5 2.4 System memory 2-11 2.5 Expansion slots 2-19 2.6 Jumpers 2-23 2.7 Onboard switches 2-25 2.8 Connectors 2-26 2.9 Starting up for the first time 2-40 2.10 Turning off the computer 2-41 ASUS P6T
User Manual
Page 25
2.1 Before you proceed Take note of the following precautions before you install motherboard components or change any motherboard settings. • Unplug the power cord from the wall socket before touching any component. • Use a grounded wrist strap or touch a safely grounded object ..., ensure that the ATX power supply is switched off or the power cord is detached from the power supply. ASUS P6T 2-1 Failure to do so may cause severe damage to avoid touching the ICs on them due to static electricity. • Hold components by the edges to the motherboard, peripherals, and/or...
2.1 Before you proceed Take note of the following precautions before you install motherboard components or change any motherboard settings. • Unplug the power cord from the wall socket before touching any component. • Use a grounded wrist strap or touch a safely grounded object ..., ensure that the ATX power supply is switched off or the power cord is detached from the power supply. ASUS P6T 2-1 Failure to do so may cause severe damage to avoid touching the ICs on them due to static electricity. • Hold components by the edges to the motherboard, peripherals, and/or...
User Manual
Page 26
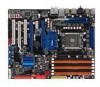
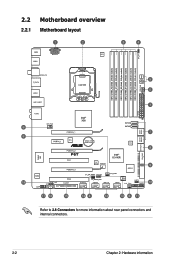
2.2 Motherboard overview 2.2.1 Motherboard layout Refer to 2.8 Connectors for more information about rear panel connectors and internal connectors. 2-2 Chapter 2: Hardware information
2.2 Motherboard overview 2.2.1 Motherboard layout Refer to 2.8 Connectors for more information about rear panel connectors and internal connectors. 2-2 Chapter 2: Hardware information
User Manual
Page 28
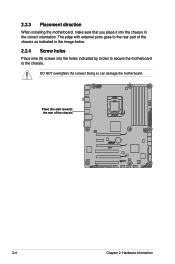
Place this side towards the rear of the chassis as indicated in the correct orientation. Doing so can damage the motherboard. 2.2.3 Placement direction When installing the motherboard, make sure that you place it into the chassis in the image below. 2.2.4 Screw holes Place nine (9) screws into the holes indicated by circles to secure the motherboard to the chassis. The edge with external ports goes to the rear part of the chassis 2-4 Chapter 2: Hardware information DO NOT overtighten the screws!
Place this side towards the rear of the chassis as indicated in the correct orientation. Doing so can damage the motherboard. 2.2.3 Placement direction When installing the motherboard, make sure that you place it into the chassis in the image below. 2.2.4 Screw holes Place nine (9) screws into the holes indicated by circles to secure the motherboard to the chassis. The edge with external ports goes to the rear part of the chassis 2-4 Chapter 2: Hardware information DO NOT overtighten the screws!
User Manual
Page 29
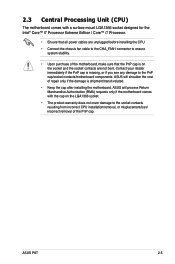
... system stability. • Upon purchase of the PnP cap. ASUS P6T 2-5 ASUS will shoulder the cost of repair only if the damage is shipment/transit-related. • Keep the cap after installing the motherboard. ASUS will process Return Merchandise Authorization (RMA) requests only if the motherboard comes with a surface mount LGA1366 socket designed for the Intel...
... system stability. • Upon purchase of the PnP cap. ASUS P6T 2-5 ASUS will shoulder the cost of repair only if the damage is shipment/transit-related. • Keep the cap after installing the motherboard. ASUS will process Return Merchandise Authorization (RMA) requests only if the motherboard comes with a surface mount LGA1366 socket designed for the Intel...
User Manual
Page 30
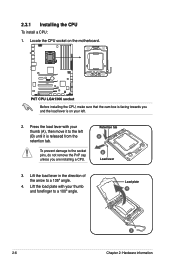
... To install a CPU: 1. To prevent damage to the socket pins, do not remove the PnP cap unless you and the load lever is on the motherboard. Load plate 4 3 2-6 Chapter 2: Hardware information Before installing the CPU, make sure that the cam box is released from the retention tab. Press the load lever...
... To install a CPU: 1. To prevent damage to the socket pins, do not remove the PnP cap unless you and the load lever is on the motherboard. Load plate 4 3 2-6 Chapter 2: Hardware information Before installing the CPU, make sure that the cam box is released from the retention tab. Press the load lever...
User Manual
Page 33
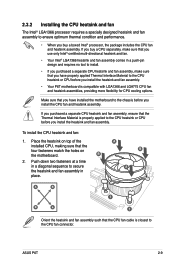
... the heatsink and fan assembly in a diagonal sequence to the chassis before you install the heatsink and fan assembly. Place the heatsink on the motherboard. ASUS P6T 2-9 Make sure that the four fasteners match the holes on top of the installed CPU, making sure that you buy a boxed Intel®... If you have properly applied Thermal Interface Material to the CPU heatsink or CPU before you install the heatsink and fan assembly. • Your P6T motherboard is properly applied to the CPU heatsink or CPU before you install the CPU fan and heatsink assembly.
... the heatsink and fan assembly in a diagonal sequence to the chassis before you install the heatsink and fan assembly. Place the heatsink on the motherboard. ASUS P6T 2-9 Make sure that the four fasteners match the holes on top of the installed CPU, making sure that you buy a boxed Intel®... If you have properly applied Thermal Interface Material to the CPU heatsink or CPU before you install the heatsink and fan assembly. • Your P6T motherboard is properly applied to the CPU heatsink or CPU before you install the CPU fan and heatsink assembly.


