
Motherboard Installation Guide
Page 12
... Others CrashFree BIOS 3 EZ Flash 2 ASUS AI NET 2 Q-Connector ASUS AI Quiet TPM (Trusted Platform Module) 1.2 (optional) BIOS features 8 Mb Flash ROM, AMI BIOS, Green PnP, DMI, Wfm2.0, ACPI v2.0a, SMBIOS v2.3, EZ Flash, CrashFree BIOS (continued on the Go AI Nap AI Gear My Logo 2 ASUS special features - AI Overclocking (intelligent CPU frequency tuner) - P5W64 WS Professional specifications...
... Others CrashFree BIOS 3 EZ Flash 2 ASUS AI NET 2 Q-Connector ASUS AI Quiet TPM (Trusted Platform Module) 1.2 (optional) BIOS features 8 Mb Flash ROM, AMI BIOS, Green PnP, DMI, Wfm2.0, ACPI v2.0a, SMBIOS v2.3, EZ Flash, CrashFree BIOS (continued on the Go AI Nap AI Gear My Logo 2 ASUS special features - AI Overclocking (intelligent CPU frequency tuner) - P5W64 WS Professional specifications...

Motherboard Installation Guide
Page 13
xiii P5W64 WS Professional specifications summary Rear panel 1 x PS/2 mouse port 1 x PS/2 keyboard port 1 x Parallel port 2 x LAN (RJ-45) ports 1 x Coaxial S/PDIF Out port 1 x Optical S/PDIF Out port 1 x eSATA ... 1 x EZ Plug connector 1 x Serial port (COM1) connector EATX power connectors (24-pin and 2 x 4-pin) System panel connector Support CD contents Device drivers BIOS Flash Utility under DOS ASUS AI Booster ASUS PC Probe 2 Anti virus software Microsoft® DirectX 9.0c Adobe® Acrobat Reader® 7.0 RAID Utility Manageability WOL by PME, WOR by...
xiii P5W64 WS Professional specifications summary Rear panel 1 x PS/2 mouse port 1 x PS/2 keyboard port 1 x Parallel port 2 x LAN (RJ-45) ports 1 x Coaxial S/PDIF Out port 1 x Optical S/PDIF Out port 1 x eSATA ... 1 x EZ Plug connector 1 x Serial port (COM1) connector EATX power connectors (24-pin and 2 x 4-pin) System panel connector Support CD contents Device drivers BIOS Flash Utility under DOS ASUS AI Booster ASUS PC Probe 2 Anti virus software Microsoft® DirectX 9.0c Adobe® Acrobat Reader® 7.0 RAID Utility Manageability WOL by PME, WOR by...
Motherboard Installation Guide
Page 23
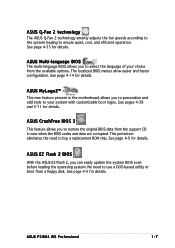
...4-14 for details. ASUS P5W64 WS Professional 1-7 ASUS Multi-language BIOS The multi-language BIOS allows you to personalize and add style to buy a replacement ROM chip. No need to your choice from the available options. See page 4-5 for details. ASUS Q-Fan 2 technology The ASUS Q-Fan 2 technology smartly... the operating system. This protection eliminates the need to select the language of your system with customizable boot logos. ASUS EZ Flash 2 BIOS With the ASUS EZ Flash 2, you to ensure quiet, cool, and efficient operation. See page 4-35 for details. See page...
...4-14 for details. ASUS P5W64 WS Professional 1-7 ASUS Multi-language BIOS The multi-language BIOS allows you to personalize and add style to buy a replacement ROM chip. No need to your choice from the available options. See page 4-5 for details. ASUS Q-Fan 2 technology The ASUS Q-Fan 2 technology smartly... the operating system. This protection eliminates the need to select the language of your system with customizable boot logos. ASUS EZ Flash 2 BIOS With the ASUS EZ Flash 2, you to ensure quiet, cool, and efficient operation. See page 4-35 for details. See page...
Motherboard Installation Guide
Page 49
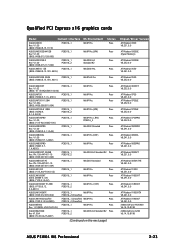
....241.0.0 nVIDIA GeForce PCX5900 V6.14.10.8198 nVIDIA GeForce 6200 V6.14.10.8198 ASUS P5W64 WS Professional 2-23 PN: 109-A47401-10 (BIOS: V009.007.001.004) PCIEX16_1 PCIEX16_2 Win2003-64 Standard R2 Pass ASUS EAX850XT PE Rev. A901) ASUS EAX700-X 128M PCIEX16_1 WinXP Pro. Status Pass Pass Pass Pass Chipset/Driver Version ATI Radeon...
....241.0.0 nVIDIA GeForce PCX5900 V6.14.10.8198 nVIDIA GeForce 6200 V6.14.10.8198 ASUS P5W64 WS Professional 2-23 PN: 109-A47401-10 (BIOS: V009.007.001.004) PCIEX16_1 PCIEX16_2 Win2003-64 Standard R2 Pass ASUS EAX850XT PE Rev. A901) ASUS EAX700-X 128M PCIEX16_1 WinXP Pro. Status Pass Pass Pass Pass Chipset/Driver Version ATI Radeon...
Motherboard Installation Guide
Page 53
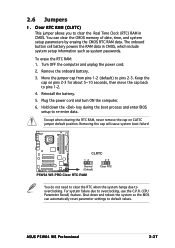
... to default values. You can automatically reset parameter settings to re-enter data. Hold down and reboot the system so the BIOS can clear the CMOS memory of date, time, and system setup parameters by erasing the CMOS RTC RAM data. Keep the cap on ...Time Clock (RTC) RAM in CMOS, which include system setup information such as system passwords. Clear RTC RAM (CLRTC) This jumper allows you to pins 2-3. ASUS P5W64 WS Professional 2-27 The onboard button cell battery powers the RAM data in CMOS. Turn OFF the computer and unplug the power cord. 2. 2.6 Jumpers 1. Remove the...
... to default values. You can automatically reset parameter settings to re-enter data. Hold down and reboot the system so the BIOS can clear the CMOS memory of date, time, and system setup parameters by erasing the CMOS RTC RAM data. Keep the cap on ...Time Clock (RTC) RAM in CMOS, which include system setup information such as system passwords. Clear RTC RAM (CLRTC) This jumper allows you to pins 2-3. ASUS P5W64 WS Professional 2-27 The onboard button cell battery powers the RAM data in CMOS. Turn OFF the computer and unplug the power cord. 2. 2.6 Jumpers 1. Remove the...
Motherboard Installation Guide
Page 59
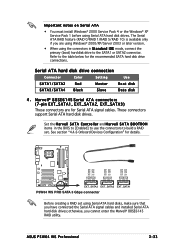
... RSATA_TX_1_DP RSATA_TX_1_DN GND RSATA_RX_1_DN RSATA_RX_1_DP GND GND RSATA_TX_2_DP RSATA_TX_2_DN GND RSATA_RX_2_DN RSATA_RX_2_DP GND EXT_SATA3 EXT_SATA2 EXT_SATA1 P5W64 WS PRO SATA 3 Gbps connector Before creating a RAID set . Refer to the table below for Serial ATA signal cables. ASUS P5W64 WS Professional 2-33 M a r v e l l® 8 8 S E 6 1 4 5 Serial ATA connectors... Windows® 2000 Service Pack 4 or the Windows® XP Service Pack 1 before using the connectors in the BIOS to [Enabled] to use the connectors to build a RAID set using Serial ATA hard disks, make sure that you...
... RSATA_TX_1_DP RSATA_TX_1_DN GND RSATA_RX_1_DN RSATA_RX_1_DP GND GND RSATA_TX_2_DP RSATA_TX_2_DN GND RSATA_RX_2_DN RSATA_RX_2_DP GND EXT_SATA3 EXT_SATA2 EXT_SATA1 P5W64 WS PRO SATA 3 Gbps connector Before creating a RAID set . Refer to the table below for Serial ATA signal cables. ASUS P5W64 WS Professional 2-33 M a r v e l l® 8 8 S E 6 1 4 5 Serial ATA connectors... Windows® 2000 Service Pack 4 or the Windows® XP Service Pack 1 before using the connectors in the BIOS to [Enabled] to use the connectors to build a RAID set using Serial ATA hard disks, make sure that you...

Motherboard Installation Guide
Page 67
... speaker This 4-pin connector is for the chassis-mounted system warning speaker. The speaker allows you turn on the BIOS settings. PWR Ground Reset Ground 14. P5W64 WS PRO System panel connector • System power LED This 3-pin connector is for the system power LED. Pressing the...in sleep mode. • Hard disk drive activity LED This 2-pin connector is for the HDD Activity LED. ASUS P5W64 WS Professional 2-41 PLED+ PLED+5V Ground Ground Speaker ® P5W64 WS PRO IDE_LED+ IDE_LED- Connect the chassis power LED cable to hear system beeps and warnings. • ATX ...
... speaker This 4-pin connector is for the chassis-mounted system warning speaker. The speaker allows you turn on the BIOS settings. PWR Ground Reset Ground 14. P5W64 WS PRO System panel connector • System power LED This 3-pin connector is for the system power LED. Pressing the...in sleep mode. • Hard disk drive activity LED This 2-pin connector is for the HDD Activity LED. ASUS P5W64 WS Professional 2-41 PLED+ PLED+5V Ground Ground Speaker ® P5W64 WS PRO IDE_LED+ IDE_LED- Connect the chassis power LED cable to hear system beeps and warnings. • ATX ...

Motherboard Installation Guide
Page 71
... Turn on the screen. After applying power, the system power LED on self tests or POST. AMI BIOS beep codes Beep Description One beep Two continuous beeps followed by two short beeps Two continuous beeps followed by ... time you press the ATX power button. Connect the power cord to enter the BIOS Setup. If you do not see BIOS beep codes table below) or additional messages appear on the devices in Chapter 4. Check... and green after the system LED turns on test. ASUS P5W64 WS Professional 3-1 The system then runs the power-on the system front panel case lights up.
... Turn on the screen. After applying power, the system power LED on self tests or POST. AMI BIOS beep codes Beep Description One beep Two continuous beeps followed by two short beeps Two continuous beeps followed by ... time you press the ATX power button. Connect the power cord to enter the BIOS Setup. If you do not see BIOS beep codes table below) or additional messages appear on the devices in Chapter 4. Check... and green after the system LED turns on test. ASUS P5W64 WS Professional 3-1 The system then runs the power-on the system front panel case lights up.
Motherboard Installation Guide
Page 74
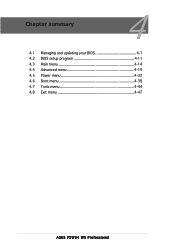
Chapter summary 4 4.1 Managing and updating your BIOS 4-1 4.2 BIOS setup program 4-11 4.3 Main menu 4-14 4.4 Advanced menu 4-19 4.5 Power menu 4-32 4.6 Boot menu 4-38 4.7 Tools menu 4-44 4.8 Exit menu 4-47 ASUS P5W64 WS Professional
Chapter summary 4 4.1 Managing and updating your BIOS 4-1 4.2 BIOS setup program 4-11 4.3 Main menu 4-14 4.4 Advanced menu 4-19 4.5 Power menu 4-32 4.6 Boot menu 4-38 4.7 Tools menu 4-44 4.8 Exit menu 4-47 ASUS P5W64 WS Professional
Motherboard Installation Guide
Page 75
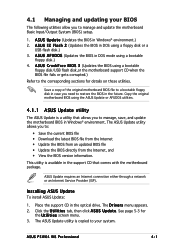
... • Update the BIOS from an updated BIOS file • Update the BIOS directly from the Internet, and • View the BIOS version information. Copy the original motherboard BIOS using a bootable floppy disk.) 4. Installing ASUS Update To install ASUS Update: 1. See page 5-3 for details on these utilities. A S U S E Z F l a s h 2 (Updates the BIOS in the future. ASUS P5W64 WS Professional 4-1 A S U S C r a s h F r e e B I O S 3 (Updates the BIOS using a floppy disk...
... • Update the BIOS from an updated BIOS file • Update the BIOS directly from the Internet, and • View the BIOS version information. Copy the original motherboard BIOS using a bootable floppy disk.) 4. Installing ASUS Update To install ASUS Update: 1. See page 5-3 for details on these utilities. A S U S E Z F l a s h 2 (Updates the BIOS in the future. ASUS P5W64 WS Professional 4-1 A S U S C r a s h F r e e B I O S 3 (Updates the BIOS using a floppy disk...

Motherboard Installation Guide
Page 77
... the ASUS Update utility from the O p e n window, then click S a v e. 4. Updating the BIOS through a BIOS file To update the BIOS through the Internet. Select U p d a t e B I O S f r o m a f i l e option from the drop-down menu, then click N e x t. 3. Follow the screen instructions to download. From the FTP site, select the BIOS version that you wish to complete the update process. Click Next. 5. ASUS P5W64 WS Professional 4-3
... the ASUS Update utility from the O p e n window, then click S a v e. 4. Updating the BIOS through a BIOS file To update the BIOS through the Internet. Select U p d a t e B I O S f r o m a f i l e option from the drop-down menu, then click N e x t. 3. Follow the screen instructions to download. From the FTP site, select the BIOS version that you wish to complete the update process. Click Next. 5. ASUS P5W64 WS Professional 4-3
Motherboard Installation Guide
Page 79
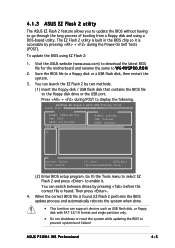
... O . You can switch between drives by pressing before the correct file is found . R O M. 2. ASUSTek EZ Flash 2 BIOS ROM Utility V3.00 FLASH TYPE: Winbond W39V080A 8Mb LPC Current ROM BOARD: P5W64-WS Pro VER: 0204 DATE: 07/04/2006 Update ROM BOARD: Unknown VER: Unknown DATE: Unknown PATH: A:\ A: Note [Enter] ...system when done. • This function can launch the EZ Flash 2 by pressing + during POST to display the following. ASUS P5W64 WS Professional 4-5 To update the BIOS using a DOS-based utility. Then press . 4. Go th the Tools menu to select EZ Flash 2 and press to ...
... O . You can switch between drives by pressing before the correct file is found . R O M. 2. ASUSTek EZ Flash 2 BIOS ROM Utility V3.00 FLASH TYPE: Winbond W39V080A 8Mb LPC Current ROM BOARD: P5W64-WS Pro VER: 0204 DATE: 07/04/2006 Update ROM BOARD: Unknown VER: Unknown DATE: Unknown PATH: A:\ A: Note [Enter] ...system when done. • This function can launch the EZ Flash 2 by pressing + during POST to display the following. ASUS P5W64 WS Professional 4-5 To update the BIOS using a DOS-based utility. Then press . 4. Go th the Tools menu to select EZ Flash 2 and press to ...

Motherboard Installation Guide
Page 81
... CD to a bootable floppy disk. The utility verifies the file and starts updating the BIOS. ASUS P5W64 WS Professional 4-7 Write the BIOS filename on the bootable floppy disk. WARNING!! Updating the BIOS file To update the BIOS file using the AFUDOS utility: 1. Save the BIOS file to the bootable floppy disk you created earlier. 3. All rights reserved. A:\>afudos /iW64WSPRO...
... CD to a bootable floppy disk. The utility verifies the file and starts updating the BIOS. ASUS P5W64 WS Professional 4-7 Write the BIOS filename on the bootable floppy disk. WARNING!! Updating the BIOS file To update the BIOS file using the AFUDOS utility: 1. Save the BIOS file to the bootable floppy disk you created earlier. 3. All rights reserved. A:\>afudos /iW64WSPRO...

Motherboard Installation Guide
Page 83
... the CD for floppy... Checking for the BIOS file. You can update a corrupted BIOS file using this utility. Insert the support CD to W 6 4 W S P R O . Starting BIOS recovery... R O M. 2. ASUS P5W64 WS Professional 4-9 When found ! Completed. Start flashing... 4. Turn on the system. 2. Checking for floppy... Bad BIOS checksum. Starting BIOS recovery... 4.1.5 ASUS CrashFree BIOS 3 utility The ASUS CrashFree BIOS 3 is an auto recovery tool that contains...
... the CD for floppy... Checking for the BIOS file. You can update a corrupted BIOS file using this utility. Insert the support CD to W 6 4 W S P R O . Starting BIOS recovery... R O M. 2. ASUS P5W64 WS Professional 4-9 When found ! Completed. Start flashing... 4. Turn on the system. 2. Checking for floppy... Bad BIOS checksum. Starting BIOS recovery... 4.1.5 ASUS CrashFree BIOS 3 utility The ASUS CrashFree BIOS 3 is an auto recovery tool that contains...

Motherboard Installation Guide
Page 85
... first two failed. Select the L o a d D e f a u l t S e t t i n g s item under the Exit Menu. ASUS P5W64 WS Professional 4-11 Being a menu-driven program, it lets you scroll through the various sub-menus and make it as easy to ensure optimum performance. See section "4.8 Exit Menu." • The BIOS setup screens shown in this section are installing a motherboard, reconfiguring your...
... first two failed. Select the L o a d D e f a u l t S e t t i n g s item under the Exit Menu. ASUS P5W64 WS Professional 4-11 Being a menu-driven program, it lets you scroll through the various sub-menus and make it as easy to ensure optimum performance. See section "4.8 Exit Menu." • The BIOS setup screens shown in this section are installing a motherboard, reconfiguring your...

Motherboard Installation Guide
Page 89
4.3.5 Primary, Third, and Fourth IDE Master/Slave The BIOS automatically detects the connected IDE devices. Primary IDE Master Device : Hard Disk Vendor : ST320413A Size : ...) M PIO Mode DMA Mode SMART Monitoring 32Bit Data Transfer [Auto] [Auto] [Auto] [Auto] [Auto] [Auto] [Enabled] The BIOS automatically detects the values opposite the dimmed items (Device, Vendor, Size, LBA Mode, Block Mode, PIO Mode, Async DMA, Ultra DMA, and... user-configurable. Setting to [Auto] allows automatic selection of IDE drive. Configuration options: [Disabled] [Auto] ASUS P5W64 WS Professional 4-15
4.3.5 Primary, Third, and Fourth IDE Master/Slave The BIOS automatically detects the connected IDE devices. Primary IDE Master Device : Hard Disk Vendor : ST320413A Size : ...) M PIO Mode DMA Mode SMART Monitoring 32Bit Data Transfer [Auto] [Auto] [Auto] [Auto] [Auto] [Auto] [Enabled] The BIOS automatically detects the values opposite the dimmed items (Device, Vendor, Size, LBA Mode, Block Mode, PIO Mode, Async DMA, Ultra DMA, and... user-configurable. Setting to [Auto] allows automatic selection of IDE drive. Configuration options: [Disabled] [Auto] ASUS P5W64 WS Professional 4-15

Motherboard Installation Guide
Page 93
... [Auto] Performance Mode Stable Mode [Auto] [Disabled] Select the target CPU frequency, and the relevant parameters will be stable. ASUS P5W64 WS Professional 4-19 If the system becomes unstable, return to achieve the desired CPU internal frequency. allows you to change the settings for the...values can cause the system to be auto-adjusted. Frequencies higher than CPU manufacturer recommends are not guaranteed to malfunction. the ASUS AI Non-delay Overclocking System feature intelligently determines the system load and automatically boost the performance for the CPU and other ...
... [Auto] Performance Mode Stable Mode [Auto] [Disabled] Select the target CPU frequency, and the relevant parameters will be stable. ASUS P5W64 WS Professional 4-19 If the system becomes unstable, return to achieve the desired CPU internal frequency. allows you to change the settings for the...values can cause the system to be auto-adjusted. Frequencies higher than CPU manufacturer recommends are not guaranteed to malfunction. the ASUS AI Non-delay Overclocking System feature intelligently determines the system load and automatically boost the performance for the CPU and other ...

Motherboard Installation Guide
Page 99
BIOS EHCI Hand-off [Enabled] Allows you to enable support for operating systems without an EHCI hand-off feature. Configuration options: [Disabled] [Enabled] ASUS P5W64 WS Professional 4-25
BIOS EHCI Hand-off [Enabled] Allows you to enable support for operating systems without an EHCI hand-off feature. Configuration options: [Disabled] [Enabled] ASUS P5W64 WS Professional 4-25

Motherboard Installation Guide
Page 101
...options: [Automatic] [Disabled] • Refer to the Appendix for details on how to use the EIST feature. • The motherboard comes with a BIOS file that supports the Enhanced Intel SpeedStep® Technology (EIST). When set to [Automatic], you can adjust the system power settings in the operating system... to [Disabled] if you do not want to enable TM or TM2 support. When set to auto the CPU Internal Thermal Control function. ASUS P5W64 WS Professional 4-27 In TM2 mode, the CPU core ratio and VID are reduced. CPU Internal Thermal Control [Auto] Allows you to disable or set...
...options: [Automatic] [Disabled] • Refer to the Appendix for details on how to use the EIST feature. • The motherboard comes with a BIOS file that supports the Enhanced Intel SpeedStep® Technology (EIST). When set to [Automatic], you can adjust the system power settings in the operating system... to [Disabled] if you do not want to enable TM or TM2 support. When set to auto the CPU Internal Thermal Control function. ASUS P5W64 WS Professional 4-27 In TM2 mode, the CPU core ratio and VID are reduced. CPU Internal Thermal Control [Auto] Allows you to disable or set...

Motherboard Installation Guide
Page 105
...[Disabled] [378] [278] Parallel Port Mode [ECP] Allows you to select the Serial Port1 base address. This item allows the BIOS to set the Parallel Port ECP DMA. Configuration options: [1.9] [1.7] Parallel Port IRQ [IRQ7] Allows you to select the Parallel Port base... [Disabled] [Enabled] Onboard 1394 Controller [Enabled] Allows you to [ECP]. This item allows the BIOS to select the Parallel Port EPP version. Configuration options: [IRQ5] [IRQ7] ASUS P5W64 WS Professional 4-31 Configuration options: [Enabled] [Disabled] Marvell SATA BOOTROM [Disabled] Allows you to enable or ...
...[Disabled] [378] [278] Parallel Port Mode [ECP] Allows you to select the Serial Port1 base address. This item allows the BIOS to set the Parallel Port ECP DMA. Configuration options: [1.9] [1.7] Parallel Port IRQ [IRQ7] Allows you to select the Parallel Port base... [Disabled] [Enabled] Onboard 1394 Controller [Enabled] Allows you to [ECP]. This item allows the BIOS to select the Parallel Port EPP version. Configuration options: [IRQ5] [IRQ7] ASUS P5W64 WS Professional 4-31 Configuration options: [Enabled] [Disabled] Marvell SATA BOOTROM [Disabled] Allows you to enable or ...


