
Motherboard Installation Guide
Page 4
... 2.1 Managing and updating your BIOS 2-2 2.1.1 Creating a bootable floppy disk 2-2 2.1.2 ASUS EZ Flash utility 2-3 2.1.3 AFUDOS utility 2-4 2.1.4 ASUS CrashFree BIOS 2 utility 2-6 2.1.5 ASUS Update utility 2-8 2.2 BIOS setup program 2-11 2.2.1 BIOS menu screen 2-12 2.2.2 Menu bar 2-12 2.2.3 Navigation keys 2-12 2.2.4 Menu items 2-13 2.2.5 Sub-menu items 2-13 2.2.6 Configuration fields 2-13 2.2.7 Pop-up window 2-13 2.2.8 Scroll bar 2-...
... 2.1 Managing and updating your BIOS 2-2 2.1.1 Creating a bootable floppy disk 2-2 2.1.2 ASUS EZ Flash utility 2-3 2.1.3 AFUDOS utility 2-4 2.1.4 ASUS CrashFree BIOS 2 utility 2-6 2.1.5 ASUS Update utility 2-8 2.2 BIOS setup program 2-11 2.2.1 BIOS menu screen 2-12 2.2.2 Menu bar 2-12 2.2.3 Navigation keys 2-12 2.2.4 Menu items 2-13 2.2.5 Sub-menu items 2-13 2.2.6 Configuration fields 2-13 2.2.7 Pop-up window 2-13 2.2.8 Scroll bar 2-...

Motherboard Installation Guide
Page 8
... may have to the following parts: • Chapter 1: Product introduction This chapter describes the features of the jumpers and connectors on ASUS hardware and software products. These documents are also provided. • Chapter 3: Software support This chapter describes the contents of the standard... organized This manual contains the following sources for additional information and for product and software updates. 1. Detailed descriptions of the BIOS parameters are not part of the support CD that comes with the motherboard package. Where to find more information Refer to perform...
... may have to the following parts: • Chapter 1: Product introduction This chapter describes the features of the jumpers and connectors on ASUS hardware and software products. These documents are also provided. • Chapter 3: Software support This chapter describes the contents of the standard... organized This manual contains the following sources for additional information and for product and software updates. 1. Detailed descriptions of the BIOS parameters are not part of the support CD that comes with the motherboard package. Where to find more information Refer to perform...

Motherboard Installation Guide
Page 10
P5S800-VM specifications summary CPU LGA775 socket for Intel® Pentium® 4/CeleronD processor Compatible with the Intel® PCG 04A and 04B processors Supports Intel® ...®) Sensing Technology support LAN Realtek® 10/100 Mbps Ethernet controller USB Supports up to 8 USB 2.0 ports Special features Power Loss Restart ASUS AI Audio ASUS EZ Flash ASUS CrashFree BIOS 2 ASUS MyLogo2™ Instant Music Lite Rear panel 1 x Parallel port 1 x LAN (RJ-45) port 4 x USB 2.0 ports 1 x VGA port 1 x Serial port (COM) 1 x PS/2 keyboard...
P5S800-VM specifications summary CPU LGA775 socket for Intel® Pentium® 4/CeleronD processor Compatible with the Intel® PCG 04A and 04B processors Supports Intel® ...®) Sensing Technology support LAN Realtek® 10/100 Mbps Ethernet controller USB Supports up to 8 USB 2.0 ports Special features Power Loss Restart ASUS AI Audio ASUS EZ Flash ASUS CrashFree BIOS 2 ASUS MyLogo2™ Instant Music Lite Rear panel 1 x Parallel port 1 x LAN (RJ-45) port 4 x USB 2.0 ports 1 x VGA port 1 x Serial port (COM) 1 x PS/2 keyboard...

Motherboard Installation Guide
Page 16
...and voltage monitoring The CPU temperature is monitored for timely failure detection. This protection eliminates the need to Windows®. ASUS EZ Flash BIOS With the ASUS EZ Flash, you to playback audio CDs even without booting the system to use a DOS-based utility or boot from...the Winbond Super I/O) to your system with customizable boot logos. ASUS MyLogo2™ This new feature present in case when the BIOS codes and data are corrupted. See page 2-3 for details. 1.3.2 Innovative ASUS features CrashFree BIOS 2 This feature allows you to personalize and add style to prevent...
...and voltage monitoring The CPU temperature is monitored for timely failure detection. This protection eliminates the need to Windows®. ASUS EZ Flash BIOS With the ASUS EZ Flash, you to playback audio CDs even without booting the system to use a DOS-based utility or boot from...the Winbond Super I/O) to your system with customizable boot logos. ASUS MyLogo2™ This new feature present in case when the BIOS codes and data are corrupted. See page 2-3 for details. 1.3.2 Innovative ASUS features CrashFree BIOS 2 This feature allows you to personalize and add style to prevent...

Motherboard Installation Guide
Page 22
...that supports Hyper-Threading Technology. 3. The item appears only if you are using any other operating systems, disable the Hyper-Threading Technology item in BIOS before installing a supported operating system. • For more information on the socket and damaging the CPU! Close the load plate (A), then ...code. Install an Intel® Pentium® 4 CPU in only one correct orientation. Power up the system and enter the BIOS Setup (see Chapter 2: BIOS setup). Under the Advanced Menu, make sure that supports Hyper-Threading Technology. 2. DO NOT force the CPU into the retention ...
...that supports Hyper-Threading Technology. 3. The item appears only if you are using any other operating systems, disable the Hyper-Threading Technology item in BIOS before installing a supported operating system. • For more information on the socket and damaging the CPU! Close the load plate (A), then ...code. Install an Intel® Pentium® 4 CPU in only one correct orientation. Power up the system and enter the BIOS Setup (see Chapter 2: BIOS setup). Under the Advanced Menu, make sure that supports Hyper-Threading Technology. 2. DO NOT force the CPU into the retention ...

Motherboard Installation Guide
Page 30
... cover (if your motherboard is completely seated on the next page. 3. Keep the screw for information on the system and change the necessary BIOS settings, if any. Turn on BIOS setup. 2. The following sub-sections describe the slots and the expansion cards that came with it by adjusting the software settings. 1. Failure...
... cover (if your motherboard is completely seated on the next page. 3. Keep the screw for information on the system and change the necessary BIOS settings, if any. Turn on BIOS setup. 2. The following sub-sections describe the slots and the expansion cards that came with it by adjusting the software settings. 1. Failure...
Motherboard Installation Guide
Page 33
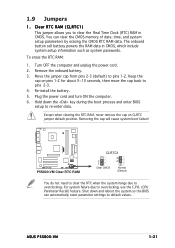
...RTC when the system hangs due to overclocking, use the C.P.R. (CPU Parameter Recall) feature. ASUS P5S800-VM 1-21 Plug the power cord and turn ON the computer. 6. Shut down the key during the boot process and enter BIOS setup to pins 2-3. 4. Except when clearing the RTC RAM, never remove the cap on ...Real Time Clock (RTC) RAM in CMOS, which include system setup information such as system passwords. Hold down and reboot the system so the BIOS can clear the CMOS memory of date, time, and system setup parameters by erasing the CMOS RTC RAM data. Turn OFF the computer and ...
...RTC when the system hangs due to overclocking, use the C.P.R. (CPU Parameter Recall) feature. ASUS P5S800-VM 1-21 Plug the power cord and turn ON the computer. 6. Shut down the key during the boot process and enter BIOS setup to pins 2-3. 4. Except when clearing the RTC RAM, never remove the cap on ...Real Time Clock (RTC) RAM in CMOS, which include system setup information such as system passwords. Hold down and reboot the system so the BIOS can clear the CMOS memory of date, time, and system setup parameters by erasing the CMOS RTC RAM data. Turn OFF the computer and ...

Motherboard Installation Guide
Page 34
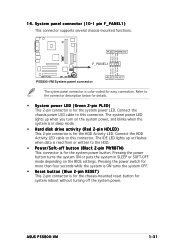
... a corresponding setting in the BIOS. Refer to enable or disable the keyboard wake-up the computer when you to the table below for a PS/2 mouse. 2 . Set this jumper to pins 2-3 (+5VSB) to a Local Area Network (LAN) through a network hub. KBPWR1 12 23 +5V +5VSB (Default) P5S800-VM ® P5S800-VM Keyboard power setting 1.10 Connectors...
... a corresponding setting in the BIOS. Refer to enable or disable the keyboard wake-up the computer when you to the table below for a PS/2 mouse. 2 . Set this jumper to pins 2-3 (+5VSB) to a Local Area Network (LAN) through a network hub. KBPWR1 12 23 +5V +5VSB (Default) P5S800-VM ® P5S800-VM Keyboard power setting 1.10 Connectors...
Motherboard Installation Guide
Page 43
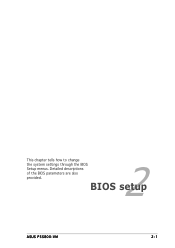
PLED+ PLEDPWR GND P5S800-VM ® PLED PWRBTN* F_PANEL1 HDLED+ HDLEDGround Reset P5S800-VM System panel connector HDLED RESET The sytem panel connector is for the HDD Activity LED. Connect the chassis power LED cable to this connector....the BIOS settings. 14. Pressing the power switch for more than four seconds while the system is ON turns the system OFF. • Reset button (Blue 2-pin RESET) This 2-pin connector is for the system power LED. System panel connector (10-1 pin F_PANEL1) This connector supports several chassis-mounted functions. ASUS P5S800-VM 1-...
PLED+ PLEDPWR GND P5S800-VM ® PLED PWRBTN* F_PANEL1 HDLED+ HDLEDGround Reset P5S800-VM System panel connector HDLED RESET The sytem panel connector is for the HDD Activity LED. Connect the chassis power LED cable to this connector....the BIOS settings. 14. Pressing the power switch for more than four seconds while the system is ON turns the system OFF. • Reset button (Blue 2-pin RESET) This 2-pin connector is for the system power LED. System panel connector (10-1 pin F_PANEL1) This connector supports several chassis-mounted functions. ASUS P5S800-VM 1-...
Motherboard Installation Guide
Page 45
Detailed descriptions of the BIOS parameters are also provided. 2 BIOS setup ASUS P5S800-VM 2-1 This chapter tells how to change the system settings through the BIOS Setup menus.
Detailed descriptions of the BIOS parameters are also provided. 2 BIOS setup ASUS P5S800-VM 2-1 This chapter tells how to change the system settings through the BIOS Setup menus.

Motherboard Installation Guide
Page 46
...BIOS using the ASUS Update or AFUDOS utilities. 2.1.1 Creating a bootable floppy disk 1. A S U S U p d a t e (Updates the BIOS in the future. Insert a 1.44MB floppy disk into the drive. Select C r e a t e a n M S - Windows® 2000 environment To create a set of boot disks for details on these utilities. b. Save a copy of the following utilities allow you need to restore the BIOS...floppy disk drive. A S U S C r a s h F r e e B I O S 2 (Updates the BIOS using a bootable floppy disk.) 2. Insert a 1.44 MB floppy disk to the optical drive. Select the 3 1/2 Floppy Drive...
...BIOS using the ASUS Update or AFUDOS utilities. 2.1.1 Creating a bootable floppy disk 1. A S U S U p d a t e (Updates the BIOS in the future. Insert a 1.44MB floppy disk into the drive. Select C r e a t e a n M S - Windows® 2000 environment To create a set of boot disks for details on these utilities. b. Save a copy of the following utilities allow you need to restore the BIOS...floppy disk drive. A S U S C r a s h F r e e B I O S 2 (Updates the BIOS using a bootable floppy disk.) 2. Insert a 1.44 MB floppy disk to the optical drive. Select the 3 1/2 Floppy Drive...

Motherboard Installation Guide
Page 47
... booting from a floppy disk and using EZ Flash: 1. EZFlash starting BIOS update Checking for floppy... Completed. ASUS P5S800-VM 2-3 Press + during the Power-On Self Tests (POST). When the correct BIOS file is found !" From the Open field, type D:\bootdisk\makeboot a: assuming that contains the BIOS file to prevent system boot failure! • A "Floppy not found...
... booting from a floppy disk and using EZ Flash: 1. EZFlash starting BIOS update Checking for floppy... Completed. ASUS P5S800-VM 2-3 Press + during the Power-On Self Tests (POST). When the correct BIOS file is found !" From the Open field, type D:\bootdisk\makeboot a: assuming that contains the BIOS file to prevent system boot failure! • A "Floppy not found...

Motherboard Installation Guide
Page 48
...; Make sure that you created earlier. 2. A:\>afudos /oOLDBIOS1.ROM AMI Firmware Update Utility - The actual BIOS screen displays may not be exactly the same as backup when the BIOS fails or gets corrupted during the updating process. A:\>afudos /oOLDBIOS1.ROM Main filename Extension name 3. Reading flash...2002 American Megatrends, Inc. done A:\> The utility returns to the floppy disk. 2.1.3 AFUDOS utility The AFUDOS utility allows you to update the BIOS file in DOS mode, then at the prompt type: afudos /o[filename] where the [filename] is not write-protected and has at least...
...; Make sure that you created earlier. 2. A:\>afudos /oOLDBIOS1.ROM AMI Firmware Update Utility - The actual BIOS screen displays may not be exactly the same as backup when the BIOS fails or gets corrupted during the updating process. A:\>afudos /oOLDBIOS1.ROM Main filename Extension name 3. Reading flash...2002 American Megatrends, Inc. done A:\> The utility returns to the floppy disk. 2.1.3 AFUDOS utility The AFUDOS utility allows you to update the BIOS file in DOS mode, then at the prompt type: afudos /o[filename] where the [filename] is not write-protected and has at least...

Motherboard Installation Guide
Page 49
... motherboard support CD to a bootable floppy disk. You need to the DOS prompt after the BIOS update process is the latest or the original BIOS file on a piece of paper. A:\>afudos /iP5S800VM.ROM AMI Firmware Update Utility - done Writing...BIOS to prevent system boot failure! 5. Reading file ..... Version 1.10 Copyright (C) 2002 American Megatrends, Inc. done Erasing flash .... done Writing flash .... 0x0008CC00 (9%) Verifying flash .. Visit the ASUS website (www.asus.com) and download the latest BIOS file for the motherboard. All rights reserved. done A:\> ASUS P5S800-VM...
... motherboard support CD to a bootable floppy disk. You need to the DOS prompt after the BIOS update process is the latest or the original BIOS file on a piece of paper. A:\>afudos /iP5S800VM.ROM AMI Firmware Update Utility - done Writing...BIOS to prevent system boot failure! 5. Reading file ..... Version 1.10 Copyright (C) 2002 American Megatrends, Inc. done Erasing flash .... done Writing flash .... 0x0008CC00 (9%) Verifying flash .. Visit the ASUS website (www.asus.com) and download the latest BIOS file for the motherboard. All rights reserved. done A:\> ASUS P5S800-VM...

Motherboard Installation Guide
Page 50
2.1.4 ASUS CrashFree BIOS 2 utility The ASUS CrashFree BIOS 2 is an auto recovery tool that you to the floppy disk drive. 3. Bad BIOS checksum. Completed. Restart the system after the utility completes the updating process. 2-6 Chapter 2: BIOS setup Turn on the system. 2. Starting BIOS recovery... DO NOT shut down or reset the system while updating the BIOS! Bad BIOS checksum. R O M. The...
2.1.4 ASUS CrashFree BIOS 2 utility The ASUS CrashFree BIOS 2 is an auto recovery tool that you to the floppy disk drive. 3. Bad BIOS checksum. Completed. Restart the system after the utility completes the updating process. 2-6 Chapter 2: BIOS setup Turn on the system. 2. Starting BIOS recovery... DO NOT shut down or reset the system while updating the BIOS! Bad BIOS checksum. R O M. The...

Motherboard Installation Guide
Page 51
... from the support CD: 1. Floppy not found ! Completed. Start flashing... Doing so can cause system boot failure! 4. ASUS P5S800-VM 2-7 Insert the support CD to download the latest BIOS file. The utility then updates the corrupted BIOS file. Restart the system after the utility completes the updating process. Checking for floppy... When no floppy disk...
... from the support CD: 1. Floppy not found ! Completed. Start flashing... Doing so can cause system boot failure! 4. ASUS P5S800-VM 2-7 Insert the support CD to download the latest BIOS file. The utility then updates the corrupted BIOS file. Restart the system after the utility completes the updating process. Checking for floppy... When no floppy disk...

Motherboard Installation Guide
Page 52
... that allows you to manage, save, and update the motherboard BIOS in Windows® environment. Click the U t i l i t i e s tab, then click I n s t a l l A S U S U p d a t e V X . 2.1.5 ASUS Update utility The ASUS Update is copied to your system. The ASUS Update utility allows you update the BIOS using this utility. 2-8 Chapter 2: BIOS setup ASUS Update requires an Internet connection either through a network or an...
... that allows you to manage, save, and update the motherboard BIOS in Windows® environment. Click the U t i l i t i e s tab, then click I n s t a l l A S U S U p d a t e V X . 2.1.5 ASUS Update utility The ASUS Update is copied to your system. The ASUS Update utility allows you update the BIOS using this utility. 2-8 Chapter 2: BIOS setup ASUS Update requires an Internet connection either through a network or an...

Motherboard Installation Guide
Page 53
Select the ASUS FTP site t h e I O S f r o m 3. N e x t. Click N e x t. Select U p d a t e B I n t e r n e t option from the Windows® desktop by clicking S t a r t > P r o g r a m s > A S U S > A S U S U p d a t e > A S U S U p d a t e. Updating the BIOS through the Internet To update the BIOS through the Internet: 1. ASUS P5S800-VM 2-9 The ASUS Update main window appears. 2. Launch the ASUS Update utility from the nearest you to avoid network drop-down menu, then click traffic, or click A u t o S e l e c t.
Select the ASUS FTP site t h e I O S f r o m 3. N e x t. Click N e x t. Select U p d a t e B I n t e r n e t option from the Windows® desktop by clicking S t a r t > P r o g r a m s > A S U S > A S U S U p d a t e > A S U S U p d a t e. Updating the BIOS through the Internet To update the BIOS through the Internet: 1. ASUS P5S800-VM 2-9 The ASUS Update main window appears. 2. Launch the ASUS Update utility from the nearest you to avoid network drop-down menu, then click traffic, or click A u t o S e l e c t.

Motherboard Installation Guide
Page 54
... of updating itself through a BIOS file: 1. Updating the BIOS through a BIOS file To update the BIOS through the Internet. Select U p d a t e B I O S f r o m a f i l e option from the Windows® desktop by clicking S t a r t > P r o g r a m s > A S U S > A S U S U p d a t e > A S U S U p d a t e. The ASUS Update main window appears. 2. From the FTP site, select the BIOS version that you wish to complete the update process. 2-10 Chapter 2: BIOS setup Click Next. 5. 4. Follow...
... of updating itself through a BIOS file: 1. Updating the BIOS through a BIOS file To update the BIOS through the Internet. Select U p d a t e B I O S f r o m a f i l e option from the Windows® desktop by clicking S t a r t > P r o g r a m s > A S U S > A S U S U p d a t e > A S U S U p d a t e. The ASUS Update main window appears. 2. From the FTP site, select the BIOS version that you wish to complete the update process. 2-10 Chapter 2: BIOS setup Click Next. 5. 4. Follow...
Motherboard Installation Guide
Page 55
... compatibility and stability. Select the L o a d D e f a u l t S e t t i n g s item under the Exit Menu. Even if you can update using the BIOS Setup program so that you are not prompted to reconfigure your system using the provided utility described in section "2.1 Managing and updating your..., the system provides you see on the system chassis. otherwise, POST continues with the opportunity to download the latest BIOS file for this program. ASUS P5S800-VM 2-11 Being a menu-driven program, it as easy to use the Setup program, you wish to ensure optimum performance...
... compatibility and stability. Select the L o a d D e f a u l t S e t t i n g s item under the Exit Menu. Even if you can update using the BIOS Setup program so that you are not prompted to reconfigure your system using the provided utility described in section "2.1 Managing and updating your..., the system provides you see on the system chassis. otherwise, POST continues with the opportunity to download the latest BIOS file for this program. ASUS P5S800-VM 2-11 Being a menu-driven program, it as easy to use the Setup program, you wish to ensure optimum performance...


