User Manual
Page 19
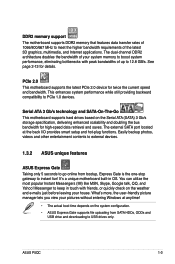
... 3D graphics, multimedia, and Internet applications. ASUS P5QC 1-3 Messenger to instant fun! What's more, the user-friendly picture manager lets you view your pictures without entering Windows at the back I/O provides smart setup and hot-plug functions. Serial ATA 3 Gb/s technology and SATA-On-The-Go This motherboard supports hard drives based on the...
... 3D graphics, multimedia, and Internet applications. ASUS P5QC 1-3 Messenger to instant fun! What's more, the user-friendly picture manager lets you view your pictures without entering Windows at the back I/O provides smart setup and hot-plug functions. Serial ATA 3 Gb/s technology and SATA-On-The-Go This motherboard supports hard drives based on the...
User Manual
Page 23
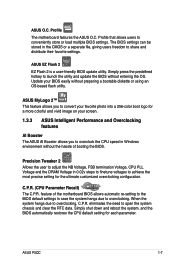
... allows you to overclock the CPU speed in case the system hangs due to the BIOS default settings in Windows environment without the hassle of the motherboard BIOS allows automatic re-setting to overclocking. ASUS P5QC 1-7 Update your favorite photo into a 256-color boot logo for each parameter. Profile that allows users to launch...
... allows you to overclock the CPU speed in case the system hangs due to the BIOS default settings in Windows environment without the hassle of the motherboard BIOS allows automatic re-setting to overclocking. ASUS P5QC 1-7 Update your favorite photo into a 256-color boot logo for each parameter. Profile that allows users to launch...
User Manual
Page 32
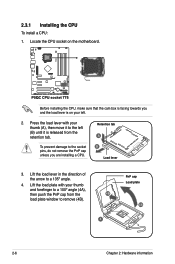
... plate with your left (B) until it to the socket pins, do not remove the PnP cap unless you and the load lever is on the motherboard. To prevent damage to the left . 2. 2.3.1 Installing the CPU To install a CPU: 1. Before installing the CPU, make sure that the cam box is ...released from the 4B load plate window to a 135º angle. 4. Lift the load lever in the direction of the arrow to remove (4B). 3 PnP cap Load plate 4A 2-6 Chapter 2: ...
... plate with your left (B) until it to the socket pins, do not remove the PnP cap unless you and the load lever is on the motherboard. To prevent damage to the left . 2. 2.3.1 Installing the CPU To install a CPU: 1. Before installing the CPU, make sure that the cam box is ...released from the 4B load plate window to a 135º angle. 4. Lift the load lever in the direction of the arrow to remove (4B). 3 PnP cap Load plate 4A 2-6 Chapter 2: ...
User Manual
Page 38
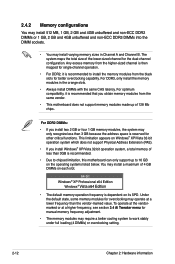
... only recognize less than 3 GB because the address space is recommended to install the memory modules from the same vendor. • This motherboard does not support memory modules made up to work stably under full loading (4 DIMMs) or overclocking setting. 2-12 Chapter 2: Hardware information ...total size of 4 GB DIMMs on each slot. 64-bit Windows® XP Professional x64 Edition Windows® Vista x64 Edition • The default memory operation frequency is recommended. • Due to chipset limitation, this motherboard can only support up of less than the vendor-marked value....
... only recognize less than 3 GB because the address space is recommended to install the memory modules from the same vendor. • This motherboard does not support memory modules made up to work stably under full loading (4 DIMMs) or overclocking setting. 2-12 Chapter 2: Hardware information ...total size of 4 GB DIMMs on each slot. 64-bit Windows® XP Professional x64 Edition Windows® Vista x64 Edition • The default memory operation frequency is recommended. • Due to chipset limitation, this motherboard can only support up of less than the vendor-marked value....
User Manual
Page 39
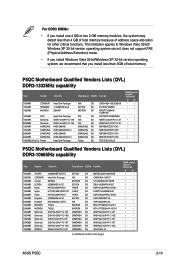
...; • • • • • • • • • • • • • • • • ASUS P5QC 2-13 This limitation applies to Windows Vista 32-bit/ Windows XP 32-bit version operating system since it does not support PAE (Physical Address Extention) mode. • If you install...• • • • • • • • • • • • • • • • • • P5QC Motherboard Qualified Vendors Lists (QVL) DDR3-1066MHz capability Size Vendor Chip No.
...; • • • • • • • • • • • • • • • • ASUS P5QC 2-13 This limitation applies to Windows Vista 32-bit/ Windows XP 32-bit version operating system since it does not support PAE (Physical Address Extention) mode. • If you install...• • • • • • • • • • • • • • • • • • P5QC Motherboard Qualified Vendors Lists (QVL) DDR3-1066MHz capability Size Vendor Chip No.
User Manual
Page 54
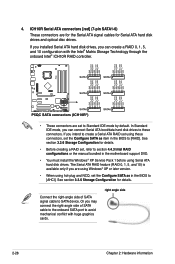
... disk drives, you can connect Serial ATA boot/data hard disk drives to these connectors, set the Configure SATA as in the motherboard support DVD. • You must install the Windows® XP Service Pack 1 before using hot-plug and NCQ, set to SATA device. If you can create a RAID 0, 1, 5, ... signal cables for Serial ATA hard disk drives and optical disc drives. ICH10R Serial ATA connectors [red] (7-pin SATA1-6) These connectors are using Windows® XP or later version. • When using Serial ATA hard disk drives. See section 3.3.6 Storage Configuration for details.
... disk drives, you can connect Serial ATA boot/data hard disk drives to these connectors, set the Configure SATA as in the motherboard support DVD. • You must install the Windows® XP Service Pack 1 before using hot-plug and NCQ, set to SATA device. If you can create a RAID 0, 1, 5, ... signal cables for Serial ATA hard disk drives and optical disc drives. ICH10R Serial ATA connectors [red] (7-pin SATA1-6) These connectors are using Windows® XP or later version. • When using Serial ATA hard disk drives. See section 3.3.6 Storage Configuration for details.
User Manual
Page 69
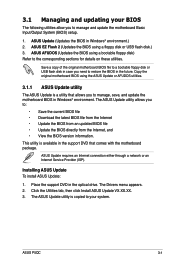
... in the future. This utility is available in Windows® environment. ASUS P5QC 3-1 ASUS Update requires an Internet connection either through a network or an Internet Service Provider (ISP). Installing ASUS Update To install ASUS Update: 1. The Drivers menu appears. 2. The ASUS Update utility is a utility that comes with the motherboard package. ASUS Update (Updates the BIOS in the optical...
... in the future. This utility is available in Windows® environment. ASUS P5QC 3-1 ASUS Update requires an Internet connection either through a network or an Internet Service Provider (ISP). Installing ASUS Update To install ASUS Update: 1. The Drivers menu appears. 2. The ASUS Update utility is a utility that comes with the motherboard package. ASUS Update (Updates the BIOS in the optical...
User Manual
Page 113
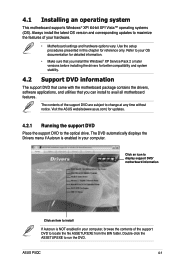
... locate the file ASSETUP.EXE from the BIN folder. ASUS P5QC 4-1 The contents of the support DVD to avail all motherboard features. Double-click the ASSETUP.EXE to maximize the features of your OS documentation for detailed information. • Make sure that you install the Windows® XP Service Pack 2 or later versions before...
... locate the file ASSETUP.EXE from the BIN folder. ASUS P5QC 4-1 The contents of the support DVD to avail all motherboard features. Double-click the ASSETUP.EXE to maximize the features of your OS documentation for detailed information. • Make sure that you install the Windows® XP Service Pack 2 or later versions before...

User Manual
Page 116
...9.0c is a multimedia technology that allows you to update the motherboard BIOS in Windows® environment. Ulead Burn.Now Installs the Ulead Burn.Now application for updates. ASUS Express Gate Installer Installs the ASUS Express Gate application. CyberLink PowerBackup Installs CyberLink PowerBackup to back up... 8 Installs the Adobe® Acrobat® Reader that enhances computer graphics and sound. Drive Xpert Installs the ASUS Drive Xpert utility. ASUS Update The ASUS Update utility allows you to open, view, and print documents in Portable Document Format (PDF). DirectX® ...
...9.0c is a multimedia technology that allows you to update the motherboard BIOS in Windows® environment. Ulead Burn.Now Installs the Ulead Burn.Now application for updates. ASUS Express Gate Installer Installs the ASUS Express Gate application. CyberLink PowerBackup Installs CyberLink PowerBackup to back up... 8 Installs the Adobe® Acrobat® Reader that enhances computer graphics and sound. Drive Xpert Installs the ASUS Drive Xpert utility. ASUS Update The ASUS Update utility allows you to open, view, and print documents in Portable Document Format (PDF). DirectX® ...
User Manual
Page 142
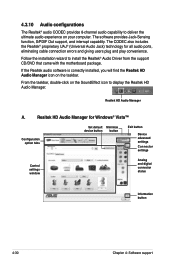
... HD Audio Manager. The CODEC also includes the Realtek® proprietary UAJ® (Universal Audio Jack) technology for Windows® Vista™ Configuration option tabs Set default Minimize device button button Exit button Device advanced settings Connector settings Control settings... ultimate audio experience on the SoundEffect icon to install the Realtek® Audio Driver from the support CD/DVD that came with the motherboard package. The software provides Jack-Sensing function, S/PDIF Out support, and interrupt capability. Realtek HD Audio Manager A. If the Realtek ...
... HD Audio Manager. The CODEC also includes the Realtek® proprietary UAJ® (Universal Audio Jack) technology for Windows® Vista™ Configuration option tabs Set default Minimize device button button Exit button Device advanced settings Connector settings Control settings... ultimate audio experience on the SoundEffect icon to install the Realtek® Audio Driver from the support CD/DVD that came with the motherboard package. The software provides Jack-Sensing function, S/PDIF Out support, and interrupt capability. Realtek HD Audio Manager A. If the Realtek ...
User Manual
Page 150
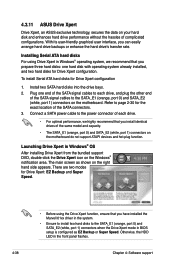
... support 4.3.11 ASUS Drive Xpert Drive Xpert, an ASUS exclusive technology, secures the data on the Windows® notification area. Plug one end of the SATA signal cables to the SATA_E1 (orange, port 0) and SATA_E2 (white, port 1) connectors on the motherboard. Launching Drive Xpert in Windows® OS ...Drive Xpert configuration. To install Serial ATA hard disks for the exact location of complicated configurations. Otherwise, the HDD LED in Windows® operating system, we highly recommend that you can easily arrange hard drive backups or enhance the hard drive's transfer rate....
... support 4.3.11 ASUS Drive Xpert Drive Xpert, an ASUS exclusive technology, secures the data on the Windows® notification area. Plug one end of the SATA signal cables to the SATA_E1 (orange, port 0) and SATA_E2 (white, port 1) connectors on the motherboard. Launching Drive Xpert in Windows® OS ...Drive Xpert configuration. To install Serial ATA hard disks for the exact location of complicated configurations. Otherwise, the HDD LED in Windows® operating system, we highly recommend that you can easily arrange hard drive backups or enhance the hard drive's transfer rate....
User Manual
Page 151
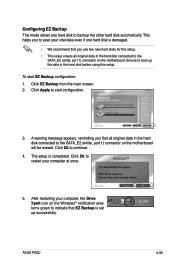
... disk automatically. To start configuration. 3. Click Apply to continue. 4. Click Ok to restart your computer, the Drive Xpert icon on the motherboard will be erased. Ensure to back up successfully. Click EZ Backup from the main screen. 2. A warning message appears, reminding you that ...disk connected to the SATA_E2 (white, port 1) connector on the Windows® notification area turns green to indicate that you use two new hard disks for this setup. After restarting your computer at once. 5. ASUS P5QC 4-39 Configuring EZ Backup This mode allows one hard disk is damaged...
... disk automatically. To start configuration. 3. Click Apply to continue. 4. Click Ok to restart your computer, the Drive Xpert icon on the motherboard will be erased. Ensure to back up successfully. Click EZ Backup from the main screen. 2. A warning message appears, reminding you that ...disk connected to the SATA_E2 (white, port 1) connector on the Windows® notification area turns green to indicate that you use two new hard disks for this setup. After restarting your computer at once. 5. ASUS P5QC 4-39 Configuring EZ Backup This mode allows one hard disk is damaged...
User Manual
Page 153
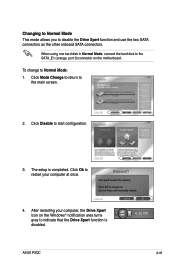
... disk to the SATA_E1 (orange, port 0) connector on the Windows® notification area turns gray to restart your computer, the Drive Xpert icon on the motherboard. Click Disable to Normal Mode: 1. After restarting your computer at once. 4. To change to start configuration. 3. ASUS P5QC 4-41 Click Mode Change to return to disable the Drive...
... disk to the SATA_E1 (orange, port 0) connector on the Windows® notification area turns gray to restart your computer, the Drive Xpert icon on the motherboard. Click Disable to Normal Mode: 1. After restarting your computer at once. 4. To change to start configuration. 3. ASUS P5QC 4-41 Click Mode Change to return to disable the Drive...
User Manual
Page 158
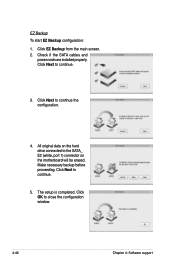
Click Next to the SATA_ E2 (white, port 1) connector on the motherboard will be erased. All original data on the hard drive connected to continue. 3. The setup is completed. Check if the SATA cables and power cords are installed properly. Click Next to close the configuration window. 4-46 Chapter 4: Software support Make necessary backup before proceeding. Click EZ Backup from the main screen. 2. Click OK to continue. 5. Click Next to continue the configuration. 4. EZ Backup To start EZ Backup configuration: 1.
Click Next to the SATA_ E2 (white, port 1) connector on the motherboard will be erased. All original data on the hard drive connected to continue. 3. The setup is completed. Check if the SATA cables and power cords are installed properly. Click Next to close the configuration window. 4-46 Chapter 4: Software support Make necessary backup before proceeding. Click EZ Backup from the main screen. 2. Click OK to continue. 5. Click Next to continue the configuration. 4. EZ Backup To start EZ Backup configuration: 1.
User Manual
Page 180
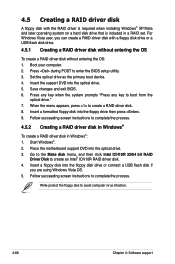
...optical drive. 3. Save changes and exit BIOS. 6. Follow succeeding screen instructions to complete the process. 4.5.2 Creating a RAID driver disk in Windows® To create a RAID driver disk in a RAID set. Write-protect the floppy disk to boot from the optical drive." 7. Press... Intel® ICH10R RAID driver disk. 4. Press during POST to enter the BIOS setup utility. 3. Place the motherboard support DVD into the optical drive. 5. For Windows Vista user, you are using Windows Vista OS. 5. 4.5 Creating a RAID driver disk A floppy disk with a floppy disk drive or a USB ...
...optical drive. 3. Save changes and exit BIOS. 6. Follow succeeding screen instructions to complete the process. 4.5.2 Creating a RAID driver disk in Windows® To create a RAID driver disk in a RAID set. Write-protect the floppy disk to boot from the optical drive." 7. Press... Intel® ICH10R RAID driver disk. 4. Press during POST to enter the BIOS setup utility. 3. Place the motherboard support DVD into the optical drive. 5. For Windows Vista user, you are using Windows Vista OS. 5. 4.5 Creating a RAID driver disk A floppy disk with a floppy disk drive or a USB ...
User Manual
Page 185
... Intel® LGA775 processors running on 32-bit operating systems. • The motherboard comes with EIST support (Windows® Vista, Windows® XP SP2 / Linux 2.6 kernel or later versions) ASUS P5QC A-1 You can download the latest BIOS file from the ASUS website (www.asus.com/ support/download/) if you need to update the BIOS. See Chapter 4 for...
... Intel® LGA775 processors running on 32-bit operating systems. • The motherboard comes with EIST support (Windows® Vista, Windows® XP SP2 / Linux 2.6 kernel or later versions) ASUS P5QC A-1 You can download the latest BIOS file from the ASUS website (www.asus.com/ support/download/) if you need to update the BIOS. See Chapter 4 for...
User Manual
Page 187
com/info/hyperthreading. Restart the computer. A.3 Intel® Hyper-Threading Technology • The motherboard supports Intel® Pentium® 4 LGA775 processors with Hyper-Threading Technology. • Hyper-Threading Technology is recommended. • Make sure to ...Service Pack 1 or later version is supported under Windows® Vista/XP and Linux 2.4.x (kernel) and later versions only. Using the Hyper-Threading Technology To use the Hyper-Threading compiler to [Enabled]. Power up the system and enter the BIOS Setup. ASUS P5QC A-3 Under the Advanced Menu, make sure that ...
com/info/hyperthreading. Restart the computer. A.3 Intel® Hyper-Threading Technology • The motherboard supports Intel® Pentium® 4 LGA775 processors with Hyper-Threading Technology. • Hyper-Threading Technology is recommended. • Make sure to ...Service Pack 1 or later version is supported under Windows® Vista/XP and Linux 2.4.x (kernel) and later versions only. Using the Hyper-Threading Technology To use the Hyper-Threading compiler to [Enabled]. Power up the system and enter the BIOS Setup. ASUS P5QC A-3 Under the Advanced Menu, make sure that ...


