User Manual
Page 19
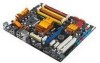
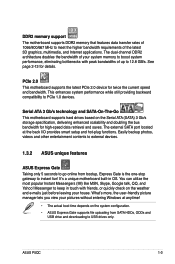
... the most popular Instant Messengers (IM) like MSN, Skype, Google talk, QQ, and Yahoo! It's a unique motherboard built-in touch with peak bandwidths of up to USB drives only. See page 2‑13 for twice the current speed and bandwidth. What's more, the user-friendly...SATA-On-The-Go This motherboard supports hard drives based on the system configuration. • ASUS Express Gate supports file uploading from bootup, Express Gate is the one-stop gateway to PCIe 1.0 devices. ASUS P5QC 1-3 The external SATA port located at anytime! • The actual boot time depends on the ...
... the most popular Instant Messengers (IM) like MSN, Skype, Google talk, QQ, and Yahoo! It's a unique motherboard built-in touch with peak bandwidths of up to USB drives only. See page 2‑13 for twice the current speed and bandwidth. What's more, the user-friendly...SATA-On-The-Go This motherboard supports hard drives based on the system configuration. • ASUS Express Gate supports file uploading from bootup, Express Gate is the one-stop gateway to PCIe 1.0 devices. ASUS P5QC 1-3 The external SATA port located at anytime! • The actual boot time depends on the ...

User Manual
Page 72
... the EZ Flash 2 by pressing + during POST to download the latest BIOS file for the motherboard. 2. To update the BIOS using a DOS‑based utility. ASUSTek EZ Flash 2 BIOS ROM ...Utility V3.25 FLASH TYPE: WXIC 25L8005 Current ROM BOARD: P5QC VER: 0405 DATE: 05/20/2008 Update ROM BOARD: Unknown VER: Unknown DATE: Unknown PATH: A:\ ...The ASUS EZ Flash 2 feature allows you to update the BIOS without having to a floppy disk or a USB flash disk, then restart the system. 3. Save the BIOS file to go through the long process of booting from...
... the EZ Flash 2 by pressing + during POST to download the latest BIOS file for the motherboard. 2. To update the BIOS using a DOS‑based utility. ASUSTek EZ Flash 2 BIOS ROM ...Utility V3.25 FLASH TYPE: WXIC 25L8005 Current ROM BOARD: P5QC VER: 0405 DATE: 05/20/2008 Update ROM BOARD: Unknown VER: Unknown DATE: Unknown PATH: A:\ ...The ASUS EZ Flash 2 feature allows you to update the BIOS without having to a floppy disk or a USB flash disk, then restart the system. 3. Save the BIOS file to go through the long process of booting from...

User Manual
Page 90
... system to adjust the ratio between CPU Core Clock and the FSB Frequency. BIOS SETUP UTILITY Main Ai Tweaker Advanced Power Boot Tools Exit CPU Configuration Chipset Onboard Devices Configuration USB Configuration PCIPnP Configure CPU. BIOS SETUP UTILITY Advanced Configure advanced CPU settings Manufacturer:Intel Brand String:Intel(R) Core(TM)2 Duo CPU...
... system to adjust the ratio between CPU Core Clock and the FSB Frequency. BIOS SETUP UTILITY Main Ai Tweaker Advanced Power Boot Tools Exit CPU Configuration Chipset Onboard Devices Configuration USB Configuration PCIPnP Configure CPU. BIOS SETUP UTILITY Advanced Configure advanced CPU settings Manufacturer:Intel Brand String:Intel(R) Core(TM)2 Duo CPU...

User Manual
Page 95
... O/S [No] NO: lets the BIOS configure all the devices in the system. Configuration options: [No] [Yes] ASUS P5QC 3-27 If detected, the USB controller legacy mode is disabled. BIOS SETUP UTILITY Advanced Advanced PCI/PnP Settings WARNING: Setting wrong values in below sections may...operating system configures the Plug and Play devices not required for boot. Configuration options: [Disabled] [Enabled] [Auto] 3.5.5 PCIPnP The PCIPnP menu items allow you to enable or disable the support for legacy USB devices. Select Screen Select Item +- Change Option F1 General ...
... O/S [No] NO: lets the BIOS configure all the devices in the system. Configuration options: [No] [Yes] ASUS P5QC 3-27 If detected, the USB controller legacy mode is disabled. BIOS SETUP UTILITY Advanced Advanced PCI/PnP Settings WARNING: Setting wrong values in below sections may...operating system configures the Plug and Play devices not required for boot. Configuration options: [Disabled] [Enabled] [Auto] 3.5.5 PCIPnP The PCIPnP menu items allow you to enable or disable the support for legacy USB devices. Select Screen Select Item +- Change Option F1 General ...
User Manual
Page 107
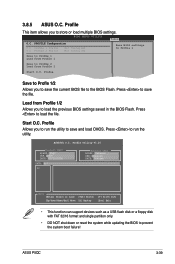
... settings saved in the BIOS Flash. Profile Allows you to load the file. Profile Utility V1.25 Current CMOS BOARD: P5QC VER: 0405 DATE: 05/20/2008 PATH: A:\ A: Restore CMOS BOARD: Unknown VER: Unknown DATE: Unknown Note [...support devices such as a USB flash disk or a floppy disk with FAT 32/16 format and single partition only. • DO NOT shut down or reset the system while updating the BIOS to save the file. ASUS P5QC 3-39 PROFILE Configuration O.C. .... Press to run the utility to prevent the system boot failure! Start O.C. ASUSTek O.C. 3.8.5 ASUS O.C.
... settings saved in the BIOS Flash. Profile Allows you to load the file. Profile Utility V1.25 Current CMOS BOARD: P5QC VER: 0405 DATE: 05/20/2008 PATH: A:\ A: Restore CMOS BOARD: Unknown VER: Unknown DATE: Unknown Note [...support devices such as a USB flash disk or a floppy disk with FAT 32/16 format and single partition only. • DO NOT shut down or reset the system while updating the BIOS to save the file. ASUS P5QC 3-39 PROFILE Configuration O.C. .... Press to run the utility to prevent the system boot failure! Start O.C. ASUSTek O.C. 3.8.5 ASUS O.C.
User Manual
Page 180
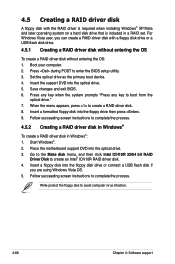
...OS. 5. Insert the support DVD into the floppy disk drive or connect a USB flash disk if you can create a RAID driver disk with the RAID driver is... When the menu appears, press to create an Intel® ICH10R RAID driver disk. 4. Place the motherboard support DVD into the floppy drive then press . 9. Go to the Make disk menu, and then .... 8. Follow succeeding screen instructions to boot from the optical drive." 7. Insert a formatted floppy disk into the optical drive. 3. Boot your computer. 2. Set the optical drive as the primary boot device. 4. Start Windows®. ...
...OS. 5. Insert the support DVD into the floppy disk drive or connect a USB flash disk if you can create a RAID driver disk with the RAID driver is... When the menu appears, press to create an Intel® ICH10R RAID driver disk. 4. Place the motherboard support DVD into the floppy drive then press . 9. Go to the Make disk menu, and then .... 8. Follow succeeding screen instructions to boot from the optical drive." 7. Insert a formatted floppy disk into the optical drive. 3. Boot your computer. 2. Set the optical drive as the primary boot device. 4. Start Windows®. ...


