
P5P800 SE User's Manual for English Edition
Page 4
... BIOS setup 4.1 Managing and updating your BIOS 4-1 4.1.1 Creating a bootable floppy disk 4-1 4.1.2 ASUS EZ Flash utility 4-2 4.1.3 AFUDOS utility 4-3 4.1.4 ASUS CrashFree BIOS 2 utility 4-5 4.1.5 ASUS Update utility 4-7 4.2 BIOS setup program 4-10 4.2.1 BIOS menu screen 4-11 4.2.2 Menu bar 4-...11 4.2.3 Navigation keys 4-11 4.2.4 Menu items 4-12 4.2.5 Sub-menu items 4-12 4.2.6 Configuration fields 4-12 4.2.7 Pop-up window 4-12 4.2.8...
... BIOS setup 4.1 Managing and updating your BIOS 4-1 4.1.1 Creating a bootable floppy disk 4-1 4.1.2 ASUS EZ Flash utility 4-2 4.1.3 AFUDOS utility 4-3 4.1.4 ASUS CrashFree BIOS 2 utility 4-5 4.1.5 ASUS Update utility 4-7 4.2 BIOS setup program 4-10 4.2.1 BIOS menu screen 4-11 4.2.2 Menu bar 4-...11 4.2.3 Navigation keys 4-11 4.2.4 Menu items 4-12 4.2.5 Sub-menu items 4-12 4.2.6 Configuration fields 4-12 4.2.7 Pop-up window 4-12 4.2.8...

P5P800 SE User's Manual for English Edition
Page 27
... a CPU. 3. 2. Gold triangle mark ASUS P5P800 SE A 2-7 To prevent damage to the left corner of the cam box should fit A l i g n m e n t k e y into the CPU notch. Position the CPU over the socket, making sure that the gold triangle is on the bottom-left (B) until it is released from the load plate window to a 135º angle...
... a CPU. 3. 2. Gold triangle mark ASUS P5P800 SE A 2-7 To prevent damage to the left corner of the cam box should fit A l i g n m e n t k e y into the CPU notch. Position the CPU over the socket, making sure that the gold triangle is on the bottom-left (B) until it is released from the load plate window to a 135º angle...

P5P800 SE User's Manual for English Edition
Page 46
SATA2 GND RSATA_TXP2 RSATA_TXN2 GND RSATA_RXP2 RSATA_RXN2 GND ® P5P800 SE SATA1 P5P800 SE SATA connectors GND RSATA_TXP1 RSATA_TXN1 GND RSATA_RXP1 RSATA_RXN1 GND Important notes on Serial ATA • Install the Windows® 2000 Service Pack 4 or the Windows® XP Service Pack1 or later versions before using the Serial ATA feature. • ...8226; The ICH chipset support to one of the IDE channels (either primary or secondary channel) is disabled in a legacy operating system (DOS, Windows® 98/ME) when you use the SATA connectors. 2-26 Chapter 2: Hardware information 3 .
SATA2 GND RSATA_TXP2 RSATA_TXN2 GND RSATA_RXP2 RSATA_RXN2 GND ® P5P800 SE SATA1 P5P800 SE SATA connectors GND RSATA_TXP1 RSATA_TXN1 GND RSATA_RXP1 RSATA_RXN1 GND Important notes on Serial ATA • Install the Windows® 2000 Service Pack 4 or the Windows® XP Service Pack1 or later versions before using the Serial ATA feature. • ...8226; The ICH chipset support to one of the IDE channels (either primary or secondary channel) is disabled in a legacy operating system (DOS, Windows® 98/ME) when you use the SATA connectors. 2-26 Chapter 2: Hardware information 3 .
P5P800 SE User's Manual for English Edition
Page 47
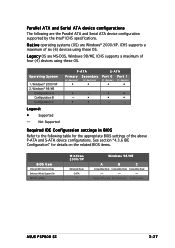
... Parallel ATA and Serial ATA device configuration supported by the Intel® ICH5 specifications. Windows 98/ME A B C Compatible Mode Compatible Mode Compatible Mode - - - Primary P-ATA+S-ATA Sec. Windows® 98/ME Configuration A Configuration B Configuration C Legend: • Supported -... Mode Support On IDE Port Settings Windows 2000/XP Enhanced Mode S-ATA - See section "4.3.6 IDE Configuration" for the appropriate BIOS settings of the above P-ATA and S-ATA device configurations. P-ATA+S-ATA P-ATA Ports Only ASUS P5P800 SE 2-27 Not Supported P-ATA Primary ...
... Parallel ATA and Serial ATA device configuration supported by the Intel® ICH5 specifications. Windows 98/ME A B C Compatible Mode Compatible Mode Compatible Mode - - - Primary P-ATA+S-ATA Sec. Windows® 98/ME Configuration A Configuration B Configuration C Legend: • Supported -... Mode Support On IDE Port Settings Windows 2000/XP Enhanced Mode S-ATA - See section "4.3.6 IDE Configuration" for the appropriate BIOS settings of the above P-ATA and S-ATA device configurations. P-ATA+S-ATA P-ATA Ports Only ASUS P5P800 SE 2-27 Not Supported P-ATA Primary ...

P5P800 SE User's Manual for English Edition
Page 58
... While the system is selected, then click the O K button to soft-off mode, depending on the BIOS setting. The power supply should turn off after Windows® shuts down. Pressing the power switch for less than four seconds lets the system enter the soft-off mode regardless of the BIOS setting... Chapter 4 for details. 3-2 Chapter 3: Powering up Click the S t a r t button then select T u r n O f f C o m p u t e r . 2. 3.2 Powering off the computer 3.2.1 Using the OS shut down function If you are using Windows® XP: 1. If you are using...
... While the system is selected, then click the O K button to soft-off mode, depending on the BIOS setting. The power supply should turn off after Windows® shuts down. Pressing the power switch for less than four seconds lets the system enter the soft-off mode regardless of the BIOS setting... Chapter 4 for details. 3-2 Chapter 3: Powering up Click the S t a r t button then select T u r n O f f C o m p u t e r . 2. 3.2 Powering off the computer 3.2.1 Using the OS shut down function If you are using Windows® XP: 1. If you are using...

P5P800 SE User's Manual for English Edition
Page 61
...; environment.) Refer to the corresponding sections for Windows® 2000: a. A S U S C r a s h F r e e B I O S 2 (Updates the BIOS using the ASUS Update or AFUDOS utilities. 4.1.1 Creating a bootable floppy disk 1. A S U S U p d a t e (Updates the BIOS in DOS mode using a floppy disk during POST... 1.44 MB floppy disk into the drive. Do either one of boot disks for details on these utilities. Insert the Windows® 2000 CD to restore the BIOS in the future. e. ASUS P5P800SE 4-1 4.1 Managing and updating your BIOS The following to create a bootable floppy disk. A S U S E Z F l a s ...
...; environment.) Refer to the corresponding sections for Windows® 2000: a. A S U S C r a s h F r e e B I O S 2 (Updates the BIOS using the ASUS Update or AFUDOS utilities. 4.1.1 Creating a bootable floppy disk 1. A S U S U p d a t e (Updates the BIOS in DOS mode using a floppy disk during POST... 1.44 MB floppy disk into the drive. Do either one of boot disks for details on these utilities. Insert the Windows® 2000 CD to restore the BIOS in the future. e. ASUS P5P800SE 4-1 4.1 Managing and updating your BIOS The following to create a bootable floppy disk. A S U S E Z F l a s ...
P5P800 SE User's Manual for English Edition
Page 67
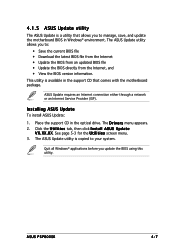
... allows you update the BIOS using this utility. Quit all Windows® applications before you to manage, save, and update the motherboard BIOS in Windows® environment. X X. Installing ASUS Update To install ASUS Update: 1. The D r i v e r s menu appears. 2. See page 5-3 for the U t i l i t i e s screen menu. 3. ASUS P5P800SE 4-7 The ASUS Update utility allows you to your system. Click the...
... allows you update the BIOS using this utility. Quit all Windows® applications before you to manage, save, and update the motherboard BIOS in Windows® environment. X X. Installing ASUS Update To install ASUS Update: 1. The D r i v e r s menu appears. 2. See page 5-3 for the U t i l i t i e s screen menu. 3. ASUS P5P800SE 4-7 The ASUS Update utility allows you to your system. Click the...

P5P800 SE User's Manual for English Edition
Page 68
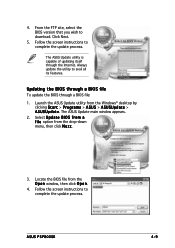
N e x t. Select U p d a t e B I n t e r n e t option from the Windows® desktop by clicking S t a r t > P r o g r a m s > A S U S > A S U S U p d a t e > A S U S U p d a t e. Click N e x t. 4-8 Chapter 4: BIOS setup Select the ASUS FTP site t h e I O S f r o m 3. The ASUS Update main window appears. 2. Updating the BIOS through the Internet To update the BIOS through the Internet: 1. Launch the ASUS Update utility from the nearest you to avoid network drop-down menu, then click traffic, or click A u t o S e l e c t.
N e x t. Select U p d a t e B I n t e r n e t option from the Windows® desktop by clicking S t a r t > P r o g r a m s > A S U S > A S U S U p d a t e > A S U S U p d a t e. Click N e x t. 4-8 Chapter 4: BIOS setup Select the ASUS FTP site t h e I O S f r o m 3. The ASUS Update main window appears. 2. Updating the BIOS through the Internet To update the BIOS through the Internet: 1. Launch the ASUS Update utility from the nearest you to avoid network drop-down menu, then click traffic, or click A u t o S e l e c t.
P5P800 SE User's Manual for English Edition
Page 69
... is capable of updating itself through a BIOS file: 1. Follow the screen instructions to complete the update process. Launch the ASUS Update utility from the O p e n window, then click O p e n. 4. Locate the BIOS file from the Windows® desktop by clicking S t a r t > P r o g r a m s > A S U S > A S U S U p d a t e > A S U S U p d a t e. Follow the screen instructions to complete the update process. Select U p d a t e B I O S f r o m a f i l e option from the drop-down...
... is capable of updating itself through a BIOS file: 1. Follow the screen instructions to complete the update process. Launch the ASUS Update utility from the O p e n window, then click O p e n. 4. Locate the BIOS file from the Windows® desktop by clicking S t a r t > P r o g r a m s > A S U S > A S U S U p d a t e > A S U S U p d a t e. Follow the screen instructions to complete the update process. Select U p d a t e B I O S f r o m a f i l e option from the drop-down...

P5P800 SE User's Manual for English Edition
Page 72
... [Enabled] MPS Revision [1.4] Select Screen Select Item +- A configurable field is enclosed in the sections below may cause system to display a pop-up window Scroll bar 4-12 Chapter 4: BIOS setup Press the Up/Down arrow keys or / keys to display the other items (Advanced, Power, Boot, and...IDE Slave Third IDE Master Fourth IDE Master IDE Configuration System Information [11:10:19] [Thu 03/27/2003] [1.44M, 3.5 in] [English] :[ST320413A] :[ASUS CD-S340] :[Not Detected] :[Not Detected] :[Not Detected] :[Not Detected] Main menu items Use [ENTER], [TAB] or [SHIFT-TAB] to select a ...
... [Enabled] MPS Revision [1.4] Select Screen Select Item +- A configurable field is enclosed in the sections below may cause system to display a pop-up window Scroll bar 4-12 Chapter 4: BIOS setup Press the Up/Down arrow keys or / keys to display the other items (Advanced, Power, Boot, and...IDE Slave Third IDE Master Fourth IDE Master IDE Configuration System Information [11:10:19] [Thu 03/27/2003] [1.44M, 3.5 in] [English] :[ST320413A] :[ASUS CD-S340] :[Not Detected] :[Not Detected] :[Not Detected] :[Not Detected] Main menu items Use [ENTER], [TAB] or [SHIFT-TAB] to select a ...

P5P800 SE User's Manual for English Edition
Page 75
...IDE Configuration The items in this menu allow you wish to Enhanced Mode if you installed. Configuration options: [Compatible Mode] [Enhanced Mode] ASUS P5P800 SE 4-15 Set to configure the item. IDE Configuration Onboard IDE Operate Mode Enhanced Mode Support On IDE Detect Time Out (Sec) [Enhanced ... Operate Mode [Enhanced Mode] Allows selection of the IDE operation mode depending on the operating system (OS) that you are using native OS, such as Windows® 2000/XP. Configuration options: [Auto] [SWDMA0] [SWDMA1] [SWDMA2] [MWDMA0] [MWDMA1] [MWDMA2] [UDMA0] [UDMA1] [UDMA2] [UDMA3] ...
...IDE Configuration The items in this menu allow you wish to Enhanced Mode if you installed. Configuration options: [Compatible Mode] [Enhanced Mode] ASUS P5P800 SE 4-15 Set to configure the item. IDE Configuration Onboard IDE Operate Mode Enhanced Mode Support On IDE Detect Time Out (Sec) [Enhanced ... Operate Mode [Enhanced Mode] Allows selection of the IDE operation mode depending on the operating system (OS) that you are using native OS, such as Windows® 2000/XP. Configuration options: [Auto] [SWDMA0] [SWDMA1] [SWDMA2] [MWDMA0] [MWDMA1] [MWDMA2] [UDMA0] [UDMA1] [UDMA2] [UDMA3] ...

P5P800 SE User's Manual for English Edition
Page 99
... values. An onboard backup battery sustains the CMOS RAM so it stays on the Setup menus. When you press , a confirmation window appears. Exit & Discard Changes Select this option only if you do not want to save your changes before exiting. Press to ... when the PC is turned off. Select Y e s to save the changes while exiting. When you select this option or if you select this option, a confirmation window appears. ASUS P5P800 SE 4-39 F10 key can be used for this option, a confirmation appears. Select E x i t & S a v e C h a n g e s or make other than System ...
... values. An onboard backup battery sustains the CMOS RAM so it stays on the Setup menus. When you press , a confirmation window appears. Exit & Discard Changes Select this option only if you do not want to save your changes before exiting. Press to ... when the PC is turned off. Select Y e s to save the changes while exiting. When you select this option or if you select this option, a confirmation window appears. ASUS P5P800 SE 4-39 F10 key can be used for this option, a confirmation appears. Select E x i t & S a v e C h a n g e s or make other than System ...
P5P800 SE User's Manual for English Edition
Page 103
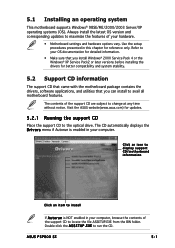
..., software applications, and utilities that you install Windows® 2000 Service Pack 4 or the Windows® XP Service Pack2 or later versions before installing the drivers for updates. 5.2.1 Running the support CD Place the support CD to your hardware. • Motherboard settings and hardware options vary. ASUS P5P800 SE 5-1 Click an icon to display support...
..., software applications, and utilities that you install Windows® 2000 Service Pack 4 or the Windows® XP Service Pack2 or later versions before installing the drivers for updates. 5.2.1 Running the support CD Place the support CD to your hardware. • Motherboard settings and hardware options vary. ASUS P5P800 SE 5-1 Click an icon to display support...
P5P800 SE User's Manual for English Edition
Page 109
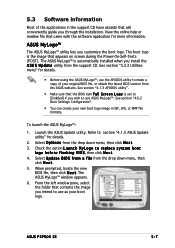
...-Self-Tests (POST). To launch the ASUS MyLogo™: 1. The ASUS MyLogo™ window appears. 6. ASUS MyLogo™ The ASUS MyLogo™ utility lets you customize the boot logo. See section "5.2.3 Utilities menu" for details. • Before using the ASUS MyLogo™, use ASUS MyLogo™. ASUS P5P800 SE 5-7 Check the option L a u n c h M y L o g o t o r e p l a c e s y s t e m b o o t l o g o b e f o r e f l a s h i n g B I O S f r o m a f i l e from the ASUS website. The boot logo is automatically...
...-Self-Tests (POST). To launch the ASUS MyLogo™: 1. The ASUS MyLogo™ window appears. 6. ASUS MyLogo™ The ASUS MyLogo™ utility lets you customize the boot logo. See section "5.2.3 Utilities menu" for details. • Before using the ASUS MyLogo™, use ASUS MyLogo™. ASUS P5P800 SE 5-7 Check the option L a u n c h M y L o g o t o r e p l a c e s y s t e m b o o t l o g o b e f o r e f l a s h i n g B I O S f r o m a f i l e from the ASUS website. The boot logo is automatically...

P5P800 SE User's Manual for English Edition
Page 110
After flashing the BIOS, restart the computer to load the new boot logo. 10. When the screen returns to the ASUS Update utility, flash the original BIOS to display the new boot logo during POST. 5-8 Chapter 5: Software support 7. Adjust the boot image to enlarge by selecting a value on it. 8. When the logo images appear on the right window pane, select an image to your desired size by clicking on the R a t i o box. 9.
After flashing the BIOS, restart the computer to load the new boot logo. 10. When the screen returns to the ASUS Update utility, flash the original BIOS to display the new boot logo during POST. 5-8 Chapter 5: Software support 7. Adjust the boot image to enlarge by selecting a value on it. 8. When the logo images appear on the right window pane, select an image to your desired size by clicking on the R a t i o box. 9.
P5P800 SE User's Manual for English Edition
Page 113
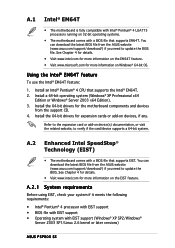
...). 3. Install the 64-bit drivers for more information on Windows® 64-bit OS. See Chapter 4 for details. • Visit www.intel.com for the motherboard components and devices from the ASUS website (www.asus.com/support/download/) if you need to verify if the card...174; 4 LGA775 processors running on 32-bit operating systems. • The motherboard comes with EIST support (Windows® XP SP2/Windows® Server 2003 SP1/Linux 2.6 kernel or later versions) ASUS P5P800 SE Using the Intel® EM64T feature To use the Intel® EM64T feature: 1. A.2 Enhanced Intel SpeedStep...
...). 3. Install the 64-bit drivers for more information on Windows® 64-bit OS. See Chapter 4 for details. • Visit www.intel.com for the motherboard components and devices from the ASUS website (www.asus.com/support/download/) if you need to verify if the card...174; 4 LGA775 processors running on 32-bit operating systems. • The motherboard comes with EIST support (Windows® XP SP2/Windows® Server 2003 SP1/Linux 2.6 kernel or later versions) ASUS P5P800 SE Using the Intel® EM64T feature To use the Intel® EM64T feature: 1. A.2 Enhanced Intel SpeedStep...

P5P800 SE User's Manual for English Edition
Page 114
... SpeedStep Technology item to save your changes and exit the BIOS setup. 5. Click the Power button on the operating system. Close the Display Properties window. After you adjust the power scheme, the CPU internal frequency slightly decreases when the CPU loading is low. Press to [Automatic], then press ...., highlight CPU Configuration, then press . 3. A.2.2 Using the EIST To use the EIST feature: 1. Go to open the Power Options Properties window. 8. After the computer restarts, right click on a blank space on the computer, then enter the BIOS Setup. 2. When the Display Properties...
... SpeedStep Technology item to save your changes and exit the BIOS setup. 5. Click the Power button on the operating system. Close the Display Properties window. After you adjust the power scheme, the CPU internal frequency slightly decreases when the CPU loading is low. Press to [Automatic], then press ...., highlight CPU Configuration, then press . 3. A.2.2 Using the EIST To use the EIST feature: 1. Go to open the Power Options Properties window. 8. After the computer restarts, right click on a blank space on the computer, then enter the BIOS Setup. 2. When the Display Properties...

P5P800 SE User's Manual for English Edition
Page 115
...the Hyper-Threading Technology: 1. Under the A d v a n c e d M e n u, make sure that supports Hyper-Threading Technology. 2. ASUS P5P800 SE A.3 Intel® Hyper-Threading Technology • The motherboard supports Intel® Pentium® 4 LGA775 processors with Hyper-Threading Technology. • Hyper-Threading ..., disable the Hyper-Threading Techonology item in the BIOS to ensure system stability and performance. • Installing Windows® XP Service Pack 1 or later version is supported under Windows® XP/2003 Server and Linux 2.4.x (kernel) and later versions only.
...the Hyper-Threading Technology: 1. Under the A d v a n c e d M e n u, make sure that supports Hyper-Threading Technology. 2. ASUS P5P800 SE A.3 Intel® Hyper-Threading Technology • The motherboard supports Intel® Pentium® 4 LGA775 processors with Hyper-Threading Technology. • Hyper-Threading ..., disable the Hyper-Threading Techonology item in the BIOS to ensure system stability and performance. • Installing Windows® XP Service Pack 1 or later version is supported under Windows® XP/2003 Server and Linux 2.4.x (kernel) and later versions only.


