User Manual
Page 3
... Chapter 1: Product introduction 1.1 Welcome 1-1 1.2 Package contents 1-1 1.3 Special features 1-1 1.3.1 Product highlights 1-1 1.3.2 Innovative ASUS features 1-2 1.4 Before you proceed 1-4 1.5 Motherboard overview 1-5 1.5.1 Placement direction 1-5 1.5.2 Screw holes 1-5 1.5.3 Motherboard layout 1-6 1.5.4 Layout contents 1-6 1.6 Central Processing Unit (CPU 1-7 1.6.1 Installing the CPU 1-7 1.6.2 Installing the CPU heatsink and fan 1-10 1.6.3 Uninstalling the CPU heatsink and fan 1-11 1.7 System memory 1-12 1.7.1 Overview 1-12 1.7.2 Memory configurations 1-13...
... Chapter 1: Product introduction 1.1 Welcome 1-1 1.2 Package contents 1-1 1.3 Special features 1-1 1.3.1 Product highlights 1-1 1.3.2 Innovative ASUS features 1-2 1.4 Before you proceed 1-4 1.5 Motherboard overview 1-5 1.5.1 Placement direction 1-5 1.5.2 Screw holes 1-5 1.5.3 Motherboard layout 1-6 1.5.4 Layout contents 1-6 1.6 Central Processing Unit (CPU 1-7 1.6.1 Installing the CPU 1-7 1.6.2 Installing the CPU heatsink and fan 1-10 1.6.3 Uninstalling the CPU heatsink and fan 1-11 1.7 System memory 1-12 1.7.1 Overview 1-12 1.7.2 Memory configurations 1-13...

User Manual
Page 4
... utility 2-1 2.1.2 ASUS EZ Flash 2 2-2 2.1.3 ASUS CrashFree BIOS 3 2-3 2.2 BIOS setup program 2-4 2.2.1 BIOS menu screen 2-5 2.2.2 Menu bar 2-5 2.2.3 Navigation keys 2-6 2.2.4 Menu items 2-6 2.2.5 Submenu items 2-6 2.2.6 Configuration fields 2-6 2.2.7 Pop-up window 2-6 2.2.8 Scroll bar 2-6 2.2.9 General help 2-6 2.3 Main menu 2-7 2.3.1 System Time 2-7 2.3.2 System Date 2-7 2.3.3 SATA 1~6 2-7 2.3.4 Storage Configuration 2-8 2.3.5 System Information 2-9 2.4 Ai Tweaker menu 2-9 2.5 Advanced menu 2-14 2.5.1 CPU Configuration 2-14 2.5.2 Chipset 2-15 2.5.3 Onboard...
... utility 2-1 2.1.2 ASUS EZ Flash 2 2-2 2.1.3 ASUS CrashFree BIOS 3 2-3 2.2 BIOS setup program 2-4 2.2.1 BIOS menu screen 2-5 2.2.2 Menu bar 2-5 2.2.3 Navigation keys 2-6 2.2.4 Menu items 2-6 2.2.5 Submenu items 2-6 2.2.6 Configuration fields 2-6 2.2.7 Pop-up window 2-6 2.2.8 Scroll bar 2-6 2.2.9 General help 2-6 2.3 Main menu 2-7 2.3.1 System Time 2-7 2.3.2 System Date 2-7 2.3.3 SATA 1~6 2-7 2.3.4 Storage Configuration 2-8 2.3.5 System Information 2-9 2.4 Ai Tweaker menu 2-9 2.5 Advanced menu 2-14 2.5.1 CPU Configuration 2-14 2.5.2 Chipset 2-15 2.5.3 Onboard...
User Manual
Page 9
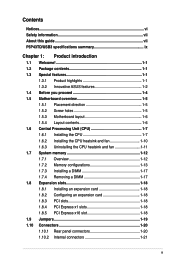
Optical S/PDIF out ports at the back panel (continued on the blue slots for better overclocking capability. ** Refer to www.asus.com or this user manual for Intel® CPU support list. Intel® ICH10 Chipset: - 10 x USB 2.0/1.1 ports (6 ports at mid-board, 4 ports at the back panel) NEC...174; dual-core / Celeron® dual-core processors Supports Intel® 45nm multi-core CPU Intel® Hyper-Threading Technology ready Support Enhanced Intel SpeedStep Technology (EIST) * Refer to www.asus.com for the Memory QVL (Qualified Vendors Lists). *** When you are using a Windows®...
Optical S/PDIF out ports at the back panel (continued on the blue slots for better overclocking capability. ** Refer to www.asus.com or this user manual for Intel® CPU support list. Intel® ICH10 Chipset: - 10 x USB 2.0/1.1 ports (6 ports at mid-board, 4 ports at the back panel) NEC...174; dual-core / Celeron® dual-core processors Supports Intel® 45nm multi-core CPU Intel® Hyper-Threading Technology ready Support Enhanced Intel SpeedStep Technology (EIST) * Refer to www.asus.com for the Memory QVL (Qualified Vendors Lists). *** When you are using a Windows®...
User Manual
Page 10
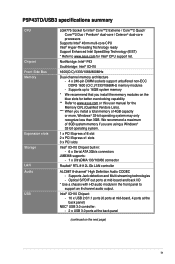
... ASUS Turbo Key ASUS EPU-4 Engine Stack Cool 3 Anti-Surge Protection ASUS Express Gate ASUS CrashFree BIOS 3 ASUS EZ Flash 2 ASUS Q-Fan 2 ASUS AI NET 2 ASUS MyLogo... 2 1 x PS/2 Mouse port 1 x PS/2 Keyboard port 1 x Optical S/PDIF out port 1 x COM port 1 x LAN (RJ-45) port 2 x USB 3.0/2.0 ports 4 x USB 2.0/1.1 ports 3 x audio jacks 3 x USB 2.0/1.1 connectors support additional 6 USB 2.0/1.1 ports 1 x IDE connector 1 x System panel connector 1 x LPT connector 1 x S/PDIF Out connector 6 x SATA connectors 1 x Front panel audio connector 1 x CPU...
... ASUS Turbo Key ASUS EPU-4 Engine Stack Cool 3 Anti-Surge Protection ASUS Express Gate ASUS CrashFree BIOS 3 ASUS EZ Flash 2 ASUS Q-Fan 2 ASUS AI NET 2 ASUS MyLogo... 2 1 x PS/2 Mouse port 1 x PS/2 Keyboard port 1 x Optical S/PDIF out port 1 x COM port 1 x LAN (RJ-45) port 2 x USB 3.0/2.0 ports 4 x USB 2.0/1.1 ports 3 x audio jacks 3 x USB 2.0/1.1 connectors support additional 6 USB 2.0/1.1 ports 1 x IDE connector 1 x System panel connector 1 x LPT connector 1 x S/PDIF Out connector 6 x SATA connectors 1 x Front panel audio connector 1 x CPU...
User Manual
Page 11
...contents Check your motherboard package for multitasking, multimedia, and enthusiastic gamers with 1600 (O.C.)/1333/1066MHz FSB. ASUS P5P43TD/USB3 1-1 Before you for buying an ASUS® P5P43TD/USB3 motherboard! Chapter 1 Product introduction 1.1 Welcome! Thank you start installing the motherboard, ..., contact your retailer. 1.3 1.3.1 Special features Product highlights Intel® Core™2 Extreme / Core™2 Quad / Core™2 Duo CPU support This motherboard supports Intel® LGA775 Core™ 2 Extreme / Core™ 2 Quad / Core™ 2 Duo processors, which...
...contents Check your motherboard package for multitasking, multimedia, and enthusiastic gamers with 1600 (O.C.)/1333/1066MHz FSB. ASUS P5P43TD/USB3 1-1 Before you for buying an ASUS® P5P43TD/USB3 motherboard! Chapter 1 Product introduction 1.1 Welcome! Thank you start installing the motherboard, ..., contact your retailer. 1.3 1.3.1 Special features Product highlights Intel® Core™2 Extreme / Core™2 Quad / Core™2 Duo CPU support This motherboard supports Intel® LGA775 Core™ 2 Extreme / Core™ 2 Quad / Core™ 2 Duo processors, which...
User Manual
Page 13
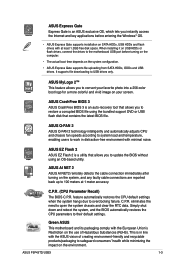
...• The actual boot time depends on the system configuration. • ASUS Express Gate supports file uploading from SATA HDDs, ODDs and USB drives. ASUS Q-FAN 2 ASUS Q-FAN 2 technology intelligently and automatically adjusts CPU and chassis fan speeds according to system load and temperature, enabling users to... noise. Simply shut down and reboot the system, and the BIOS automatically restores the CPU parameters to the motherboard USB port before entering the Windows® OS. • ASUS Express Gate supports installation on USB HDDs or flash drives, connect the drives to their...
...• The actual boot time depends on the system configuration. • ASUS Express Gate supports file uploading from SATA HDDs, ODDs and USB drives. ASUS Q-FAN 2 ASUS Q-FAN 2 technology intelligently and automatically adjusts CPU and chassis fan speeds according to system load and temperature, enabling users to... noise. Simply shut down and reboot the system, and the BIOS automatically restores the CPU parameters to the motherboard USB port before entering the Windows® OS. • ASUS Express Gate supports installation on USB HDDs or flash drives, connect the drives to their...

User Manual
Page 16
... 1-22 9. USB connectors (10-1 pin USB78, USB910, 1-26 USB1112) 4. Digital audio connector (4-1 pin SPDIF_OUT) 1-22 6. Clear RTC RAM (3-pin CLRTC) 1-19 1-6 Chapter 1: Product introduction LGA775 CPU socket 1-7 10. 1.5.3 Motherboard layout 1.5.4 Layout contents Connectors/Jumpers/Slots/LED Page Connectors/Jumpers/Slots/LED Page 1. LPT connector (26-1 pin LPT) 1-26...
... 1-22 9. USB connectors (10-1 pin USB78, USB910, 1-26 USB1112) 4. Digital audio connector (4-1 pin SPDIF_OUT) 1-22 6. Clear RTC RAM (3-pin CLRTC) 1-19 1-6 Chapter 1: Product introduction LGA775 CPU socket 1-7 10. 1.5.3 Motherboard layout 1.5.4 Layout contents Connectors/Jumpers/Slots/LED Page Connectors/Jumpers/Slots/LED Page 1. LPT connector (26-1 pin LPT) 1-26...

User Manual
Page 17
... damage to the PnP cap/socket contacts/motherboard components. ASUS will shoulder the cost of the PnP cap. ASUS P5P43TD/USB3 1-7 Contact your retailer immediately if the PnP cap is on your left. Before installing the CPU, ensure that the PnP cap is shipment/transit-related.... • Keep the cap after installing the motherboard. 1.6 Central Processing Unit (CPU) The motherboard comes...
... damage to the PnP cap/socket contacts/motherboard components. ASUS will shoulder the cost of the PnP cap. ASUS P5P43TD/USB3 1-7 Contact your retailer immediately if the PnP cap is on your left. Before installing the CPU, ensure that the PnP cap is shipment/transit-related.... • Keep the cap after installing the motherboard. 1.6 Central Processing Unit (CPU) The motherboard comes...

User Manual
Page 18
2. Lift the load lever in the direction of the socket then fit the socket alignment key into the CPU notch. CPU notch Gold triangle mark Alignment key 1-8 Chapter 1: Product introduction Lift the load plate with your thumb and forefinger to a 135º angle. 4. To prevent damage ... a 100º angle (4A), then push the PnP cap from the retention tab. Retention tab A B Load lever PnP cap Load plate 4B 4A 3 5. Position the CPU over the socket, ensuring that the gold triangle is released from the load plate window to the socket pins, do not remove the PnP cap...
2. Lift the load lever in the direction of the socket then fit the socket alignment key into the CPU notch. CPU notch Gold triangle mark Alignment key 1-8 Chapter 1: Product introduction Lift the load plate with your thumb and forefinger to a 135º angle. 4. To prevent damage ... a 100º angle (4A), then push the PnP cap from the retention tab. Retention tab A B Load lever PnP cap Load plate 4B 4A 3 5. Position the CPU over the socket, ensuring that the gold triangle is released from the load plate window to the socket pins, do not remove the PnP cap...
User Manual
Page 19
... push the load lever (B) until it off immediately, and seek professional medical help. If so, skip this step. If it gets into the A retention tab. B ASUS P5P43TD/USB3 1-9 To prevent contaminating the paste, DO NOT spread the paste with your skin, ensure that it is spread in contact with pre-applied...
... push the load lever (B) until it off immediately, and seek professional medical help. If so, skip this step. If it gets into the A retention tab. B ASUS P5P43TD/USB3 1-9 To prevent contaminating the paste, DO NOT spread the paste with your skin, ensure that it is spread in contact with pre-applied...

User Manual
Page 20
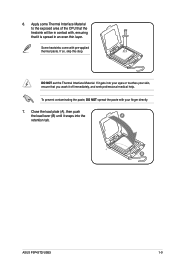
... installation steps and functions should remain the same. Ensure that you have properly applied Thermal Interface Material to the CPU heatsink or CPU before you install the CPU fan and heatsink assembly. B B Orient the heatsink and fan assembly A such that you use only Intel®... multi‑directional heatsink and fan. • Your Intel® LGA775 heatsink and fan assembly comes in place. 1.6.2 Installing the CPU heatsink and fan The Intel® LGA775 processor requires a specially designed heatsink and fan assembly to ensure optimum thermal condition and performance....
... installation steps and functions should remain the same. Ensure that you have properly applied Thermal Interface Material to the CPU heatsink or CPU before you install the CPU fan and heatsink assembly. B B Orient the heatsink and fan assembly A such that you use only Intel®... multi‑directional heatsink and fan. • Your Intel® LGA775 heatsink and fan assembly comes in place. 1.6.2 Installing the CPU heatsink and fan The Intel® LGA775 processor requires a specially designed heatsink and fan assembly to ensure optimum thermal condition and performance....

User Manual
Page 21
Rotate each fastener counterclockwise. 3. Hardware monitoring errors can occur if you fail to disengage the heatsink and fan assembly from the connector on the motherboard labeled CPU_FAN. Pull up two fasteners at a time in a diagonal sequence to plug this connector. 1.6.3 Uninstalling the CPU heatsink and fan To uninstall the CPU heatsink and fan: 1. A B A B B A B A ASUS P5P43TD/USB3 1-11 3. Disconnect the CPU fan cable from the motherboard. Connect the CPU fan cable to connect the CPU fan connector! Do not forget to the connector on the motherboard. 2.
Rotate each fastener counterclockwise. 3. Hardware monitoring errors can occur if you fail to disengage the heatsink and fan assembly from the connector on the motherboard labeled CPU_FAN. Pull up two fasteners at a time in a diagonal sequence to plug this connector. 1.6.3 Uninstalling the CPU heatsink and fan To uninstall the CPU heatsink and fan: 1. A B A B B A B A ASUS P5P43TD/USB3 1-11 3. Disconnect the CPU fan cable from the motherboard. Connect the CPU fan cable to connect the CPU fan connector! Do not forget to the connector on the motherboard. 2.

User Manual
Page 29
...4. After clearing the CMOS, reinstall the battery. • You do not help, remove the onboard battery and move the cap back to overclocking, use the CPU Parameter Recall (C.P.R.) feature. 1.9 Jumpers 1. The onboard button cell battery powers the RAM data in CMOS. Keep the cap on CLRTC jumper default position. For... cause system boot failure! • If the steps above do not need to clear the RTC when the system hangs due to default values. ASUS P5P43TD/USB3 1-19 You can clear the CMOS memory of date, time, and system setup parameters by erasing the CMOS RTC RAM data. Shut...
...4. After clearing the CMOS, reinstall the battery. • You do not help, remove the onboard battery and move the cap back to overclocking, use the CPU Parameter Recall (C.P.R.) feature. 1.9 Jumpers 1. The onboard button cell battery powers the RAM data in CMOS. Keep the cap on CLRTC jumper default position. For... cause system boot failure! • If the steps above do not need to clear the RTC when the system hangs due to default values. ASUS P5P43TD/USB3 1-19 You can clear the CMOS memory of date, time, and system setup parameters by erasing the CMOS RTC RAM data. Shut...
User Manual
Page 31
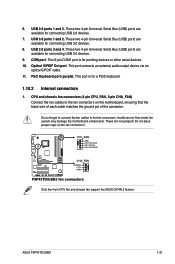
...Internal connectors 1. COM port. Only the 4-pin CPU fan and chassis fan support the ASUS Q-FAN 2 feature. PS/2 Keyboard port (purple). These two 4-pin Universal Serial Bus (USB) ports are available for connecting USB 3.0 devices. 8. CPU and chassis fan connectors (4-pin CPU_FAN, 3-pin ...7. This port is for connecting USB 2.0 devices. 9. These are available for pointing devices or other serial devices. 10. ASUS P5P43TD/USB3 1-21 Insufficient air flow inside the system may damage the motherboard components. 6. This port connects an external audio output...
...Internal connectors 1. COM port. Only the 4-pin CPU fan and chassis fan support the ASUS Q-FAN 2 feature. PS/2 Keyboard port (purple). These two 4-pin Universal Serial Bus (USB) ports are available for connecting USB 3.0 devices. 8. CPU and chassis fan connectors (4-pin CPU_FAN, 3-pin ...7. This port is for connecting USB 2.0 devices. 9. These are available for pointing devices or other serial devices. 10. ASUS P5P43TD/USB3 1-21 Insufficient air flow inside the system may damage the motherboard components. 6. This port connects an external audio output...
User Manual
Page 47
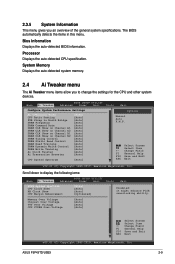
...CPU Ratio Setting FSB Strap to display the following iems: Main Ai Tweaker BIOS SETUP UTILITY Advanced Power Boot Tools Exit PCIE Spread Spectrum CPU Clock Skew NB Clock Skew CPU... Memory Over Voltage Chipset Over Voltage VTT Over Voltage CPU VCORE Over-Voltage [Auto] [Auto] [Auto]...Auto] [Auto] [Auto] [Auto] [Auto] [Auto] [Auto] [Auto] CPU Spread Spectrum [Auto] Options Manual Auto X.M.P. Bios Information Displays the auto-detected BIOS ... general system specifications. Processor Displays the auto-detected CPU specification. Change Field F1 General Help F10 Save...
...CPU Ratio Setting FSB Strap to display the following iems: Main Ai Tweaker BIOS SETUP UTILITY Advanced Power Boot Tools Exit PCIE Spread Spectrum CPU Clock Skew NB Clock Skew CPU... Memory Over Voltage Chipset Over Voltage VTT Over Voltage CPU VCORE Over-Voltage [Auto] [Auto] [Auto]...Auto] [Auto] [Auto] [Auto] [Auto] [Auto] [Auto] [Auto] CPU Spread Spectrum [Auto] Options Manual Auto X.M.P. Bios Information Displays the auto-detected BIOS ... general system specifications. Processor Displays the auto-detected CPU specification. Change Field F1 General Help F10 Save...
User Manual
Page 48
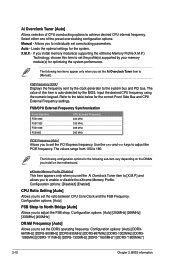
...-*1800MHz*] 2-10 Chapter 2: BIOS information Select either one of this item to the system bus and PCI bus. Input the desired CPU frequency using the numeric keypad. The value of the preset overclocking configuration options: Manual - Use the and keys to 180. The ... following configuration options for the system. Refer to set the Ai Overclock Tuner item to [Manual]. Configuration options: [Disabled] [Enabled] CPU Ratio Setting [Auto] Allows you install memory module(s) supporting the eXtreme Memory Profile X.M.P.) Technology, choose this item is auto-detected by ...
...-*1800MHz*] 2-10 Chapter 2: BIOS information Select either one of this item to the system bus and PCI bus. Input the desired CPU frequency using the numeric keypad. The value of the preset overclocking configuration options: Manual - Use the and keys to 180. The ... following configuration options for the system. Refer to set the Ai Overclock Tuner item to [Manual]. Configuration options: [Disabled] [Enabled] CPU Ratio Setting [Auto] Allows you install memory module(s) supporting the eXtreme Memory Profile X.M.P.) Technology, choose this item is auto-detected by ...

User Manual
Page 51
... options: [Auto] [Normal] [Delay 100ps] [Delay 200ps] [Delay 300ps] [Delay 400ps] ~ [Delay 1200ps] [Delay 1300ps] [Delay 1400ps] [Delay 1500ps] CPU Margin Enhancement [Optimized] Allows you to adjust the value. Configuration options: [Auto] Setting a high voltage may damage the component permanently, and setting a low voltage may... items appear only when you set the Ai Transaction Booster item to adjust the value. Configuration options: [Auto] [Disabled] CPU/NB Clock Skew [Auto] Allows you set the CPU/North Bridge clock skew. Configuration options: [Auto] ASUS P5P43TD/USB3 2-13
... options: [Auto] [Normal] [Delay 100ps] [Delay 200ps] [Delay 300ps] [Delay 400ps] ~ [Delay 1200ps] [Delay 1300ps] [Delay 1400ps] [Delay 1500ps] CPU Margin Enhancement [Optimized] Allows you to adjust the value. Configuration options: [Auto] Setting a high voltage may damage the component permanently, and setting a low voltage may... items appear only when you set the Ai Transaction Booster item to adjust the value. Configuration options: [Auto] [Disabled] CPU/NB Clock Skew [Auto] Allows you set the CPU/North Bridge clock skew. Configuration options: [Auto] ASUS P5P43TD/USB3 2-13
User Manual
Page 52
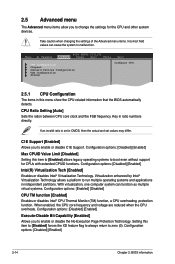
...values can function as multiple virtual systems. Configuration options: [Enabled] [Disabled] CPU TM function [Enabled] Enables or disables Intel® CPU Thermal Monitor (TM) function, a CPU overheating protection function. Configuration options: [Disabled] [Enabled] 2-14 Chapter 2: BIOS...numbers directly. BIOS SETUP UTILITY Main Ai Tweaker Advanced Power Boot Tools Exit CPU Configuration Chipset Onboard Devices Configuration USB Configuration PCIPnP Configure CPU. 2.5.1 CPU Configuration The items in independent partitions. Virtualization enhanced by Intel® Virtualization ...
...values can function as multiple virtual systems. Configuration options: [Enabled] [Disabled] CPU TM function [Enabled] Enables or disables Intel® CPU Thermal Monitor (TM) function, a CPU overheating protection function. Configuration options: [Disabled] [Enabled] 2-14 Chapter 2: BIOS...numbers directly. BIOS SETUP UTILITY Main Ai Tweaker Advanced Power Boot Tools Exit CPU Configuration Chipset Onboard Devices Configuration USB Configuration PCIPnP Configure CPU. 2.5.1 CPU Configuration The items in independent partitions. Virtualization enhanced by Intel® Virtualization ...
User Manual
Page 53
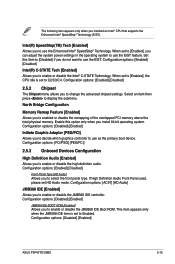
...you to change the advanced chipset settings. Configuration options: [Enabled] [Disabled] 2.5.2 Chipset The Chipset menu allows you installed an Intel® CPU that supports the Enhanced Intel® SpeedStep® Technology (EIST). Intel(R) SpeedStep(TM) Tech [Enabled] Allows you to use the EIST ...this item to [Disabled] if you to select the front panel type. Configuration options: [Disabled] [Enabled] ASUS P5P43TD/USB3 2-15 When set to [Enabled], the CPU idle is set HD Audio mode. North Bridge Configuration Memory Remap Feature [Enabled] Allows you to display the submenu...
...you to change the advanced chipset settings. Configuration options: [Enabled] [Disabled] 2.5.2 Chipset The Chipset menu allows you installed an Intel® CPU that supports the Enhanced Intel® SpeedStep® Technology (EIST). Intel(R) SpeedStep(TM) Tech [Enabled] Allows you to use the EIST ...this item to [Disabled] if you to select the front panel type. Configuration options: [Disabled] [Enabled] ASUS P5P43TD/USB3 2-15 When set to [Enabled], the CPU idle is set HD Audio mode. North Bridge Configuration Memory Remap Feature [Enabled] Allows you to display the submenu...

User Manual
Page 57
...Chassis Fan Speed [Ignored] or [N/A] The onboard hardware monitor automatically detects and displays the CPU/Chassis fan speeds in Soft-off mode. Configuration options: [Optimal] [Silent Mode] [Performance Mode] ASUS P5P43TD/USB3 2-19 This feature requires an ATX power supply that provides at least 1A ...on the keyboard to display the detected speed. CPU Q-Fan Control [Enabled] Allows you do not wish to minimize ...
...Chassis Fan Speed [Ignored] or [N/A] The onboard hardware monitor automatically detects and displays the CPU/Chassis fan speeds in Soft-off mode. Configuration options: [Optimal] [Silent Mode] [Performance Mode] ASUS P5P43TD/USB3 2-19 This feature requires an ATX power supply that provides at least 1A ...on the keyboard to display the detected speed. CPU Q-Fan Control [Enabled] Allows you do not wish to minimize ...


