
User Manual
Page 11
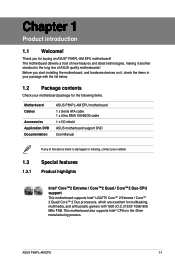
...for the following items. Motherboard Cables Accessories Application DVD Documentation ASUS P5KPL-AM EPU motherboard 1 x Serial ATA cable 1 x Ultra DMA 100/66/33 cable 1 x I/O shield ASUS motherboard support DVD User Manual 1.3 1.3.1 If any of ASUS quality motherboards! Before you for multitasking, multimedia, and ...2 Extreme / Core™ 2 Quad/ Core™ 2 Duo processors, which are excellent for buying an ASUS® P5KPL-AM EPU motherboard! The motherboard delivers a host of new features and latest technologies, making it , check the items in the 45nm manufacturing...
...for the following items. Motherboard Cables Accessories Application DVD Documentation ASUS P5KPL-AM EPU motherboard 1 x Serial ATA cable 1 x Ultra DMA 100/66/33 cable 1 x I/O shield ASUS motherboard support DVD User Manual 1.3 1.3.1 If any of ASUS quality motherboards! Before you for multitasking, multimedia, and ...2 Extreme / Core™ 2 Quad/ Core™ 2 Duo processors, which are excellent for buying an ASUS® P5KPL-AM EPU motherboard! The motherboard delivers a host of new features and latest technologies, making it , check the items in the 45nm manufacturing...
User Manual
Page 13
...failure. ASUS P5KPL-AM EPU 1-3 ASUS AI NET2 ASUS AI NET2 remotely detects the cable connection immediately after turning on the environment. feature automatically restores the CPU default settings when the system hangs due to open the system chassis and clear the RTC data. C.P.R. ASUS CrashFree BIOS 3 ASUS CrashFree ...allows you to convert your favorite photo into a 256-color boot logo for a more colorful and vivid image on your screen. ASUS MyLogo2™ This feature allows you to their default settings. C.P.R. (CPU Parameter Recall) The BIOS C.P.R. Simply shut down and ...
...failure. ASUS P5KPL-AM EPU 1-3 ASUS AI NET2 ASUS AI NET2 remotely detects the cable connection immediately after turning on the environment. feature automatically restores the CPU default settings when the system hangs due to open the system chassis and clear the RTC data. C.P.R. ASUS CrashFree BIOS 3 ASUS CrashFree ...allows you to convert your favorite photo into a 256-color boot logo for a more colorful and vivid image on your screen. ASUS MyLogo2™ This feature allows you to their default settings. C.P.R. (CPU Parameter Recall) The BIOS C.P.R. Simply shut down and ...
User Manual
Page 15
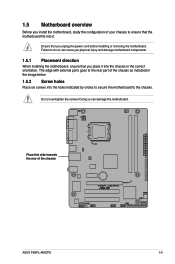
1.5 Motherboard overview Before you install the motherboard, study the configuration of the chassis ASUS P5KPL-AM EPU 1-5 Failure to do so can damage the motherboard. Doing so can cause you physical injury and damage motherboard components. 1.5.1 Placement direction When installing the motherboard, ...
1.5 Motherboard overview Before you install the motherboard, study the configuration of the chassis ASUS P5KPL-AM EPU 1-5 Failure to do so can damage the motherboard. Doing so can cause you physical injury and damage motherboard components. 1.5.1 Placement direction When installing the motherboard, ...
User Manual
Page 17
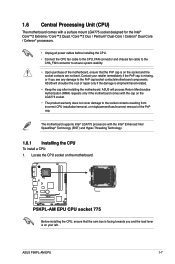
... only if the motherboard comes with the Intel® Enhanced Intel SpeedStep® Technology (EIST) and Hyper-Threading Technology. 1.6.1 Installing the CPU To install a CPU: 1. ASUS P5KPL-AM EPU 1-7 1.6 Central Processing Unit (CPU) The motherboard comes with a surface mount LGA775 socket designed for the Intel® Core™2 Extreme / Core™2 Quad / Core... bent. Locate the CPU socket on the LGA775 socket. • The product warranty does not cover damage to the PnP cap/socket contacts/motherboard components. ASUS will shoulder the cost of the PnP cap.
... only if the motherboard comes with the Intel® Enhanced Intel SpeedStep® Technology (EIST) and Hyper-Threading Technology. 1.6.1 Installing the CPU To install a CPU: 1. ASUS P5KPL-AM EPU 1-7 1.6 Central Processing Unit (CPU) The motherboard comes with a surface mount LGA775 socket designed for the Intel® Core™2 Extreme / Core™2 Quad / Core... bent. Locate the CPU socket on the LGA775 socket. • The product warranty does not cover damage to the PnP cap/socket contacts/motherboard components. ASUS will shoulder the cost of the PnP cap.
User Manual
Page 19
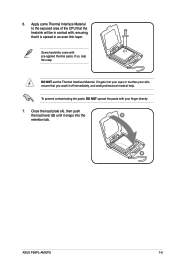
.... 6. To prevent contaminating the paste, DO NOT spread the paste with your skin, ensure that it snaps into your eyes or touches your finger directly. 7. B ASUS P5KPL-AM EPU 1-9 Close the load plate (A), then push the load lever (B) until it is spread in contact with pre-applied thermal paste.
.... 6. To prevent contaminating the paste, DO NOT spread the paste with your skin, ensure that it snaps into your eyes or touches your finger directly. 7. B ASUS P5KPL-AM EPU 1-9 Close the load plate (A), then push the load lever (B) until it is spread in contact with pre-applied thermal paste.

User Manual
Page 21
Hardware monitoring errors can occur if you fail to connect the CPU fan connector! Pull up two fasteners at a time in a diagonal sequence to the connector on the motherboard. 2. 3. Do not forget to plug this connector. 1.6.3 Uninstalling the CPU heatsink and fan To uninstall the CPU heatsink and fan: 1. A B A B B A B A ASUS P5KPL-AM EPU 1-11 Disconnect the CPU fan cable from the motherboard. Rotate each fastener counterclockwise. 3. Connect the CPU fan cable to disengage the heatsink and fan assembly from the connector on the motherboard labeled CPU_FAN.
Hardware monitoring errors can occur if you fail to connect the CPU fan connector! Pull up two fasteners at a time in a diagonal sequence to the connector on the motherboard. 2. 3. Do not forget to plug this connector. 1.6.3 Uninstalling the CPU heatsink and fan To uninstall the CPU heatsink and fan: 1. A B A B B A B A ASUS P5KPL-AM EPU 1-11 Disconnect the CPU fan cable from the motherboard. Rotate each fastener counterclockwise. 3. Connect the CPU fan cable to disengage the heatsink and fan assembly from the connector on the motherboard labeled CPU_FAN.
User Manual
Page 23
...; Some old-version DDR2-800 DIMMs may not match Intel®'s On‑Die‑Termination (ODT) requirement and will be about 3GB or less. ASUS P5KPL-AM EPU 1-13 For effective use a more efficient cooling system to run at DDR2-667 by default setting. Under the default state, some memory modules for...
...; Some old-version DDR2-800 DIMMs may not match Intel®'s On‑Die‑Termination (ODT) requirement and will be about 3GB or less. ASUS P5KPL-AM EPU 1-13 For effective use a more efficient cooling system to run at DDR2-667 by default setting. Under the default state, some memory modules for...
User Manual
Page 27
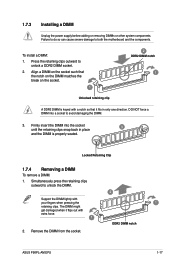
... to unlock the DIMM. 2 Support the DIMM lightly with your fingers when pressing the retaining clips. Locked Retaining Clip 1.7.4 Removing a DIMM To remove a DIMM: 1. ASUS P5KPL-AM EPU 1-17 Simultaneously press the retaining clips outward to both the motherboard and the components. The DIMM might get damaged when it flips out with a notch...
... to unlock the DIMM. 2 Support the DIMM lightly with your fingers when pressing the retaining clips. Locked Retaining Clip 1.7.4 Removing a DIMM To remove a DIMM: 1. ASUS P5KPL-AM EPU 1-17 Simultaneously press the retaining clips outward to both the motherboard and the components. The DIMM might get damaged when it flips out with a notch...
User Manual
Page 29
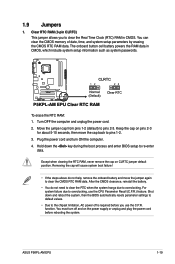
... RTC RAM data. Move the jumper cap from pins 1-2 (default) to pins 1-2. 3. Keep the cap on CLRTC jumper default position. To erase the RTC RAM: 1. ASUS P5KPL-AM EPU 1-19
... RTC RAM data. Move the jumper cap from pins 1-2 (default) to pins 1-2. 3. Keep the cap on CLRTC jumper default position. To erase the RTC RAM: 1. ASUS P5KPL-AM EPU 1-19

User Manual
Page 31
... 2-channel Line In Line Out Mic In 4-channel Rear Speaker Out Front Speaker Out Mic In 6-channel Rear Speaker Out Front Speaker Out Bass/Center ASUS P5KPL-AM EPU 1-21 Microphone port (pink). This port is for the LAN port LED indications. This port connects a microphone. Refer to a Local Area Network (LAN) through...
... 2-channel Line In Line Out Mic In 4-channel Rear Speaker Out Front Speaker Out Mic In 6-channel Rear Speaker Out Front Speaker Out Bass/Center ASUS P5KPL-AM EPU 1-21 Microphone port (pink). This port is for the LAN port LED indications. This port connects a microphone. Refer to a Local Area Network (LAN) through...
User Manual
Page 33
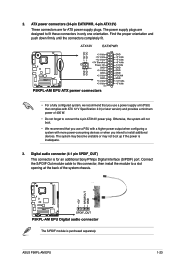
... use a PSU with a higher power output when configuring a system with ATX 12 V Specification 2.0 (or later version) and provides a minimum power of the system chassis. ASUS P5KPL-AM EPU 1-23 2. The system may become unstable or may not boot up if the power is purchased separately. Connect the S/PDIF Out module cable to this...
... use a PSU with a higher power output when configuring a system with ATX 12 V Specification 2.0 (or later version) and provides a minimum power of the system chassis. ASUS P5KPL-AM EPU 1-23 2. The system may become unstable or may not boot up if the power is purchased separately. Connect the S/PDIF Out module cable to this...
User Manual
Page 35
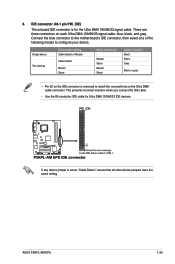
There are three connectors on the Ultra DMA cable connector. ASUS P5KPL-AM EPU 1-25 Single device Two devices Drive jumper setting Cable-Select or Master Cable-Select Master Slave Mode of the following modes to match the covered ...
There are three connectors on the Ultra DMA cable connector. ASUS P5KPL-AM EPU 1-25 Single device Two devices Drive jumper setting Cable-Select or Master Cable-Select Master Slave Mode of the following modes to match the covered ...
User Manual
Page 37
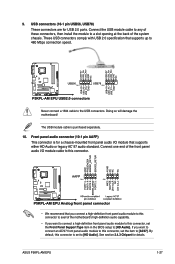
...) This connector is set the Front Panel Support Type item in the BIOS setup to [HD Audio]. By default, this connector, set to [HD Audio]. ASUS P5KPL-AM EPU 1-27 The USB module cable is purchased separately. 10. See section 2.4.3 Chipset for USB 2.0 ports. USB connectors (10-1 pin USB56, USB78) These connectors are...
...) This connector is set the Front Panel Support Type item in the BIOS setup to [HD Audio]. By default, this connector, set to [HD Audio]. ASUS P5KPL-AM EPU 1-27 The USB module cable is purchased separately. 10. See section 2.4.3 Chipset for USB 2.0 ports. USB connectors (10-1 pin USB56, USB78) These connectors are...
User Manual
Page 39
... BIOS in the future. Follow the onscreen instructions to launch the ASUS Update utility. 2. Quit all Windows® applications before you to restore the BIOS in Windows® environment. • ASUS Update requires an Internet connection either through a network or an Internet...Copy the original motherboard BIOS using the ASUS Update utility. 2.1.1 ASUS Update utility The ASUS Update is available in the optical drive. Chapter 2 BIOS information 2.1 Managing and updating your BIOS Save a copy of the updating process: ASUS P5KPL-AM EPU 2-1 Updating the BIOS To update the ...
... BIOS in the future. Follow the onscreen instructions to launch the ASUS Update utility. 2. Quit all Windows® applications before you to restore the BIOS in Windows® environment. • ASUS Update requires an Internet connection either through a network or an Internet...Copy the original motherboard BIOS using the ASUS Update utility. 2.1.1 ASUS Update utility The ASUS Update is available in the optical drive. Chapter 2 BIOS information 2.1 Managing and updating your BIOS Save a copy of the updating process: ASUS P5KPL-AM EPU 2-1 Updating the BIOS To update the ...
User Manual
Page 41
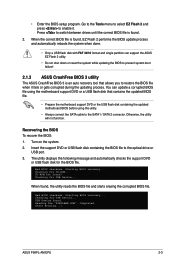
...Flash 2 utility. • Do not shut down or reset the system while updating the BIOS to prevent system boot failure! 2.1.3 ASUS CrashFree BIOS 3 utility The ASUS CrashFree BIOS 3 is found , the utility reads the BIOS file and starts erasing the corrupted BIOS file. CD-ROM not found ....the SATA cable to restore the BIOS file when it . Recovering the BIOS To recover the BIOS: 1. Checking for USB Device... Start Erasing...\ ASUS P5KPL-AM EPU 2-3 When the correct BIOS file is found, EZ Flash 2 performs the BIOS update process and automatically reboots the system when done. • ...
...Flash 2 utility. • Do not shut down or reset the system while updating the BIOS to prevent system boot failure! 2.1.3 ASUS CrashFree BIOS 3 utility The ASUS CrashFree BIOS 3 is found , the utility reads the BIOS file and starts erasing the corrupted BIOS file. CD-ROM not found ....the SATA cable to restore the BIOS file when it . Recovering the BIOS To recover the BIOS: 1. Checking for USB Device... Start Erasing...\ ASUS P5KPL-AM EPU 2-3 When the correct BIOS file is found, EZ Flash 2 performs the BIOS update process and automatically reboots the system when done. • ...
User Manual
Page 43
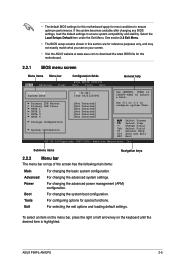
... to download the latest BIOS file for this motherboard apply for most conditions to ensure optimum performance. Boot For changing the system boot configuration. ASUS P5KPL-AM EPU 2-5 Submenu items Navigation keys 2.2.2 Menu bar The menu bar on the keyboard until the desired item is highlighted. Change Field Tab Select Field F1 General...
... to download the latest BIOS file for this motherboard apply for most conditions to ensure optimum performance. Boot For changing the system boot configuration. ASUS P5KPL-AM EPU 2-5 Submenu items Navigation keys 2.2.2 Menu bar The menu bar on the keyboard until the desired item is highlighted. Change Field Tab Select Field F1 General...
User Manual
Page 45
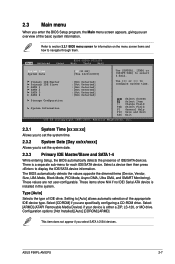
Select Screen Select Item +- Select a device item then press to navigate through them. ASUS P5KPL-AM EPU 2-7 Refer to section 2.2.1 BIOS menu screen for each IDE/SATA device. Setting to [Auto] allows automatic selection of IDE drive. Type [Auto] Selects the type ...
Select Screen Select Item +- Select a device item then press to navigate through them. ASUS P5KPL-AM EPU 2-7 Refer to section 2.2.1 BIOS menu screen for each IDE/SATA device. Setting to [Auto] allows automatic selection of IDE drive. Type [Auto] Selects the type ...
User Manual
Page 47
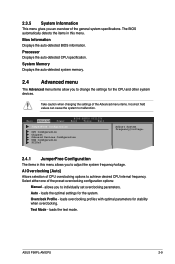
... the general system specifications. Overclock Profile - loads the optimal settings for stability when overclocking. loads overclocking profiles with optimal parameters for the system. Test Mode - ASUS P5KPL-AM EPU 2-9 2.3.5 System Information This menu gives you an overview of the preset overclocking configuration options: Manual - Bios Information Displays the auto-detected BIOS information. Take...
... the general system specifications. Overclock Profile - loads the optimal settings for stability when overclocking. loads overclocking profiles with optimal parameters for the system. Test Mode - ASUS P5KPL-AM EPU 2-9 2.3.5 System Information This menu gives you an overview of the preset overclocking configuration options: Manual - Bios Information Displays the auto-detected BIOS information. Take...
User Manual
Page 49
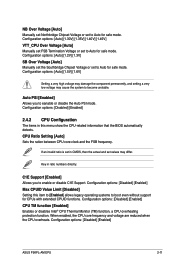
... component permanently, and setting a very low voltage may differ. Auto PSI [Enabled] Allows you to enable or disable C1E Support. Configuration options: [Disabled] [Enabled] ASUS P5KPL-AM EPU 2-11 When enabled, the CPU core frequency and voltage are reduced when the CPU overheats. C1E Support [Enabled] Allows you to Auto for safe mode...
... component permanently, and setting a very low voltage may differ. Auto PSI [Enabled] Allows you to enable or disable C1E Support. Configuration options: [Disabled] [Enabled] ASUS P5KPL-AM EPU 2-11 When enabled, the CPU core frequency and voltage are reduced when the CPU overheats. C1E Support [Enabled] Allows you to Auto for safe mode...
User Manual
Page 51
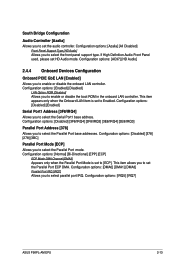
... to select the Serial Port1 base address. If High Definition Audio Front Panel used, please set the Parallel Port ECP DMA. Configuration options: [IRQ5] [IRQ7] ASUS P5KPL-AM EPU 2-13
... to select the Serial Port1 base address. If High Definition Audio Front Panel used, please set the Parallel Port ECP DMA. Configuration options: [IRQ5] [IRQ7] ASUS P5KPL-AM EPU 2-13


