
User Manual
Page 7
.... • If you detect any area where it may become wet. • Place the product on it, carefully read all power cables from connectors, slots, sockets and circuitry. • Avoid dust, humidity, and temperature extremes. About this guide is set to fix it supports. If you encounter technical problems with the...
.... • If you detect any area where it may become wet. • Place the product on it, carefully read all power cables from connectors, slots, sockets and circuitry. • Avoid dust, humidity, and temperature extremes. About this guide is set to fix it supports. If you encounter technical problems with the...
User Manual
Page 9
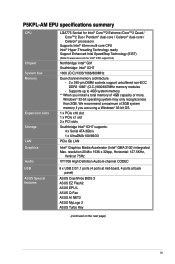
P5KPL-AM EPU specifications summary CPU Chipset System bus Memory Expansion slots Storage LAN Graphics Audio LGA775 Socket for Intel® CPU support list) Northbridge: Intel® G31 Southbridge: Intel® ICH7 1600 (O.C)/1333/1066/800MHz Dual-channel memory architecture - 2 x 240-pin DIMM sockets...Vertical: 75Hz VT1708 High Definition Audio 6-channel CODEC USB ASUS Special features 8 x USB 2.0/1.1 ports (4 ports at mid-board, 4 ports at back panel) ASUS CrashFree BIOS 3 ASUS EZ Flash2 ASUS EPU-L ASUS Q-Fan ASUS AI NET2 ASUS MyLogo 2 ASUS Turbo Key (continued on the next page) ix ...
P5KPL-AM EPU specifications summary CPU Chipset System bus Memory Expansion slots Storage LAN Graphics Audio LGA775 Socket for Intel® CPU support list) Northbridge: Intel® G31 Southbridge: Intel® ICH7 1600 (O.C)/1333/1066/800MHz Dual-channel memory architecture - 2 x 240-pin DIMM sockets...Vertical: 75Hz VT1708 High Definition Audio 6-channel CODEC USB ASUS Special features 8 x USB 2.0/1.1 ports (4 ports at mid-board, 4 ports at back panel) ASUS CrashFree BIOS 3 ASUS EZ Flash2 ASUS EPU-L ASUS Q-Fan ASUS AI NET2 ASUS MyLogo 2 ASUS Turbo Key (continued on the next page) ix ...

User Manual
Page 14
... it on a grounded antistatic pad or in any motherboard settings. • Unplug the power cord from the power supply. This is detached from the wall socket before removing or plugging in the bag that came with a standby power LED that lights up to the motherboard, peripherals, or components. 1.4 Before you proceed...
... it on a grounded antistatic pad or in any motherboard settings. • Unplug the power cord from the power supply. This is detached from the wall socket before removing or plugging in the bag that came with a standby power LED that lights up to the motherboard, peripherals, or components. 1.4 Before you proceed...
User Manual
Page 16
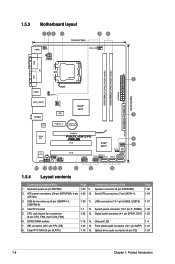
.... System panel connector (10-1 pin F_PANEL) 1-26 5. DDR2 DIMM sockets 1-12 14. USB connectors (10-1 pin USB56, USB78) 1-27 4. Front panel audio connector (10-1 pin AAFP) 1-27 8. Clear RTC RAM (3-pin CLRTC) 1-19 16. Digital ...
.... System panel connector (10-1 pin F_PANEL) 1-26 5. DDR2 DIMM sockets 1-12 14. USB connectors (10-1 pin USB56, USB78) 1-27 4. Front panel audio connector (10-1 pin AAFP) 1-27 8. Clear RTC RAM (3-pin CLRTC) 1-19 16. Digital ...
User Manual
Page 17
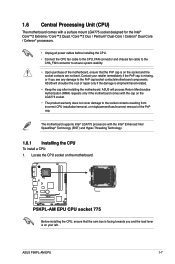
...; LGA775 processors with the Intel® Enhanced Intel SpeedStep® Technology (EIST) and Hyper-Threading Technology. 1.6.1 Installing the CPU To install a CPU: 1. Locate the CPU socket on the motherboard. Contact your left. ASUS P5KPL-AM EPU 1-7 ASUS will process Return Merchandise Authorization (RMA) requests only if the motherboard comes with the cap on the LGA775...
...; LGA775 processors with the Intel® Enhanced Intel SpeedStep® Technology (EIST) and Hyper-Threading Technology. 1.6.1 Installing the CPU To install a CPU: 1. Locate the CPU socket on the motherboard. Contact your left. ASUS P5KPL-AM EPU 1-7 ASUS will process Return Merchandise Authorization (RMA) requests only if the motherboard comes with the cap on the LGA775...

User Manual
Page 18
... the PnP cap from the load plate window to the left (B) until it is on the bottom‑left corner of the arrow to the socket pins, do not remove the PnP cap unless you are installing a CPU. 3. 2. Lift the load lever in the direction of the... socket then fit the socket alignment key into the CPU notch. Position the CPU over the socket, ensuring that the gold triangle is released from the retention tab. To prevent damage to a 135º angle...
... the PnP cap from the load plate window to the left (B) until it is on the bottom‑left corner of the arrow to the socket pins, do not remove the PnP cap unless you are installing a CPU. 3. 2. Lift the load lever in the direction of the... socket then fit the socket alignment key into the CPU notch. Position the CPU over the socket, ensuring that the gold triangle is released from the retention tab. To prevent damage to a 135º angle...
User Manual
Page 22
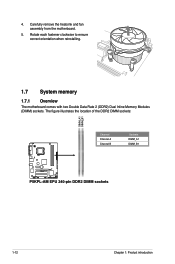
4. Rotate each fastener clockwise to ensure correct orientation when reinstalling. 1.7 System memory 1.7.1 Overview The motherboard comes with two Double Data Rate 2 (DDR2) Dual Inline Memory Modules (DIMM) sockets. The figure illustrates the location of the DDR2 DIMM sockets: Channel Channel A Channel B Sockets DIMM_A1 DIMM_B1 1-12 Chapter 1: Product introduction Carefully remove the heatsink and fan assembly from the motherboard. 5.
4. Rotate each fastener clockwise to ensure correct orientation when reinstalling. 1.7 System memory 1.7.1 Overview The motherboard comes with two Double Data Rate 2 (DDR2) Dual Inline Memory Modules (DIMM) sockets. The figure illustrates the location of the DDR2 DIMM sockets: Channel Channel A Channel B Sockets DIMM_A1 DIMM_B1 1-12 Chapter 1: Product introduction Carefully remove the heatsink and fan assembly from the motherboard. 5.
User Manual
Page 23
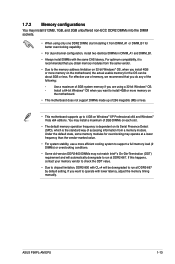
...version DDR2-800 DIMMs may not match Intel®'s On‑Die‑Termination (ODT) requirement and will be about 3GB or less. ASUS P5KPL-AM EPU 1-13 For effective use a more efficient cooling system to run at DDR2-667. Under the default state, some memory modules for overclocking ...• Always install DIMMs with the same CAS latency. You may install 512MB, 1GB, and 2GB unbuffered non‑ECC DDR2 DIMMs into the DIMM sockets. • When using a 32-bit Windows® OS. - For optimum compatibility, it from DIMM_A1 or DIMM_B1 for the OS can be downgraded ...
...version DDR2-800 DIMMs may not match Intel®'s On‑Die‑Termination (ODT) requirement and will be about 3GB or less. ASUS P5KPL-AM EPU 1-13 For effective use a more efficient cooling system to run at DDR2-667. Under the default state, some memory modules for overclocking ...• Always install DIMMs with the same CAS latency. You may install 512MB, 1GB, and 2GB unbuffered non‑ECC DDR2 DIMMs into the DIMM sockets. • When using a 32-bit Windows® OS. - For optimum compatibility, it from DIMM_A1 or DIMM_B1 for the OS can be downgraded ...
User Manual
Page 27
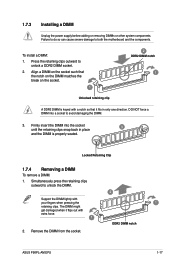
... to both the motherboard and the components. Locked Retaining Clip 1.7.4 Removing a DIMM To remove a DIMM: 1. To install a DIMM: 1. ASUS P5KPL-AM EPU 1-17 Remove the DIMM from the socket. DO NOT force a DIMM into the socket until the retaining clips snap back in only one direction. The DIMM might get damaged when it fits in...
... to both the motherboard and the components. Locked Retaining Clip 1.7.4 Removing a DIMM To remove a DIMM: 1. To install a DIMM: 1. ASUS P5KPL-AM EPU 1-17 Remove the DIMM from the socket. DO NOT force a DIMM into the socket until the retaining clips snap back in only one direction. The DIMM might get damaged when it fits in...


