
Motherboard Installation Guide
Page 1
P5GD2-X Motherboard
P5GD2-X Motherboard

P5GD2-X User's Manual for English Edition
Page 1
P5GD2-X Motherboard
P5GD2-X Motherboard
P5GD2-X User's Manual for English Edition
Page 3
Contents Notices vi Safety information vii About this guide viii Typography ix P5GD2-X specifications summary x Chapter 1: Product introduction 1.1 Welcome 1-2 1.2 Package contents 1-2 1.3 Special features 1-2 1.3.1 Product highlights 1-2 1.3.2 ASUS Proactive features 1-4 1.3.3 Innovative ASUS features 1-5 1.4 Before you proceed 1-6 1.5 Motherboard overview 1-7 1.5.1 Placement direction 1-7 1.5.2 Screw holes 1-7 1.5.3 Motherboard layout 1-8 1.6 Central Processing Unit (CPU 1-9 1.6.1 Installling the CPU 1-9 1.6.2 Installling the CPU heatsink and fan 1-12...
Contents Notices vi Safety information vii About this guide viii Typography ix P5GD2-X specifications summary x Chapter 1: Product introduction 1.1 Welcome 1-2 1.2 Package contents 1-2 1.3 Special features 1-2 1.3.1 Product highlights 1-2 1.3.2 ASUS Proactive features 1-4 1.3.3 Innovative ASUS features 1-5 1.4 Before you proceed 1-6 1.5 Motherboard overview 1-7 1.5.1 Placement direction 1-7 1.5.2 Screw holes 1-7 1.5.3 Motherboard layout 1-8 1.6 Central Processing Unit (CPU 1-9 1.6.1 Installling the CPU 1-9 1.6.2 Installling the CPU heatsink and fan 1-12...
P5GD2-X User's Manual for English Edition
Page 7
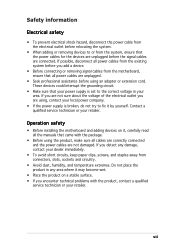
...hazard, disconnect the power cable from the electrical outlet before relocating the system. • When adding or removing devices to or from the motherboard, ensure that all power cables are unplugged. • Seek professional assistance before the signal cables are connected. If possible, disconnect all power... contact your local power company. • If the power supply is set to fix it by yourself. Operation safety • Before installing the motherboard and adding devices on it may become wet. • Place the product on a stable surface. • If you detect any area where it...
...hazard, disconnect the power cable from the electrical outlet before relocating the system. • When adding or removing devices to or from the motherboard, ensure that all power cables are unplugged. • Seek professional assistance before the signal cables are connected. If possible, disconnect all power... contact your local power company. • If the power supply is set to fix it by yourself. Operation safety • Before installing the motherboard and adding devices on it may become wet. • Place the product on a stable surface. • If you detect any area where it...
P5GD2-X User's Manual for English Edition
Page 8
..., that you need when installing and configuring the motherboard. These documents are also provided. • Chapter 3: Software support This chapter describes the contents of the jumpers and connectors on ASUS hardware and software products. Optional documentation Your product package... Product introduction This chapter describes the features of the standard package. ASUS websites The ASUS website provides updated information on the motherboard. • Chapter 2: BIOS setup This chapter tells how to the ASUS contact information. 2. How this guide This user guide contains the ...
..., that you need when installing and configuring the motherboard. These documents are also provided. • Chapter 3: Software support This chapter describes the contents of the jumpers and connectors on ASUS hardware and software products. Optional documentation Your product package... Product introduction This chapter describes the features of the standard package. ASUS websites The ASUS website provides updated information on the motherboard. • Chapter 2: BIOS setup This chapter tells how to the ASUS contact information. 2. How this guide This user guide contains the ...
P5GD2-X User's Manual for English Edition
Page 13
This chapter describes the motherboard features and the new technologies it supports. 1Product introduction ASUS P5GD2-X 1-1
This chapter describes the motherboard features and the new technologies it supports. 1Product introduction ASUS P5GD2-X 1-1
P5GD2-X User's Manual for English Edition
Page 14
... it another standout in the 775-land package. See page 1-9 for buying an ASUS® P5GD2-X motherboard! The motherboard supports the Intel® Pentium® 4 processor with a 775-pin surface mount Land Grid Array (LGA) socket designed for the following items. Motherboard ASUS P5GD2-X motherboard Cables 1 x Serial ATA signal cables 1 x Serial ATA power cables 1 x Ultra DMA cables 1 x Floppy...
... it another standout in the 775-land package. See page 1-9 for buying an ASUS® P5GD2-X motherboard! The motherboard supports the Intel® Pentium® 4 processor with a 775-pin surface mount Land Grid Array (LGA) socket designed for the following items. Motherboard ASUS P5GD2-X motherboard Cables 1 x Serial ATA signal cables 1 x Serial ATA power cables 1 x Ultra DMA cables 1 x Floppy...
P5GD2-X User's Manual for English Edition
Page 15
... for faster and more flexible cables with the Intel® EM64T (Extended Memory 64 Technology). DDR2 memory support The motherboard supports DDR2 memory which features data transfer rates of 533/400 MHz to -point serial interconnections between devices and allows ... The SATA specification allows for thinner, more efficient computing. See page 1-16 for details. See page 1-22 for graphics card. ASUS P5GD2-X 1-3 The dual-channel DDR2 architecture doubles the bandwidth of your computer to boost system performance, eliminating bottlenecks with existing PCI specifications...
... for faster and more flexible cables with the Intel® EM64T (Extended Memory 64 Technology). DDR2 memory support The motherboard supports DDR2 memory which features data transfer rates of 533/400 MHz to -point serial interconnections between devices and allows ... The SATA specification allows for thinner, more efficient computing. See page 1-16 for details. See page 1-22 for graphics card. ASUS P5GD2-X 1-3 The dual-channel DDR2 architecture doubles the bandwidth of your computer to boost system performance, eliminating bottlenecks with existing PCI specifications...
P5GD2-X User's Manual for English Edition
Page 16
...See page 1-26 and 1-27 for details. S/PDIF digital sound ready The motherboard supports the S/PDIF Out function through the midboard S/PDIF interface. USB 2.0 technology The motherboard implements the Universal Serial Bus (USB) 2.0 specification, dramatically increasing the connection speed... the voltage levels to determine audio device classes, and pre-defined equalization for critical components. 1.3.2 ASUS Proactive features AI NOS™ (Non-Delay Overclocking System) ASUS Non-delay Overclocking System™ (NOS) is fully-compliant with USB 1.1. The system fan rotation...
...See page 1-26 and 1-27 for details. S/PDIF digital sound ready The motherboard supports the S/PDIF Out function through the midboard S/PDIF interface. USB 2.0 technology The motherboard implements the Universal Serial Bus (USB) 2.0 specification, dramatically increasing the connection speed... the voltage levels to determine audio device classes, and pre-defined equalization for critical components. 1.3.2 ASUS Proactive features AI NOS™ (Non-Delay Overclocking System) ASUS Non-delay Overclocking System™ (NOS) is fully-compliant with USB 1.1. The system fan rotation...
P5GD2-X User's Manual for English Edition
Page 17
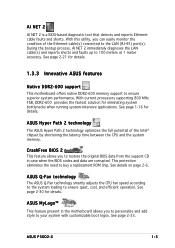
...and the system memory. With current processors supporting 800 MHz FSB, DDR2-600 provides the fastest solution for details. ASUS P5GD2-X 1-5 ASUS Hyper Path 2 technology The ASUS Hyper Path 2 technology optimizes the full potential of the Ethernet cable(s) connected to restore the original BIOS data from... according to the system loading to 100 meters at 1 meter accuracy. See page 1-16 for details. 1.3.3 Innovative ASUS features Native DDR2-600 support This motherboard offers native DDR2-600 memory support to buy a replacement ROM chip. During the bootup process, AI NET 2 immediately...
...and the system memory. With current processors supporting 800 MHz FSB, DDR2-600 provides the fastest solution for details. ASUS P5GD2-X 1-5 ASUS Hyper Path 2 technology The ASUS Hyper Path 2 technology optimizes the full potential of the Ethernet cable(s) connected to restore the original BIOS data from... according to the system loading to 100 meters at 1 meter accuracy. See page 1-16 for details. 1.3.3 Innovative ASUS features Native DDR2-600 support This motherboard offers native DDR2-600 memory support to buy a replacement ROM chip. During the bootup process, AI NET 2 immediately...
P5GD2-X User's Manual for English Edition
Page 18
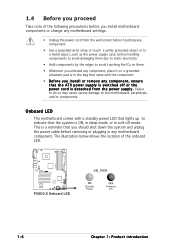
...r d i s d e t a c h e d f r o m t h e p o w e r s u p p l y . The illustration below shows the location of the following precautions before you install motherboard components or change any motherboard settings. • Unplug the power cord from the wall socket before touching any component. • Use a grounded wrist strap or touch a safely grounded...Onboard LED The motherboard comes with the component. • Before you uninstall any component, place it on a grounded antistatic pad or in the bag that the ATX power supply is switched off mode. P5GD2-X ® P5GD2-X Onboard LED ...
...r d i s d e t a c h e d f r o m t h e p o w e r s u p p l y . The illustration below shows the location of the following precautions before you install motherboard components or change any motherboard settings. • Unplug the power cord from the wall socket before touching any component. • Use a grounded wrist strap or touch a safely grounded...Onboard LED The motherboard comes with the component. • Before you uninstall any component, place it on a grounded antistatic pad or in the bag that the ATX power supply is switched off mode. P5GD2-X ® P5GD2-X Onboard LED ...
P5GD2-X User's Manual for English Edition
Page 19
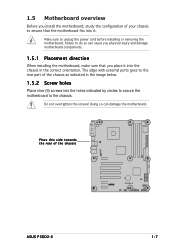
... correct orientation. Doing so can cause you place it . Place this side towards the rear of the chassis P5GD2-X ® ASUS P5GD2-X 1-7 Failure to do so can damage the motherboard. Do not overtighten the screws! 1.5 Motherboard overview Before you install the motherboard, study the configuration of your chassis to ensure that you physical injury and damage...
... correct orientation. Doing so can cause you place it . Place this side towards the rear of the chassis P5GD2-X ® ASUS P5GD2-X 1-7 Failure to do so can damage the motherboard. Do not overtighten the screws! 1.5 Motherboard overview Before you install the motherboard, study the configuration of your chassis to ensure that you physical injury and damage...
P5GD2-X User's Manual for English Edition
Page 21
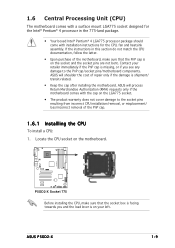
... the cost of repair only if the damage is shipment/ transit-related. • Keep the cap after installing the motherboard. ASUS P5GD2-X 1-9 If the instructions in the 775-land package. • Your boxed Intel® Pentium® 4 LGA775 processor package should come with installation ... the load lever is on the LGA775 socket. • The product warranty does not cover damage to the PnP cap/socket pins/motherboard components. P5GD2-X ® P5GD2-X Socket 775 Before installing the CPU, make sure that the socket box is facing towards you see any damage to the socket pins...
... the cost of repair only if the damage is shipment/ transit-related. • Keep the cap after installing the motherboard. ASUS P5GD2-X 1-9 If the instructions in the 775-land package. • Your boxed Intel® Pentium® 4 LGA775 processor package should come with installation ... the load lever is on the LGA775 socket. • The product warranty does not cover damage to the PnP cap/socket pins/motherboard components. P5GD2-X ® P5GD2-X Socket 775 Before installing the CPU, make sure that the socket box is facing towards you see any damage to the socket pins...
P5GD2-X User's Manual for English Edition
Page 23
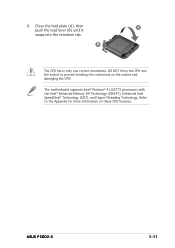
B The CPU fits in only one correct orientation. The motherboard supports Intel® Pentium® 4 LGA775 processors with the Intel® Enhanced Memory 64 Technology (EM64T), Enhanced Intel SpeedStep® Technology (EIST), and Hyper-Threading Technology. Refer to prevent bending the connectors on these CPU features. DO NOT force the CPU into the retention tab. Close the load plate (A), then A push the load lever (B) until it snaps into the socket to the Appendix for more information on the socket and damaging the CPU! 6. ASUS P5GD2-X 1-11
B The CPU fits in only one correct orientation. The motherboard supports Intel® Pentium® 4 LGA775 processors with the Intel® Enhanced Memory 64 Technology (EM64T), Enhanced Intel SpeedStep® Technology (EIST), and Hyper-Threading Technology. Refer to prevent bending the connectors on these CPU features. DO NOT force the CPU into the retention tab. Close the load plate (A), then A push the load lever (B) until it snaps into the socket to the Appendix for more information on the socket and damaging the CPU! 6. ASUS P5GD2-X 1-11
P5GD2-X User's Manual for English Edition
Page 24
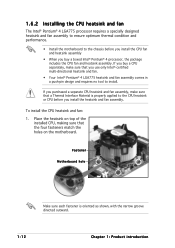
.... • Your Intel® Pentium® 4 LGA775 heatsink and fan assembly comes in a push-pin design and requires no tool to install. Fastener Motherboard hole Make sure each fastener is properly applied to the CPU heatsink or CPU before you install the CPU fan and heatsink assembly • When...Intel® Pentium® 4 LGA775 processor requires a specially designed heatsink and fan assembly to ensure optimum thermal condition and performance. • Install the motherboard to the chassis before you buy a CPU separately, make sure that the four fasteners match the holes on the...
.... • Your Intel® Pentium® 4 LGA775 heatsink and fan assembly comes in a push-pin design and requires no tool to install. Fastener Motherboard hole Make sure each fastener is properly applied to the CPU heatsink or CPU before you install the CPU fan and heatsink assembly • When...Intel® Pentium® 4 LGA775 processor requires a specially designed heatsink and fan assembly to ensure optimum thermal condition and performance. • Install the motherboard to the chassis before you buy a CPU separately, make sure that the four fasteners match the holes on the...
P5GD2-X User's Manual for English Edition
Page 25
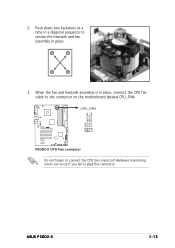
ASUS P5GD2-X 1-13 2. When the fan and heatsink assembly is in place, connect the CPU fan cable to secure the heatsink and fan B assembly in a diagonal sequence to the connector on the motherboard labeled CPU_FAN. Push down two fasteners at a time in place. CPU_FAN P5GD2-X GND CPU FAN PWR CPU FAN IN CPU FAN PWM ® P5GD2-X CPU Fan connector Do not forget to plug this connector. Hardware monitoring errors can occur if you fail to connect the CPU fan connector! A A A B B B A 3.
ASUS P5GD2-X 1-13 2. When the fan and heatsink assembly is in place, connect the CPU fan cable to secure the heatsink and fan B assembly in a diagonal sequence to the connector on the motherboard labeled CPU_FAN. Push down two fasteners at a time in place. CPU_FAN P5GD2-X GND CPU FAN PWR CPU FAN IN CPU FAN PWM ® P5GD2-X CPU Fan connector Do not forget to plug this connector. Hardware monitoring errors can occur if you fail to connect the CPU fan connector! A A A B B B A 3.
P5GD2-X User's Manual for English Edition
Page 26
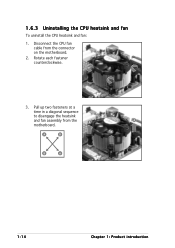
Pull up two fasteners at a time in a diagonal sequence to disengage the heatsink B and fan assembly from the connector on the motherboard. 2. 1.6.3 Uninstalling the CPU heatsink and fan To uninstall the CPU heatsink and fan: 1. Rotate each fastener counterclockwise. 3. B A B B A 1-14 Chapter 1: Product introduction Disconnect the CPU fan cable from the A A motherboard.
Pull up two fasteners at a time in a diagonal sequence to disengage the heatsink B and fan assembly from the connector on the motherboard. 2. 1.6.3 Uninstalling the CPU heatsink and fan To uninstall the CPU heatsink and fan: 1. Rotate each fastener counterclockwise. 3. B A B B A 1-14 Chapter 1: Product introduction Disconnect the CPU fan cable from the A A motherboard.
P5GD2-X User's Manual for English Edition
Page 27
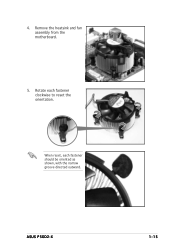
ASUS P5GD2-X 1-15 Remove the heatsink and fan assembly from the motherboard. 5. Rotate each fastener should be oriented as shown, with the narrow groove directed outward. When reset, each fastener clockwise to reset the orientation. 4.
ASUS P5GD2-X 1-15 Remove the heatsink and fan assembly from the motherboard. 5. Rotate each fastener should be oriented as shown, with the narrow groove directed outward. When reset, each fastener clockwise to reset the orientation. 4.
P5GD2-X User's Manual for English Edition
Page 28
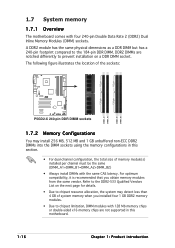
...and 1 GB unbuffered non-ECC DDR2 DIMMs into the DIMM sockets using the memory configurations in this motherboard. 1-16 Chapter 1: Product introduction 1.7 System memory 1.7.1 Overview The motherboard comes with the same CAS latency. The following figure illustrates the location of memory module(s) installed per...section. • For dual-channel configuration, the total size of the sockets: 112 pin 112 pin P5GD2-X ® 128 pin 128 pin DIMM_A1 DIMM_A2 DIMM_B1 DIMM_B2 P5GD2-X 240-pin DDR DIMM sockets 1.7.2 Memory Configurations You may detect less than 4 GB of system memory...
...and 1 GB unbuffered non-ECC DDR2 DIMMs into the DIMM sockets using the memory configurations in this motherboard. 1-16 Chapter 1: Product introduction 1.7 System memory 1.7.1 Overview The motherboard comes with the same CAS latency. The following figure illustrates the location of memory module(s) installed per...section. • For dual-channel configuration, the total size of the sockets: 112 pin 112 pin P5GD2-X ® 128 pin 128 pin DIMM_A1 DIMM_A2 DIMM_B1 DIMM_B2 P5GD2-X 240-pin DDR DIMM sockets 1.7.2 Memory Configurations You may detect less than 4 GB of system memory...
P5GD2-X User's Manual for English Edition
Page 31
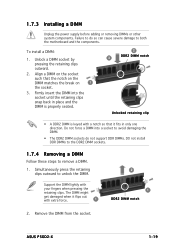
... the DIMM into a socket to avoid damaging the DIMM. • The DDR2 DIMM sockets do so can cause severe damage to both the motherboard and the components. The DIMM might get damaged when it fits in place and the DIMM is properly seated. 2 3 DDR2 DIMM notch Unlocked... matches the break on 1 the socket. 3. Do not force a DIMM into the socket until the retaining clips snap back in only one direction. ASUS P5GD2-X 1-19 Unlock a DIMM socket by pressing the retaining clips outward. 2. Simultaneously press the retaining clips outward to remove a DIMM. 1. Failure to ...
... the DIMM into a socket to avoid damaging the DIMM. • The DDR2 DIMM sockets do so can cause severe damage to both the motherboard and the components. The DIMM might get damaged when it fits in place and the DIMM is properly seated. 2 3 DDR2 DIMM notch Unlocked... matches the break on 1 the socket. 3. Do not force a DIMM into the socket until the retaining clips snap back in only one direction. ASUS P5GD2-X 1-19 Unlock a DIMM socket by pressing the retaining clips outward. 2. Simultaneously press the retaining clips outward to remove a DIMM. 1. Failure to ...


